2014 Peugeot 3008 Hybrid 4 change time
[x] Cancel search: change timePage 212 of 378
Practical information
210
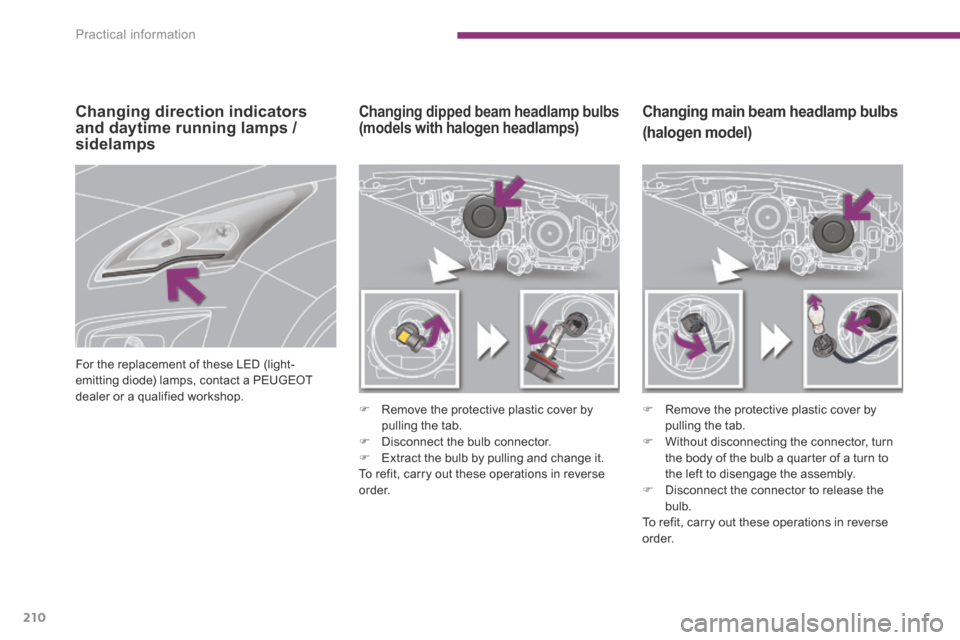
Changing main beam headlamp bulbs
(halogen model)
Remove the protective plastic cover by pulling the tab. Without disconnecting the connector, turn the body of the bulb a quarter of a turn to the left to disengage the assembly. Disconnect the connector to release the bulb. To refit, carry out these operations in reverse
o r d e r.
Changing dipped beam headlamp bulbs (models with halogen headlamps)
Remove the protective plastic cover by pulling the tab. Disconnect the bulb connector. Extract the bulb by pulling and change it. To refit, carry out these operations in reverse o r d e r.
Changing direction indicators and daytime running lamps / sidelamps
For the replacement of these LED (light-emitting diode) lamps, contact a PEUGEOT dealer or a qualified workshop.
Page 220 of 378

Practical information
218
Engine compartment fuses
Access to the fuses
Unclip the cover. Change the fuse (see corresponding paragraph). When you have finished, close the cover carefully to ensure correct sealing of the fusebox.
The fusebox is placed in the engine compartment near the battery. Fuse N° Rating (A) Functions
F215 Horn.
F310 Front / rear wash-wipe.
F410 Daytime running lamps.
F515
Air flow sensor, wiper, sensor heater, hybrid control unit, hybrid selector dial, electronic thermostat, variable valve timing electrovalves, turbo pressure regulation electrovalves (Diesel), engine coolant level sensor (Diesel).
F610 Diagnostic socket, directional headlamps, particle emission filter pump (Diesel), mirror adjustment control, network inter face unit, head-up display.
F710 Power steering control unit, directional headlamps height adjustment motor.
F820 Starter motor control.
F910 Clutch and brake pedal switches.
F1140 Air conditioning blower.
Page 262 of 378
04
NAV2AB C3DEF5JKL4GHI6MNO8TUV7PQR S9WXYZ0*#
1RADIO MEDIA NA
V TRAFFIC
SETUPADDR
BOOK
2ABC3DEF5JKL4GHI6MNO8TUV7PQR S9WXYZ0*#
1RADIO MEDIA NA
V TRAFFIC
SETUPADDR
BOOK
2ABC3DEF5JKL4GHI6MNO8TUV7PQR S9WXYZ0*#
1RADIO MEDIA NA
V TRAFFIC
SETUPADDR
BOOK
2ABC3DEF5JKL4GHI6MNO8TUV7PQR S9WXYZ0*#
1RADIO MEDIA NA
V TRAFFIC
SETUPADDR
BOOK
2ABC3DEF5JKL4GHI6MNO8TUV7PQR S9WXYZ0*#
1RADIO MEDIA NA
V TRAFFIC
SETUPADDR
BOOK
2ABC3DEF5JKL4GHI6MNO8TUV7PQR S9WXYZ0*#
1RADIO MEDIA NA
V TRAFFIC
SETUPADDR
BOOK
2ABC3DEF5JKL4GHI6MNO8TUV7PQR S9WXYZ0*#
1RADIO MEDIA NA
V TRAFFIC
SETUPADDR
BOOK
260
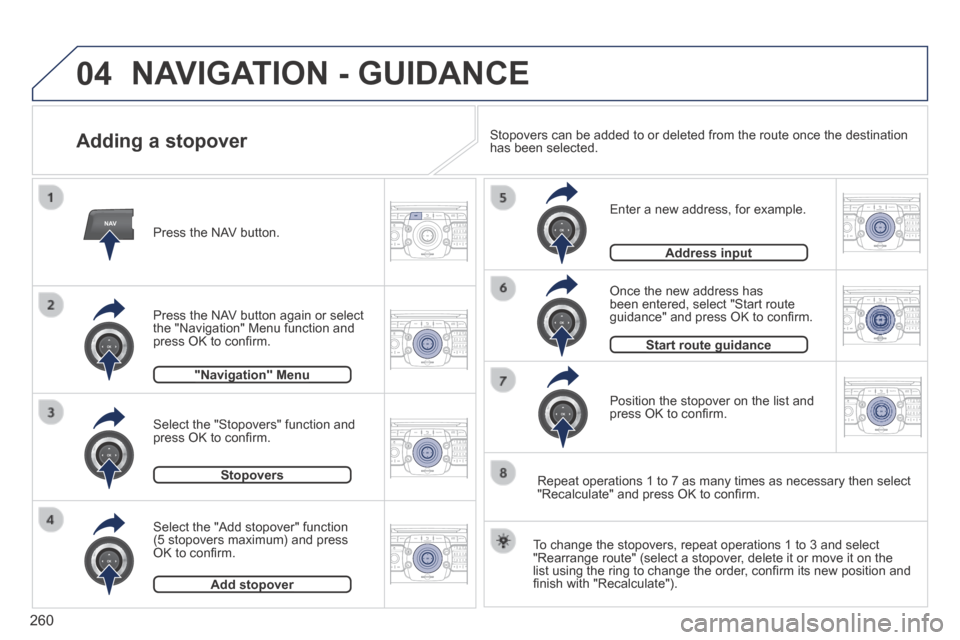
Adding a stopover
Enter a new address, for example.
Once the new address has been entered, select "Start route guidance" and press OK to confi rm.
Position the stopover on the list and press OK to confi rm.
Press the NAV button.
Press the NAV button again or select the "Navigation" Menu function and press OK to confi rm.
Select the "Add stopover" function (5 stopovers maximum) and press OK to confi rm.
Select the "Stopovers" function and press OK to confi rm.
"Navigation" Menu"Navigation" Menu
StopoversStopovers
Add stopoverAdd stopover
Address inputAddress input
To change the stopovers, repeat operations 1 to 3 and select "Rearrange route" (select a stopover, delete it or move it on the list using the ring to change the order, confi rm its new position and fi nish with "Recalculate").
Stopovers can be added to or deleted from the route once the destination\
has been selected.
Repeat operations 1 to 7 as many times as necessary then select "Recalculate" and press OK to confi rm.
Start route guidanceStart route guidance
NAVIGATION - GUIDANCE
Page 272 of 378
07
MEDIA
2ABC3DEF5JKL4GHI6MNO8TU V7PQRS9WXYZ0*#
1RADIOM EDIA NA
V ESC TRAFFIC
SETUPADDR
BOOK
2AB C3DEF5JKL4GHI6MNO8TUV7PQR S9WXYZ0*#
1RADIO MEDIA NA
V TRAFFIC
SETUPADDR
BOOK
2ABC3DEF5JKL4GHI6MNO8TUV7PQR S9WXYZ0*#
1RADIO MEDIA NA
V TRAFFIC
SETUPADDR
BOOK
2ABC3DEF5JKL4GHI6MNO8TUV7PQR S9WXYZ0*#
1RADIO MEDIA NA
V TRAFFIC
SETUPADDR
BOOK
2ABC3DEF5JKL4GHI6MNO8TUV7PQR S9WXYZ0*#
1RADIO MEDIA NA
V TRAFFIC
SETUPADDR
BOOK
2ABC3DEF5JKL4GHI6MNO8TUV7PQR S9WXYZ0*#
1RADIO MEDIA NA
V TRAFFIC
SETUPADDR
BOOK
2ABC3DEF5JKL4GHI6MNO8TUV7PQR S9WXYZ0*#
1RADIO MEDIA NA
V TRAFFIC
SETUPADDR
BOOK
2ABC3DEF5JKL4GHI6MNO8TUV7PQR S9WXYZ0*#
1RADIO MEDIA NA
V TRAFFIC
SETUPADDR
BOOK
RADIO NA
V TRAFFICMEDIA
270
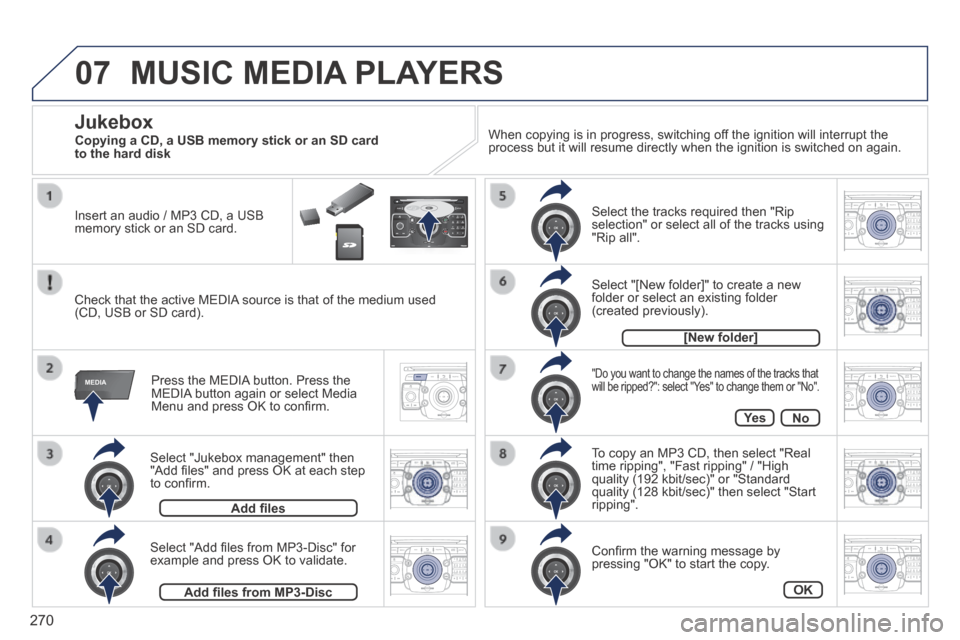
Select "Jukebox management" then "Add fi les" and press OK at each step to confi rm.
Press the MEDIA button. Press the MEDIA button again or select Media Menu and press OK to confi rm.
Insert an audio / MP3 CD, a USB memory stick or an SD card.
Jukebox
Add fi les
Check that the active MEDIA source is that of the medium used (CD, USB or SD card).
Select "Add fi les from MP3-Disc" for example and press OK to validate.
Select the tracks required then "Rip selection" or select all of the tracks using "Rip all".
Select "[New folder]" to create a new folder or select an existing folder (created previously).
Add fi les from MP3-Disc
[New folder]
"Do you want to change the names of the tracks that will be ripped?": select "Yes" to change them or "No".
To copy an MP3 CD, then select "Real time ripping", "Fast ripping" / "High quality (192 kbit/sec)" or "Standard quality (128 kbit/sec)" then select "Start ripping".
Confi rm the warning message by pressing "OK" to start the copy.
OK
Ye sNo
When copying is in progress, switching off the ignition will interrupt the process but it will resume directly when the ignition is switched on aga\
in.
MUSIC MEDIA PLAYERS
Copying a CD, a USB memory stick or an SD card to the hard disk
Page 274 of 378
07
MEDIA
2ABC3DEF5JKL4GHI6MNO8TU V7PQRS9WXYZ0*#
1RADIOM EDIA NA
V ESC TRAFFIC
SETUPADDR
BOOK
MEDIA
2AB C3DEF5JKL4GHI6MNO8TUV7PQR S9WXYZ0*#
1RADIO MEDIA NA
V TRAFFIC
SETUPADDR
BOOK
2ABC3DEF5JKL4GHI6MNO8TUV7PQR S9WXYZ0*#
1RADIO MEDIA NA
V TRAFFIC
SETUPADDR
BOOK
2ABC3DEF5JKL4GHI6MNO8TUV7PQR S9WXYZ0*#
1RADIO MEDIA NA
V TRAFFIC
SETUPADDR
BOOK
RADIO NA
V TRAFFICMEDIA
RADIO NA
V TRAFFICMEDIA
272
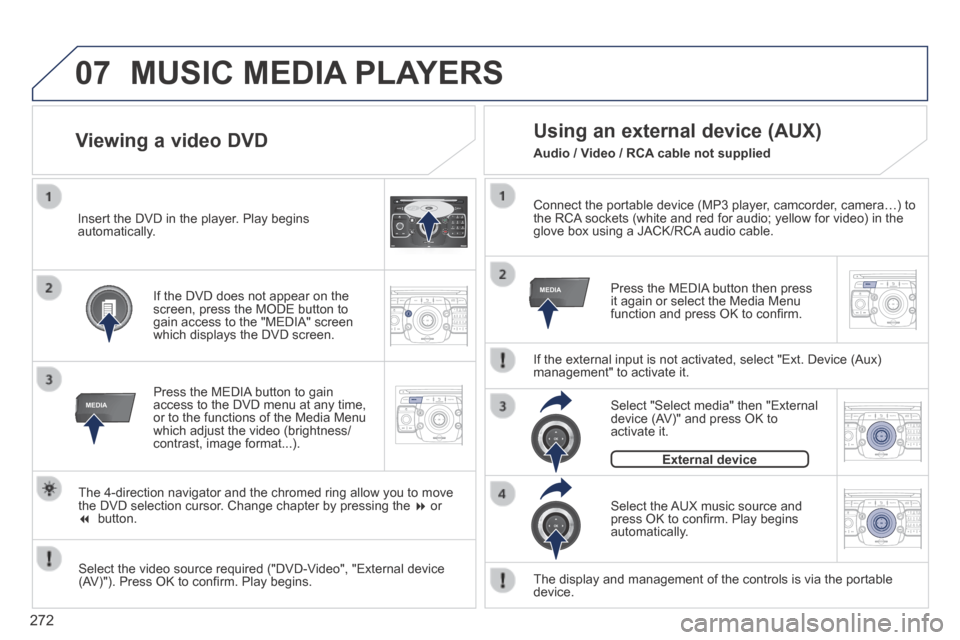
Connect the portable device (MP3 player, camcorder, camera…) to the RCA sockets (white and red for audio; yellow for video) in the glove box using a JACK/RCA audio cable.
Press the MEDIA button then press it again or select the Media Menu function and press OK to confi rm.
Select the AUX music source and press OK to confi rm. Play begins automatically.
Select "Select media" then "External device (AV)" and press OK to activate it.
External device
The display and management of the controls is via the portable device.
Using an external device (AUX)
If the external input is not activated, select "Ext. Device (Aux) management" to activate it.
Viewing a video DVD
Select the video source required ("DVD-Video", "External device (AV)"). Press OK to confi rm. Play begins.
Press the MEDIA button to gain access to the DVD menu at any time, or to the functions of the Media Menu which adjust the video (brightness/contrast, image format...).
If the DVD does not appear on the screen, press the MODE button to gain access to the "MEDIA" screen which displays the DVD screen.
Insert the DVD in the player. Play begins automatically.
The 4-direction navigator and the chromed ring allow you to move the DVD selection cursor. Change chapter by pressing the or button.
MUSIC MEDIA PLAYERS
Audio / Video / RCA cable not supplied
Page 283 of 378

SETUP
281
Settings 2
Automatic answering system3
Select ring tone3
Phone / Ring tone volume3
Enter mailbox number3
Internal phone settings3
Automatically accept call3
Signal waiting call (?)3
Show status3
Activate waiting call3
Deactivate waiting call3
Call forward (?)3
Show status3
Activate call forward3
Deactivate call forward3
Suppress own number3
Select network3
Set network automatically3
Set network manually3
Search for networks3
PIN settings3
Change PIN3
Activate PIN 4
Deactivate PIN 4
Remember PIN3
SIM-card memory status3
"SETUP" Menu
Menu language
Language & Speech
1
2
3
Deutsch 4
English 4
Español 4
Français 4
Italiano 4
Nederlands 4
Polski 4
Voice control3
Voice control active 4
Tutorial 4
Portuguese 4
Basics 5
Examples 5
Tips 5
Speaker adaptation 4
New speaker adaptation 5
Delete speaker adaptation 5
Voice output volume3
Date & Time 2
Set date & time3
Date format3
Time format3
Page 328 of 378

08
326
Insert the CD in the player, insert the USB memory stick in the USB player or connect the USB peripheral to the USB port using a suitable cable (not supplied) .
The system builds playlists (in temporary memory), an operation which can take from a few seconds to several minutes at the fi rst connection.
Reduce the number of non-music fi les and the number of folders to reduce the waiting time.
The playlists are updated every time the ignition is switched off or connection of a USB memory stick. However, the system memorises these lists and if they are not modifi ed, the loading time will be shorter.
Play starts automatically after a period which depends on the capacity of the USB memory stick.
Selection of source
The SOURCE button on the steering mounted controls allows a direct change to the next media source.
" CD / CD MP3 "
" USB, iPod "
" AUX " " STREAMING "
" RADIO "
Press MUSIC to display the " MEDIA " menu.
Select " Following media source " and confi rm.
Repeat the operation as many times as necessary to obtain the desired media source (except for radio which is accessible either with SOURCE or RADIO ).
Sources
MUSIC MEDIA PLAYERS
Page 349 of 378
04
347
AUDIO
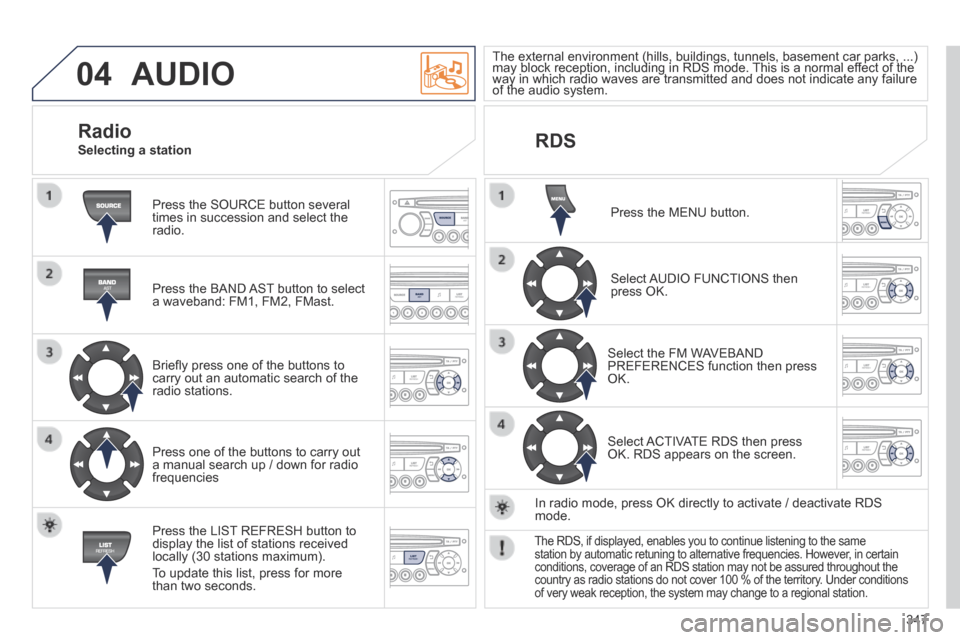
Press the SOURCE button several times in succession and select the radio.
Press the BAND AST button to select a waveband: FM1, FM2, FMast.
Briefl y press one of the buttons to carry out an automatic search of the radio stations.
Press one of the buttons to carry out a manual search up / down for radio frequencies
Press the LIST REFRESH button to display the list of stations received locally (30 stations maximum).
To update this list, press for more than two seconds.
The external environment (hills, buildings, tunnels, basement car parks, ...) may block reception, including in RDS mode. This is a normal effect of the The external environment (hills, buildings, tunnels, basement car parks, ...) may block reception, including in RDS mode. This is a normal effect of the The external environment (hills, buildings, tunnels, basement car parks, ...)
way in which radio waves are transmitted and does not indicate any failu\
re may block reception, including in RDS mode. This is a normal effect of the way in which radio waves are transmitted and does not indicate any failu\
re may block reception, including in RDS mode. This is a normal effect of the
of the audio system. way in which radio waves are transmitted and does not indicate any failu\
re of the audio system. way in which radio waves are transmitted and does not indicate any failu\
re
RDS
Radio Selecting a station
Press the MENU button.
Select AUDIO FUNCTIONS then press OK.
Select the FM WAVEBAND PREFERENCES function then press OK.
Select ACTIVATE RDS then press OK. RDS appears on the screen.
In radio mode, press OK directly to activate / deactivate RDS mode.
The RDS, if displayed, enables you to continue listening to the same station by automatic retuning to alternative frequencies. However, in certain conditions, coverage of an RDS station may not be assured throughout the\
country as radio stations do not cover 100 % of the territory. Under conditions of very weak reception, the system may change to a regional station.