2014 PEUGEOT 108 turn signal
[x] Cancel search: turn signalPage 16 of 256

14
Operation indicator lamps
Left-hand direction
indicatorflashing with buzzer.th e lighting stalk is pushed down.
Right-hand
direction indicator flashing with buzzer.
th
e lighting stalk is pushed up.
Sidelamps or
dipped beam
headlamps fixed.
th
e sidelamps or dipped beam
headlamps are on.
Main beam
headlamps fixed.
th
e lighting stalk is pulled towards
you. Pull the stalk to return to dipped beam headlamps.
Warning / indicator lamp
StateCause Action / Observations
Illumination of one of the following indicator lamps confirms that the corresponding system has been switched on.
It may be accompanied by an audible signal.
Rear foglamp fixed.
th
e rear foglamp is switched on
using the ring on the lighting control
stalk.
tu
rn the ring on the lighting control stalk to the rear to
switch off the rear foglamp.
Front foglamps
fixed.
th
e front foglamps (if your vehicle
has them) are switched on.
tu
rn the ring on the stalk rear wards twice to switch off
the front foglamps.
Please note : if front foglamps have been fitted as an
accessory, the control may be different.
Monitoring
Page 25 of 256

23
Stop & Star t
(e-VTi 68 engine)flashing.th
e Stop & Start system has a fault. Have the system checked by a Pe ugeOt dealer or a
qualified workshop.
Warning / indicator lamp
StateCause Action / Observations
Speed limiter fixed.
th
e speed limiter has a fault.Have it checked by a P
e
uge
Ot
dealer or a qualified
workshop.
Door(s) open /
Boot open fixed, accompanied by
an audible signal. A door or the boot is still open. Close the door or boot.
Keyless Entr y
and Starting
system flashing quickly.
th
e steering column has not been
unlocked. Change to "
OFF" mode, then " ON" mode and turn the
wheel slightly to unlock the steering column.
flashing, accompanied
by an audible signal.
th
e battery in the electronic key is
discharged. Replace the battery.
Refer to the corresponding section.
You are leaving the vehicle without
activating " OFF" mode. With the electronic key on your person, press the
S
tA
R
t/
S
tO
P button to change to "OFF" mode.
th
e electronic key has not been
detected. Check that you have the electronic key with you.
th
e Keyless e
n
try and Starting
system has a fault. Have the system checked by a P
e
uge
Ot
dealer or a
qualified workshop.
1
Monitoring
Page 37 of 256

35
Emergency procedure
Unlocking
F Insert the integral key into the driver's door lock barrel and turn it towards the front of
the vehicle to unlock the vehicle.
Locking
F Insert the integral key into the driver's door lock barrel and turn it towards the rear of
the vehicle to lock the vehicle.
th
e integral key is used to lock and unlock the
vehicle when the electronic key cannot operate
and in the event of a fault with the Keyless
en
try and Starting system:
-
c
ell battery discharged, vehicle battery
discharged or disconnected, ...
-
v
ehicle located in an area with strong
electromagnetic signals.
F
P
ress and hold the latch 1 to extract the
integral key 2 .
2
Access
Page 73 of 256
71
Starting - stopping the engine with the key
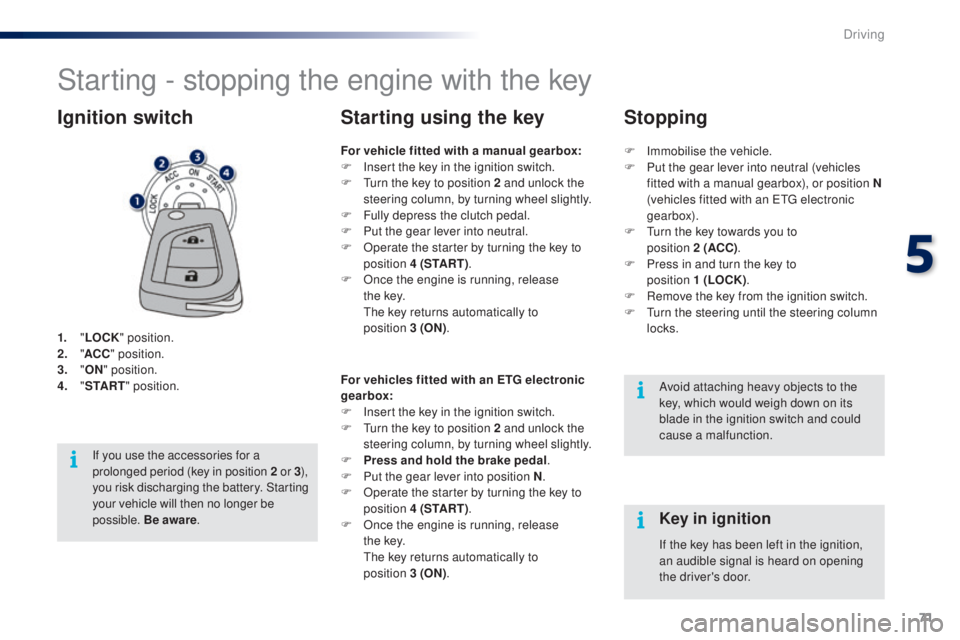
1. "LOCK " position.
2. " AC
C" position.
3.
"ON " position.
4.
" S
TA R T" position.
Ignition switch
Avoid attaching heavy objects to the
key, which would weigh down on its
blade in the ignition switch and could
cause a malfunction.
Key in ignition
For vehicle fitted with a manual gearbox:
F
I nsert the key in the ignition switch.
F
t
u
rn the key to position 2 and unlock the
steering column, by turning wheel slightly.
F
F
ully depress the clutch pedal.
F
P
ut the gear lever into neutral.
F
O
perate the starter by turning the key to
position 4 (S TA R T ) .
F
O
nce the engine is running, release
t h e
key.
t
h
e key returns automatically to
position
3
(ON).
Starting using the key
If the key has been left in the ignition,
an audible signal is heard on opening
the driver's door.
For vehicles fitted with an ETG electronic
gearbox:
F
I
nsert the key in the ignition switch.
F
t
u
rn the key to position 2 and unlock the
steering column, by turning wheel slightly.
F
P
ress and hold the brake pedal
.
F
P
ut the gear lever into position N
.
F
O
perate the starter by turning the key to
position 4 (S TA R T ) .
F
O
nce the engine is running, release
t h e
key.
th
e key returns automatically to
position
3
(ON) .
If you use the accessories for a
prolonged period (key in position 2
or 3),
you risk discharging the battery. Starting
your vehicle will then no longer be
possible. Be aware . F
Imm
obilise the vehicle.
F
P
ut the gear lever into neutral (vehicles
fitted with a manual gearbox), or position N
(vehicles fitted with an etg electronic
gearbox).
F
t
u
rn the key towards you to
position
2
(ACC)
.
F
P
ress in and turn the key to
position
1 (LOCK)
.
F
R
emove the key from the ignition switch.
F
t
u
rn the steering until the steering column
locks.
Stopping
5
Driving
Page 81 of 256
79
Temporarily taking control of
gear changes
You can temporarily take control of gear
changes using the "+" and "-"
steering
mounted control paddles.
ge
ar change commands are only acted on if
the engine speed allows.
t
h
ere is an audible
signal if a command is not accepted.
th
e gear engaged is displayed in the
instrument panel.
th
is function allows you to anticipate certain
situations such as overtaking a vehicle or
approaching a corner.
After a few moments with no action on the
controls, the gearbox returns to automatic
control of the gears. It is possible to change mode at any time,
by moving the gear lever from position E to
position M and the other way round.
Never select neutral N when the vehicle
is moving.
F
P
lace the gear lever in position M
.
F
C
hange up or down using:
- t he gear lever, pushing:
- back, "+" to change up,
-
for ward, "-" to change down.
-
o
r the "+" or "-" steering mounted
control paddle.
the
gear engaged is displayed.
ge
ar change commands are only acted on if
the engine speed allows.
It is not necessary to release the accelerator
peal during gear changes.
t
h
ere is an audible
signal if a command is not accepted.
When braking or slowing down, the gearbox
automatically changes down so that pick-up is
in the right gear.
Manual mode
under sharp acceleration, the gearbox will not
change up without action by the driver on the
gear lever or steering mounted control paddles
(unless the engine speed is close to maximum).
5
Driving
Page 90 of 256
88
Switching off
F Press the end of the control stalk. th e display of information related to the
speed limiter disappears.
Operating fault
Illumination of this warning lamp in
the instrument panel indicates a fault
with the speed limiter.
Have it checked by a P
e
uge
Ot
dealer or a qualified workshop.
th
e use of mats not approved by
P
e
uge
Ot
may inter fere with the
operation of the speed limiter.
to a
void any risk of jamming of the
pedals:
-
e
nsure that the mat is secured
c o r r e c t l y,
-
d
o not fit one mat on top of another.
Temporarily exceeding the
programmed speed
F Press f irmly on the accelerator pedal,
going beyond the point of resistance, to
exceed the programmed speed limit.
th
e speed limiter is deactivated temporarily
and the displayed programmed speed flashes.
As soon as the vehicle's speed returns to the
programmed value, the limiter operates again:
the display of the programmed speed becomes
steady again. An audible signal accompanies the
flashing of the programmed speed
when exceeding the speed is not due to
an action by the driver (steep hill...).
Driving
Page 93 of 256
91
Switching off
F Press the end of the control stalk th e display of information related to the
speed limiter disappears.
Operating fault
Illumination of this warning lamp in
the instrument panel indicates a fault
with the speed limiter.
th
e use of mats not approved by
P
e
uge
Ot
may inter fere with the
operation of the speed limiter.
to a
void any risk of jamming of the
pedals:
-
e
nsure that the mat is secured
c o r r e c t l y,
-
d
o not fit one mat on top of another.
Temporarily exceeding the
programmed speed
F Press f irmly on the accelerator pedal,
going beyond the point of resistance, to
exceed the programmed speed limit.
th
e speed limiter is deactivated temporarily
and the displayed programmed speed flashes. Have it checked by a P
e
uge
Ot
dealer or a
qualified workshop.
An audible signal accompanies the
flashing of the programmed speed
when exceeding the speed is not due to
an action by the driver (steep hill...).
As soon as the vehicle's speed returns to the
programmed value, the limiter operates again:
the display of the programmed speed becomes
steady again.
5
Driving
Page 97 of 256
95
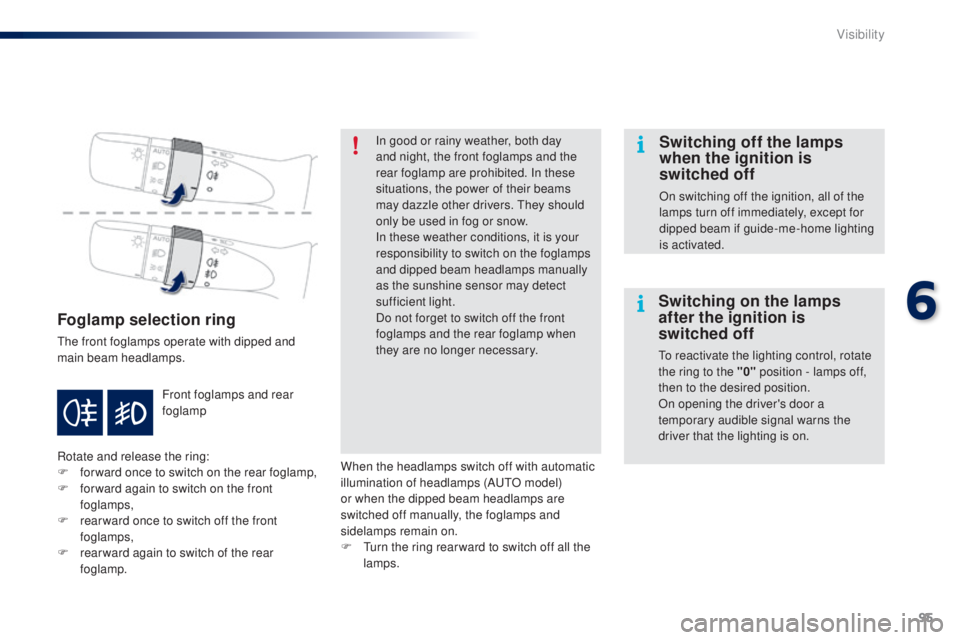
Foglamp selection ring
the front foglamps operate with dipped and
main beam headlamps.
Rotate and release the ring:
F
fo
rward once to switch on the rear foglamp,
F
f
or ward again to switch on the front
foglamps,
F
r
ear ward once to switch off the front
foglamps,
F
r
ear ward again to switch of the rear
foglamp. Front foglamps and rear
foglamp In good or rainy weather, both day
and night, the front foglamps and the
rear foglamp are prohibited. In these
situations, the power of their beams
may dazzle other drivers.
t
he
y should
only be used in fog or snow.
In these weather conditions, it is your
responsibility to switch on the foglamps
and dipped beam headlamps manually
as the sunshine sensor may detect
sufficient light.
Do not forget to switch off the front
foglamps and the rear foglamp when
they are no longer necessary.
Switching off the lamps
when the ignition is
switched off
On switching off the ignition, all of the
lamps turn off immediately, except for
dipped beam if guide-me-home lighting
is activated.
Switching on the lamps
after the ignition is
switched off
to reactivate the lighting control, rotate
the ring to the "0" position - lamps off,
then to the desired position.
On opening the driver's door a
temporary audible signal warns the
driver that the lighting is on.
When the headlamps switch off with automatic
illumination of headlamps (A
u
t
O m
odel)
or when the dipped beam headlamps are
switched off manually, the foglamps and
sidelamps remain on.
F
t
u
rn the ring rear ward to switch off all the
lamps.
6
Visibility