Page 9 of 20
7
heaDliGhT CoNTrol SwiTCh
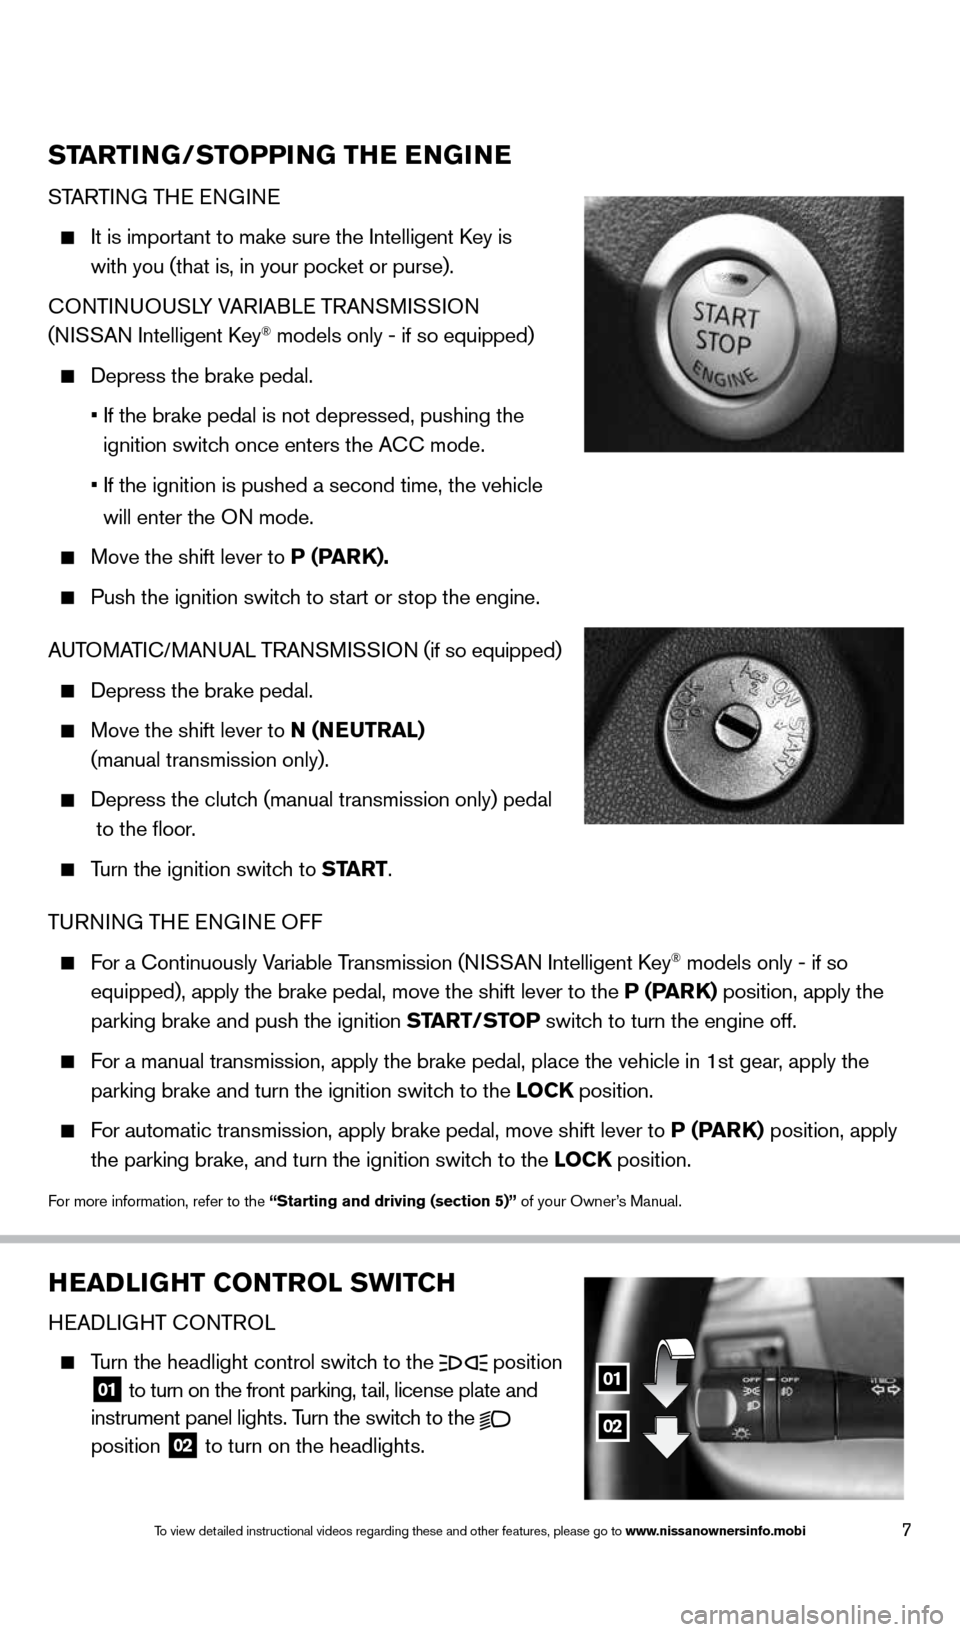
HEADLIGHT c ONTROL
Turn the headlight control switch to the
position
01 to turn on the front parking, tail, license plate and
instrument panel lights. Turn the switch to the
position 02 to turn on the headlights.
01
02
ST
arTi NG/ST oPPiNG The e NGiN e
STARTING THE ENGINE
It is important to make sure the Intelligent k ey is
with you (that is, in your pocket or purse).
cONTINUOUSLY VARIABLE TRANSMISSION
(NISSAN Intelligent k ey
® models only - if so equipped)
Depress the brake pedal.
• If the brake pedal is not depressed, pushing the
ignition switch once enters the A cc mode.
• If the ignition is pushed a second time, the vehicle
will enter the ON mode.
Move the shift lever to P (P arK).
Push the ignition switch to start or stop the engine.
AUTOMATI c/MANUAL TRANSMISSION (if so equipped)
Depress the brake pedal.
Move the shift lever to N (N euTral)
(manual transmission only).
Depress the clutch (manual transmission only) pedal
to the floor.
Turn the ignition switch to ST arT.
TURNING THE ENGINE OFF
For a continuously Variable Transmission (NISSAN Intelligent k ey® models only - if so
equipped), apply the brake pedal, move the shift lever to the P (P arK) position, apply the
parking brake and push the ignition ST arT/SToP switch to turn the engine off.
For a manual transmission, apply the brake pedal, place the vehicle in 1s\
t gear, apply the
parking brake and turn the ignition switch to the loCK position.
For automatic transmission, apply brake pedal, move shift lever to P (P arK) position, apply
the parking brake, and turn the ignition switch to the loCK position.
For more information, refer to the “Starting and driving (section 5)” of your Owner’s Manual.
1598305_14c_Versa_Sedan_QRG_091013.indd 79/10/13 12:18 PM
To view detailed instructional videos regarding these and other features, please go\
to www.nissanownersinfo.mobi
Page 10 of 20
8
first drive features
wiNDShiel D wiPer
aND waS her SwiTCh
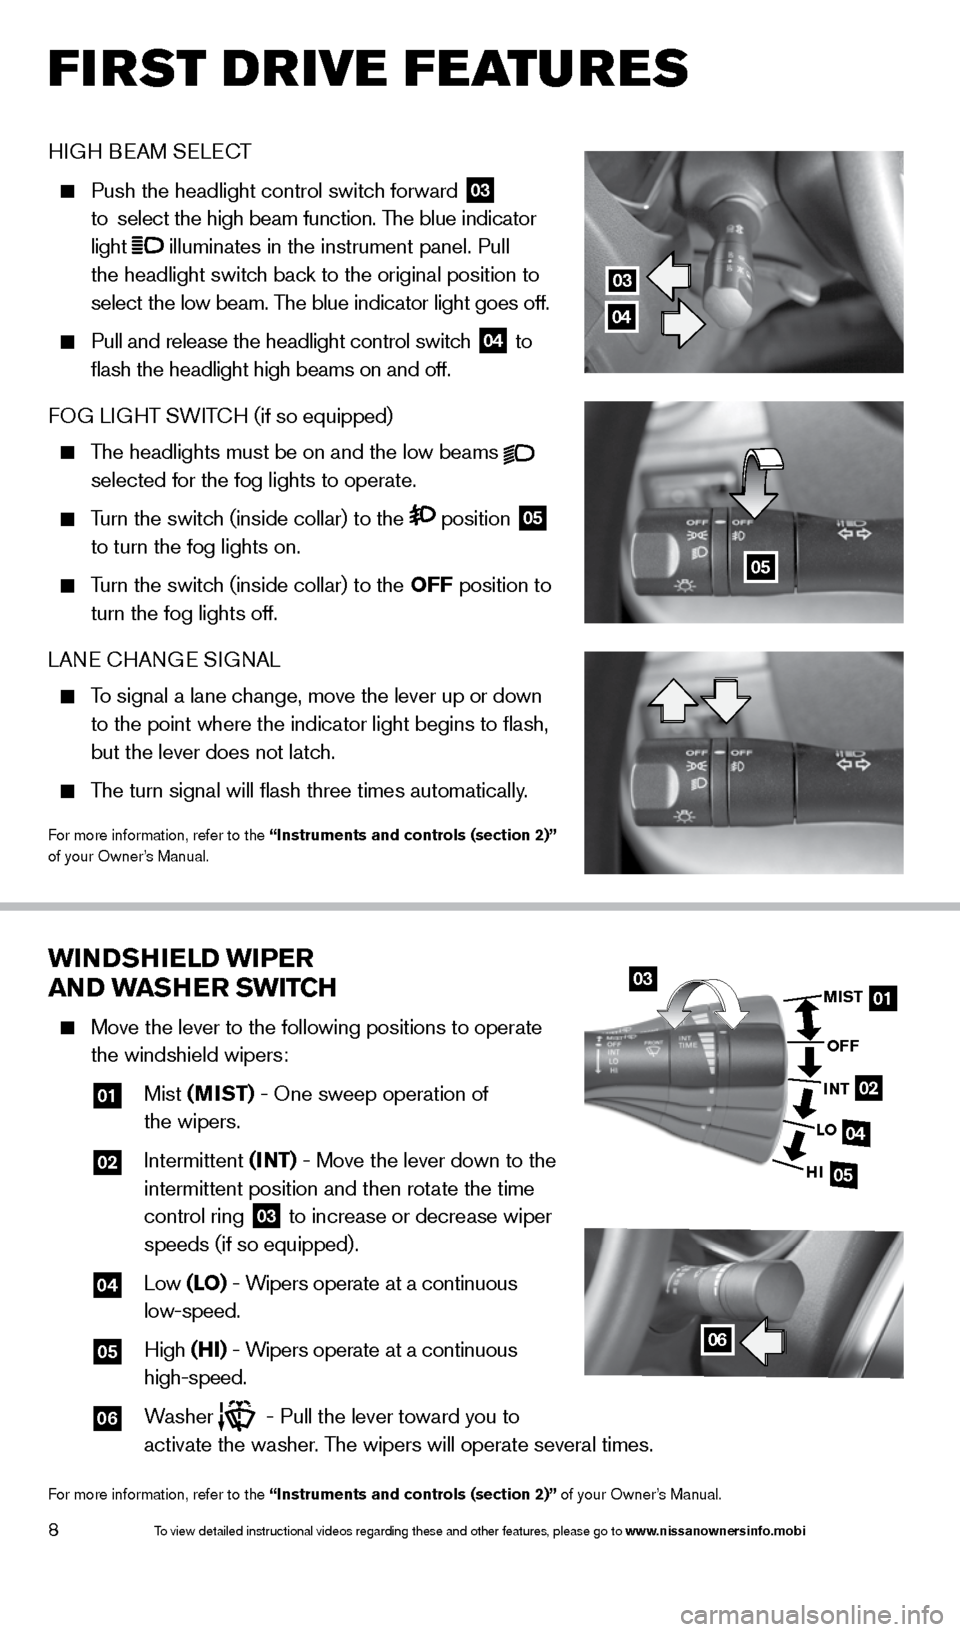
Move the lever to the following positions to operate
the windshield wipers:
01 Mist (MiST) - One sweep operation of
the wipers.
02
Intermittent (iNT) - Move the lever down to the
intermittent position and then rotate the time
control ring
03 to increase or decrease wiper
speeds (if so equipped).
04 Low (lo) - Wipers operate at a continuous
low-speed.
05 High (hi) - Wipers operate at a continuous
high-speed.
06 Washer - Pull the lever toward you to
activate the washer. The wipers will operate several times.
For more information, refer to the “instruments and controls (section 2)” of your Owner’s Manual.
0301
02
04
05
MiST
oFF
i NT
lo
hi
06
HIGH BEAM SELE cT
Push the headlight control switch forward
03
to select the high beam function. The blue indicator
light
illuminates in the instrument panel. Pull
the headlight switch back to the original position to
select the low beam. The blue indicator light goes off.
Pull and release the headlight control switch
04 to
flash the headlight high beams on and off.
FOG LIGHT SWIT cH (if so equipped)
The headlights must be on and the low beams
selected for the fog lights to operate.
Turn the switch (inside collar) to the position
05
to turn the fog lights on.
Turn the switch (inside collar)
to the oFF position to
turn the fog lights off.
LANE c HANGE SIGNAL
To signal a lane change, move the lever up or down
to the point where the indicator light begins to flash,
but the lever does not latch.
The turn signal will flash three times automatically.
For more information, refer to the “instruments and controls (section 2)”
of your Owner’s Manual.
03
04
05
1598305_14c_Versa_Sedan_QRG_091013.indd 89/10/13 12:18 PM
To view detailed instructional videos regarding these and other features, please go\
to www.nissanownersinfo.mobi
Page 11 of 20
9
MaNual Cli MaTe CoNTrolS
01 F
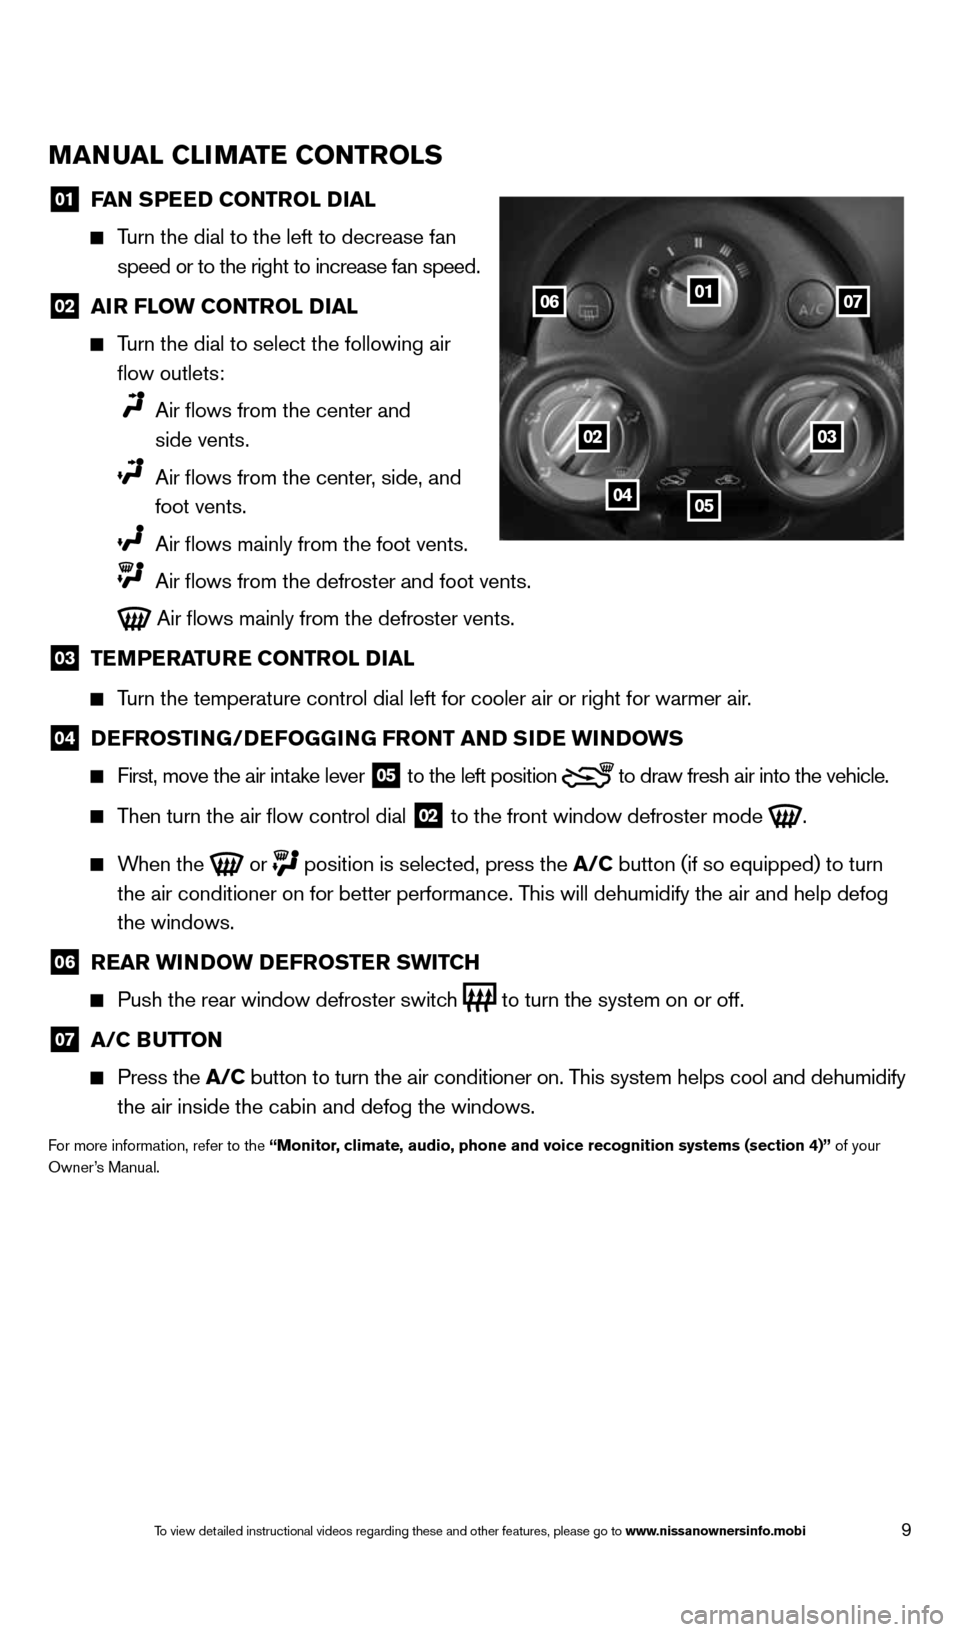
aN SPee D CoNTrol D ial
Turn the dial to the left to decrease fan
speed or to the right to increase fan speed.
02 air Flow CoNTrol D
ial
Turn the dial to select the following air
flow outlets:
Air flows from the center and
side vents.
Air flows from the center, side, and
foot vents.
Air flows mainly from the foot vents.
Air flows from the defroster and foot vents.
Air flows mainly from the defroster vents.
03 Te
MPera Ture CoNTrol D ial
Turn the temperature control dial left for cooler air or right for warmer\
air.
04 D
eFroSTi NG/DeFoGG iNG FroNT aND S iD e wi NDowS
First, move the air intake lever
05 to the
left position to draw fresh air into the vehicle.
Then turn the air flow control dial
02 to the front window defroster mode
.
When the
or
position is selected, press the a/C button (if so equipped) to turn
the air conditioner on for better performance. This will dehumidify the air and help defog
the windows.
06 rear wi
NDow D eFroSTer SwiTCh
Push the rear window defroster switch
to turn the system on or off.
07 a/C B
uTToN
Press the a/C button to turn the air conditioner on. This system helps cool and dehumidify
the air inside the cabin and defog the windows.
For more information, refer to the “Monitor, climate, audio, phone and voice recognition systems (section 4)” of your
Owner’s Manual.
01
0203
0405
0607
1598305_14c_Versa_Sedan_QRG_091013.indd 99/10/13 12:18 PM
To view detailed instructional videos regarding these and other features, please go\
to www.nissanownersinfo.mobi
Page 12 of 20
10
first drive features
FM/ aM/SiriusXM* Sa TelliTe raDio wiTh CD Pla Yer
(if so equipped)
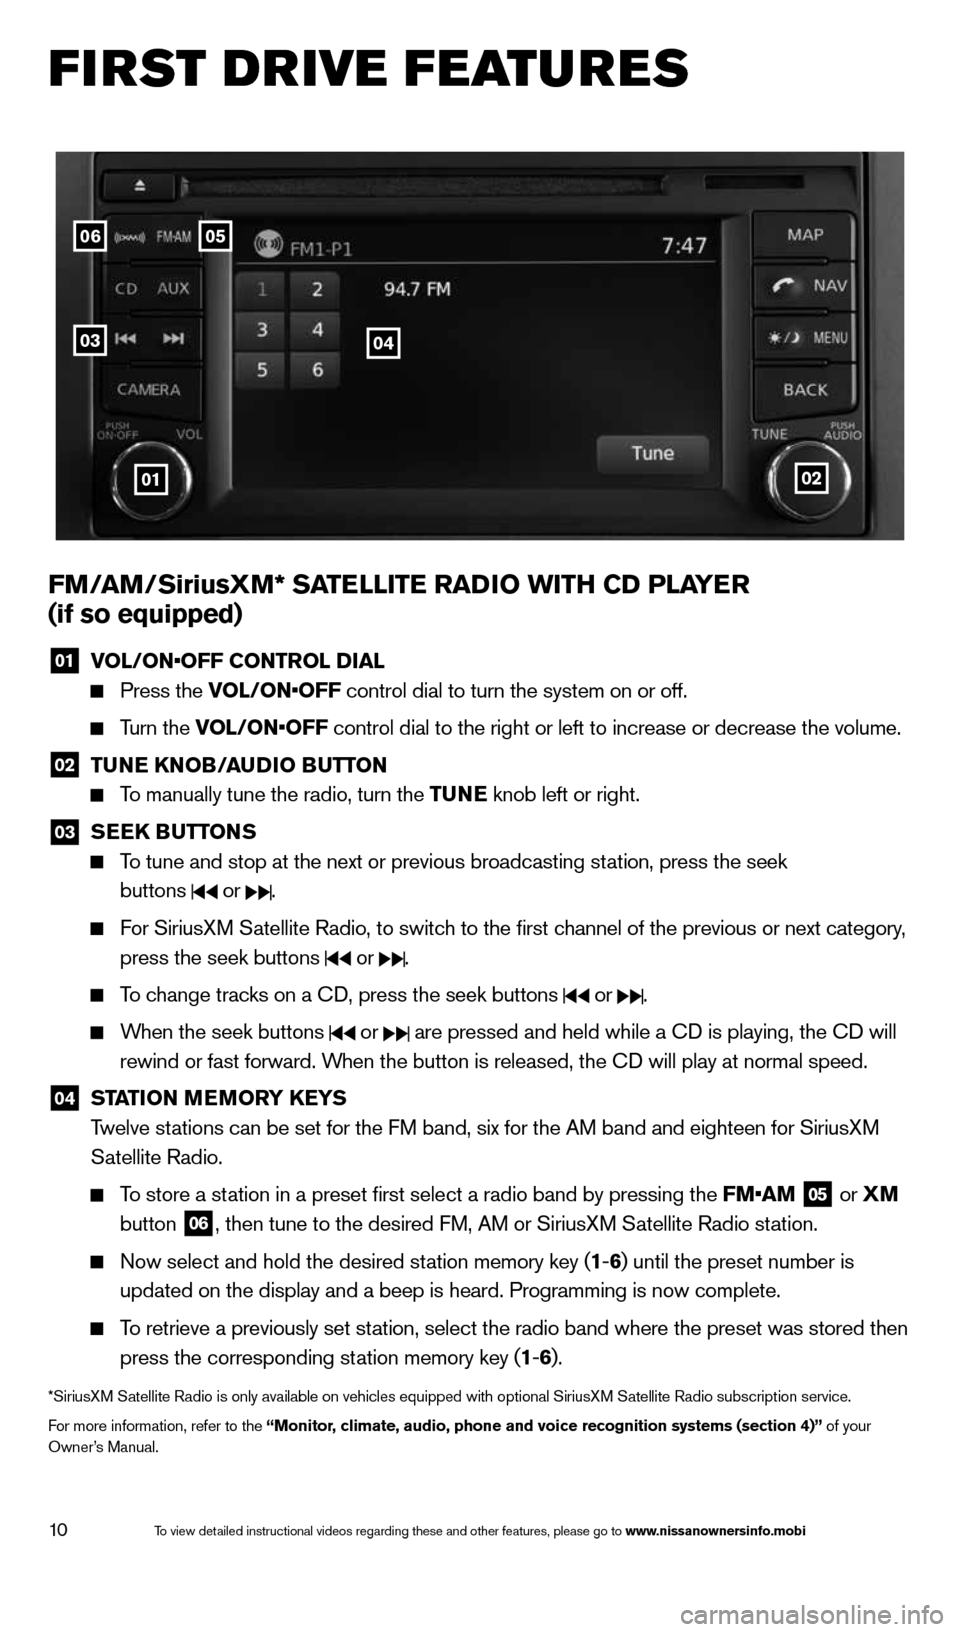
01 VOL/ON•OFF CONTROL DIAL
Press the VOL/ON•OFF control dial to turn the system on or off.
Turn the VOL/ON•OFF control dial to the right or left to increase or decrease the volume.
02 Tu
Ne KN oB/auDio B uTToN
To manually tune the radio, turn the Tu Ne knob left or right.
03
SeeK Bu
TToNS
To tune and stop at the next or previous broadcasting station, press the seek
buttons
or .
For SiriusXM Satellite Radio, to switch to the first channel of the previous or next category,
press the seek buttons
or .
To change tracks on a c D, press the seek buttons or .
When the seek buttons or are pressed and held while a c D is playing, the cD will
rewind or fast forward. When the button is released, the c D will play at normal speed.
04 ST
aTioN M eM or Y K eYS
Twelve stations can be set for the FM band, six for the AM band and eighteen for SiriusXM
Satellite Radio.
To store a station in a preset first select a radio band by pressing the FM•AM
05 or
XM
button 06, then tune to the desired FM, AM or SiriusXM Satellite Radio station.
Now select and hold the desired station memory key (1 -6 ) until the preset number is
updated on the display and a beep is heard. Programming is now complete.\
To retrieve a previously set station, select the radio band where the preset was stored then
press the corresponding station memory key (1 -6 ).
*SiriusXM Satellite Radio is only available on vehicles equipped with optional Siri\
usXM Satellite Radio subscription service.
For more information, refer to the “Monitor, climate, audio, phone and voice recognition systems (section 4)” of your
Owner’s Manual.
0506
03
01
04
02
1598305_14c_Versa_Sedan_QRG_091013.indd 109/10/13 12:18 PM
To view detailed instructional videos regarding these and other features, please go\
to www.nissanownersinfo.mobi
Page 13 of 20
11
Crui Se C oNT rol (if so equipped)
The cruise control system enables you to set a
constant cruising speed once the vehicle has reached
25 MPH (40 km/h).
The system will automatically maintain the set speed
until you tap the brake pedal, accelerate, cancel or
turn the system off.
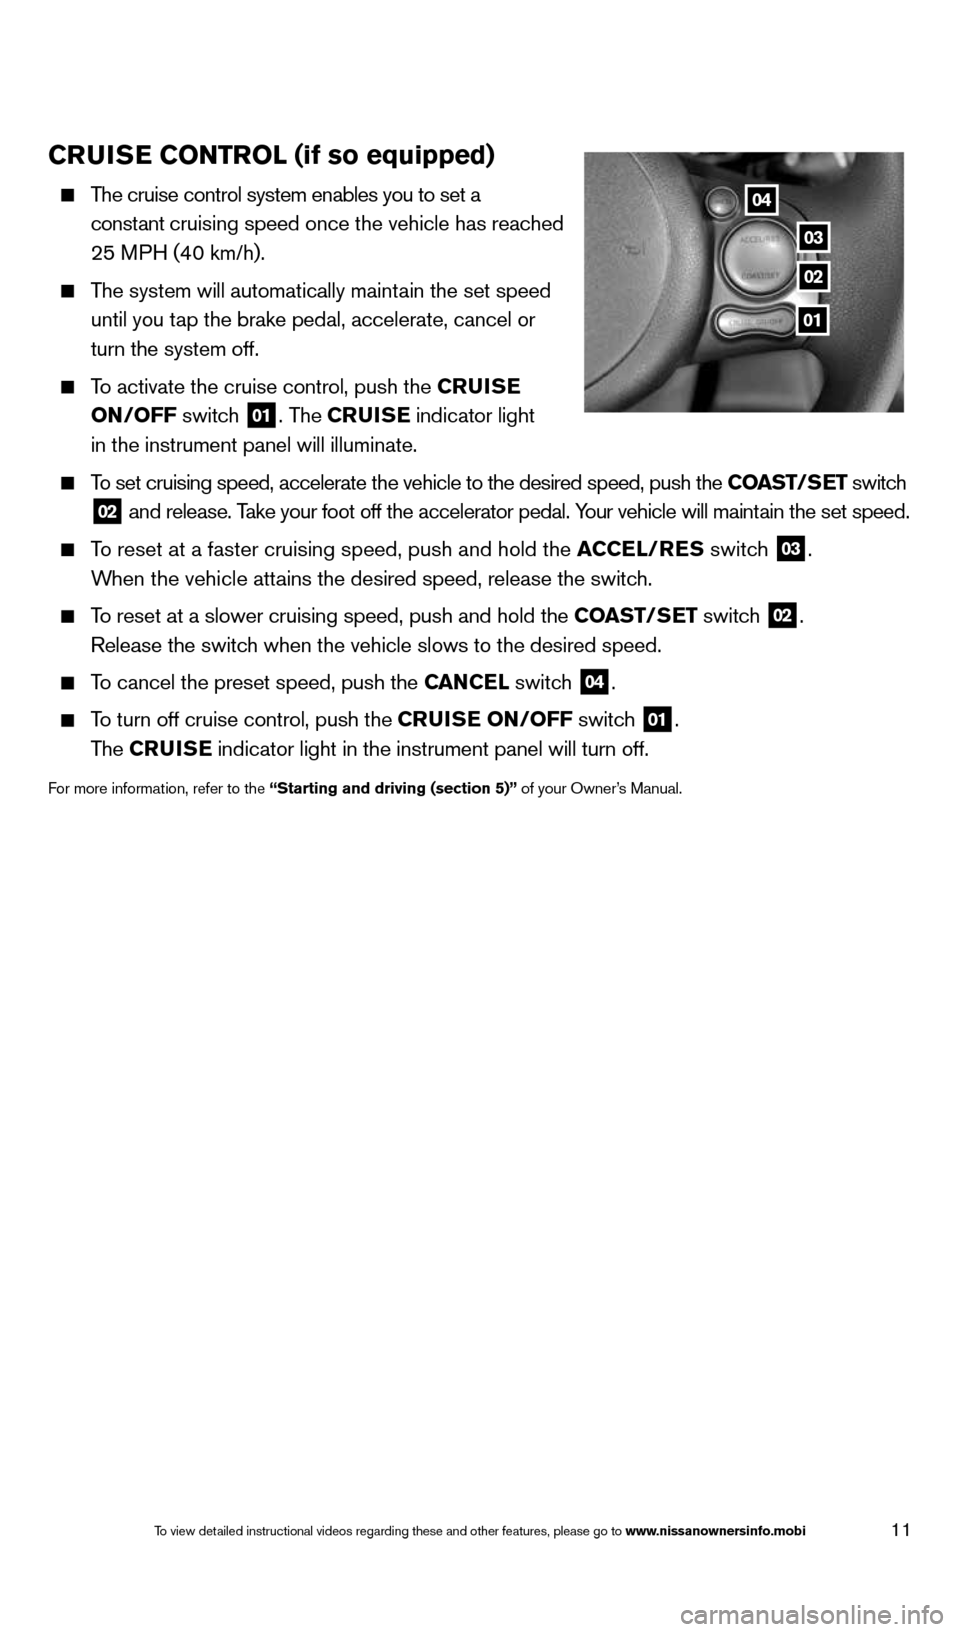
To activate the cruise control, push the C ruiSe
oN/oFF switch
01. The CruiSe indicator light
in the instrument panel will illuminate.
To set cruising speed, accelerate the vehicle to the desired speed, push \
the CoaST/S eT switch
02 and release. Take your foot off the accelerator pedal. Your vehicle will maintain the set speed.
To reset at a faster cruising speed, push and hold the a CCel/reS switch
03.
When the vehicle attains the desired speed, release the switch.
To reset at a slower cruising speed, push and hold the CoaST/S eT switch
02.
Release the switch when the vehicle slows to the desired speed.
To cancel the preset speed, push the C aNCel switch
04.
To turn off cruise control, push the Crui Se oN/oFF switch
01.
The CruiSe indicator light in the instrument panel will turn off.
For more information, refer to the “Starting and driving (section 5)” of your Owner’s Manual.
04
03
02
01
1598305_14c_Versa_Sedan_QRG_091013.indd 119/10/13 12:18 PM
To view detailed instructional videos regarding these and other features, please go\
to www.nissanownersinfo.mobi
Page 14 of 20
12
system guide
B lueT ooTh® haNDS-Free PhoN e SYSTeM (if so equipped)
A cellular telephone should not be used while driving
so full attention may be given to vehicle operation.*
SYSTEM OPERATING TIPS
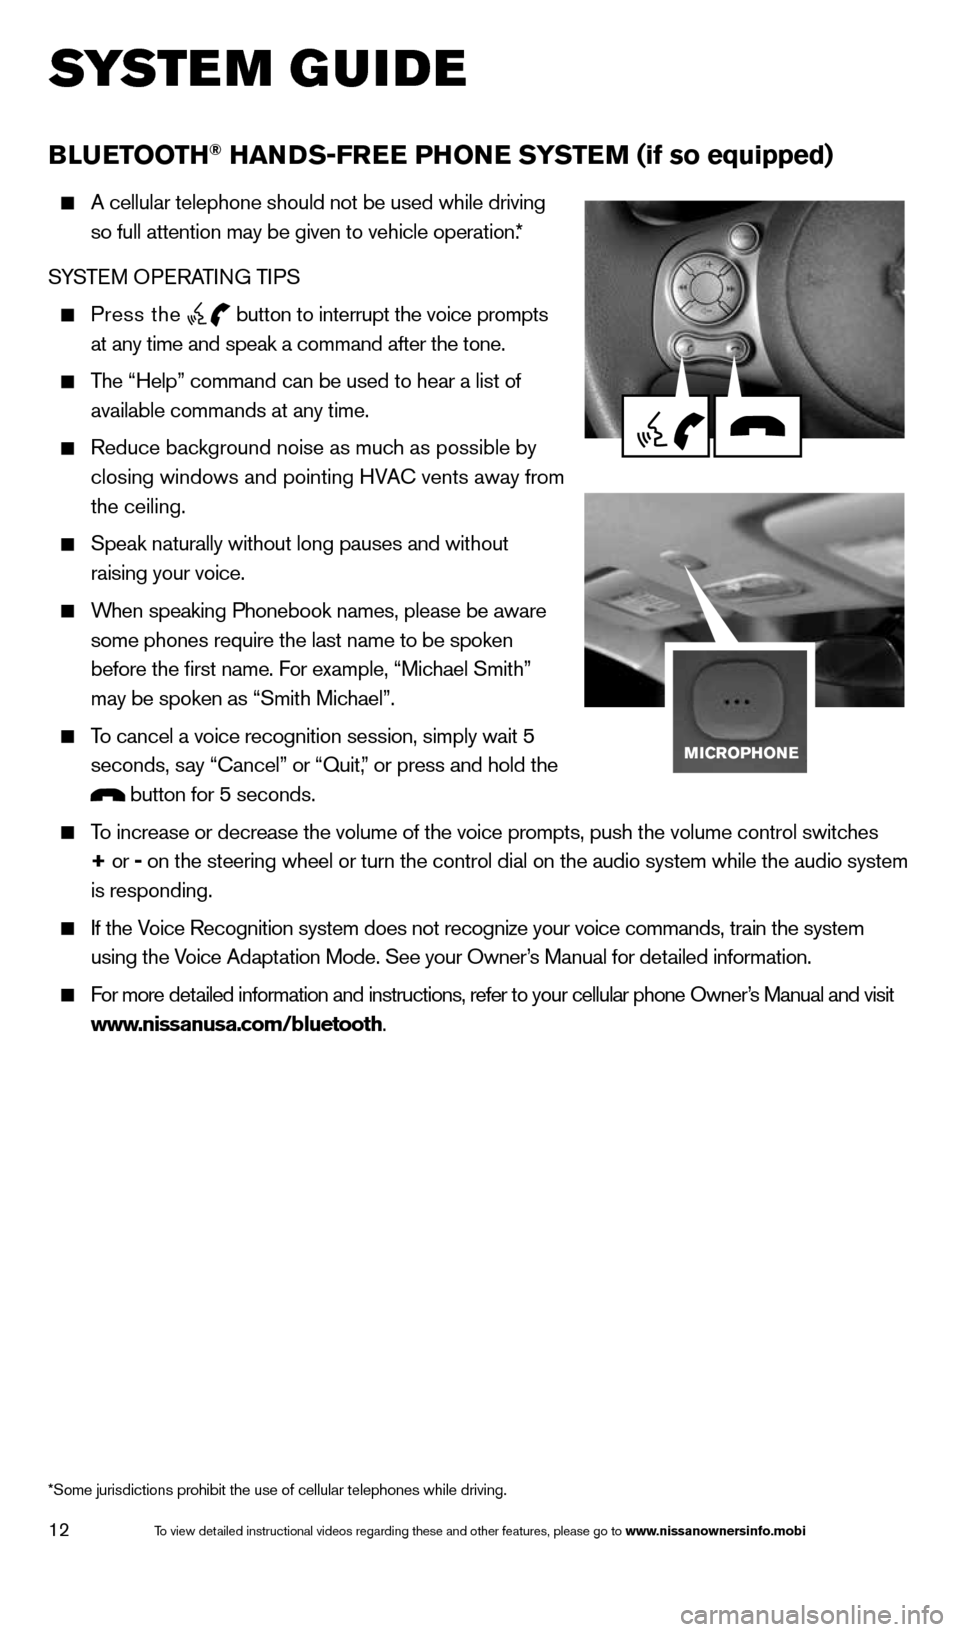
Press the button to interrupt the voice prompts
at any time and speak a command after the tone.
The “Help” command can be used to hear a list of
available commands at any time.
Reduce background noise as much as possible by
closing windows and pointing HVA c vents away from
the ceiling.
Speak naturally without long pauses and without
raising your voice.
When speaking Phonebook names, please be aware
some phones require the last name to be spoken
before the first name. For example, “Michael Smith”
may be spoken as “Smith Michael”.
To cancel a voice recognition session, simply wait 5
seconds, say “cancel” or “Quit,” or press and hold the
button for 5 seconds.
To increase or decrease the volume of the voice prompts, push the volume \
control switches
+ or - on the steering wheel or turn the control dial on the audio system whil\
e the audio system
is responding.
If the Voice Recognition system does not recognize your voice commands, train th\
e system
using the Voice Adaptation Mode. See your Owner’s Manual for detailed information.
For more detailed information and instructions, refer to your cellular phone Owner’s Manual and visit
www.nissanusa.com/bluetooth.
*Some jurisdictions prohibit the use of cellular telephones while drivin\
g.
1598305_14c_Versa_Sedan_QRG_091013.indd 129/10/13 12:18 PM
To view detailed instructional videos regarding these and other features, please go\
to www.nissanownersinfo.mobi
Page 15 of 20
13
BlueTooTh® SYSTe M wiThouT NaviGaTioN (if so equipped)
cONNEc TING PROcEDURE
The vehicle must be stationary when connecting the phone.
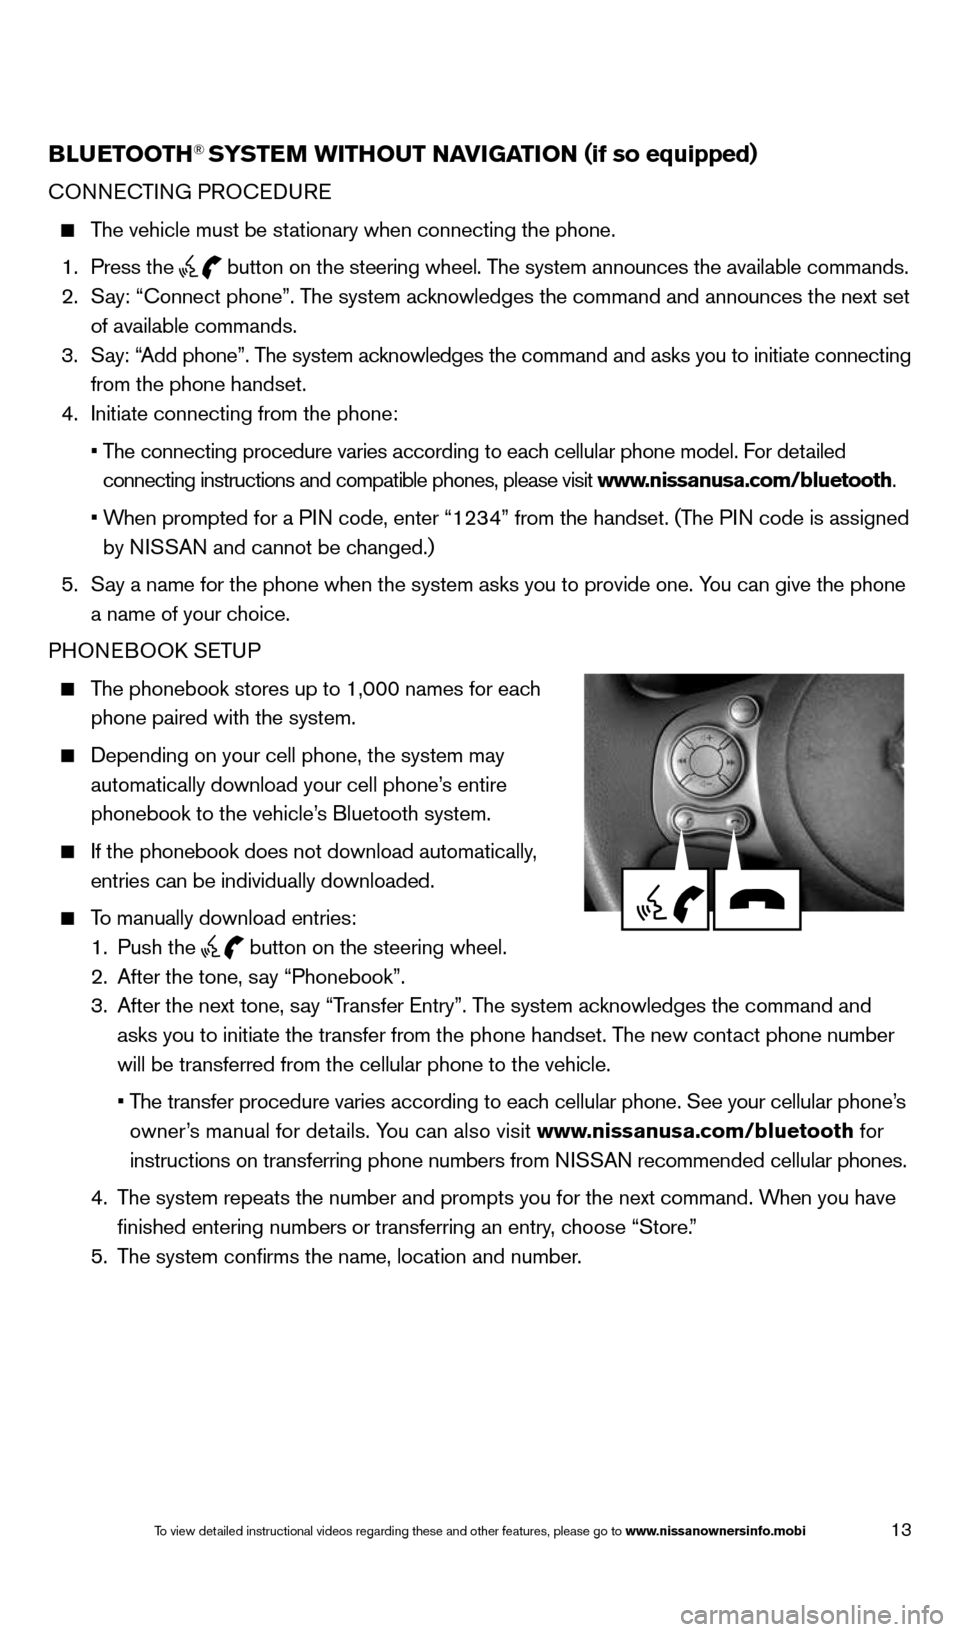
1. Press the
button on the steering wheel. The system announces the available commands.
2. Say: “connect phone”. The system acknowledges the command and announces the next set
of available commands.
3. Say: “Add phone”. The system acknowledges the command and asks you to initiate connecting
from the phone handset.
4. Initiate connecting from the phone:
• The connecting procedure varies according to each cellular phone model. For detailed
connecting instructions and compatible phones, please visit www.nissanusa.com/bluetooth.
• When prompted for a PIN code, enter “1234” from the handset. (The PIN code is assigned
by NISSAN and cannot be changed.)
5. Say a name for the phone when the system asks you to provide one. You can give the phone
a name of your choice.
PHONEBOOk SETUP
The phonebook stores up to 1,000 names for each
phone paired with the system.
Depending on your cell phone, the system may
automatically download your cell phone’s entire
phonebook to the vehicle’s Bluetooth system.
If the phonebook does not download automatically,
entries can be individually downloaded.
To manually download entries:
1. Push the
button on the steering wheel.
2. After the tone, say “Phonebook”.
3. After the next tone, say “Transfer Entry”. The system acknowledges the command and
asks you to initiate the transfer from the phone handset. The new contact phone number
will be transferred from the cellular phone to the vehicle.
• The transfer procedure varies according to each cellular phone. See your cellular phone’s
owner’s manual for details. You can also visit www.nissanusa.com/bluetooth for
instructions on transferring phone numbers from NISSAN recommended cellular phones.
4. The system repeats the number and prompts you for the next command. When you have
finished entering numbers or transferring an entry, choose “Store.”
5. The system confirms the name, location and number.
1598305_14c_Versa_Sedan_QRG_091013.indd 139/10/13 12:18 PM
To view detailed instructional videos regarding these and other features, please go\
to www.nissanownersinfo.mobi
Page 16 of 20

14
system guide
MAk ING A c ALL FROM THE PHONEBOO k
In some cases, names stored using all UPPER cASE letters may not be recognized by
the voice recognition system.
1. Press the
button.
2. After waiting for the tone, say “call”.
3. After the next tone, speak the name of a phonebook entry. For example “Michael Smith”.
4. confirm the correct name is recognized by saying “Dial” after the tone.
MAk ING A c ALL BY PHONE NUMBER
1. Press the
button. A tone will sound.
2. Say: “call”. The system acknowledges the command and announces the next set of
available commands.
3. Say: “Phone Number”. The system acknowledges the command and announces the next
set of available commands.
4. Say the number you wish to call, starting with the area code in single digit format.
5. When you have finished speaking the phone number, the system repeats it back and
announces the available commands.
6. Say: “Dial”. The system acknowledges the command and makes the call.
RE cEIVING/ENDING A c ALL
When you receive a phone call, a ring tone sounds through the audio syste\
m.
To accept the call, press the
button.
To reject the call, press the button.
To hang up the phone at the end of a call or to disconnect during call pl\
acement,
press the
button.
For more information, refer to the “Monitor, climate, audio, phone and voice recognition systems (section 4)” of your
Owner’s Manual or please visit www.nissanusa.com/bluetooth.
1598305_14c_Versa_Sedan_QRG_091013.indd 149/10/13 12:18 PM
To view detailed instructional videos regarding these and other features, please go\
to www.nissanownersinfo.mobi