Page 313 of 372

Check the fluid level in the reservoir. If the level is
below the MIN line
�1, add Genuine NISSAN
Super Heavy Duty Brake Fluid or equivalent DOT
3 fluid up to the MAX line
�2. If fluid must be
added frequently, the system should be checked
by a NISSAN dealer.
WINDSHIELD-WASHER FLUID
RESERVOIR
Add a washer solvent to the windshield-washer
fluid reservoir for better cleaning. In the winter
season, add a windshield-washer antifreeze. Fol-
low the manufacturer’s instructions for the mix-
ture ratio.
Refill the reservoir more frequently when driving
conditions require an increased amount of
windshield-washer fluid.
Recommended fluid is Genuine NISSAN
Windshield-Washer Fluid Concentrate Cleaner
& Anti-freeze or equivalent.
CAUTION
● Do not substitute engine anti-freeze
coolant for windshield-washer solution.
This may result in damage to the paint.
● Do not fill the windshield-washer fluid
reservoir with washer fluid concen-
trates at full strength. Some methyl al-
cohol based washer fluid concentrates
may permanently stain the grille if
spilled while filling the windshield-
washer fluid reservoir.
● Pre-mix windshield-washer fluid con-
centrates with water to the manufactur-
er’s recommended levels before pour-
ing the fluid into the windshield-washer
fluid reservoir. Do not use the
windshield-washer fluid reservoir to
mix the washer fluid concentrate and
water.
LDI2184LDI2040
WINDSHIELD-WASHER FLUID
8-12Maintenance and do-it-yourself
Page 314 of 372

●Keep the battery surface clean and dry.
Clean the battery with a solution of baking
soda and water.
● Make certain the terminal connections are
clean and securely tightened.
● If the vehicle is not to be used for 30 days or
longer, disconnect the negative (-) battery
terminal cable to prevent discharge.
NOTE:
Care should be taken to avoid situations
that can lead to potential battery discharge
and potential no-start conditions such as: 1. Installation or extended use of electronic accessories that consume battery power
when the engine is not running (Phone char-
gers, GPS, DVD players, etc.)
2. Vehicle is not driven regularly and/or only driven short distances. In these cases, the
battery may need to be charged to maintain
battery health.WARNING
●Do not expose the battery to electrical
sparks, flames or smoking. Hydrogen
gas generated by the battery is explo-
sive. Explosive gases can cause blind-
ness or injury. Do not allow battery fluid
to contact your skin, eyes, fabrics or
painted surfaces. Sulfuric acid can
cause blindness or severe burns. After
touching a battery or battery cap, do not
touch or rub your eyes. Thoroughly
wash your hands. If the acid contacts
your eyes, skin or clothing, immediately
flush with water for at least 15 minutes
and seek medical attention.
● Do not operate the vehicle if the fluid in
the battery is low. Low battery fluid can
cause a higher load on the battery
which can generate heat, reduce battery
life, and in some cases lead to an
explosion.
● When working on or near a battery, al-
ways wear suitable eye protection and
remove all jewelry.
● Do not tip the battery. Keep the vent
caps tight and the battery level. ●
Battery posts, terminals and related ac-
cessories contain lead and lead com-
pounds. Wash hands after handling.
● Keep battery out of the reach of
children.
BATTERY
Maintenance and do-it-yourself8-13
Page 315 of 372
1. Remove the battery vent caps with a screw-driver as shown.
2. Check the fluid level in each cell. If it isnecessary to add fluid , add only distilled
water to bring the level up to the bottom of
the filler opening. Do not overfill.
3. Reinstall the battery vent caps. Vehicles operated in high temperatures or under
severe conditions require frequent checks of the
battery fluid level.
JUMP STARTING
If jump starting is necessary, see “Jump starting”
in the “In case of emergency” section of this
manual. If the engine does not start by jump
starting, the battery may have to be replaced.
Contact a NISSAN dealer.
WDI0701
WDI0529
8-14Maintenance and do-it-yourself
Page 316 of 372

CAUTION
●Do not ground accessories directly to
the battery terminal. Doing so will by-
pass the variable voltage control sys-
tem and the vehicle battery may not
charge completely.
● Use electrical accessories with the en-
gine running to avoid discharging the
vehicle battery.
Your vehicle is equipped with a variable voltage
control system. This system measures the
amount of electrical discharge from the battery
and controls voltage generated by the generator. The current sensor
�Ais located near the battery
along the negative battery cable. If you add elec-
trical accessories to your vehicle, be sure to
ground them to a suitable body ground such as
the frame or engine block area.
1. Water pump
2. Generator
3. Crankshaft pulley
4. Air conditioner compressor (if so
equipped)
5. Manual tensioner
� Tension checking point
WARNING
Be sure the ignition switch is placed in the
OFF or LOCK position before servicing
drive belt. The engine could rotate
unexpectedly.
LDI2250WDI0695
VARIABLE VOLTAGE CONTROL
SYSTEM DRIVE BELT
Maintenance and do-it-yourself8-15
Page 317 of 372
1. Visually inspect the belt for signs of unusualwear, cuts, or fraying. If the belt is in poor
condition, have it replaced or adjusted by a
NISSAN dealer.
2. Have the belt checked regularly for condi- tion.
REPLACING SPARK PLUGS
Platinum-tipped spark plugs
It is not necessary to replace platinum-tipped�A
spark plugs as frequently as conventional type
spark plugs because they last much longer. Fol-
low the maintenance log shown in the “NISSAN
Service and Maintenance Guide”. Do not service
platinum-tipped spark plugs by cleaning or re-
gapping.
● Always replace spark plugs with rec-
ommended or equivalent ones.
WARNING
Be sure the engine and ignition switch are
off and that the parking brake is engaged
securely.
CAUTION
Be sure to use the correct socket to re-
move the spark plugs. An incorrect socket
can damage the spark plugs.
SDI1895
SPARK PLUGS
8-16Maintenance and do-it-yourself
Page 318 of 372

WARNING
●Operating the engine with the air
cleaner filter off can cause you or others
to be burned. The air cleaner filter not
only cleans the intake air, it also stops
the flame if the engine backfires. If the
air cleaner is not installed and the en-
gine backfires, you could be burned.
Never drive with the air cleaner filter off.
Be cautious working on the engine
when the air cleaner is off.
To remove the filter from the air cleaner, release
the retaining clips
�1, then release the holders at
the back of the unit. Pull the unit upward
�2. The viscous paper type filter element should not
be cleaned and reused. The dry paper type filter
element may be cleaned and reused. Replace the
air filter according to the maintenance log shown
in a separate maintenance booklet.
When replacing the air filter, wipe the inside of
the air cleaner housing and the cover with a damp
cloth.
CLEANING
If your windshield is not clear after using the
windshield washer or if a wiper blade chatters
when running, wax or other material may be on
the blade or windshield.
Clean the outside of the windshield with a washer
fluid or a mild detergent. Your windshield is clean
if beads do not form when rinsing with clear
water.
Clean each blade by wiping it with a cloth soaked
in a washer fluid or a mild detergent. Then rinse
the blades with clear water. If your windshield is
still not clear after cleaning the blades and using
the wiper, install new windshield wiper blades.
CAUTION
Worn windshield wiper blades can dam-
age the windshield and impair driver
vision.
LDI2185
AIR CLEANER
WINDSHIELD WIPER BLADES
Maintenance and do-it-yourself8-17
Page 321 of 372
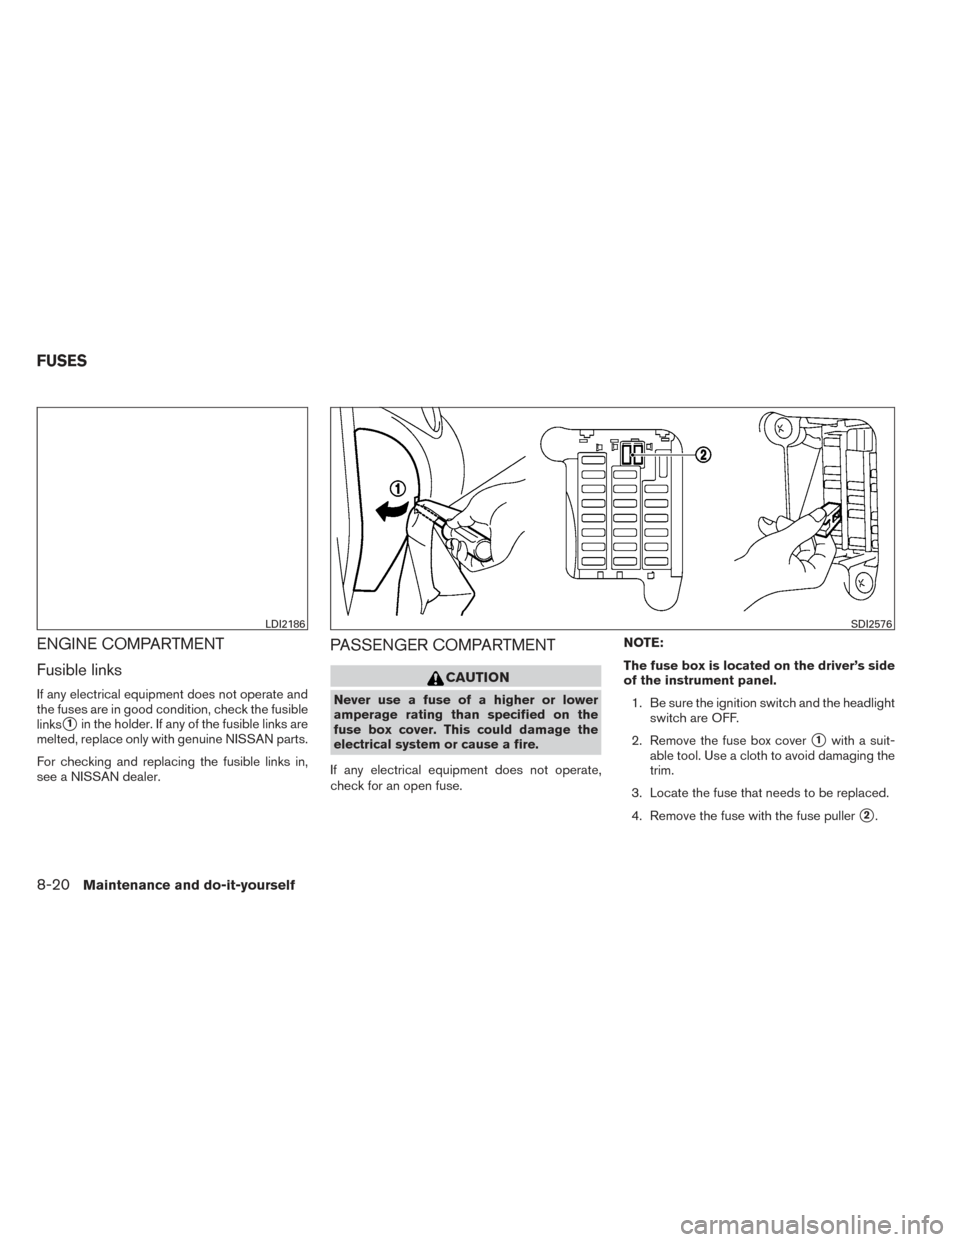
ENGINE COMPARTMENT
Fusible links
If any electrical equipment does not operate and
the fuses are in good condition, check the fusible
links
�1in the holder. If any of the fusible links are
melted, replace only with genuine NISSAN parts.
For checking and replacing the fusible links in,
see a NISSAN dealer.
PASSENGER COMPARTMENT
CAUTION
Never use a fuse of a higher or lower
amperage rating than specified on the
fuse box cover. This could damage the
electrical system or cause a fire.
If any electrical equipment does not operate,
check for an open fuse. NOTE:
The fuse box is located on the driver’s side
of the instrument panel.
1. Be sure the ignition switch and the headlight switch are OFF.
2. Remove the fuse box cover
�1with a suit-
able tool. Use a cloth to avoid damaging the
trim.
3. Locate the fuse that needs to be replaced.
4. Remove the fuse with the fuse puller
�2.
LDI2186SDI2576
FUSES
8-20Maintenance and do-it-yourself
Page 325 of 372

4. Close the lid securely as illustrated�C�D.
5. Operate the buttons to check the operation.
See a NISSAN dealer if you need assistance for
replacement.
FCC Notice:
For USA:
This device complies with Part 15 of the
FCC Rules. Operation is subject to the fol-
lowing two conditions: (1) This device may
not cause harmful interference, and (2) this
device must accept any interference re-
ceived, including interference that may
cause undesired operation. Note: Changes or modifications not ex-
pressly approved by the party responsible
for compliance could void the user’s au-
thority to operate the equipment.
For Canada:
This device complies with RSS-210 of In-
dustry Canada. Operation is subject to the
following two conditions: (1) this device
may not cause interference, and (2) this
device must accept any interference, in-
cluding interference that may cause unde-
sired operation of the device.
HEADLIGHTS
Replacing the halogen headlight bulb
The headlight is a semi-sealed beam type which
uses a replaceable headlight (halogen) bulb.
They can be replaced from inside the engine
compartment without removing the headlight as-
sembly.
CAUTION
●
High-pressure halogen gas is sealed in-
side the bulb. The bulb may break if the
glass envelope is scratched or the bulb
is dropped.
● Aiming should not be necessary after
replacing the bulb. When aiming adjust-
ment is necessary, contact a NISSAN
dealer.
● Do not leave the headlight assembly
open without a bulb installed for a long
period of time. Dust, moisture, smoke,
etc. entering the headlight body may
affect bulb performance. Remove the
bulb from the headlight assembly just
before a replacement bulb is installed.
WDI0535
LIGHTS
8-24Maintenance and do-it-yourself