2014 NISSAN ROGUE wheel
[x] Cancel search: wheelPage 88 of 442
20. Vehicle Dynamic Control (VDC) OFFswitch (P. 2-40)
Sport mode switch (P. 2-40)
Power liftgate switch (if so equipped)
(P.3-23)
Power liftgate main switch
(if so equipped) (P. 3-26)
Warning systems switch
(if so equipped) (P.2-42)
All-Wheel Drive (AWD) lock switch
(if so equipped) (P.2-40)
Hill descent control switch
(if so equipped) (P.2-41)
21. Instrument brightness control
(P. 2-37)/Twin trip odometer reset
switch (P. 2-4)
*: Refer to the separate Navigation System Own-
er’s Manual (if so equipped) .
See the page number indicated in paren-
theses for operating details.
1. Tachometer
2. Warning/indicator lights
3. Vehicle Information Display/Odometer/Twin trip odometer
4. Speedometer
5. Fuel gauge 6. Engine coolant temperature gauge
LIC2627
METERS AND GAUGES
Instruments and controls2-3
Page 94 of 442
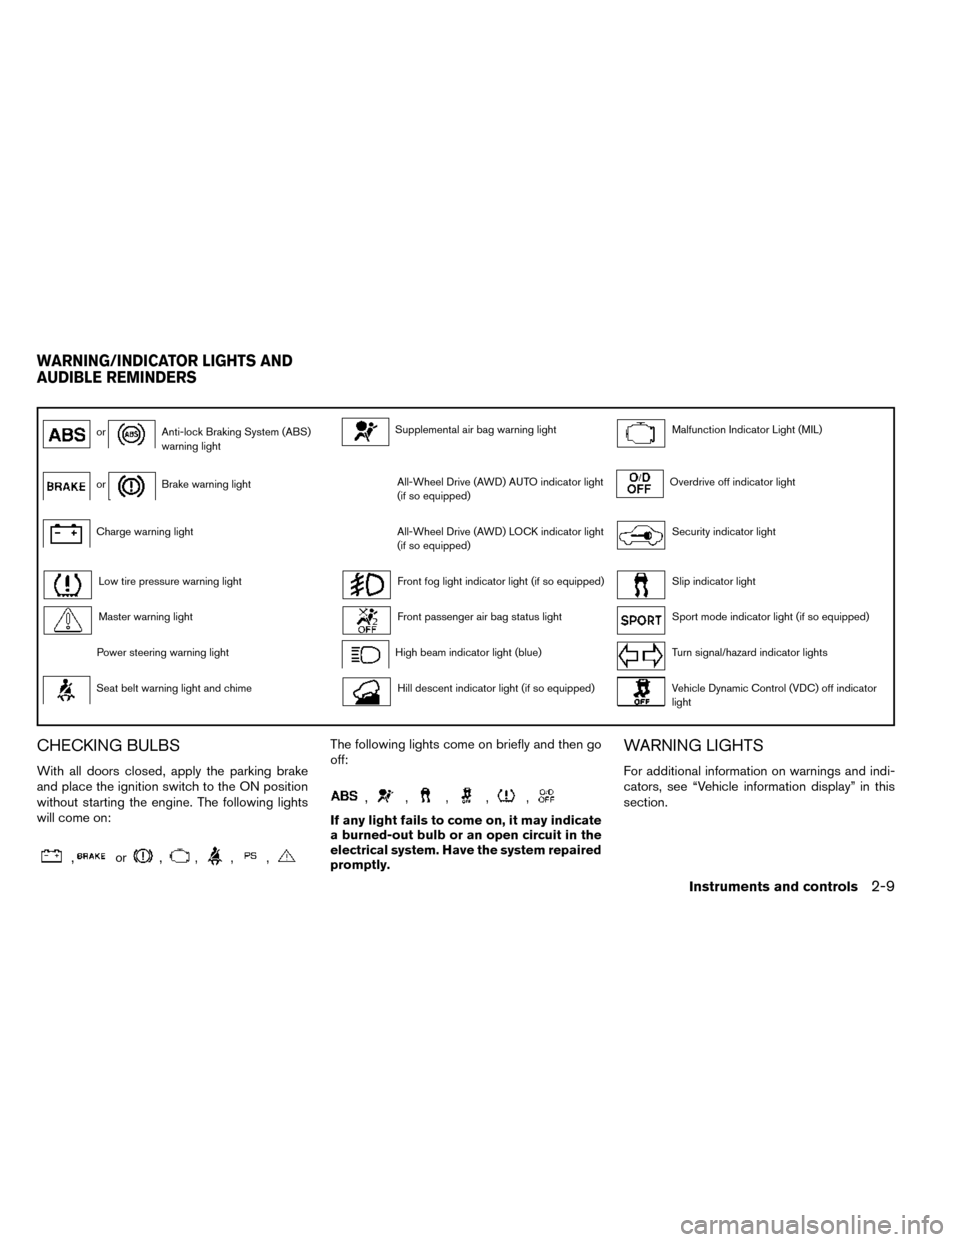
orAnti-lock Braking System (ABS)
warning lightSupplemental air bag warning lightMalfunction Indicator Light (MIL)
orBrake warning lightAll-Wheel Drive (AWD) AUTO indicator light
(if so equipped)Overdrive off indicator light
Charge warning lightAll-Wheel Drive (AWD) LOCK indicator light
(if so equipped)Security indicator light
Low tire pressure warning lightFront fog light indicator light (if so equipped)Slip indicator light
Master warning lightFront passenger air bag status lightSport mode indicator light (if so equipped)
Power steering warning lightHigh beam indicator light (blue)Turn signal/hazard indicator lights
Seat belt warning light and chimeHill descent indicator light (if so equipped)Vehicle Dynamic Control (VDC) off indicator
light
CHECKING BULBS
With all doors closed, apply the parking brake
and place the ignition switch to the ON position
without starting the engine. The following lights
will come on:
,or,,,,
The following lights come on briefly and then go
off:
,,,,,
If any light fails to come on, it may indicate
a burned-out bulb or an open circuit in the
electrical system. Have the system repaired
promptly.
WARNING LIGHTS
For additional information on warnings and indi-
cators, see “Vehicle information display” in this
section.
WARNING/INDICATOR LIGHTS AND
AUDIBLE REMINDERS
Instruments and controls2-9
Page 97 of 442
●If the light illuminates while driving,
avoid sudden steering maneuvers or
abrupt braking, reduce vehicle speed,
pull off the road to a safe location and
stop the vehicle as soon as possible.
Driving with under-inflated tires may per-
manently damage the tires and increase
the likelihood of tire failure. Serious ve-
hicle damage could occur and may lead
to an accident and could result in serious
personal injury. Check the tire pressure
for all four tires. Adjust the tire pressure
to the recommended COLD tire pressure
shown on the Tire and Loading Informa-
tion label located in the driver’s door
opening to turn the low tire pressure
warning light OFF. If the light still illumi-
nates while driving after adjusting the
tire pressure, a tire may be flat. If you
have a flat tire, replace it with a spare tire
as soon as possible.
● When a spare tire is mounted or a wheel
is replaced tire pressure will not be in-
dicated, the TPMS will not function and
the low tire pressure warning light will
flash for approximately 1 minute. The
light will remain on after 1 minute. Con-
tact your NISSAN dealer as soon as
possible for tire replacement and/or
system resetting. ●
Replacing tires with those not originally
specified by NISSAN could affect the
proper operation of the TPMS.
CAUTION
● The TPMS is not a substitute for the
regular tire pressure check. Be sure to
check the tire pressure regularly.
● If the vehicle is being driven at speeds
of less than 16 MPH (25 km/h), the
TPMS may not operate correctly.
● Be sure to install the specified size of
tires to the 4 wheels correctly.
Master warning light
When the ignition is in the ON position, the
master warning light illuminates if any of the fol-
lowing are displayed on the vehicle information
display.
● All-Wheel Drive (AWD) Tire Size Incorrect
See Owner’s Manual
● All-Wheel Drive (AWD) High Temp. Stop
vehicle
● All-Wheel Drive (AWD) Error See Owner’s
Manual
● No key warning ●
Low fuel warning
● Low windshield-washer fluid warning
● Parking brake release warning
● Door/liftgate open warning
● Loose fuel cap
If the All-Wheel Drive (AWD) system malfunc-
tions, or the diameter of the front and the rear
wheels are different, the master warning light will
illuminate. (See “All-Wheel Drive (AWD)” in the
“Starting and Driving” section.) ● If the warning light comes on while driving
there may be a malfunction in the AWD
system. Reduce the vehicle speed and have
your vehicle checked by a NISSAN dealer as
soon as possible.
CAUTION
● If the master warning light was illumi-
nated while driving:
—AWD High Temp Stop vehicle
Pull off the road in a safe area and idle the
engine. The driving mode will change to
2WD to prevent the AWD system from
malfunctioning. If the warning light turns
off, you can drive again.
2-12Instruments and controls
Page 99 of 442
WARNING
If the supplemental air bag warning light
is on, it could mean that the front air bag,
side air bag, curtain air bag and/or preten-
sioner systems will not operate in an acci-
dent. To help avoid injury to yourself or
others, have your vehicle checked by a
NISSAN dealer as soon as possible.
INDICATOR LIGHTS
For additional information on warnings and indi-
cators, see “Vehicle information display” in this
section.
All-Wheel Drive (AWD) AUTOindicator light (if so equipped)
When the ignition switch is in the “ON” position,
the All-Wheel Drive (AWD) AUTO indicator light
illuminates.
If the master warning light comes on during op-
eration, have your vehicle checked by a NISSAN
dealer as soon as possible.
All-Wheel Drive (AWD) LOCKindicator light (if so equipped)
When the ignition switch is in the “ON” position,
the All-Wheel Drive (AWD) LOCK indicator light
illuminates and then turns off. When selecting AWD LOCK mode while the
engine is running, the AWD LOCK indicator light
illuminates.
CAUTION
Do not drive on dry hard surface roads in
the LOCK mode.
Front fog light indicator light (if
so equipped)
The front fog light indicator light illuminates when
the front fog lights are ON. For additional infor-
mation, refer to “Fog light switch” in this section.
Front passenger air bag statuslight
The front passenger air bag status light will be lit
and the passenger front air bag will be OFF
depending on how the front passenger seat is
being used.
For front passenger air bag status light operation,
see “Front passenger air bag and status light” in
the “Safety — Seats, seat belts and supplemental
restraint system” section of this manual.
High beam indicator light(blue)
This blue light comes on when the headlight high
beams are on and goes out when the low beams
are selected.
The high beam indicator light also comes on
when the passing signal is activated.
Hill descent control system onindicator light (if so equipped)
When the ignition switch is placed in the ON
position, this light comes on briefly and then turns
off.
The light comes on when the hill descent control
system is activated.
If the hill descent control switch is on and the
indicator light blinks, the system is not engaged.
If the indicator light does not come on when the
hill descent switch is on, the system may not be
functioning properly. Have the system checked
by a NISSAN dealer.
For additional information, refer to “Hill descent
control (HDC) switch” in this section and “Hill
descent control (HDC) system” in the “Starting
and driving” section of this manual.
2-14Instruments and controls
Page 101 of 442
For additional information, see “Security sys-
tems” in this section.
Slip indicator light
This indicator will blink when the VDC system is
operating, thus alerting the driver to the fact that
the road surface is slippery and the vehicle is
nearing its traction limits.
You may feel or hear the system working; this is
normal.
The light will blink for a few seconds after the
VDC system stops limiting wheel spin.
The
indicator light also comes on when
you place the ignition switch in the ON position.
The light will turn off after approximately 2 sec-
onds if the system is operational. If the light does
not come on have the system checked by a
NISSAN dealer.
SPORT mode indicator light (if
so equipped)
This light illuminates and then turns off when the
ignition switch is placed into the ON position, and
when the overdrive off mode off is selected.
For additional information, see “Continuously
Variable Transmission (CVT)” in the “Starting and
driving” section of this manual.
Turn signal/hazard indicator
lights
The appropriate light flashes when the turn signal
switch is activated.
Both lights flash when the hazard switch is turned
on.
Vehicle Dynamic Control(VDC) off indicator light
This indicator light comes on when the Vehicle
Dynamic Control off switch is pushed to OFF.
This indicates the Vehicle Dynamic Control sys-
tem is not operating.
Push the Vehicle Dynamic Control off switch
again or restart the engine and the system will
operate normally. See “Vehicle Dynamic Control
(VDC) system” in the “Starting and driving” sec-
tion of this manual.
The Vehicle Dynamic Control light also comes on
when you place the ignition switch in the ON
position. The light will turn off after about 2 sec-
onds if the system is operational. If the light stays
on or comes on along with the
indicator
light while you are driving, have the Vehicle Dy-
namic Control system checked by a NISSAN
dealer. While the Vehicle Dynamic Control system is
operating, you might feel slight vibration or hear
the system working when starting the vehicle or
accelerating, but this is normal.
AUDIBLE REMINDERS
Brake pad wear warning
The disc brake pads have audible wear warnings.
When a disc brake pad requires replacement, it
makes a high pitched scraping sound when the
vehicle is in motion, whether or not the brake
pedal is depressed. Have the brakes checked as
soon as possible if the warning sound is heard.
Key reminder chime
A chime sounds if the driver’s door is opened
while the ignition switch is placed in the ACC (if
so equipped) or OFF position or placed in the
OFF or LOCK position with the Intelligent Key left
in the vehicle. Make sure the ignition switch is
placed in the LOCK position, and take the Intelli-
gent Key with you when leaving the vehicle.
Light reminder chime
With the ignition switch placed in the OFF posi-
tion, a chime sounds when the driver’s door is
opened if the headlights or parking lights are on.
Turn the headlight control switch off before leav-
ing the vehicle.
2-16Instruments and controls
Page 102 of 442
NISSAN Intelligent Key® door buzzer
The Intelligent Key door buzzer sounds if the
Intelligent Key is left inside the vehicle when
locking the doors. When the buzzer sounds, be
sure to check both the vehicle and the Intelligent
Key. See “NISSAN Intelligent Key®” in the “Pre-
driving checks and adjustments” section.The vehicle information display is located to the
left of the speedometer. It displays such items as:● Vehicle settings
● Trip computer information
● Drive system warnings and settings (if so
equipped)
● Cruise control system information
●
NISSAN Intelligent Key® operation information
● Chassis Control
● Indicators and warnings (if so equipped)
● Tire Pressure information
HOW TO USE THE VEHICLE
INFORMATION DISPLAY
The vehicle information display can be changed
using the buttons
and ENTER located on
the steering wheel.
1.
— navigate through the items in ve-
hicle information
ENTER — change or select an item in the
vehicle information display
2.
— select/enter the Vehicle informa-
tion menu items or to change from one dis-
play screen to the next (i.e. trip, TPMS, Fuel
economy)
LIC2630LIC2671
VEHICLE INFORMATION DISPLAY
Instruments and controls2-17
Page 103 of 442
3.— go back to the previous menu
The ENTER and
buttons also control audio
and control panel functions. For additional infor-
mation see, “Steering wheel switch for audio
control” in “Monitor, climate, audio, phone and
voice recognition systems” section.
STARTUP DISPLAY
When the vehicle in placed in the ON or ACC (if
so equipped) position the screens that display in
the vehicle information include:
● Active system status (if so equipped)
● Trip computer
● Tire pressure information
● Fuel economy
● Warnings
● Outside air temperature
● Odometer/Twin Trip Odometer
Warnings will only display if there are any pres-
ent, for more information on warnings and indica-
tors see, “Vehicle information display warnings
and indicators” in this section.
To control what items display in the vehicle infor-
mation display, see “Main menu selection” in this
section.
SETTINGS
The setting mode allows you to change the infor-
mation displayed in the vehicle information display:
● Driver Assistance
● Clock
● Meter Settings
● Vehicle Settings
● Maintenance
● Alarm
● Unit
● Language
● Factory Reset
Driver Assistance
To change the status, warnings or turn on or off
any of the systems/warnings displayed in the
“Driver Assistance” menu:
Use the
button to select and the ENTER
button to change a menu item:
● Driving Aids (if so equipped)
– Forward (FCW) On/Off
– Lane (LDW) On/Off
– Blind Spot (BSW) On/Off ●
Parking Aids (if so equipped)
– Moving Object On/Off
● Chassis Control
– Trace Control – See “Active Trace Con- trol” in “Starting and Operating” for more
information.
– Engine Brake – See “Active Engine Brake” in “Starting and Operating” for
more information.
To change the status, warnings or turn on or off
any of the systems/warnings displayed in the
“Driver Assistance” menu:
Use the
button to select and the ENTER
button to change a menu item:
● Driving Aids (if so equipped)
– Forward (FCW) On/Off
– Lane (LDW) On/Off
– Blind Spot (BSW) On/Off
● Parking Aids (if so equipped)
– Moving Object On/Off
2-18Instruments and controls
Page 109 of 442
WARNING
The tire replacement indicator is not a
substitute for regular tire checks, includ-
ing tire pressure checks. See “Changing
Wheels and Tires” in “Maintenance & Do-
It-Yourself” section. Many factors includ-
ing tire inflation, alignment, driving habits
and road conditions affect tire wear and
when tires should be replaced. Setting the
tire replacement indicator for a certain
driving distance does not mean your tires
will last that long. Use the tire replace-
ment indicator as a guide only and always
perform regular tire checks. Failure to per-
form regular tire checks, including tire
pressure checks could result in tire failure.
Serious vehicle damage could occur and
may lead to a collision, which could result
in serious personal injury or death.
Other
This indicator appears when the customer set
distance is reached for checking or replacing
maintenance items other than the engine oil, oil
filter and tires. Other maintenance items can in-
clude such things as air filter or tire rotation. The
distance for checking or replacing the items can
be set or reset.
Alarm
This setting allows the customer to set alarms for
outside temperature and a timer alert.
1. Press the
button.
2. Use the
button until “Settings” is se-
lected, and press ENTER.
3. Select “Alarm” using the
button and
press ENTER.
Outside Temperature
This setting allows the customer to
enable/disable the alert for low outside tempera-
ture in the vehicle information display.
1. Use the
button to select “Outside
Temperature”.
2. Press the ENTER button to turn ON/OFF the outside temperature in the vehicle infor-
mation display.
Timer Alert
This setting allows the driver to set an alert to
notify a set time has been reached.
1. Use the
button to select “Timer Alert”.
2. Press the ENTER button. 3. To change the timer amount, use the
button and the ENTER button to save the
selected time amount.
Units
The units that are shown in the vehicle informa-
tion display can be changed:
● Mileage
● Tire pressures
● Temperature
Use the
,, and the ENTER buttons to
select and change the units of the vehicle infor-
mation display. The units of the navigation screen
can be changed independently of the vehicle
information display. For vehicles equipped with
Navigation, see “How to use the
button”
in the “Monitor, climate, audio, phone and voice
recognition systems” section of this manual.
Mileage
The unit for the mileage that displays in the ve-
hicle information display can be changed to:
● miles, MPG
● km/h, km/l
● km/h, l/100km
2-24Instruments and controls