Page 17 of 32
15
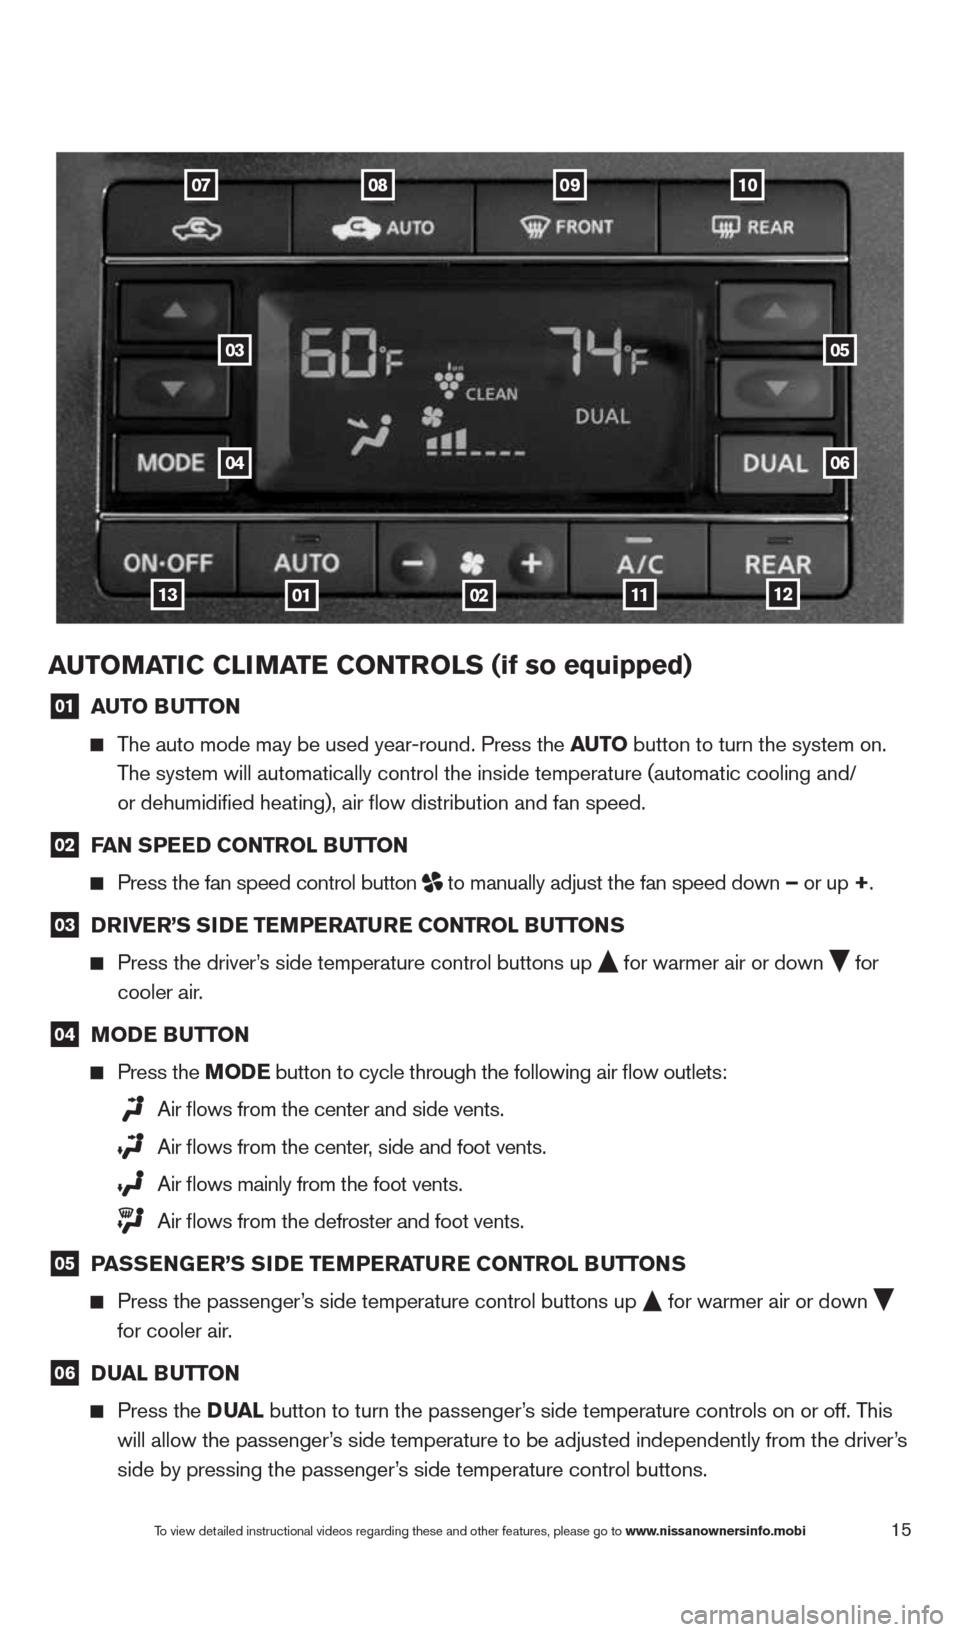
auTOMaTIC CLIMa Te CONTrOLS (if so equipped)
01 auTO B
uTTON
The auto mode may be used year-round. Press the au TO button to turn the system on.
The system will automatically control the inside temperature (automatic \
cooling and/
or dehumidified heating), air flow distribution and fan speed.
02 F
aN SPee D CONTr OL BuTTON
Press the fan speed control button
to manually adjust the fan speed down –
or up +.
03 D
rIVer’S SID e TeMPera Ture CONTr OL BuTTONS
Press the driver’s side temperature control buttons up
for warmer air or down
for
cooler air.
04 MOD
e BuTTON
Press the MOD e button
to cycle through the following air flow outlets:
Air flows from the center and side vents.
Air flows from the center, side and foot vents.
Air flows mainly from the foot vents.
Air flows from the defroster and foot vents.
05 P
aSS eNG er’S SID e TeMPera Ture CONTr OL BuTTONS
Press the passenger’s side temperature control buttons up
for warmer air or down
for cooler air.
06 D
uaL B uTTON
Press the Dua L button to turn the passenger’s side temperature controls on or off. This
will allow the passenger’s side temperature to be adjusted independently from the driver’s
side by pressing the passenger’s side temperature control buttons.
09070810
03
04
05
06
0113111202
To view detailed instructional videos regarding these and other features, please go\
to www.nissanownersinfo.mobi
1490690_14_Quest_QRG_072513.indd 157/25/13 9:24 AM
Page 18 of 32
16
07 aI
r re CIrCu LaTION B uTTON
Press the air recirculation button to recirculate interior air inside the vehicle. The
indicator light on the button will illuminate. This system is used to avoid certain outside
odors and helps to adjust the inside vehicle temperature more effectivel\
y.
The air recirculation mode cannot be activated when the air conditioner i\
s in the front
defroster mode
Fr
ONT or in the front defroster and foot vent mode .
08 auTO-re
CIrCu LaTION B uTTON
Press the auto-recirculation button
au
TO
to switch to the automatic air intake
control mode. The indicator light on the button will illuminate.
In this mode, the sensor detects certain odors and gasses to automatically switch
between the air recirculation mode and the outside air circulation mode.\
The auto-recirculation mode cannot be activated when the air flow contr\
ol mode is in
the front defroster mode
Fr
ONT or in the front defroster and foot vent mode .
09 D
eFr OSTING/D eFOGGING Fr ONT aND SID e wINDOwS
Press the front defroster control button
Fr
ONT to turn the system on. The A/c
automatically turns on when the defroster mode is selected. This feature removes humidity
from the air.
Press the temperature control buttons
or
to set the desired temperature.
To defrost the front and side windows quickly, set the temperature controls and fan speed
controls to their maximum settings.
10 D
eFr OSTING rear wINDO w aND OuTSIDe MIrrOr S (if so equipped)
Push the rear window defroster switch
rear
to turn the system on or off.
This function automatically turns off after approximately 15 minutes.
11 a/C B
uTTON
Press the a/C button to turn the air conditioner system on or off. This system helps cool
and dehumidify the air inside the cabin and defog the windows.
12 rear CONTr
OL BuTTON
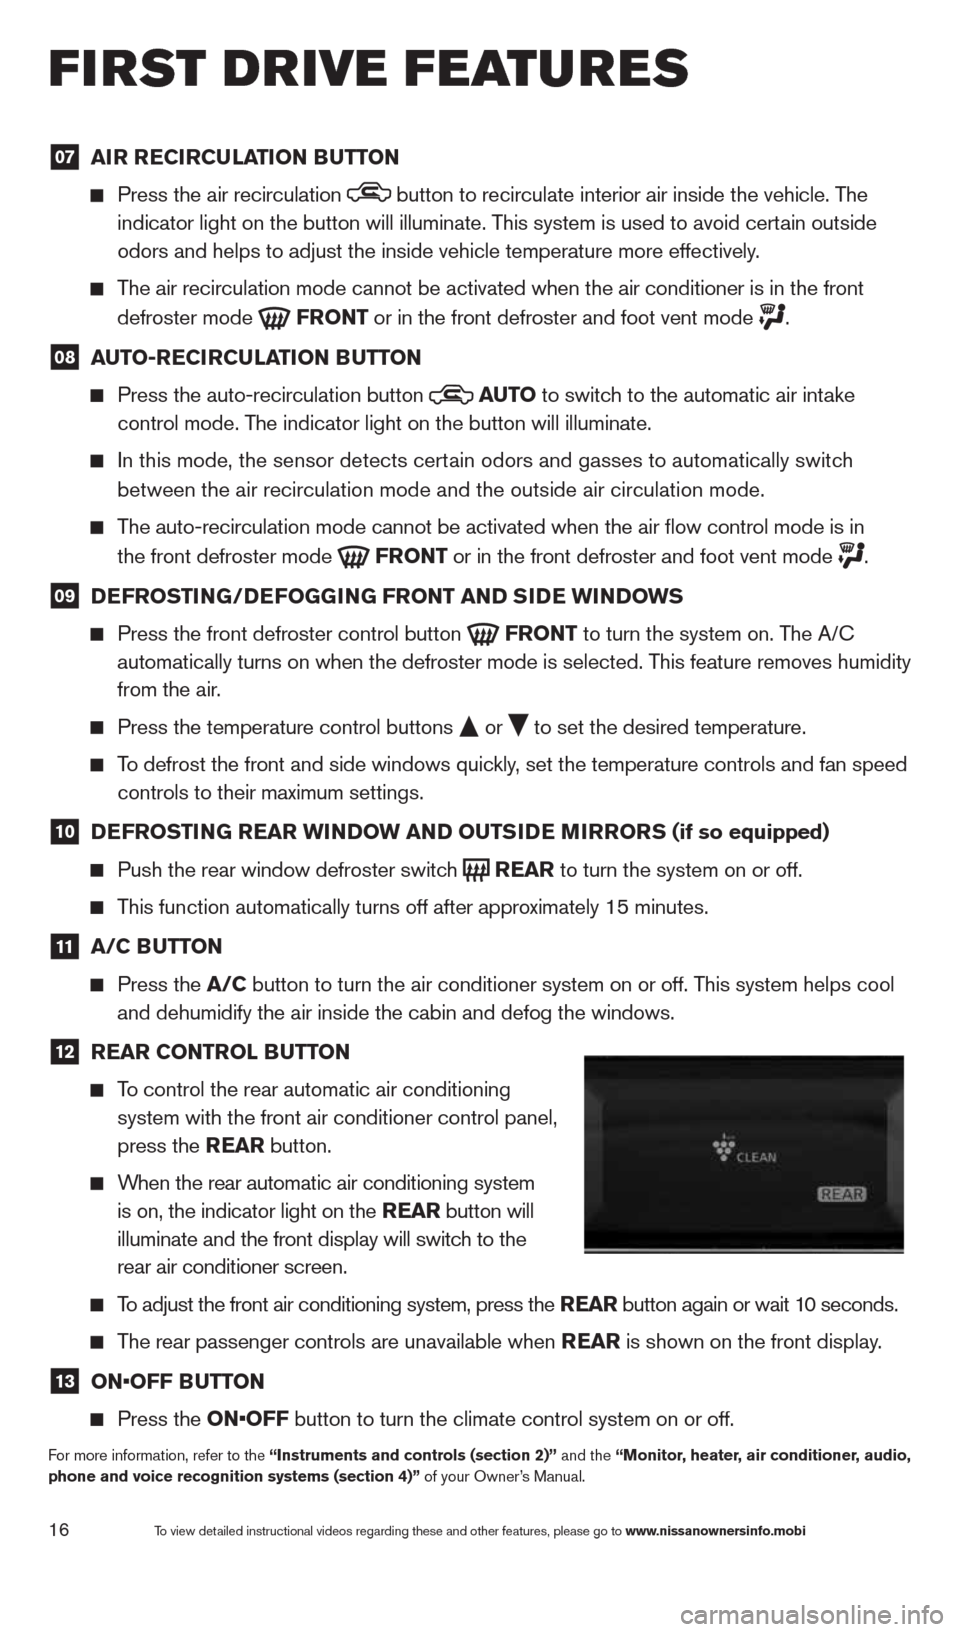
To control the rear automatic air conditioning
system with the front air conditioner control panel,
press the rear button.
When the rear automatic air conditioning system
is on, the indicator light on the rear button will
illuminate and the front display will switch to the
rear air conditioner screen.
To adjust the front air conditioning system, press the rear button again or wait 10 seconds.
The rear passenger controls are unavailable when rear is shown on the front display.
13 ON•OFF B
uTTON
Press the ON•OFF button to turn the climate control system on or off.
For more information, refer to the “Instruments and controls (section 2)” and the “Monitor, heater, air conditioner, audio,
phone and voice recognition systems (section 4)” of your Owner’s Manual.
first drive features
To view detailed instructional videos regarding these and other features, please go\
to www.nissanownersinfo.mobi
1490690_14_Quest_QRG_072513.indd 167/25/13 9:24 AM
Page 19 of 32
17
01
0605
03
02
FM/aM/SiriusXM* Sa TeLLITe raDIO wITH CD/DVD PLa Yer
(if so equipped)
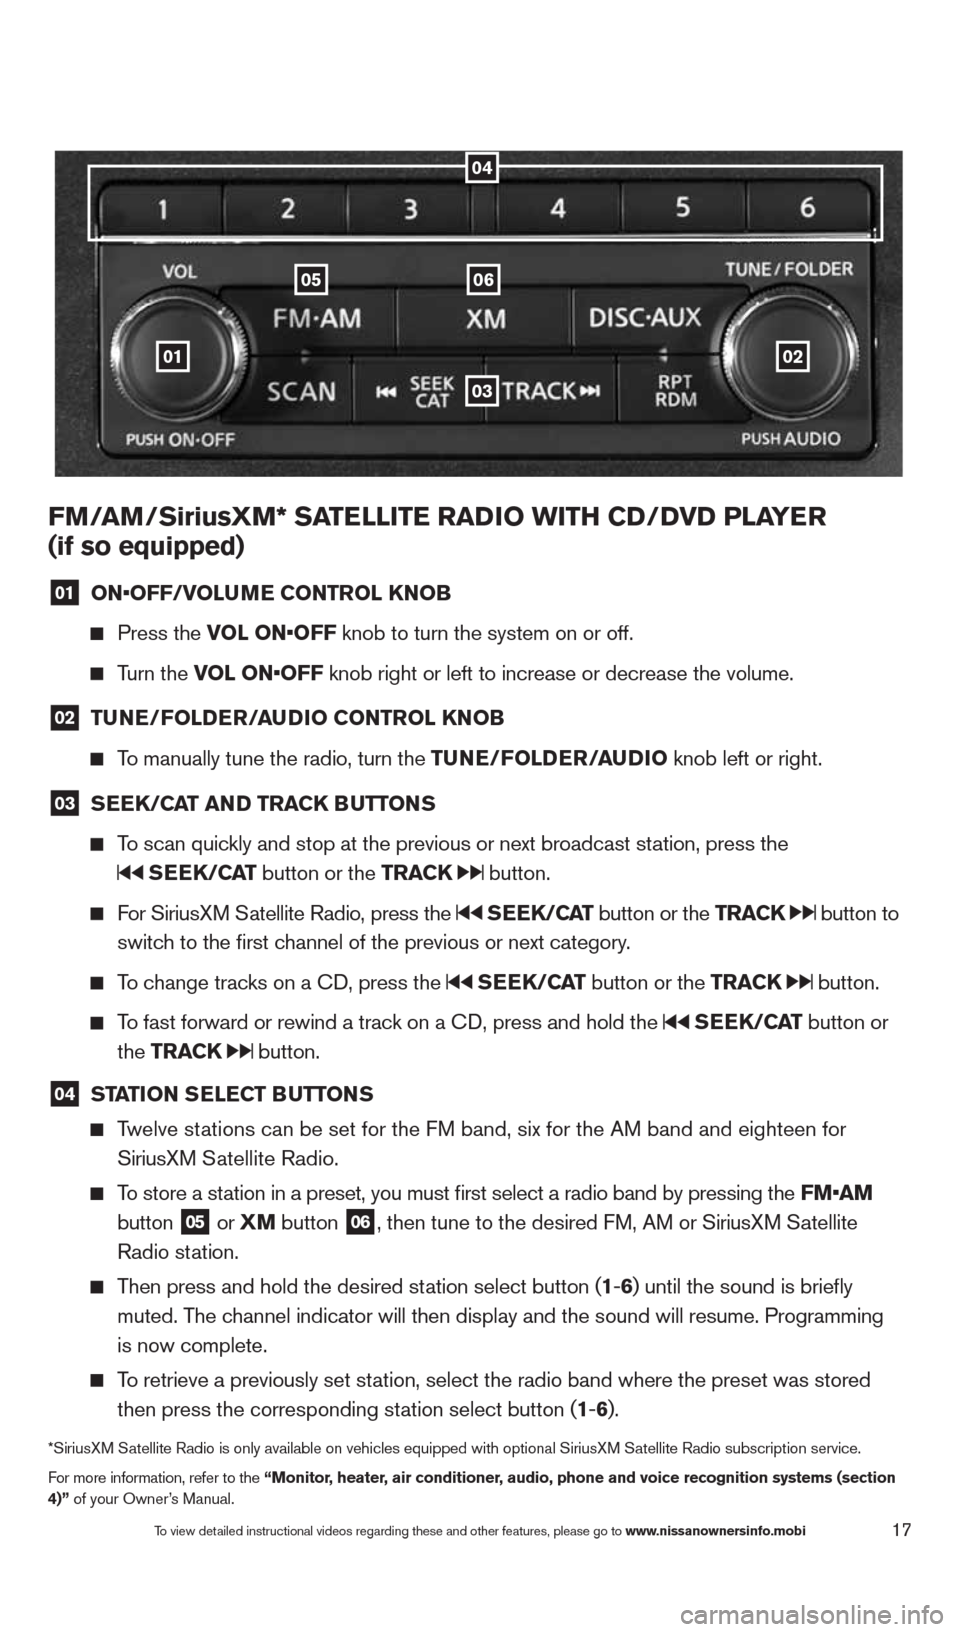
01 ON•OFF/VOLu
Me CONTr OL KNOB
Press the VOL ON•OFF knob to turn the system on or off.
Turn the VOL ON•OFF knob right or left to increase or decrease the volume.
02 Tu
Ne/FOLD er/au DIO CONTr OL KNOB
To manually tune the radio, turn the T uNe/FOLDer/auDIO knob left or right.
03 S
ee K/C aT aND Tra CK BuTTONS
To scan quickly and stop at the previous or next broadcast station, press the
SeeK/C aT button or the Tra CK button.
For SiriusXM Satellite Radio, press the SeeK/C aT button or the Tra CK button to
switch to the first channel of the previous or next category.
To change tracks on a c D, press the SeeK/C aT button or the Tra CK button.
To fast forward or rewind a track on a c D, press and hold the SeeK/C aT button or
the Tra CK
button.
04 ST
aTION S eLe CT B uTTONS
Twelve stations can be set for the FM band, six for the AM band and eighteen for
SiriusXM Satellite Radio.
To store a station in a preset, you must first select a radio band by pressing the \
FM•aM
button
05 or
XM button 06, then tune to the desired FM, AM or SiriusXM Satellite
Radio station.
Then press and hold the desired station select button (1 -6 ) until the sound is briefly
muted. The channel indicator will then display and the sound will resume. Programmin\
g
is now complete.
To retrieve a previously set station, select the radio band where the preset was stored
then press the corresponding station select button (1 -6 ).
*SiriusXM Satellite Radio is only available on vehicles equipped with optional Siri\
usXM Satellite Radio subscription service.
For more information, refer to the “Monitor, heater, air conditioner, audio, phone and voice recognition systems (section
4)” of your Owner’s Manual.
04
To view detailed instructional videos regarding these and other features, please go\
to www.nissanownersinfo.mobi
1490690_14_Quest_QRG_072513.indd 177/25/13 9:24 AM
Page 20 of 32
18
CruISe CONTr OL
The cruise control system enables you to set a constant,
cruising speed once the vehicle has reached 25 MPH
(40 km/h).
The system will automatically maintain the set speed
until you tap the brake pedal, accelerate, cancel or
turn the system off.
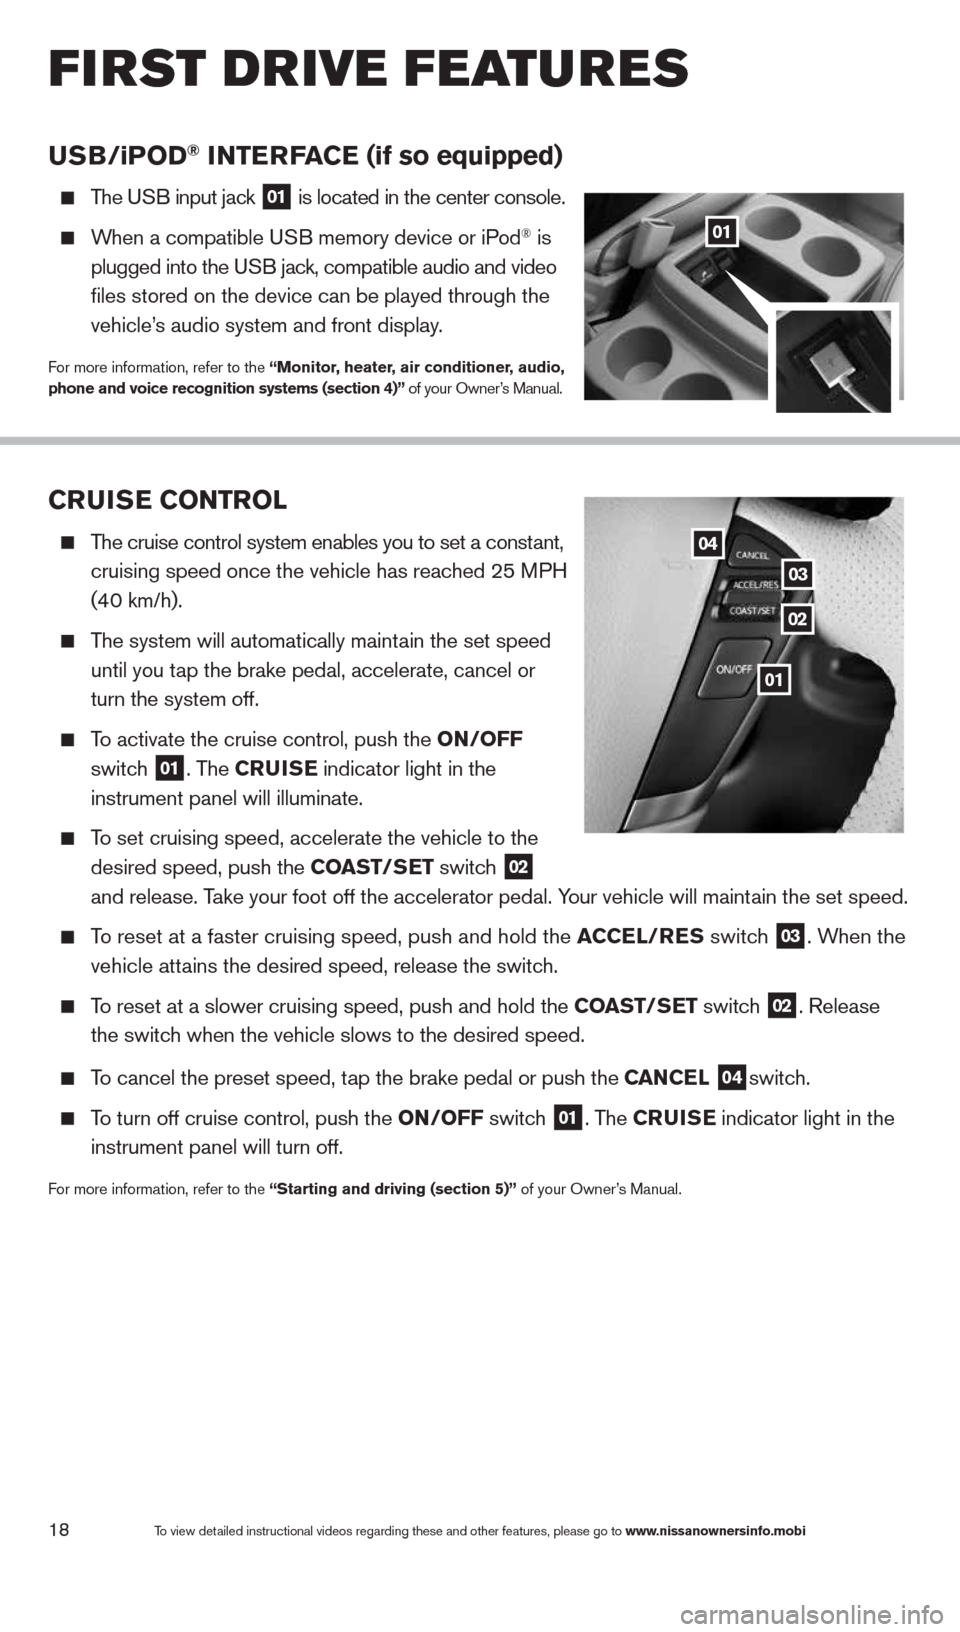
To activate the cruise control, push the ON/OFF
switch
01. The C ruISe indicator light in the
instrument panel will illuminate.
To set cruising speed, accelerate the vehicle to the
desired speed, push the CO aST/SeT switch
02
and release. Take your foot off the accelerator pedal. Your vehicle will maintain the set speed.
To reset at a faster cruising speed, push and hold the a CCeL/reS switch 03. When the
vehicle attains the desired speed, release the switch.
To reset at a slower cruising speed, push and hold the CO aST/SeT switch 02. Release
the switch when the vehicle slows to the desired speed.
To cancel the preset speed, tap the brake pedal or push the C aNCeL 04switch.
To turn off cruise control, push the ON/OFF switch 01. The C ruISe indicator light
in the
instrument panel will turn off.
For more information, refer to the “Starting and driving (section 5)” of your Owner’s Manual.
uSB/ iP OD® INTer Fa Ce (if so equipped)
The USB input jack 01 is located in the center console.
When a compatible USB memory device or iPod® is
plugged into the USB jack, compatible audio and video
files stored on the device can be played through the
vehicle’s audio system and front display.
For more information, refer to the “Monitor, heater, air conditioner, audio,
phone and voice recognition systems (section 4)” of your Owner’s Manual.
01
02
03
04
To view detailed instructional videos regarding these and other features, please go\
to www.nissanownersinfo.mobi
first drive features
01
1490690_14_Quest_QRG_072513.indd 187/25/13 9:24 AM
Page 21 of 32
19To view detailed instructional videos regarding these and other features, please go\
to www.nissanownersinfo.mobi
POwer OuTLeTS
To use a power outlet, open the cap.
Use power outlets with the engine running to avoid discharging the vehicle’s battery.
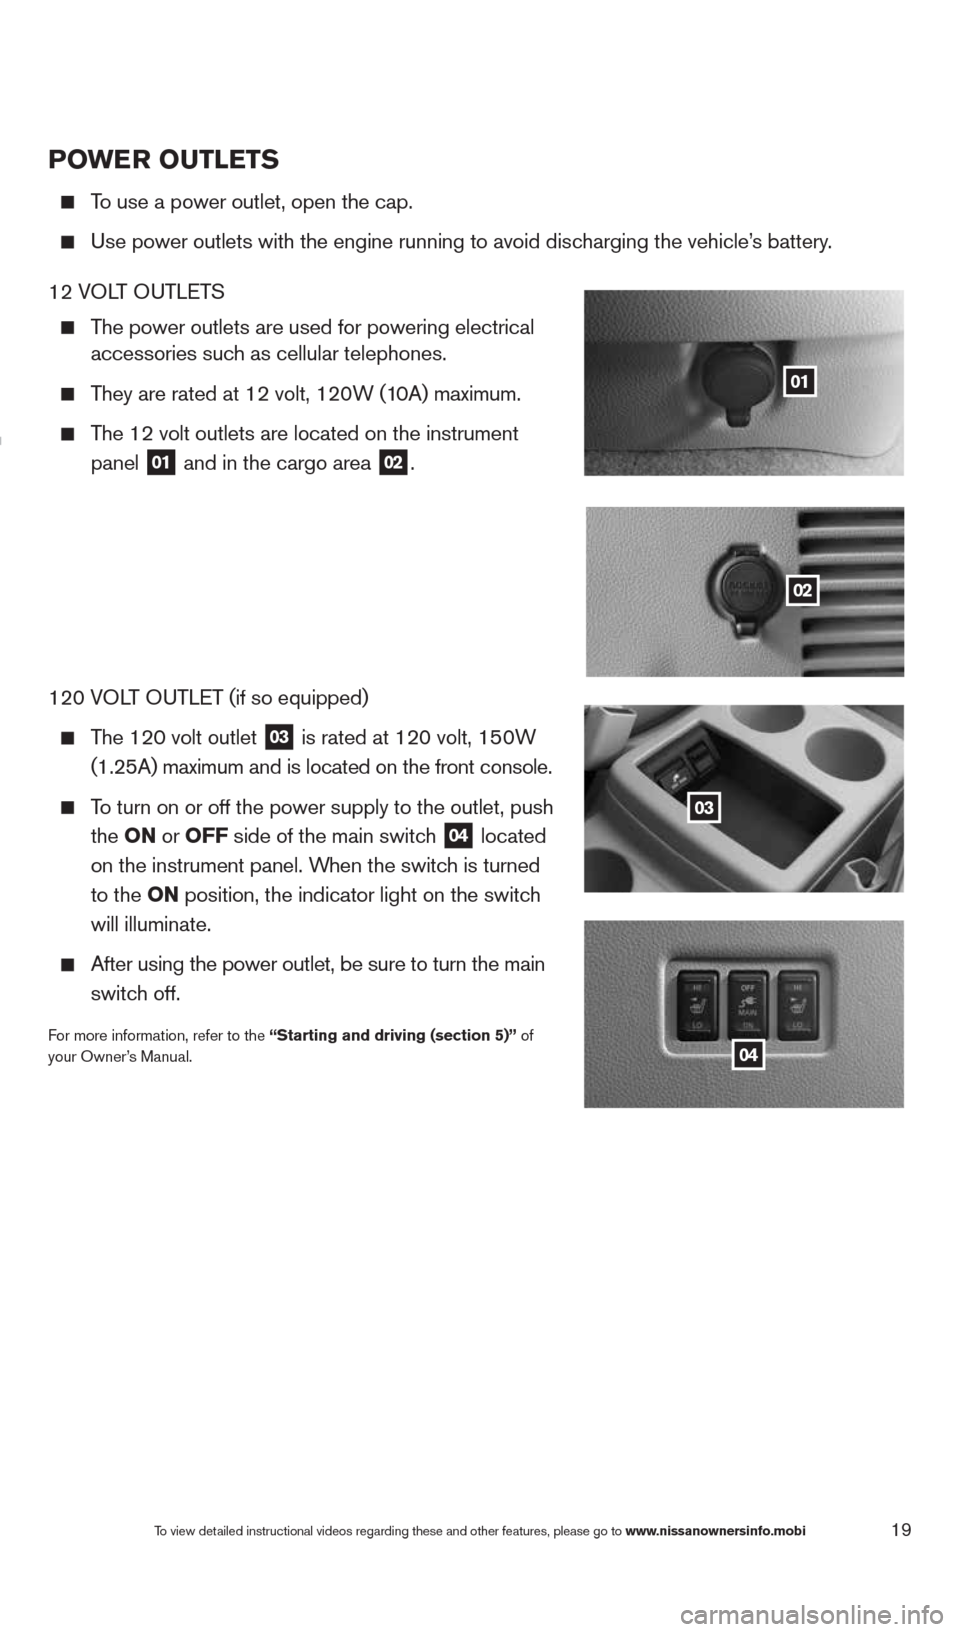
12 VOLT OUTLETS
The power outlets are used for powering electrical
accessories such as cellular telephones.
They are rated at 12 volt, 120W (10A) maximum.
The 12 volt outlets are located on the instrument
panel
01 and in the cargo area 02.
120 VOLT OUTLET (if so equipped)
The 120 volt outlet
03 is rated at 120 volt, 150W
(1.25A) maximum and is located on the front console.
To turn on or off the power supply to the outlet, push
the ON or OFF side of the main switch
04 located
on the instrument panel. When the switch is turned
to the ON position, the indicator light
on the switch
will illuminate.
After using the power outlet, be sure to turn the main
switch off.
For more information, refer to the “Starting and driving (section 5)” of
your Owner’s Manual.
01
02
03
04
1490690_14_Quest_QRG_072513.indd 197/25/13 9:24 AM
Page 22 of 32
20
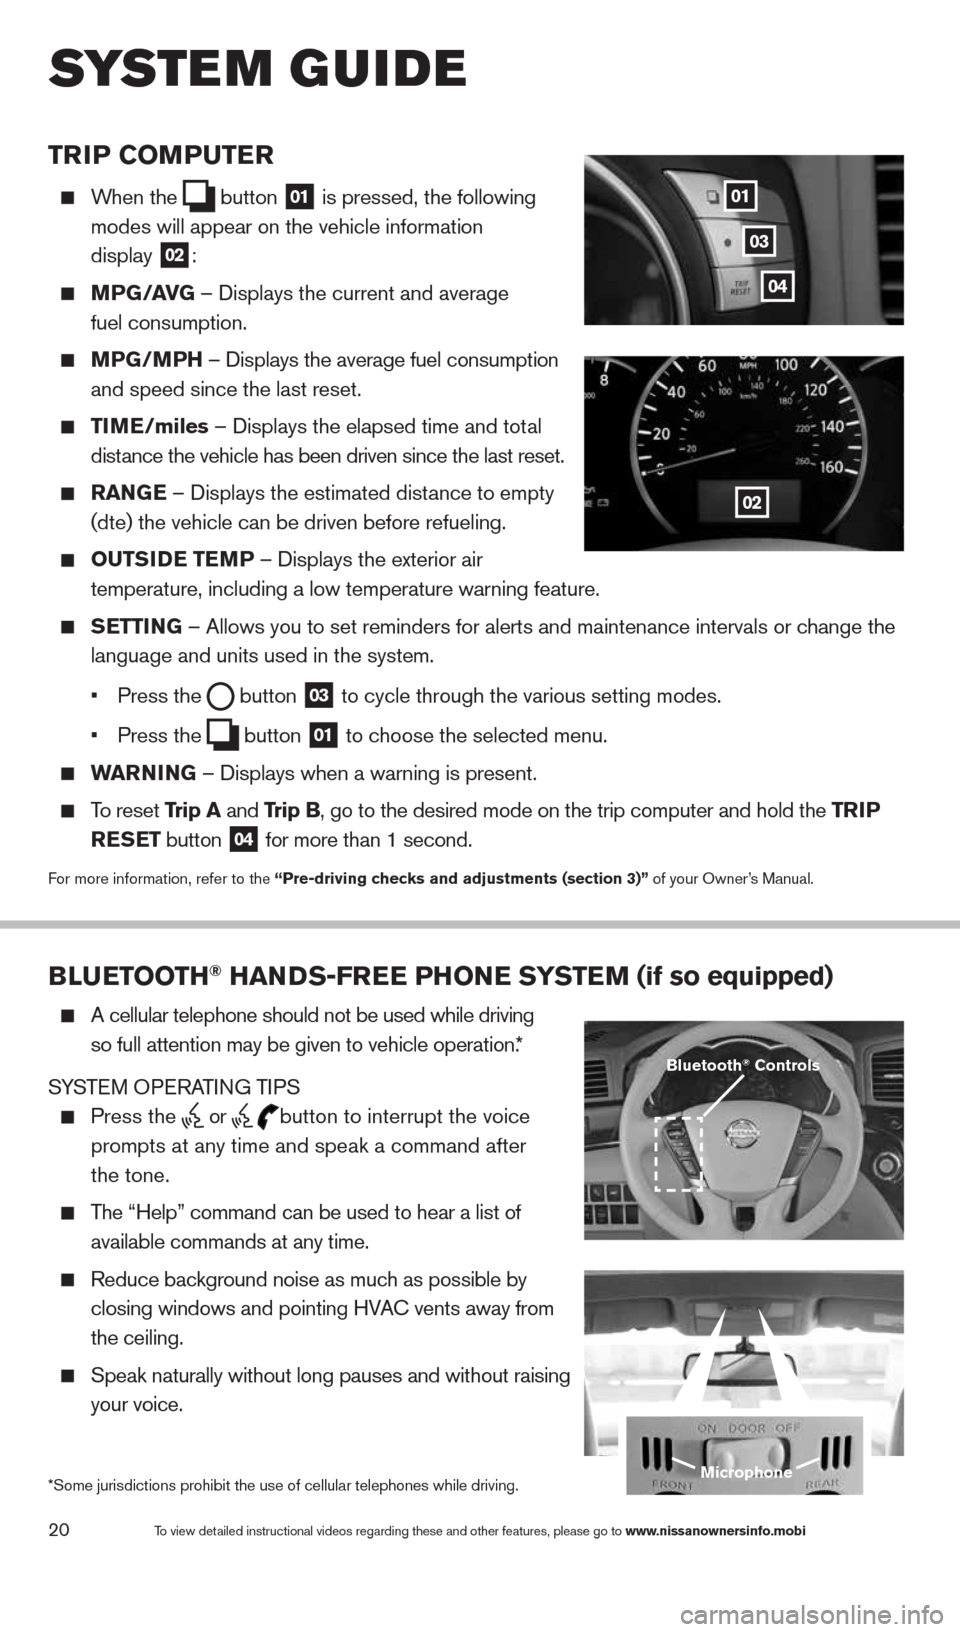
TrIP COMPuTer
When the
button
01 is pressed, the following
modes will appear on the vehicle information
display
02:
MPG/ aVG – Displays the current and average
fuel consumption.
MPG/MPH – Displays the average fuel consumption
and speed since the last reset.
TIM e/miles – Displays the elapsed time and total
distance the vehicle has been driven since the last reset.
raNG e – Displays the estimated distance to empty
(dte) the vehicle can be driven before refueling.
OuTSID e TeMP – Displays the exterior air
temperature, including a low temperature warning feature.
SeTTING – Allows you to set reminders for alerts and maintenance intervals o\
r change the
language and units used in the system.
• Press the
button
03 to cycle through the various setting modes.
• Press the
button
01 to choose the selected menu.
warNING – Displays when a warning is present.
To reset Trip a and Trip B, go to the desired mode on the trip computer and hold the T rIP
reSe T button
04 for more than 1 second.
For more information, refer to the “Pre-driving checks and adjustments (section 3)”
of your Owner’s Manual.
01
02
03
BLueTOOTH® HaNDS-Free PHONe SYSTeM (if so equipped)
A cellular telephone should not be used while driving
so full attention may be given to vehicle operation.*
SYSTEM OPERATING TIPS
Press the or button to interrupt the voice
prompts at any time and speak a command after
the tone.
The “Help” command can be used to hear a list of
available commands at any time.
Reduce background noise as much as possible by
closing windows and pointing HVA c vents away from
the ceiling.
Speak naturally without long pauses and without raising
your voice.
Microphone
Bluetooth® Controls
*Some jurisdictions prohibit the use of cellular telephones while drivin\
g.
system guide
To view detailed instructional videos regarding these and other features, please go\
to www.nissanownersinfo.mobi
04
1490690_14_Quest_QRG_072513.indd 207/25/13 9:24 AM
Page 23 of 32
21
When speaking Phonebook names, please be aware some phones require the la\
st name
to be spoken before the first name. For example, “Michael Smith” may be spoken as
“Smith Michael”.
To cancel a voice recognition session, say “Exit” or press and hold the
or
button.
To decrease or increase the volume of the voice prompts, push the volume \
control switches
or
on the steering wheel or turn the VOL/ON•OFF control knob on the audio system
while the system is responding.
Voice commands can be used to operate various Bluetooth System features u\
sing the
NISSAN Voice Recognition system. See your Owner’s Manual for detailed information.
If the Voice Recognition system does not recognize your voice commands, train th\
e system
using the Speaker Adaptation Mode.
For more detailed information and instructions, refer to your cellular phone’s Owner’s Manual
and visit www.nissanusa.com/bluetooth.
Bluetooth® System with Navigation* (if so equipped)
Bluetooth Streaming Audio (available with Navigation System only) allo\
ws you to use a
compatible Bluetooth phone to play audio files on your device. Your compatible cellular
phone can be connected to the vehicle’s audio system, allowing audio files to play through
the vehicle’s speakers.
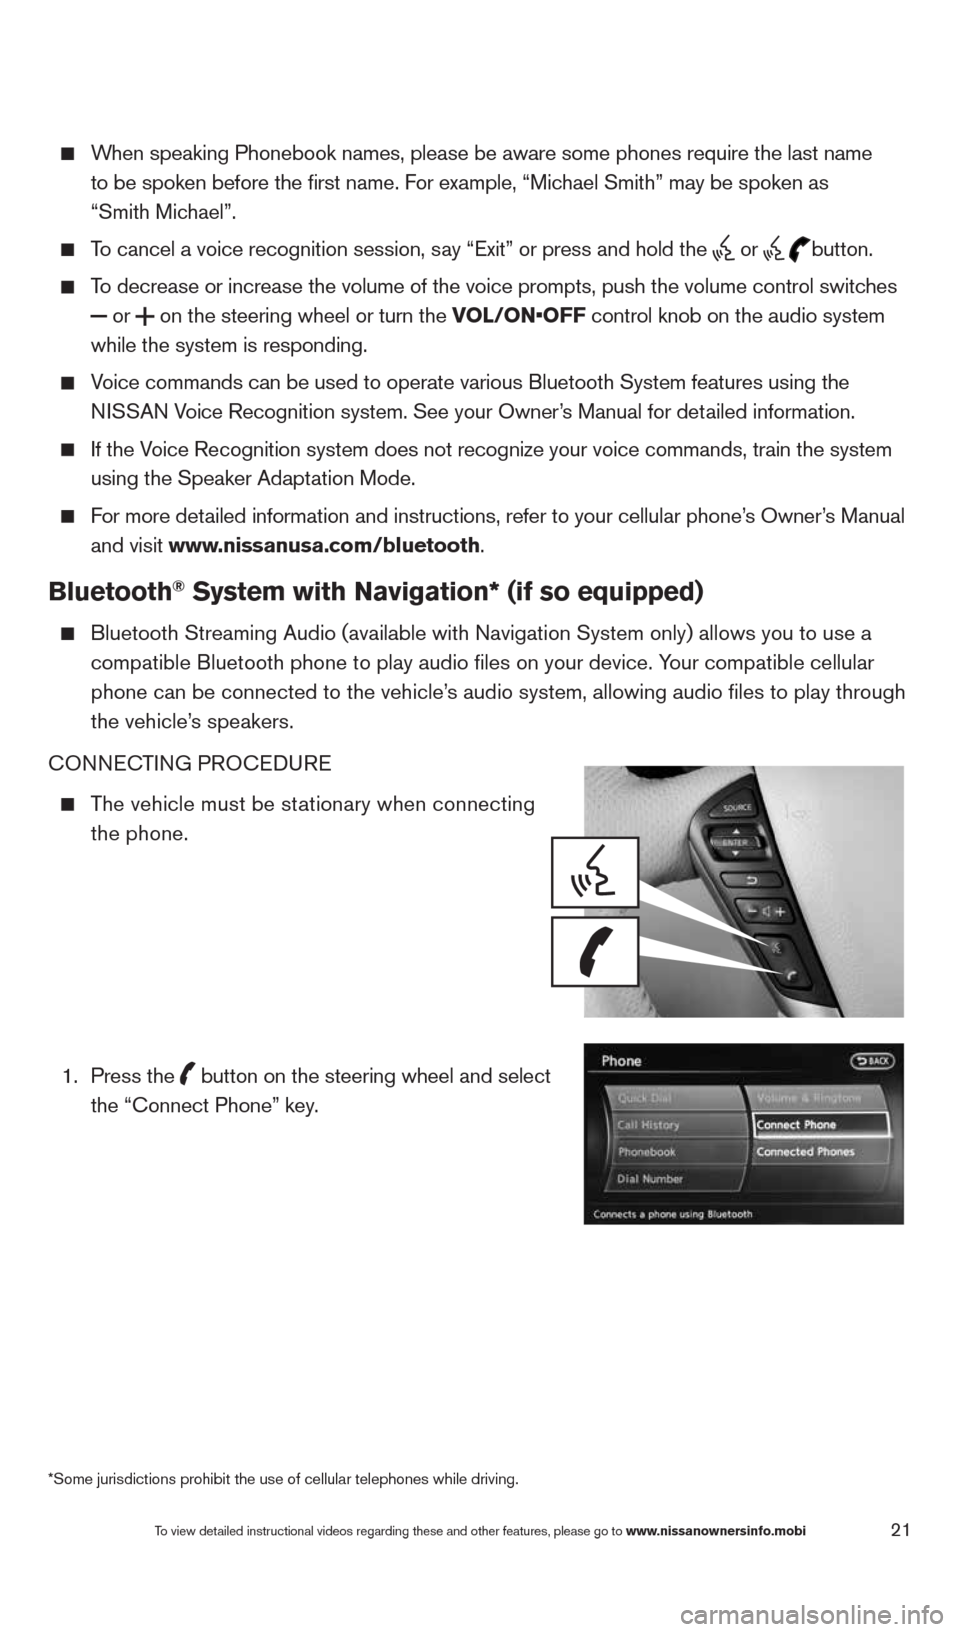
cONNEc TING PROcEDURE
The vehicle must be stationary when connecting
the phone.
1.
Press the
button on the steering wheel and select
the “connect Phone” key.
*Some jurisdictions prohibit the use of cellular telephones while drivin\
g.
To view detailed instructional videos regarding these and other features, please go\
to www.nissanownersinfo.mobi
1490690_14_Quest_QRG_072513.indd 217/25/13 9:24 AM
Page 24 of 32
22
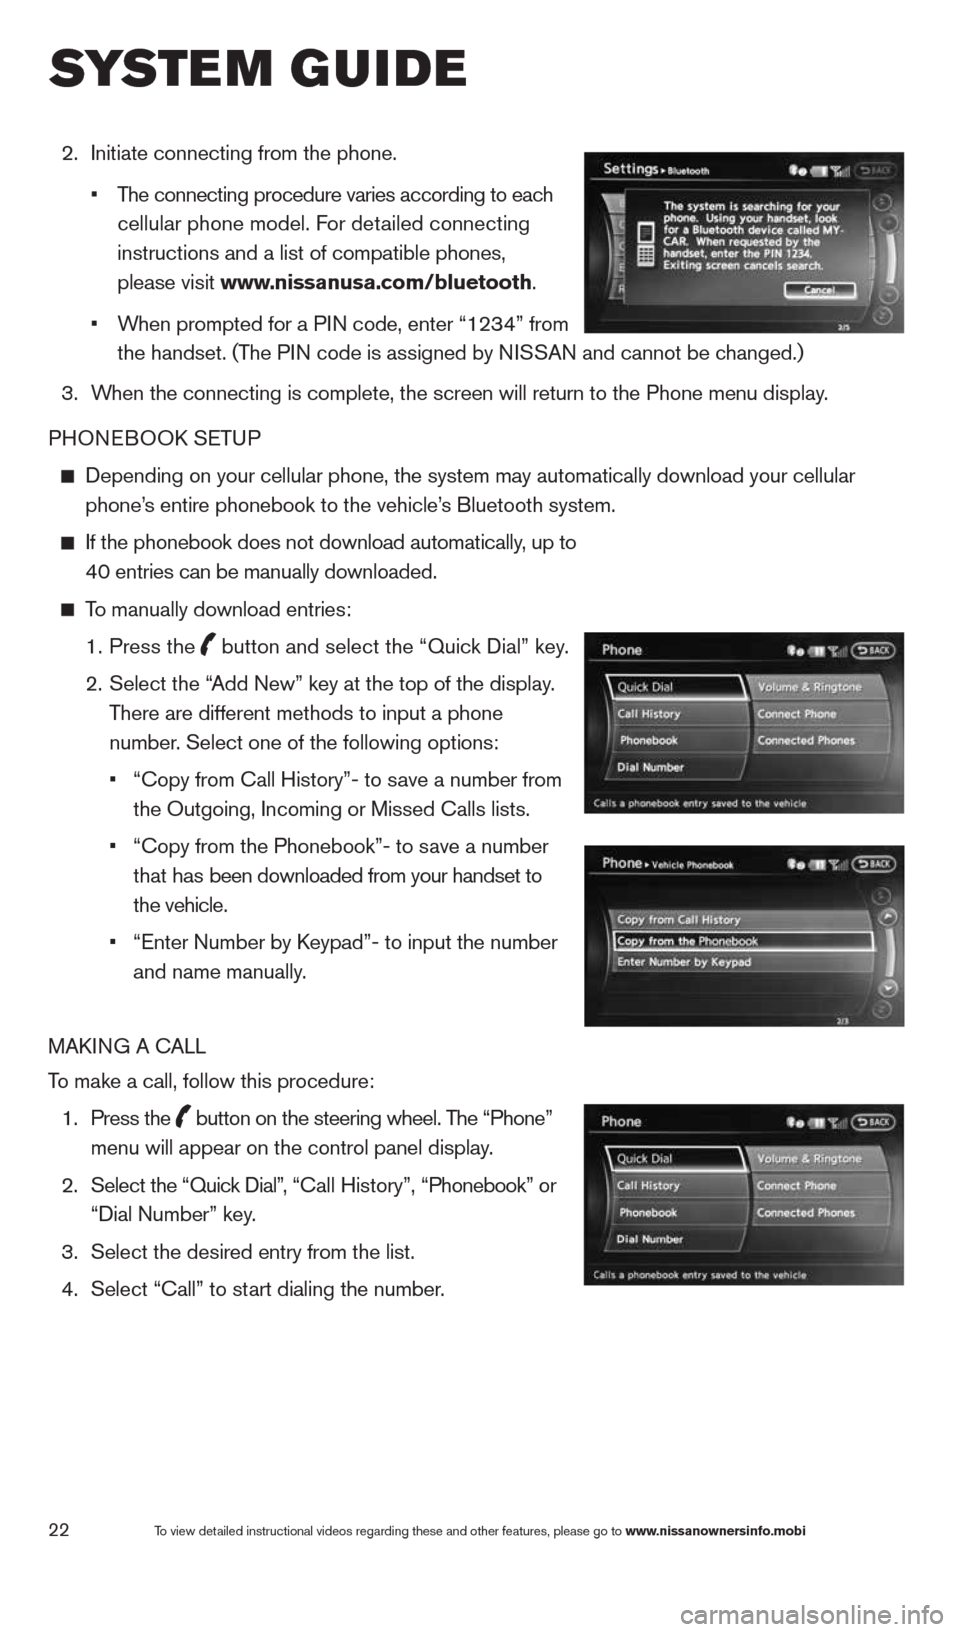
2. Initiate connecting from the phone.
• The connecting procedure varies according to each
cellular phone model. For detailed connecting
instructions and a list of compatible phones,
please visit www.nissanusa.com/bluetooth.
• When prompted for a PIN code, enter “1234” from
the handset. (The PIN code is assigned by NISSAN and cannot be changed.)
3. When the connecting is complete, the screen will return to the Phone menu display.
PHONEBOOk SETUP
Depending on your cellular phone, the system may automatically download \
your cellular
phone’s entire phonebook to the vehicle’s Bluetooth system.
If the phonebook does not download automatically, up to
40 entries can be manually downloaded.
To manually download entries:
1. Press the
button and select the “Quick Dial” key.
2.
Select the “Add New” key at the top of the display.
There are different methods to input a phone
number. Select one of the following options:
•
“copy from call History”- to save a number from
the Outgoing, Incoming or Missed calls lists.
• “copy from the Phonebook”- to save a number
that has been downloaded from your handset to
the vehicle.
• “Enter Number by k eypad”- to input the number
and name manually.
MAk ING A c ALL
To make a call, follow this procedure:
1. Press the
button on the steering wheel. The “Phone”
menu will appear on the control panel display.
2. Select the “Quick Dial”, “ call History”, “Phonebook” or
“Dial Number” key.
3. Select the desired entry from the list.
4. Select “call” to start dialing the number.
To view detailed instructional videos regarding these and other features, please go\
to www.nissanownersinfo.mobi
system guide
1490690_14_Quest_QRG_072513.indd 227/25/13 9:24 AM