2014 NISSAN QUEST window
[x] Cancel search: windowPage 348 of 482
the low tire pressure warning light
OFF. If the light still illuminates
while driving after adjusting the tire
pressure, a tire may be flat. If you
have a flat tire, replace it with a
spare tire as soon as possible. (See
“Flat tire” (P.6-3) for changing a flat
tire.)
. When a spare tire is mounted or a
wheel is replaced, the TPMS will not
function and the low tire pressure
warning light will flash for approxi-
mately 1 minute. The light will
remain on after 1 minute. Contact
your NISSAN dealer as soon as
possible for tire replacement and/
or system resetting.
. Replacing tires with those not ori-
ginally specified by NISSAN could
affect the proper operation of the
TPMS.
. Do not inject any tire liquid or
aerosol tire sealant into the tires,
as this may cause a malfunction of
the tire pressure sensors.CAUTION
.The TPMS may not function properly
when the wheels are equipped with
tire chains or the wheels are buried
in snow.
. Do not place metalized film or any
metal parts (antenna, etc.) on the
windows. This may cause poor re-
ception of the signals from the tire
pressure sensors, and the TPMS will
not function properly.
Some devices and transmitters may temporarily
interfere with the operation of the TPMS and
cause the low tire pressure warning light to
illuminate. Some examples are:
. Facilities or electric devices using similar
radio frequencies are near the vehicle.
. If a transmitter set to similar frequencies is
being used in or near the vehicle.
. If a computer (or similar equipment) or a DC/
AC converter is being used in or near the
vehicle. FCC Notice:
For USA:
This device complies with Part 15 of the
FCC Rules. Operation is subject to the
following two conditions: (1) This device
may not cause harmful interference, and
(2) this device must accept any interfer-
ence received, including interference that
may cause undesired operation.
Note: Changes or modifications not ex-
pressly approved by the party responsible
for compliance could void the user’s
authority to operate the equipment.
For Canada:
This device complies with RSS-210 of
Industry Canada. Operation is subject to
the following two conditions: (1) this
device may not cause interference, and
(2) this device must accept any interfer-
ence, including interference that may
cause undesired operation of the device.
Starting and driving5-5
Page 352 of 482
.Never leave the Intelligent Key in-
side the vehicle when you leave the
vehicle.
SSD0436
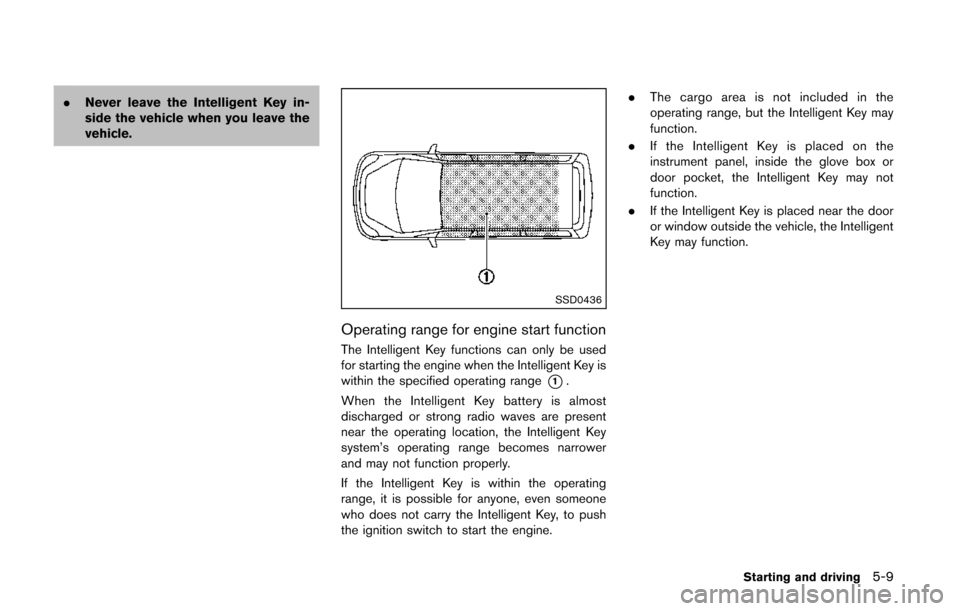
Operating range for engine start function
The Intelligent Key functions can only be used
for starting the engine when the Intelligent Key is
within the specified operating range
*1.
When the Intelligent Key battery is almost
discharged or strong radio waves are present
near the operating location, the Intelligent Key
system’s operating range becomes narrower
and may not function properly.
If the Intelligent Key is within the operating
range, it is possible for anyone, even someone
who does not carry the Intelligent Key, to push
the ignition switch to start the engine. .
The cargo area is not included in the
operating range, but the Intelligent Key may
function.
. If the Intelligent Key is placed on the
instrument panel, inside the glove box or
door pocket, the Intelligent Key may not
function.
. If the Intelligent Key is placed near the door
or window outside the vehicle, the Intelligent
Key may function.
Starting and driving5-9
Page 355 of 482
5-12Starting and driving
.Make sure the area around the vehicle is
clear.
. Check fluid levels such as engine oil, cool-
ant, brake fluid and window washer fluid as
frequently as possible, or at least whenever
you refuel.
. Check that all windows and lights are clean.
. Visually inspect tires for their appearance
and condition. Also check tires for proper
inflation.
. Lock all doors.
. Position seats and adjust head restraints/
headrests.
. Adjust inside and outside mirrors.
. Fasten seat belts and ask all passengers to
do likewise.
. Check the operation of warning lights when
the ignition switch is pushed to the ON
position. (See “Warning/indicator lights and
audible reminders” (P.2-11) .) 1. Apply the parking brake.
2. Move the shift lever to the P (Park) or N
(Neutral) position. (P is recommended.)
The starter is designed not to operate unless
the shift lever is in either of the above
positions.
3. Push the ignition switch to the ON position. Depress the brake pedal and push the
ignition switch to start the engine.
To start the engine immediately, push and
release the ignition switch while depressing
the brake pedal with the ignition switch in
any position.
.If the engine is very hard to start inextremely cold weather or when restart-
ing, depress the accelerator pedal a little
(approximately 1/3 to the floor) and while
holding, crank the engine. Release the
accelerator pedal when the engine starts.
.If the engine is very hard to start becauseit is flooded, depress the accelerator
pedal all the way to the floor and hold it.
Push the ignition switch to the ON
position to start cranking the engine.
After 5 or 6 seconds, stop cranking by
pushing the ignition switch to OFF. After
cranking the engine, release the accel-
erator pedal. Crank the engine with your
foot off the accelerator pedal bydepressing the brake pedal and pushing
the push-button ignition switch to start
the engine. If the engine starts, but fails
to run, repeat the above procedure.
CAUTION
Do not operate the starter for more
than 15 seconds at a time. If the engine
does not start, push the ignition switch
to OFF and wait 10 seconds before
cranking again, otherwise the starter
could be damaged.
4. Warm-up
Allow the engine to idle for at least 30
seconds after starting. Do not race the
engine while warming it up. Drive at
moderate speed for a short distance first,
especially in cold weather. In cold weather,
keep the engine running for a minimum of 2 -
3 minutes before shutting it off. Starting and
stopping the engine over a short period of
time may make the vehicle more difficult to
start.
5. To stop the engine, shift the shift lever to the P (Park) position and push the ignition
switch to the OFF position.
BEFORE STARTING THE ENGINE STARTING THE ENGINE
Page 369 of 482
5-26Starting and driving
To reset at a faster cruising speed,use one
of the following methods:
. Depress the accelerator pedal. When the
vehicle attains the desired speed, push and
release the COAST/SET switch.
. Push and hold the ACCELERATE/RESUME
switch. When the vehicle attains the desired
speed, release the switch.
. Push, then quickly release the ACCELER-
ATE/RESUME switch. Each time you do
this, the set speed will increase by about 1
MPH (1.6 km/h) .
To reset at a slower cruising speed, use one
of the following methods:
. Lightly tap the brake pedal. When the
vehicle attains the desired speed, push the
COAST/SET switch and release it.
. Push and hold the COAST/SET switch.
Release the switch when the vehicle slows
down to the desired speed.
. Push, then quickly release the COAST/SET
switch. Each time you do this, the set speed
will decrease by about 1 MPH (1.6 km/h).
To resume the preset speed, push and
release the ACCELERATE/RESUME switch.
The vehicle will resume the last set cruising
speed when the vehicle speed is over 25 MPH
(40 km/h).
CAUTION
During the first 1,200 miles (2,000 km) ,
follow these recommendations to ob-
tain maximum engine performance and
ensure the future reliability and econo-
my of your new vehicle. Failure to
follow these recommendations may
result in shortened engine life and
reduced engine performance.
. Avoid driving for long periods at constant
speed, either fast or slow. Do not run the
engine over 4,000 rpm.
. Do not accelerate at full throttle in any gear.
. Avoid quick starts.
. Avoid hard braking as much as possible.
. Do not tow a trailer for the first 500 miles
(800 km) . Your engine, axle or other parts
could be damaged. Follow these easy-to-use Fuel Efficient Driving
Tips to help you achieve the most fuel economy
from your vehicle.
1. Use smooth accelerator and brake pedal
application.
.Avoid rapid starts and stops..Use smooth, gentle accelerator andbrake application whenever possible.
.Maintain constant speed while commut-
ing and coast whenever possible.
2. Maintain constant speed.
.Look ahead to try and anticipate and minimize stops.
.Synchronizing your speed with traffic
lights allows you to reduce your number
of stops.
.Maintaining a steady speed can minimize red light stops and improve fuel effi-
ciency.
3. Use air conditioning (A/C) at higher vehicle speeds.
.Below 40 MPH (64 km/h), it is moreefficient to open windows to cool the
vehicle due to reduced engine load.
.Above 40 MPH (64 km/h) , it is moreefficient to use A/C to cool the vehicle
due to increased aerodynamic drag.
BREAK-IN SCHEDULE FUEL EFFICIENT DRIVING TIPS
Page 370 of 482
.Recirculating the cool air in the cabinwhen the A/C is on reduces cooling load.
4. Drive at economical speeds and distances.
.Observing the speed limit and not ex- ceeding 60 MPH (97 km/h) (where
legally allowed) can improve fuel effi-
ciency due to reduced aerodynamic
drag.
.Maintaining a safe following distancebehind other vehicles reduces unneces-
sary braking.
.Safely monitoring traffic to anticipatechanges in speed permits reduced brak-
ing and smooth acceleration changes.
.Select a gear range suitable to road conditions.
5. Use cruise control.
.Using cruise control during highway driving helps maintain a steady speed.
.Cruise control is particularly effective in providing fuel savings when driving on
flat terrains.
6. Plan for the shortest route.
.Utilize a map or navigation system to determine the best route to save time.
7. Avoid idling.
.Shutting off your engine when safe for stops exceeding 30-60 seconds saves fuel and reduces emissions.
8. Buy an automated pass for toll roads.
.Automated passes permit drivers to use special lanes to maintain cruising speed
through the toll and avoid stopping and
starting.
9. Winter warm up.
.Limit idling time to minimize impact to fuel economy.
.Vehicles typically need no more than 30seconds of idling at start-up to effectively
circulate the engine oil before driving.
.Your vehicle will reach its ideal operatingtemperature more quickly while driving
versus idling.
10. Keeping your vehicle cool.
.Park your vehicle in a covered parking area or in the shade whenever possible.
.When entering a hot vehicle, opening thewindows will help to reduce the inside
temperature faster, resulting in reduced
demand on your A/C system. .
Keep your engine tuned up.
. Follow the recommended scheduled main-
tenance.
. Keep the tires inflated to the correct
pressure. Low tire pressure increases tire
wear and lowers fuel economy.
. Keep the wheels in correct alignment.
Improper alignment increases tire wear and
lowers fuel economy.
. Use the recommended viscosity engine oil.
(See “Engine oil and oil filter recommenda-
tion” (P.9-5) .)
Starting and driving5-27
INCREASING FUEL ECONOMY
Page 376 of 482
ing lightmay illuminate.
. The VDC system is not a substitute
for winter tires or tire chains on a
snow covered road.FREEING A FROZEN DOOR LOCK
To prevent a door lock from freezing, apply
deicer through the key hole. If the lock becomes
frozen, heat the key before inserting it into the
key hole or use the remote keyless entry keyfob.
ANTI-FREEZE
In the winter when it is anticipated that the
outside temperature will drop below 328F(0 8C) ,
check the anti-freeze to assure proper winter
protection. For additional information, see “En-
gine cooling system” (P.8-7) .
BATTERY
If the battery is not fully charged during
extremely cold weather conditions, the battery
fluid may freeze and damage the battery. To
maintain maximum efficiency, the battery should
be checked regularly. For additional information,
see “Battery” (P.8-13) .
DRAINING OF COOLANT WATER
If the vehicle is to be left outside without anti-
freeze, drain the cooling system, including the
engine block. Refill before operating the vehicle.
For details, see “Engine cooling system” (P.8-7) .
TIRE EQUIPMENT
SUMMER tires have a tread designed to provide
superior performance on dry pavement. How-
ever, the performance of these tires will be
substantially reduced in snowy and icy condi-
tions. If you operate your vehicle on snowy or icy
roads, NISSAN recommends the use of MUD &
SNOW or ALL SEASON tires on all four wheels.
Consult a NISSAN dealer for the tire type, size,
speed rating and availability information.
For additional traction on icy roads, studded
tires may be used. However, some U.S. states
and Canadian provinces prohibit their use.
Check local, state and provincial laws before
installing studded tires.
Skid and traction capabilities of studded
snow tires, on wet or dry surfaces, may be
poorer than that of non-studded snow
tires.
Tire chains may be used. For details, see “Tire
chains” (P.8-36) .
SPECIAL WINTER EQUIPMENT
It is recommended that the following items be
carried in the vehicle during winter:
. A scraper and stiff-bristled brush to remove
ice and snow from the windows and wiper
blades.
Starting and driving5-33
COLD WEATHER DRIVING
Page 377 of 482
5-34Starting and driving
.A sturdy, flat board to be placed under the
jack to give it firm support.
. A shovel to dig the vehicle out of snow-
drifts.
. Extra window washer fluid to refill the
reservoir tank.
DRIVING ON SNOW OR ICE
WARNING
.Wet ice (328F, 0 8C and freezing rain) ,
very cold snow or ice can be slick
and very hard to drive on. The
vehicle will have much less traction
or “grip” under these conditions. Try
to avoid driving on wet ice until the
road is salted or sanded.
. Whatever the condition, drive with
caution. Accelerate and slow down
with care. If accelerating or down-
shifting too fast, the drive wheels
will lose even more traction.
. Allow more stopping distance under
these conditions. Braking should be
started sooner than on dry pave-
ment.
. Allow greater following distances
on slippery roads. .
Watch for slippery spots (glare ice) .
These may appear on an otherwise
clear road in shaded areas. If a
patch of ice is seen ahead, brake
before reaching it. Try not to brake
while on the ice, and avoid any
sudden steering maneuvers.
. Do not use cruise control on slip-
pery roads.
. Snow can trap dangerous exhaust
gases under your vehicle. Keep
snow clear of the exhaust pipe and
from around your vehicle.
ENGINE BLOCK HEATER (if so
equipped)
Engine block heaters are used to assist with
cold temperature starting.
The engine block heater should be used when
the outside temperature is 208F( −78C) or lower.
To use the engine block heater
1. Turn the engine off.
2. Open the hood and unwrap the engine
block heater cord.
3. Plug the engine block heater cord into a grounded 3-wire, 3-pronged extension cord. 4. Plug the extension cord into a Ground Fault
Interrupt (GFI) protected, grounded 110-
volt AC (VAC) outlet.
5. The engine block heater must be plugged in for at least 2 - 4 hours, depending on
outside temperatures, to properly warm the
engine coolant. Use an appropriate timer to
turn the engine block heater on.
6. Before starting the engine, unplug and properly store the cord to keep it away from
moving parts.
WARNING
. Do not use your engine block heater
with an ungrounded electrical sys-
tem or a 2-pronged adapter. You can
be seriously injured by an electrical
shock if you use an ungrounded
connection.
. Disconnect and properly store the
engine block heater cord before
starting the engine. Damage to the
cord could result in an electrical
shock and can cause serious injury.
. Use a heavy-duty 3-wire, 3-pronged
extension cord rated for at least
10A. Plug the extension cord into a
Page 391 of 482
6-12In case of emergency
5. Start the engine of the booster vehicle*Band let it run for a few minutes.
6. Keep the engine speed of the booster vehicle
*Bat about 2,000 rpm, and start
the engine of the vehicle
*Abeing jump
started.
CAUTION
Do not keep the starter motor engaged
for more than 10 seconds. If the engine
does not start right away, place the
ignition switch in the OFF position and
wait 10 seconds before trying again.
7. After starting your engine, carefully discon- nect the negative cable and then the positive
cable (
*4?*3?*2?*1).
8. Replace the vent caps (if so equipped). Be sure to dispose of the cloth used to cover
the vent holes as it may be contaminated
with corrosive acid. Do not attempt to start the engine by pushing.
CAUTION
Continuously Variable Transmission
(CVT) models cannot be push-started
or tow-started. Attempting to do so may
cause transmission damage.
CAUTION
.
Do not continue to drive if your
vehicle overheats. Doing so could
cause engine damage or a vehicle
fire.
. To avoid the danger of being
scalded, never remove the radiator
cap while the engine is still hot.
When the radiator cap is removed,
pressurized hot water will spurt out,
possibly causing serious injury.
. Do not open the hood if steam is
coming out.
If your vehicle is overheating (indicated by an
extremely high temperature gauge reading) , or if
you feel a lack of engine power, detect abnormal
noise, etc., take the following steps:
1. Move the vehicle safely off the road, apply the parking brake and move the shift lever to
the P (Park) position.
Do not stop the engine.
2. Turn off the air conditioner. Open all the windows, move the heater or air conditioner
temperature control to maximum hot and fan
control to high speed.
PUSH STARTING IF YOUR VEHICLE OVERHEATS