2014 NISSAN QUEST window
[x] Cancel search: windowPage 166 of 482
The door windows can be opened or closed by
turning the mechanical key in a door lock. (See
“Doors” (P.3-5).)
Opening/closing power sliding door (if
so equipped)
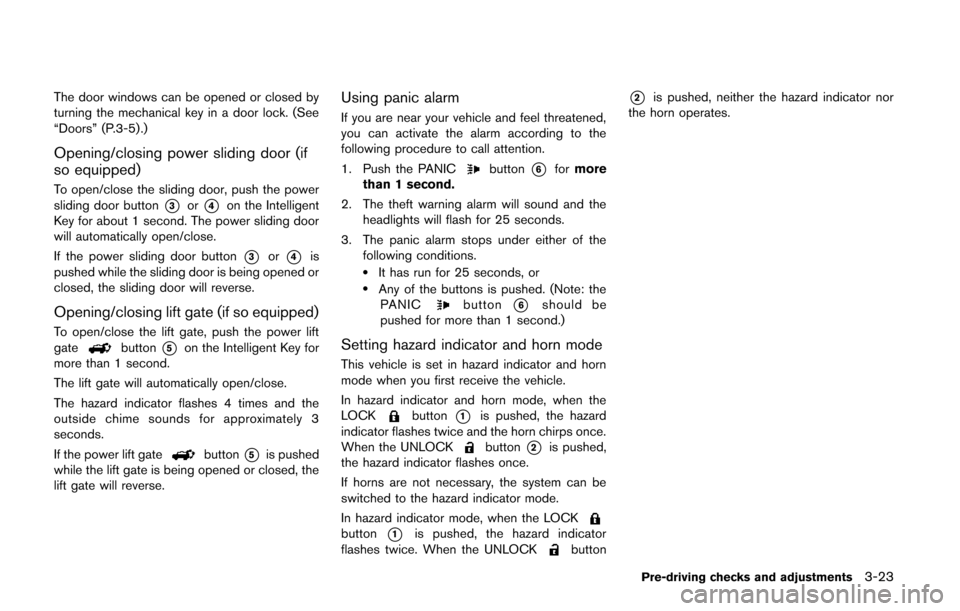
To open/close the sliding door, push the power
sliding door button
*3or*4on the Intelligent
Key for about 1 second. The power sliding door
will automatically open/close.
If the power sliding door button
*3or*4is
pushed while the sliding door is being opened or
closed, the sliding door will reverse.
Opening/closing lift gate (if so equipped)
To open/close the lift gate, push the power lift
gatebutton*5on the Intelligent Key for
more than 1 second.
The lift gate will automatically open/close.
The hazard indicator flashes 4 times and the
outside chime sounds for approximately 3
seconds.
If the power lift gate
button*5is pushed
while the lift gate is being opened or closed, the
lift gate will reverse.
Using panic alarm
If you are near your vehicle and feel threatened,
you can activate the alarm according to the
following procedure to call attention.
1. Push the PANIC
button*6for more
than 1 second.
2. The theft warning alarm will sound and the headlights will flash for 25 seconds.
3. The panic alarm stops under either of the following conditions.
.It has run for 25 seconds, or.Any of the buttons is pushed. (Note: thePANICbutton*6should be
pushed for more than 1 second.)
Setting hazard indicator and horn mode
This vehicle is set in hazard indicator and horn
mode when you first receive the vehicle.
In hazard indicator and horn mode, when the
LOCK
button*1is pushed, the hazard
indicator flashes twice and the horn chirps once.
When the UNLOCK
button*2is pushed,
the hazard indicator flashes once.
If horns are not necessary, the system can be
switched to the hazard indicator mode.
In hazard indicator mode, when the LOCK
button*1is pushed, the hazard indicator
flashes twice. When the UNLOCKbutton
*2is pushed, neither the hazard indicator nor
the horn operates.
Pre-driving checks and adjustments3-23
Page 178 of 482
tion, see “HomeLink®Universal Transceiver”
(P.2-59) .
OUTSIDE MIRRORS
WARNING
Objects viewed in the outside mirror on
the passenger side are closer than they
appear. Be careful when moving to the
right. Using only this mirror could cause
an accident. Use the inside mirror or
glance over your shoulder to properly
judge distances to other objects.
SPA2319
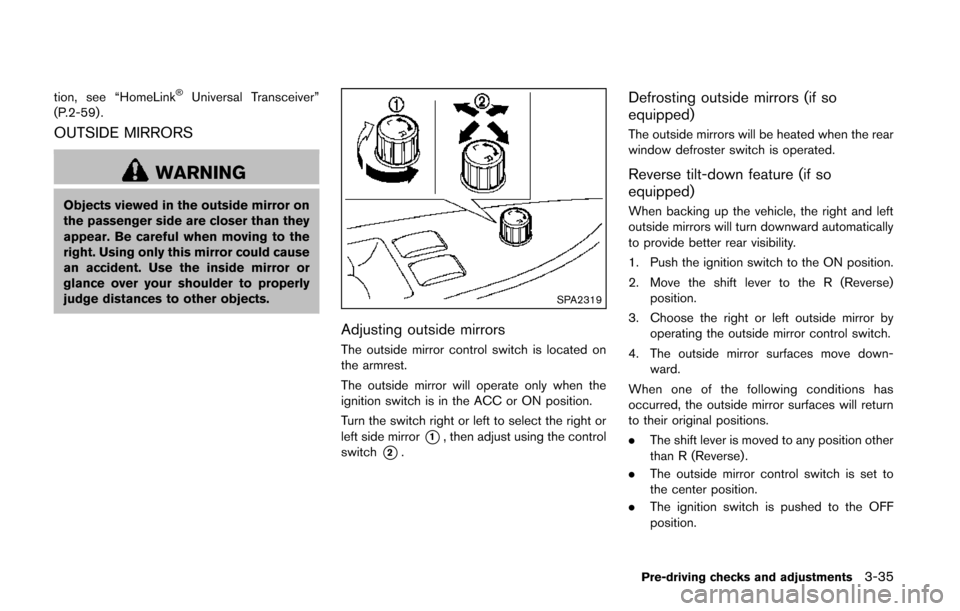
Adjusting outside mirrors
The outside mirror control switch is located on
the armrest.
The outside mirror will operate only when the
ignition switch is in the ACC or ON position.
Turn the switch right or left to select the right or
left side mirror
*1, then adjust using the control
switch
*2.
Defrosting outside mirrors (if so
equipped)
The outside mirrors will be heated when the rear
window defroster switch is operated.
Reverse tilt-down feature (if so
equipped)
When backing up the vehicle, the right and left
outside mirrors will turn downward automatically
to provide better rear visibility.
1. Push the ignition switch to the ON position.
2. Move the shift lever to the R (Reverse) position.
3. Choose the right or left outside mirror by operating the outside mirror control switch.
4. The outside mirror surfaces move down- ward.
When one of the following conditions has
occurred, the outside mirror surfaces will return
to their original positions.
. The shift lever is moved to any position other
than R (Reverse).
. The outside mirror control switch is set to
the center position.
. The ignition switch is pushed to the OFF
position.
Pre-driving checks and adjustments3-35
Page 212 of 482
OPERATING TIPS
.When the shift lever is shifted to the R
(Reverse) position, the monitor screen auto-
matically changes to the RearView Monitor
mode. However, the radio can be heard.
. When the temperature is extremely high or
low, the screen may not clearly display
objects. This is not a malfunction.
. When strong light is directly coming on the
camera, objects may not be displayed
clearly. This is not a malfunction.
. Vertical lines may be seen in objects on the
screen. This is due to strong reflected light
from the bumper. This is not a malfunction.
. The screen may flicker under fluorescent
light. This is not a malfunction.
. The colors of objects on the RearView
Monitor may differ somewhat from the actual
color of objects. This is not a malfunction.
. Objects on the monitor may not be clear in a
dark environment. This is not a malfunction.
. If dirt, rain or snow accumulates on the
camera, the RearView Monitor may not
display objects clearly. Clean the camera.
. Do not use alcohol, benzine or thinner to
clean the camera. This will cause discolora-
tion. To clean the camera, wipe with a cloth
dampened with diluted mild cleaning agent
and then wipe with a dry cloth. .
Do not damage the camera as the monitor
screen may be adversely affected.
. Do not use wax on the camera window.
Wipe off any wax with a clean cloth
dampened with mild detergent diluted with
water. When you push the CAMERA button on the
center multi-function control panel or shift the
shift lever into the “R” (Reverse) position while
the ignition switch is in the ON position, the
Around View Monitor operates. The monitor
displays various views of the position of the
vehicle.
Available views:
.
Bird-eye View
The surrounding view of the vehicle.
. Front-side View
The view around and ahead of the front
passenger’s side wheel.
. Front View
The view to the front of the vehicle.
. Rear View
The view to the rear of the vehicle.
The system is designed as an aid to the driver in
situations such as slot parking or parallel
parking.
Monitor, heater, air conditioner, audio, phone and voice recognition systems4-29
AROUND VIEWTMMONITOR (if so
equipped)
Page 213 of 482
4-30Monitor, heater, air conditioner, audio, phone and voice recognition systems
JVH0336X
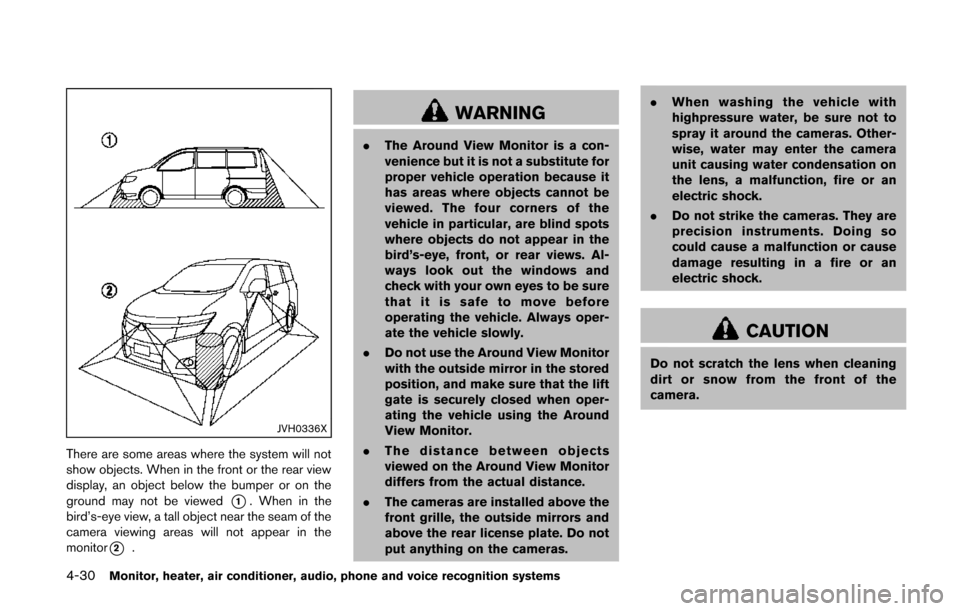
There are some areas where the system will not
show objects. When in the front or the rear view
display, an object below the bumper or on the
ground may not be viewed
*1. When in the
bird’s-eye view, a tall object near the seam of the
camera viewing areas will not appear in the
monitor
*2.
WARNING
. The Around View Monitor is a con-
venience but it is not a substitute for
proper vehicle operation because it
has areas where objects cannot be
viewed. The four corners of the
vehicle in particular, are blind spots
where objects do not appear in the
bird’s-eye, front, or rear views. Al-
ways look out the windows and
check with your own eyes to be sure
that it is safe to move before
operating the vehicle. Always oper-
ate the vehicle slowly.
. Do not use the Around View Monitor
with the outside mirror in the stored
position, and make sure that the lift
gate is securely closed when oper-
ating the vehicle using the Around
View Monitor.
. The distance between objects
viewed on the Around View Monitor
differs from the actual distance.
. The cameras are installed above the
front grille, the outside mirrors and
above the rear license plate. Do not
put anything on the cameras. .
When washing the vehicle with
highpressure water, be sure not to
spray it around the cameras. Other-
wise, water may enter the camera
unit causing water condensation on
the lens, a malfunction, fire or an
electric shock.
. Do not strike the cameras. They are
precision instruments. Doing so
could cause a malfunction or cause
damage resulting in a fire or an
electric shock.
CAUTION
Do not scratch the lens when cleaning
dirt or snow from the front of the
camera.
Page 221 of 482
4-38Monitor, heater, air conditioner, audio, phone and voice recognition systems
course.
HOW TO ADJUST THE SCREEN
To adjust the Display ON/OFF, Brightness, Tint,
Color, Contrast and Black Level of the Around
View Monitor, push the SETTING button with
the Around View Monitor on, select the item key
and adjust the level using the multi-function
controller.
Do not adjust the Brightness, Tint, Color,
Contrast and Black Level of the Around View
Monitor while the vehicle is moving. Make sure
the parking brake is firmly applied.
The display of the predictive course lines can be
set to ON or OFF. For details, see “Predictive
course line settings” (P.4-28) .
OPERATING TIPS
.The screen displayed on the Around View
Monitor will automatically return to the
previous screen when no operation takes
place for 3 minutes after the CAMERA
button has been pushed while the shift lever
is in a position other than the “R” (Reverse)
position.
. The display of images on the screen may be
delayed after screens are switched.
. When the temperature is extremely high or
low, the screen may not display objects
clearly. This is not a malfunction. .
When strong light directly shines on the
camera, objects may not be displayed
clearly. This is not a malfunction.
. The screen may flicker under fluorescent
light. This is not a malfunction.
. The colors of objects on the Around View
Monitor may differ somewhat from those of
the actual object.
. Objects on the monitor may not be clear and
the color of the object may differ in a dark
location or at night. This is not a malfunction.
. There may be differences in clearness
between each camera view of the bird’s-
eye view.
. If dirt, rain or snow attaches to the camera,
the Around View Monitor may not display
objects clearly. Clean the camera.
. Do not use alcohol, benzine or thinner to
clean the camera. This will cause discolora-
tion. To clean the camera, wipe with a cloth
that has been dampened with a diluted mild
cleaning agent and then wipe with a dry
cloth.
. Do not damage the camera because the
monitor screen may be adversely affected.
. Do not use wax on the camera window.
Wipe off any wax with a clean cloth that has
been dampened with a mild detergent
diluted with water.
SAA3511Center
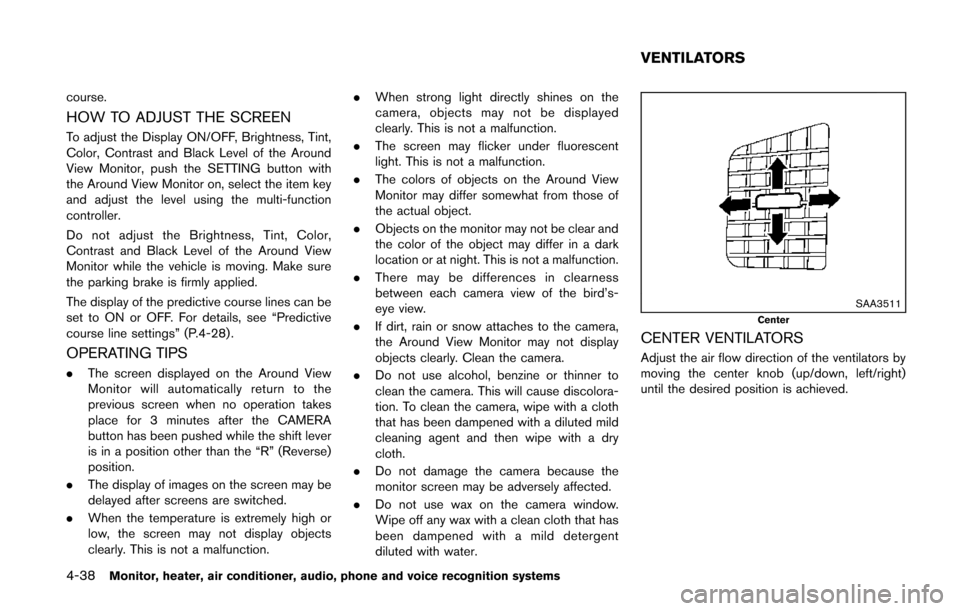
CENTER VENTILATORS
Adjust the air flow direction of the ventilators by
moving the center knob (up/down, left/right)
until the desired position is achieved.
VENTILATORS
Page 222 of 482
SAA3676Side
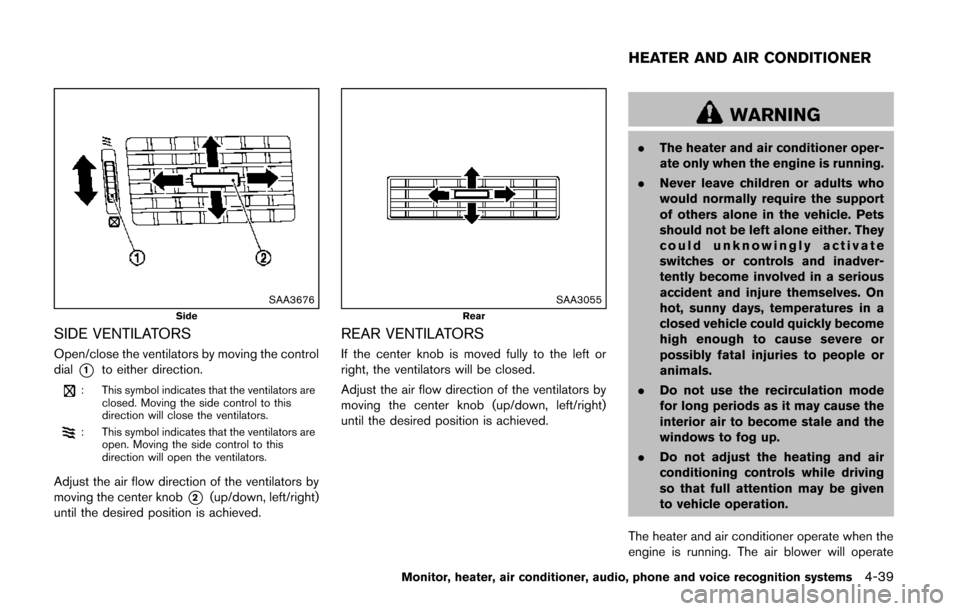
SIDE VENTILATORS
Open/close the ventilators by moving the control
dial
*1to either direction.
: This symbol indicates that the ventilators areclosed. Moving the side control to this
direction will close the ventilators.
: This symbol indicates that the ventilators areopen. Moving the side control to this
direction will open the ventilators.
Adjust the air flow direction of the ventilators by
moving the center knob
*2(up/down, left/right)
until the desired position is achieved.
SAA3055Rear
REAR VENTILATORS
If the center knob is moved fully to the left or
right, the ventilators will be closed.
Adjust the air flow direction of the ventilators by
moving the center knob (up/down, left/right)
until the desired position is achieved.
WARNING
. The heater and air conditioner oper-
ate only when the engine is running.
. Never leave children or adults who
would normally require the support
of others alone in the vehicle. Pets
should not be left alone either. They
could unknowingly activate
switches or controls and inadver-
tently become involved in a serious
accident and injure themselves. On
hot, sunny days, temperatures in a
closed vehicle could quickly become
high enough to cause severe or
possibly fatal injuries to people or
animals.
. Do not use the recirculation mode
for long periods as it may cause the
interior air to become stale and the
windows to fog up.
. Do not adjust the heating and air
conditioning controls while driving
so that full attention may be given
to vehicle operation.
The heater and air conditioner operate when the
engine is running. The air blower will operate
Monitor, heater, air conditioner, audio, phone and voice recognition systems4-39
HEATER AND AIR CONDITIONER
Page 224 of 482
SAA3596
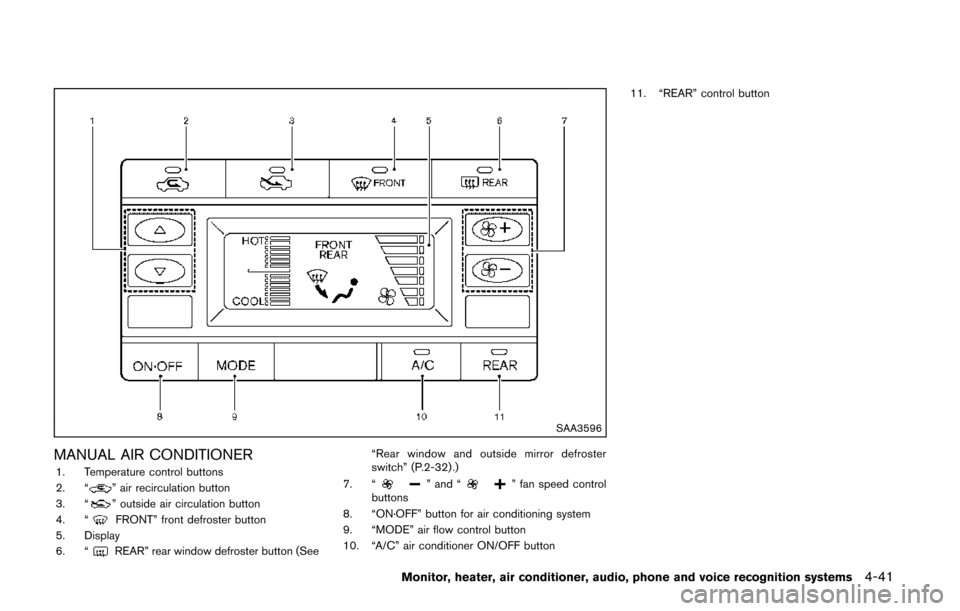
MANUAL AIR CONDITIONER1. Temperature control buttons
2. “” air recirculation button
3. “” outside air circulation button
4. “FRONT” front defroster button
5. Display
6. “
REAR” rear window defroster button (See “Rear window and outside mirror defroster
switch” (P.2-32) .)
7. “
” and “” fan speed control
buttons
8. “ON·OFF” button for air conditioning system
9. “MODE” air flow control button
10. “A/C” air conditioner ON/OFF button 11. “REAR” control button
Monitor, heater, air conditioner, audio, phone and voice recognition systems4-41
Page 226 of 482
Heating and defogging:
This mode heats the interior and defogs the
windows.
1. Push the air flow control button to change tothe
mode.
2. Push the fan speed control
buttons to
set the desired fan speed.
3. Push the temperature control buttons to set the desired temperature.
When the
mode is selected, the air
conditioner will automatically turn on. This will
dehumidify the air and help to defog the
windows. The A/C indicator light will illuminate
when the air conditioner automatically turns on.
The air conditioner and A/C indicator light will
remain on in all flow control modes until the A/C
button is pressed.
Air conditioner operation
The air conditioner system should be operated
for approximately 10 minutes at least once a
month. This helps prevent damage to the air
conditioner system due to the lack of lubrication.
Cooling:
This mode is used to cool and dehumidify the air.
1. Push the outside air circulation “
” button
to switch to the outside air circulation mode.
(The indicator light turns on.) 2. Push the air flow control button to change to
the
mode.
3. Push the fan speed control buttons to set the desired fan speed.
4. Push the A/C button on. (The A/C indicator light will illuminate.)
5. Push the temperature control buttons to set the desired temperature between the middle
and the cool position.
. For quick cooling when the outside tem-
perature is high, push the air recirculation
button to switch to the air recirculation
mode. (The indicator light turns on.) Be sure
to turn off the air recirculation mode for
normal cooling.
. A visible mist may be seen coming from the
ventilators in hot, humid conditions as the air
is cooled rapidly. This does not indicate a
malfunction.
Dehumidified heating:
This mode is used to heat and dehumidify the
air.
1. Push the outside air circulation “
” button
to switch to the outside air circulation mode.
(The indicator light turns on.)
2. Push the air flow control button to change to the
position. 3. Push the fan speed control buttons to the
desired fan speed.
4. Push the A/C button on. (The A/C indicator light will illuminate.)
5. Push the temperature control buttons to set the desired temperature between the middle
and the hot position.
Dehumidified or defrosting/defogging:
This mode is used to defog the windows and
dehumidify the air.
1. Push the front defroster button
on. (The
indicator light turns on.)
2. Push the fan speed control buttons to set the desired fan speed.
3. Push the temperature control buttons to set the desired temperature.
When the
mode is selected, the air
conditioner will automatically turn on. This will
dehumidify the air and help to defog the
windows. The A/C indicator light will illuminate
when the air conditioner automatically turns on.
The air conditioner and A/C indicator light will
remain on in all flow control modes until the A/C
button is pushed.
To remove frost from the outside surface of the
windshield quickly, set the temperature to the
maximum hot position and the fan speed to
maximum position.
Monitor, heater, air conditioner, audio, phone and voice recognition systems4-43