2014 NISSAN QUEST sensor
[x] Cancel search: sensorPage 230 of 482
Automatic operation (AUTO)
The AUTO mode may be used year-round as the
system automatically controls constant tempera-
ture, air flow distribution and fan speed after the
desired temperature is set manually.
To turn the heater and air conditioner on or off,
push the “ON·OFF” button.
Cooling and dehumidified heating:
1. Push the “AUTO” button.(The AUTO indicator light will illuminate.)
2. If the A/C indicator light does not illuminate, push the “A/C” button.
(The A/C indicator light will illuminate.)
3. Push the temperature control buttons (“
” and “”) (driver’s side) to set the
desired temperature.
.The temperature can be set within the range of 60 to 908F (18 to 328C) .
.When “DUAL” does not appear on thedisplay:
— Pushing the “AUTO” button changes both the driver’s and front passenger’s
side temperature.
— Pushing the “DUAL” button allows the user to independently change the front
passenger’s side temperature with the
passenger side temperature control but- tons (“
” and “”) . (“DUAL” will
appear on the display.)
To cancel the separate temperature
setting, push the “DUAL” button (“DUAL”
will disappear from the display) and the
driver’s side temperature setting will be
applied to both the driver’s and front
passenger’s sides.
4. Models with Advanced Climate Control System:
.Push the “AUTO” auto-recirculation
button. The indicator light on the “
AUTO” auto-recirculation button will illu-
minate. In this mode, the sensor detects
odors and gas to automatically switch
between the air recirculation mode and
the outside air circulation mode. (See
“Advanced climate control system” (P.4-
50) for details.)
Models without Advanced Climate Control
System:
.Push and hold the air recirculation “”
button or outside air circulation “”
button (the one with the indicator light
on) for more than 2 seconds to set the
automatic control between the air recir-
culation and outside air circulation
modes. (The “
” and “” indicator
lights will blink twice.)
The following conditions need to be met for the automatic air intake control mode to function
properly.
.
The air flow control is not in the front
defroster mode (the indicator light on the
front defroster “
FRONT” button is
turned off).
. The outside temperature is approximately
328F(0 8C) or above.
A visible mist may be seen coming from the
ventilators in hot, humid conditions as the air is
cooled rapidly. This does not indicate a mal-
function.
Heating (A/C off):
1. Push the “AUTO” button.
(The AUTO indicator light will illuminate.)
2. If the A/C indicator light illuminates, push the “A/C” button.
(The A/C indicator light will turn off.)
3. Push the temperature control buttons (“
” and “”) (driver’s side) to set the
desired temperature.
When the DUAL mode is turned off (“DUAL”
does not appear on the display):
.Pushing the “AUTO” button changes both the driver’s and front passenger’s
side temperature.
Monitor, heater, air conditioner, audio, phone and voice recognition systems4-47
Page 231 of 482
4-48Monitor, heater, air conditioner, audio, phone and voice recognition systems
.Pushing the “DUAL” button allows theuser to independently change the front
passenger’s side temperature with the
passenger side temperature control but-
tons (“
”or“”) . (“DUAL” will
appear on the display.)
To cancel the separate temperature
setting, push the “DUAL” button (“DUAL”
will disappear from the display) and the
driver’s side temperature setting will be
applied to both the driver’s and front
passenger’s sides.
4. Models with Advanced Climate Control System:
.Push the “AUTO” auto-recirculation
button. The indicator light on the “
AUTO” auto-recirculation button will illu-
minate. In this mode, the sensor detects
odors and gas to automatically switch
between the air recirculation mode and
the outside air circulation mode. (See
“Advanced climate control system” (P.4-
50) for details.)
Models without Advanced Climate Control
System:
.Push and hold the air recirculation “”
button or outside air circulation “”
button (the one with the indicator light
on) for more than 2 seconds to set the
automatic control between the air recir- culation and outside air circulation
modes. (The “
”or“” indicator
light will blink twice.)
The following conditions need to be met for the
automatic air intake control mode to function
properly.
. The air flow control is not in the front
defroster mode (the indicator light on the
front defroster “
FRONT” button is
turned off).
. The outside temperature is approximately
328F(0 8C) or above.
NOTE:
. Do not set the temperature lower than
the outside air temperature. Doing so
may prevent the temperature from
being controlled properly.
. To dehumidify the air, push the “A/C”
button before turning on the heater.
Dehumidified defrosting/defogging:
1. Push the front defroster “
FRONT”
button. (The indicator light will illuminate.)
2. Push the temperature control buttons (“
” and “”) to set the desired
temperature.
.To remove frost from the outside surface
of the windshield quickly, set the tem-
perature control and fan speed control to their maximum position.
.After the windshield is cleared, push the
“AUTO” button to set to the automatic
mode.
.When the front defroster “FRONT”
button is pushed, the air conditioner will
automatically turn on sensing the outside
air temperature to defog the windshield.
Do not select the air recirculation mode
for the best defogging performance.
NOTE:
Do not set the temperature too low when
the front defroster mode is on (the indi-
cator on the front defroster “
FRONT”
button is illuminated) . Doing so may fog
up the windshield.
Manual operation
The manual mode can be used to control the
heater and air conditioner to your desired
settings.
Fan speed control:
Push the fan speed control button “
”to
increase the fan speed.
Push the fan speed control button “
”to
decrease the fan speed.
Push the “AUTO” button to change the fan
speed to the automatic mode.
Page 232 of 482
Air flow control:
Push the “MODE” button to change the air flow
mode.
: Air flows from the center and side ventila-tors.
: Air flows from the center and side ventila-tors, and foot outlets.
: Air flows mainly from the foot outlets.
: Air flows from the defroster and foot outlets.
Temperature control:
Push the temperature control buttons (“
”
and “”) to set the desired temperature.
The temperature can be set within the range of
60 to 908F (18 to 328C) .
Air recirculation:
Push the air recirculation “
” button to
recirculate interior air inside the vehicle. The
indicator light on the air recirculation “
”
button will illuminate.
The air recirculation mode cannot be activated
when the air conditioner is in the front defrosting
mode.
Outside air circulation:
. Models with Advanced Climate Control
System:
Push the air recirculation “
” button twice
to draw outside air into the passenger compartment. The indicator light on the air
recirculation “
” button will turn off.
. Models without Advanced Climate Control
System:
Push the outside air circulation “
” button
to draw outside air into the passenger
compartment. The indicator light on the
outside air circulation “
” button will turn
on.
Automatic air intake control:
. Models with Advanced Climate Control
System:
Push the “
AUTO” auto-recirculation”
button to switch to the automatic air intake
control mode. The indicator light on the
“
AUTO” auto-recirculation button will
illuminate. In this mode, the sensor detects
odors and gas to automatically switch
between the air recirculation mode and the
outside air circulation mode. (See “Ad-
vanced climate control system” (P.4-50) for
details.)
. Models without Advanced Climate Control
System:
To switch to the automatic control mode,
push the intake air control button for about 2
seconds. The indicator lights (both air
recirculation “
” and outside air circula-
tion “” buttons) will flash twice, and then the intake air will be controlled automatically.
The following conditions need to be met for the
automatic air intake control mode to function
properly.
. The air flow control is not in the front
defroster mode (the indicator light on the
front defroster “
FRONT” button is
turned off).
. The outside temperature is approximately
08C (328F) or above.
Monitor, heater, air conditioner, audio, phone and voice recognition systems4-49
Page 233 of 482
4-50Monitor, heater, air conditioner, audio, phone and voice recognition systems
SAA3670
Advanced climate control system (if so
equipped)
The advanced climate control system keeps the
air inside of the vehicle clean, using the ion
control and the automatic air intake control with
exhaust gas detecting sensor.
Push the “
AUTO” auto-recirculation button
(the indicator light on the “AUTO” auto-
recirculation button will illuminate) to activate the
ion control and the automatic air intake control.
Ion control:
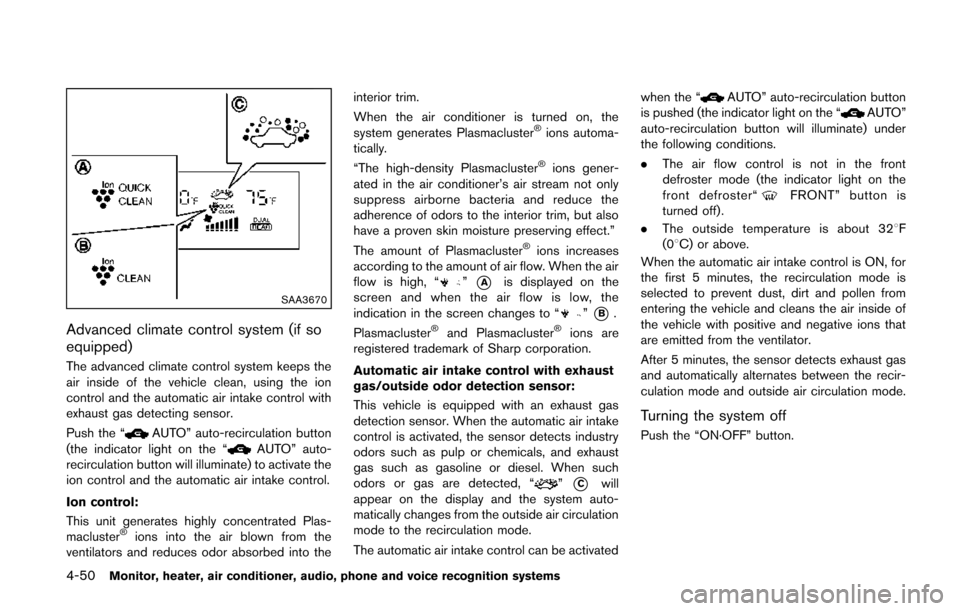
This unit generates highly concentrated Plas-
macluster
®ions into the air blown from the
ventilators and reduces odor absorbed into the interior trim.
When the air conditioner is turned on, the
system generates Plasmacluster
®ions automa-
tically.
“The high-density Plasmacluster
®ions gener-
ated in the air conditioner’s air stream not only
suppress airborne bacteria and reduce the
adherence of odors to the interior trim, but also
have a proven skin moisture preserving effect.”
The amount of Plasmacluster
®ions increases
according to the amount of air flow. When the air
flow is high, “
”*Ais displayed on the
screen and when the air flow is low, the
indication in the screen changes to “
”*B.
Plasmacluster®and Plasmacluster®ions are
registered trademark of Sharp corporation.
Automatic air intake control with exhaust
gas/outside odor detection sensor:
This vehicle is equipped with an exhaust gas
detection sensor. When the automatic air intake
control is activated, the sensor detects industry
odors such as pulp or chemicals, and exhaust
gas such as gasoline or diesel. When such
odors or gas are detected, “
”*Cwill
appear on the display and the system auto-
matically changes from the outside air circulation
mode to the recirculation mode.
The automatic air intake control can be activated when the “
AUTO” auto-recirculation button
is pushed (the indicator light on the “AUTO”
auto-recirculation button will illuminate) under
the following conditions.
. The air flow control is not in the front
defroster mode (the indicator light on the
front defroster“
FRONT” button is
turned off).
. The outside temperature is about 328 F
(08C) or above.
When the automatic air intake control is ON, for
the first 5 minutes, the recirculation mode is
selected to prevent dust, dirt and pollen from
entering the vehicle and cleans the air inside of
the vehicle with positive and negative ions that
are emitted from the ventilator.
After 5 minutes, the sensor detects exhaust gas
and automatically alternates between the recir-
culation mode and outside air circulation mode.
Turning the system off
Push the “ON·OFF” button.
Page 348 of 482
the low tire pressure warning light
OFF. If the light still illuminates
while driving after adjusting the tire
pressure, a tire may be flat. If you
have a flat tire, replace it with a
spare tire as soon as possible. (See
“Flat tire” (P.6-3) for changing a flat
tire.)
. When a spare tire is mounted or a
wheel is replaced, the TPMS will not
function and the low tire pressure
warning light will flash for approxi-
mately 1 minute. The light will
remain on after 1 minute. Contact
your NISSAN dealer as soon as
possible for tire replacement and/
or system resetting.
. Replacing tires with those not ori-
ginally specified by NISSAN could
affect the proper operation of the
TPMS.
. Do not inject any tire liquid or
aerosol tire sealant into the tires,
as this may cause a malfunction of
the tire pressure sensors.CAUTION
.The TPMS may not function properly
when the wheels are equipped with
tire chains or the wheels are buried
in snow.
. Do not place metalized film or any
metal parts (antenna, etc.) on the
windows. This may cause poor re-
ception of the signals from the tire
pressure sensors, and the TPMS will
not function properly.
Some devices and transmitters may temporarily
interfere with the operation of the TPMS and
cause the low tire pressure warning light to
illuminate. Some examples are:
. Facilities or electric devices using similar
radio frequencies are near the vehicle.
. If a transmitter set to similar frequencies is
being used in or near the vehicle.
. If a computer (or similar equipment) or a DC/
AC converter is being used in or near the
vehicle. FCC Notice:
For USA:
This device complies with Part 15 of the
FCC Rules. Operation is subject to the
following two conditions: (1) This device
may not cause harmful interference, and
(2) this device must accept any interfer-
ence received, including interference that
may cause undesired operation.
Note: Changes or modifications not ex-
pressly approved by the party responsible
for compliance could void the user’s
authority to operate the equipment.
For Canada:
This device complies with RSS-210 of
Industry Canada. Operation is subject to
the following two conditions: (1) this
device may not cause interference, and
(2) this device must accept any interfer-
ence, including interference that may
cause undesired operation of the device.
Starting and driving5-5
Page 349 of 482
5-6Starting and driving
TPMS with Easy Fill Tire Alert
When adding air to an under-inflated tire, the
TPMS with Easy Fill Tire Alert provides visual
and audible signals outside the vehicle to help
you inflate the tires to the recommended COLD
tire pressure.
Vehicle set-up:
1. Park the vehicle in a safe and level place.
2. Apply the parking brake and place the shiftlever in the P (Park) position.
3. Place the ignition switch in the ON position. Do not start the engine.
Operation:
1. Add air to the tire.
2. Within a few seconds, the hazard indicators will start flashing.
3. When the designated pressure is reached, the horn beeps once and the hazard
indicators stop flashing.
4. Perform the above steps for each tire.
.If the tire is over-inflated to more than approximately 4 psi (30 kPa) , the horn
beeps and the hazard indicators flash 3
times. To correct the pressure, push the
core of the valve stem on the tire briefly to
release pressure. When the pressure
reaches the designated pressure, the horn beeps once.
.If the hazard indicator does not flash
within approximately 15 seconds after
starting to inflate the tire, it indicates that
the TPMS with Easy Fill Tire Alert is not
operating.
.The TPMS will not activate the Easy Fill
Tire Alert under the following conditions:
— If there is interference from an external device or transmitter
— The air pressure from the inflation device is not sufficient to inflate the tire
— There is a malfunction in the TPMS system
— There is a malfunction in the horn or hazard indicators
— The identification code of the tire pres- sure sensor is not registered to the
system
— The battery of the tire pressure sensor is low
.If the TPMS with Easy Fill Tire Alert does
not operate due to TPMS interference,
move the vehicle about 1 m (3 ft)
backward or forward and try again.
If the TPMS with Easy Fill Tire Alert is not
working, use a tire pressure gauge.
AVOIDING COLLISION AND ROLL-
OVER
WARNING
Failure to operate this vehicle in a safe
and prudent manner may result in loss
of control or an accident.
Be alert and drive defensively at all times. Obey
all traffic regulations. Avoid excessive speed,
high speed cornering, or sudden steering
maneuvers, because these driving practices
could cause you to lose control of your vehicle.
As with any vehicle, a loss of control could
result in a collision with other vehicles or
objects, or cause the vehicle to rollover,
particularly if the loss of control causes the
vehicle to slide sideways. Be attentive at all
times, and avoid driving when tired. Never drive
when under the influence of alcohol or drugs
(including prescription or over-the-counter
drugs which may cause drowsiness) . Always
wear your seat belt as outlined in the “Seat
belts” (P.1-15) of this manual, and also instruct
your passengers to do so.
Seat belts help reduce the risk of injury in
collisions and rollovers. In a rollover crash, an
unbelted or improperly belted person is
Page 361 of 482
5-18Starting and driving
SSD1178
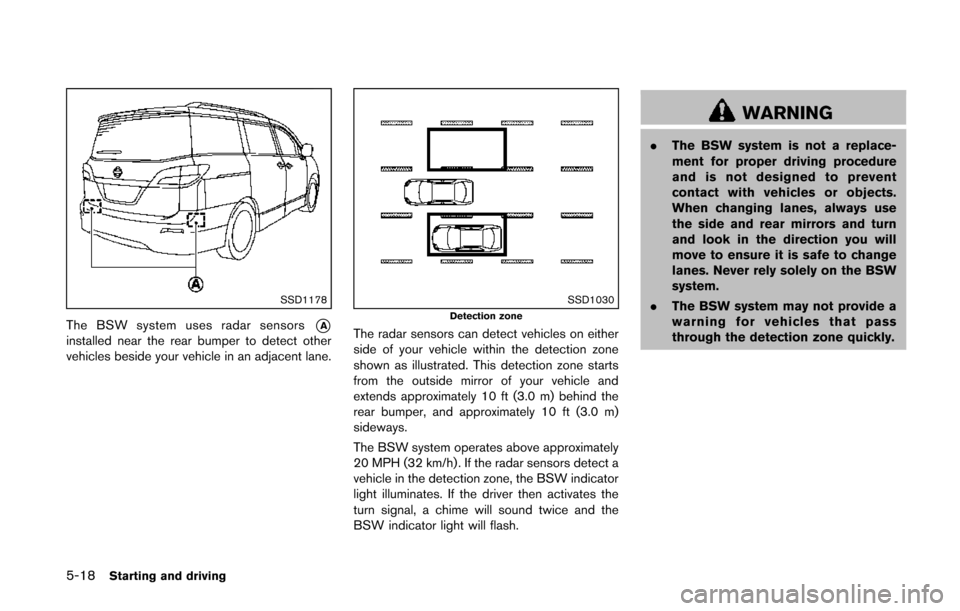
The BSW system uses radar sensors*Ainstalled near the rear bumper to detect other
vehicles beside your vehicle in an adjacent lane.
SSD1030Detection zone
The radar sensors can detect vehicles on either
side of your vehicle within the detection zone
shown as illustrated. This detection zone starts
from the outside mirror of your vehicle and
extends approximately 10 ft (3.0 m) behind the
rear bumper, and approximately 10 ft (3.0 m)
sideways.
The BSW system operates above approximately
20 MPH (32 km/h). If the radar sensors detect a
vehicle in the detection zone, the BSW indicator
light illuminates. If the driver then activates the
turn signal, a chime will sound twice and the
BSW indicator light will flash.
WARNING
.The BSW system is not a replace-
ment for proper driving procedure
and is not designed to prevent
contact with vehicles or objects.
When changing lanes, always use
the side and rear mirrors and turn
and look in the direction you will
move to ensure it is safe to change
lanes. Never rely solely on the BSW
system.
. The BSW system may not provide a
warning for vehicles that pass
through the detection zone quickly.
Page 362 of 482
SSD1184BSW indicator light
SSD1029BSW system warning light
SSD1179BSW switch
BSW SYSTEM OPERATION
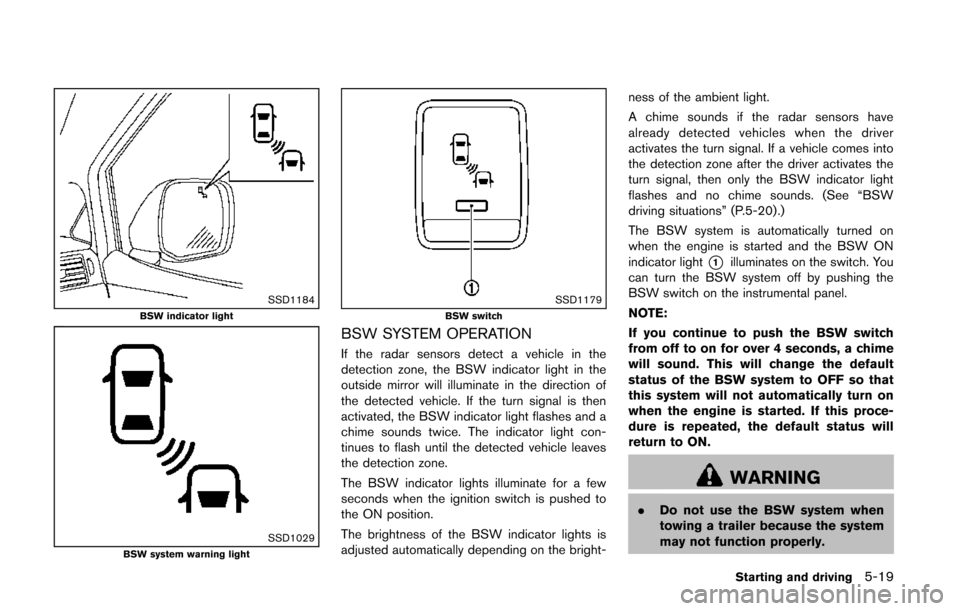
If the radar sensors detect a vehicle in the
detection zone, the BSW indicator light in the
outside mirror will illuminate in the direction of
the detected vehicle. If the turn signal is then
activated, the BSW indicator light flashes and a
chime sounds twice. The indicator light con-
tinues to flash until the detected vehicle leaves
the detection zone.
The BSW indicator lights illuminate for a few
seconds when the ignition switch is pushed to
the ON position.
The brightness of the BSW indicator lights is
adjusted automatically depending on the bright-ness of the ambient light.
A chime sounds if the radar sensors have
already detected vehicles when the driver
activates the turn signal. If a vehicle comes into
the detection zone after the driver activates the
turn signal, then only the BSW indicator light
flashes and no chime sounds. (See “BSW
driving situations” (P.5-20).)
The BSW system is automatically turned on
when the engine is started and the BSW ON
indicator light
*1illuminates on the switch. You
can turn the BSW system off by pushing the
BSW switch on the instrumental panel.
NOTE:
If you continue to push the BSW switch
from off to on for over 4 seconds, a chime
will sound. This will change the default
status of the BSW system to OFF so that
this system will not automatically turn on
when the engine is started. If this proce-
dure is repeated, the default status will
return to ON.
WARNING
. Do not use the BSW system when
towing a trailer because the system
may not function properly.
Starting and driving5-19