2014 NISSAN QUEST display
[x] Cancel search: displayPage 336 of 482
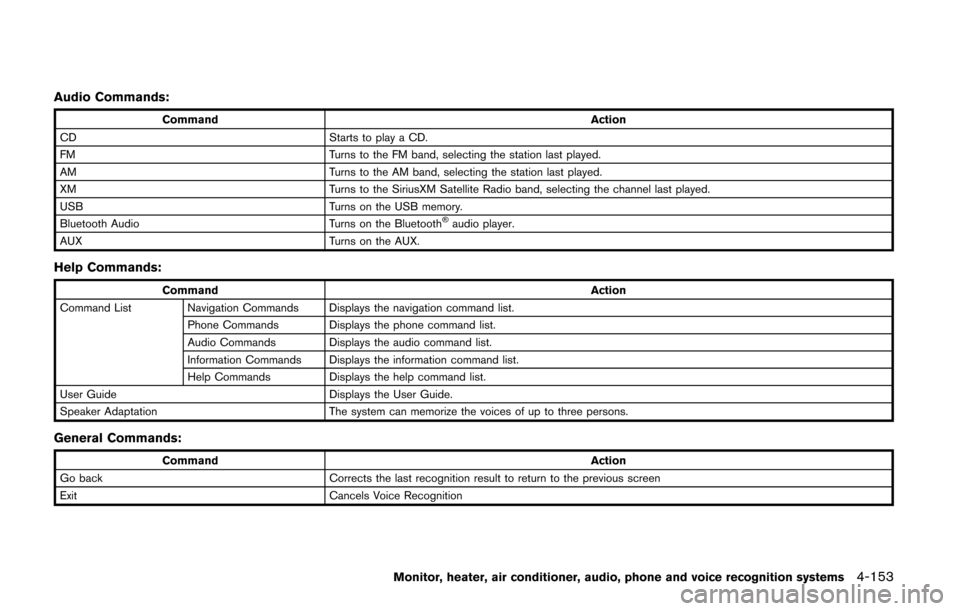
Audio Commands:
CommandAction
CD Starts to play a CD.
FM Turns to the FM band, selecting the station last played.
AM Turns to the AM band, selecting the station last played.
XM Turns to the SiriusXM Satellite Radio band, selecting the channel last played.
USB Turns on the USB memory.
Bluetooth Audio Turns on the Bluetooth
®audio player.
AUX Turns on the AUX.
Help Commands:
Command Action
Command List Navigation Commands Displays the navigation command list. Phone Commands Displays the phone command list.
Audio Commands Displays the audio command list.
Information Commands Displays the information command list.
Help Commands Displays the help command list.
User Guide Displays the User Guide.
Speaker Adaptation The system can memorize the voices of up to three persons.
General Commands:
Command Action
Go back Corrects the last recognition result to return to the previous screen
Exit Cancels Voice Recognition
Monitor, heater, air conditioner, audio, phone and voice recognition systems4-153
Page 337 of 482
4-154Monitor, heater, air conditioner, audio, phone and voice recognition systems
SAA2547
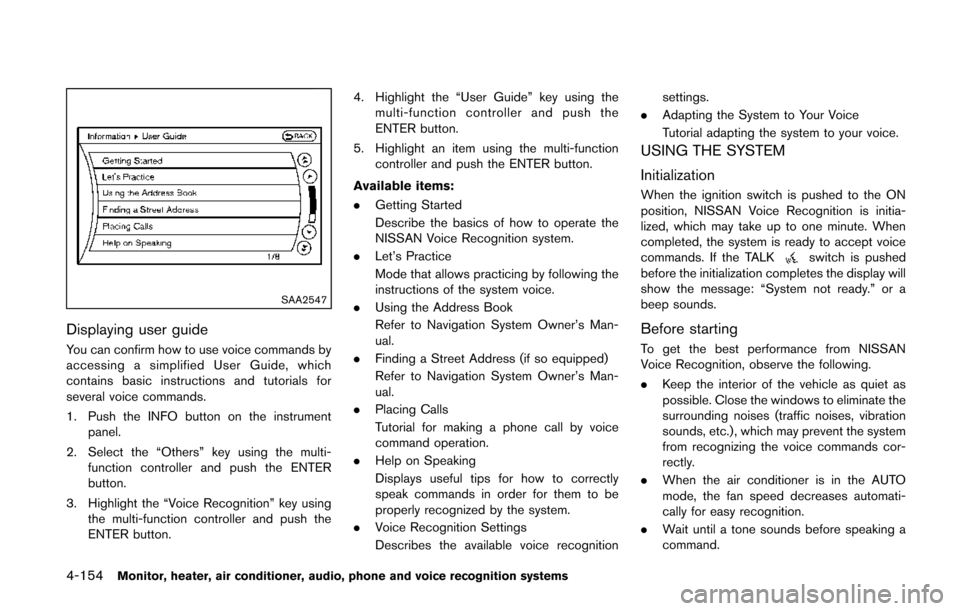
Displaying user guide
You can confirm how to use voice commands by
accessing a simplified User Guide, which
contains basic instructions and tutorials for
several voice commands.
1. Push the INFO button on the instrumentpanel.
2. Select the “Others” key using the multi- function controller and push the ENTER
button.
3. Highlight the “Voice Recognition” key using the multi-function controller and push the
ENTER button. 4. Highlight the “User Guide” key using the
multi-function controller and push the
ENTER button.
5. Highlight an item using the multi-function controller and push the ENTER button.
Available items:
. Getting Started
Describe the basics of how to operate the
NISSAN Voice Recognition system.
. Let’s Practice
Mode that allows practicing by following the
instructions of the system voice.
. Using the Address Book
Refer to Navigation System Owner’s Man-
ual.
. Finding a Street Address (if so equipped)
Refer to Navigation System Owner’s Man-
ual.
. Placing Calls
Tutorial for making a phone call by voice
command operation.
. Help on Speaking
Displays useful tips for how to correctly
speak commands in order for them to be
properly recognized by the system.
. Voice Recognition Settings
Describes the available voice recognition settings.
. Adapting the System to Your Voice
Tutorial adapting the system to your voice.
USING THE SYSTEM
Initialization
When the ignition switch is pushed to the ON
position, NISSAN Voice Recognition is initia-
lized, which may take up to one minute. When
completed, the system is ready to accept voice
commands. If the TALK
switch is pushed
before the initialization completes the display will
show the message: “System not ready.” or a
beep sounds.
Before starting
To get the best performance from NISSAN
Voice Recognition, observe the following.
. Keep the interior of the vehicle as quiet as
possible. Close the windows to eliminate the
surrounding noises (traffic noises, vibration
sounds, etc.), which may prevent the system
from recognizing the voice commands cor-
rectly.
. When the air conditioner is in the AUTO
mode, the fan speed decreases automati-
cally for easy recognition.
. Wait until a tone sounds before speaking a
command.
Page 338 of 482
.Speak in a natural voice without pausing
between words.
SAA1859
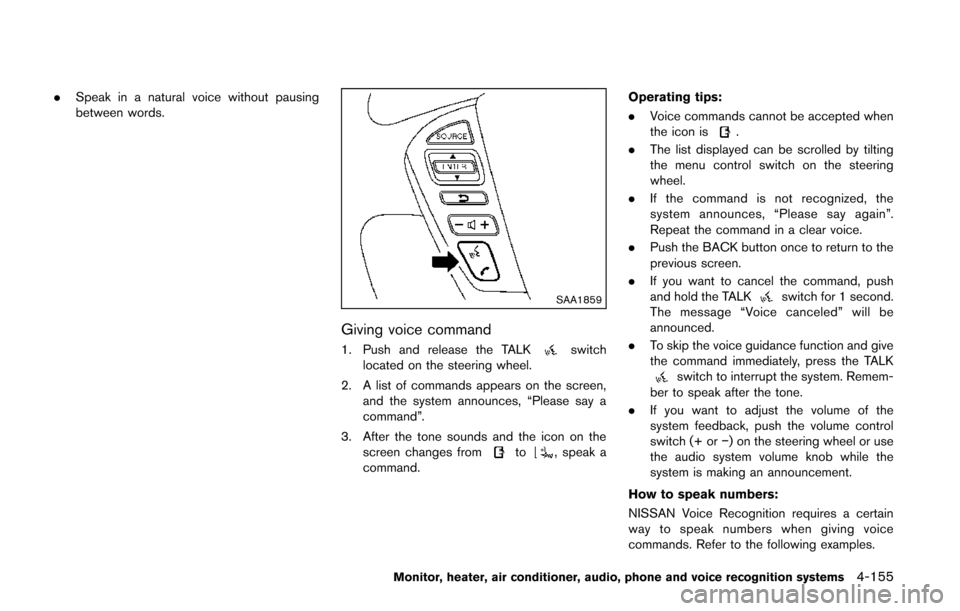
Giving voice command
1. Push and release the TALKswitch
located on the steering wheel.
2. A list of commands appears on the screen, and the system announces, “Please say a
command”.
3. After the tone sounds and the icon on the screen changes from
to, speak a
command. Operating tips:
.
Voice commands cannot be accepted when
the icon is
.
. The list displayed can be scrolled by tilting
the menu control switch on the steering
wheel.
. If the command is not recognized, the
system announces, “Please say again”.
Repeat the command in a clear voice.
. Push the BACK button once to return to the
previous screen.
. If you want to cancel the command, push
and hold the TALK
switch for 1 second.
The message “Voice canceled” will be
announced.
. To skip the voice guidance function and give
the command immediately, press the TALK
switch to interrupt the system. Remem-
ber to speak after the tone.
. If you want to adjust the volume of the
system feedback, push the volume control
switch (+ or −) on the steering wheel or use
the audio system volume knob while the
system is making an announcement.
How to speak numbers:
NISSAN Voice Recognition requires a certain
way to speak numbers when giving voice
commands. Refer to the following examples.
Monitor, heater, air conditioner, audio, phone and voice recognition systems4-155
Page 340 of 482
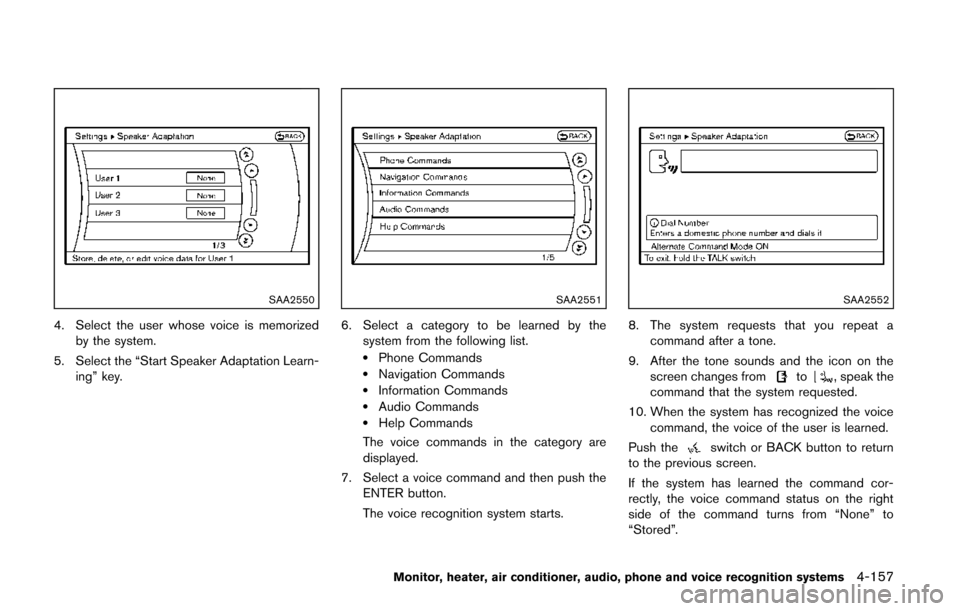
SAA2550
4. Select the user whose voice is memorizedby the system.
5. Select the “Start Speaker Adaptation Learn- ing” key.
SAA2551
6. Select a category to be learned by the
system from the following list.
.Phone Commands.Navigation Commands.Information Commands.Audio Commands.Help Commands
The voice commands in the category are
displayed.
7. Select a voice command and then push the ENTER button.
The voice recognition system starts.
SAA2552
8. The system requests that you repeat a
command after a tone.
9. After the tone sounds and the icon on the screen changes from
to, speak the
command that the system requested.
10. When the system has recognized the voice command, the voice of the user is learned.
Push the
switch or BACK button to return
to the previous screen.
If the system has learned the command cor-
rectly, the voice command status on the right
side of the command turns from “None” to
“Stored”.
Monitor, heater, air conditioner, audio, phone and voice recognition systems4-157
Page 341 of 482
4-158Monitor, heater, air conditioner, audio, phone and voice recognition systems
SAA2553
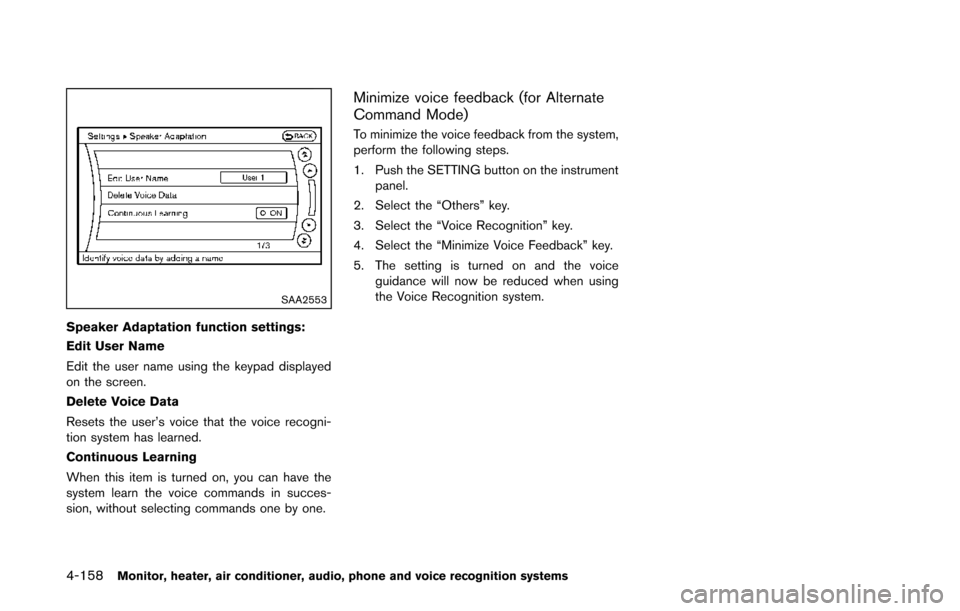
Speaker Adaptation function settings:
Edit User Name
Edit the user name using the keypad displayed
on the screen.
Delete Voice Data
Resets the user’s voice that the voice recogni-
tion system has learned.
Continuous Learning
When this item is turned on, you can have the
system learn the voice commands in succes-
sion, without selecting commands one by one.
Minimize voice feedback (for Alternate
Command Mode)
To minimize the voice feedback from the system,
perform the following steps.
1. Push the SETTING button on the instrumentpanel.
2. Select the “Others” key.
3. Select the “Voice Recognition” key.
4. Select the “Minimize Voice Feedback” key.
5. The setting is turned on and the voice guidance will now be reduced when using
the Voice Recognition system.
Page 347 of 482
5-4Starting and driving
pressure telltale.
Your vehicle has also been equipped with a
TPMS malfunction indicator to indicate when the
system is not operating properly. The TPMS
malfunction indicator is combined with the low
tire pressure telltale. When the system detects a
malfunction, the telltale will flash for approxi-
mately one minute and then remain continuously
illuminated. This sequence will continue upon
subsequent vehicle start-ups as long as the
malfunction exists. When the malfunction indi-
cator is illuminated, the system may not be able
to detect or signal low tire pressure as intended.
TPMS malfunctions may occur for a variety of
reasons, including the installation of replace-
ment or alternate tires or wheels on the vehicle
that prevent the TPMS from functioning properly.
Always check the TPMS malfunction telltale
after replacing one or more tires or wheels on
your vehicle to ensure that the replacement or
alternate tires and wheels allow the TPMS to
continue to function properly.
Additional information
.The TPMS does not monitor the tire
pressure of the spare tire.
. The TPMS will activate only when the
vehicle is driven at speeds above 16 MPH
(25 km/h) . Also, this system may not detect
a sudden drop in tire pressure (for example a flat tire while driving) .
. The low tire pressure warning light does not
automatically turn off when the tire pressure
is adjusted. After the tire is inflated to the
recommended pressure, the vehicle must be
driven at speeds above 16 MPH (25 km/h)
to activate the TPMS and turn off the low tire
pressure warning light. Use a tire pressure
gauge to check the tire pressure.
. The CHECK TIRE PRESSURE warning also
appears on the dot matrix liquid crystal
display when the low tire pressure warning
light is illuminated and low tire pressure is
detected. The CHECK TIRE PRESSURE
warning turns off when the low tire pressure
warning light turns off.
The CHECK TIRE PRESSURE warning
appears each time the ignition switch is
placed in the ON position as long as the low
tire pressure warning light remains illumi-
nated.
The CHECK TIRE PRESSURE warning
does not appear if the low tire pressure
warning light illuminates to indicate a TPMS
malfunction.
. Tire pressure rises and falls depending on
the heat caused by the vehicle’s operation
and the outside temperature. Low outside
temperature can lower the temperature of the air inside the tire which can cause a
lower tire inflation pressure. This may cause
the low tire pressure warning light to
illuminate. If the warning light illuminates in
low ambient temperature, check the tire
pressure for all four tires.
For additional information, see “Low tire pres-
sure warning light” (P.2-14) and “Tire Pressure
Monitoring System (TPMS)” (P.6-3) .
WARNING
. If the low tire pressure warning light
illuminates while driving, avoid sud-
den steering maneuvers or abrupt
braking, reduce vehicle speed, pull
off the road to a safe location and
stop the vehicle as soon as possi-
ble. Driving with under-inflated tires
may permanently damage the tires
and increase the likelihood of tire
failure. Serious vehicle damage
could occur and may lead to an
accident and could result in serious
personal injury. Check the tire pres-
sure for all four tires. Adjust the tire
pressure to the recommended COLD
tire pressure shown on the Tire and
Loading Information label to turn
Page 353 of 482
5-10Starting and driving
SSD1021
PUSH-BUTTON IGNITION SWITCH
OPERATION
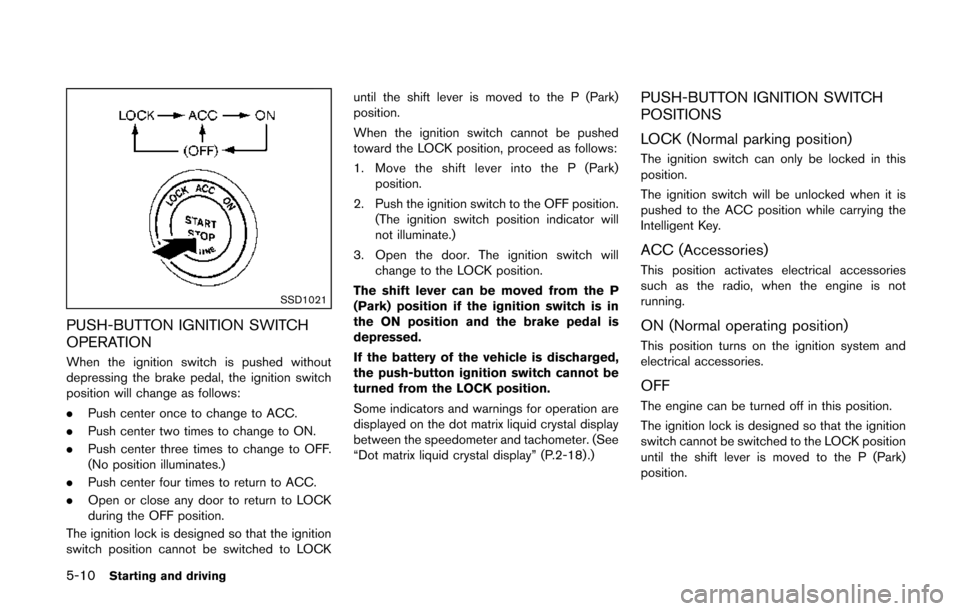
When the ignition switch is pushed without
depressing the brake pedal, the ignition switch
position will change as follows:
.Push center once to change to ACC.
. Push center two times to change to ON.
. Push center three times to change to OFF.
(No position illuminates.)
. Push center four times to return to ACC.
. Open or close any door to return to LOCK
during the OFF position.
The ignition lock is designed so that the ignition
switch position cannot be switched to LOCK until the shift lever is moved to the P (Park)
position.
When the ignition switch cannot be pushed
toward the LOCK position, proceed as follows:
1. Move the shift lever into the P (Park)
position.
2. Push the ignition switch to the OFF position. (The ignition switch position indicator will
not illuminate.)
3. Open the door. The ignition switch will change to the LOCK position.
The shift lever can be moved from the P
(Park) position if the ignition switch is in
the ON position and the brake pedal is
depressed.
If the battery of the vehicle is discharged,
the push-button ignition switch cannot be
turned from the LOCK position.
Some indicators and warnings for operation are
displayed on the dot matrix liquid crystal display
between the speedometer and tachometer. (See
“Dot matrix liquid crystal display” (P.2-18) .)
PUSH-BUTTON IGNITION SWITCH
POSITIONS
LOCK (Normal parking position)
The ignition switch can only be locked in this
position.
The ignition switch will be unlocked when it is
pushed to the ACC position while carrying the
Intelligent Key.
ACC (Accessories)
This position activates electrical accessories
such as the radio, when the engine is not
running.
ON (Normal operating position)
This position turns on the ignition system and
electrical accessories.
OFF
The engine can be turned off in this position.
The ignition lock is designed so that the ignition
switch cannot be switched to the LOCK position
until the shift lever is moved to the P (Park)
position.
Page 354 of 482
CAUTION
Do not leave the vehicle with the push-
button ignition switch in ACC or ON
positions when the engine is not run-
ning for an extended period. This can
discharge the battery.
EMERGENCY ENGINE SHUT OFF
To shut off the engine in an emergency situation
while driving perform the following procedure:
.Rapidly push the push-button ignition switch
3 consecutive times in less that 1.5 sec-
onds, or
. Push and hold the push-button ignition
switch for more than 2 seconds.
SSD0944
INTELLIGENT KEY BATTERY DIS-
CHARGE
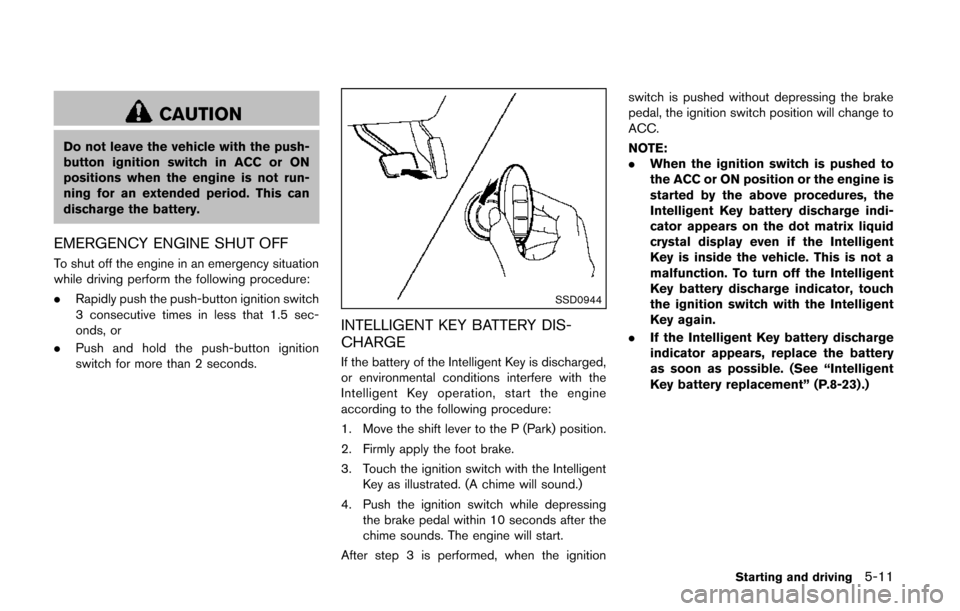
If the battery of the Intelligent Key is discharged,
or environmental conditions interfere with the
Intelligent Key operation, start the engine
according to the following procedure:
1. Move the shift lever to the P (Park) position.
2. Firmly apply the foot brake.
3. Touch the ignition switch with the Intelligent
Key as illustrated. (A chime will sound.)
4. Push the ignition switch while depressing the brake pedal within 10 seconds after the
chime sounds. The engine will start.
After step 3 is performed, when the ignition switch is pushed without depressing the brake
pedal, the ignition switch position will change to
ACC.
NOTE:
.
When the ignition switch is pushed to
the ACC or ON position or the engine is
started by the above procedures, the
Intelligent Key battery discharge indi-
cator appears on the dot matrix liquid
crystal display even if the Intelligent
Key is inside the vehicle. This is not a
malfunction. To turn off the Intelligent
Key battery discharge indicator, touch
the ignition switch with the Intelligent
Key again.
. If the Intelligent Key battery discharge
indicator appears, replace the battery
as soon as possible. (See “Intelligent
Key battery replacement” (P.8-23) .)
Starting and driving5-11