2014 NISSAN QUEST warning
[x] Cancel search: warningPage 211 of 482
4-28Monitor, heater, air conditioner, audio, phone and voice recognition systems
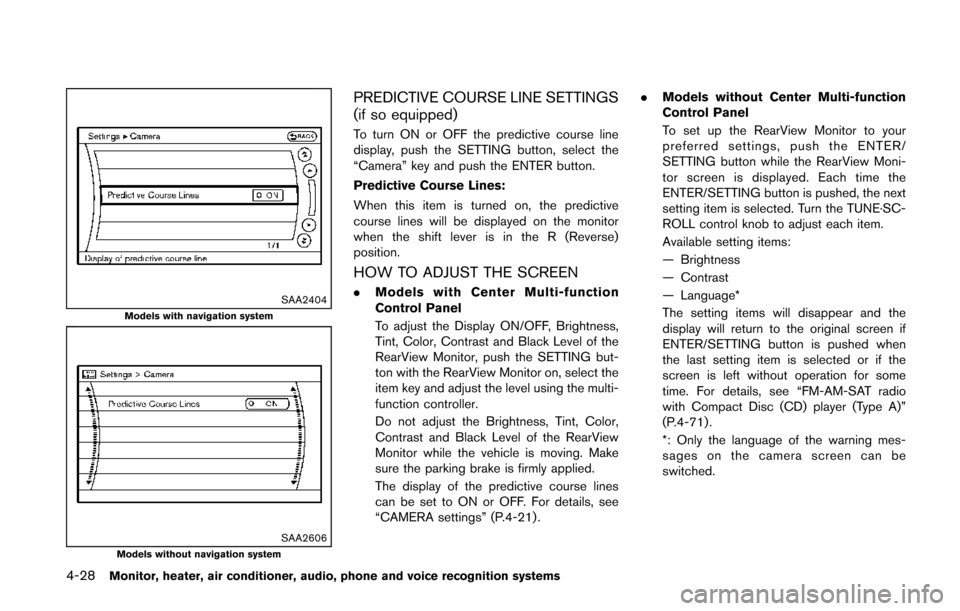
SAA2404Models with navigation system
SAA2606Models without navigation system
PREDICTIVE COURSE LINE SETTINGS
(if so equipped)
To turn ON or OFF the predictive course line
display, push the SETTING button, select the
“Camera” key and push the ENTER button.
Predictive Course Lines:
When this item is turned on, the predictive
course lines will be displayed on the monitor
when the shift lever is in the R (Reverse)
position.
HOW TO ADJUST THE SCREEN
.Models with Center Multi-function
Control Panel
To adjust the Display ON/OFF, Brightness,
Tint, Color, Contrast and Black Level of the
RearView Monitor, push the SETTING but-
ton with the RearView Monitor on, select the
item key and adjust the level using the multi-
function controller.
Do not adjust the Brightness, Tint, Color,
Contrast and Black Level of the RearView
Monitor while the vehicle is moving. Make
sure the parking brake is firmly applied.
The display of the predictive course lines
can be set to ON or OFF. For details, see
“CAMERA settings” (P.4-21) . .
Models without Center Multi-function
Control Panel
To set up the RearView Monitor to your
preferred settings, push the ENTER/
SETTING button while the RearView Moni-
tor screen is displayed. Each time the
ENTER/SETTING button is pushed, the next
setting item is selected. Turn the TUNE·SC-
ROLL control knob to adjust each item.
Available setting items:
— Brightness
— Contrast
— Language*
The setting items will disappear and the
display will return to the original screen if
ENTER/SETTING button is pushed when
the last setting item is selected or if the
screen is left without operation for some
time. For details, see “FM-AM-SAT radio
with Compact Disc (CD) player (Type A)”
(P.4-71) .
*: Only the language of the warning mes-
sages on the camera screen can be
switched.
Page 213 of 482
4-30Monitor, heater, air conditioner, audio, phone and voice recognition systems
JVH0336X
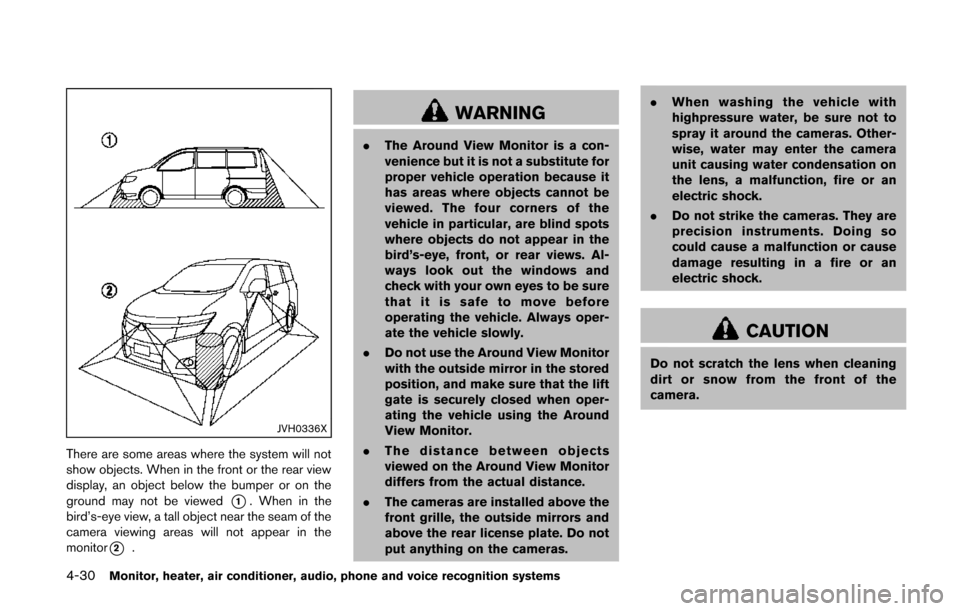
There are some areas where the system will not
show objects. When in the front or the rear view
display, an object below the bumper or on the
ground may not be viewed
*1. When in the
bird’s-eye view, a tall object near the seam of the
camera viewing areas will not appear in the
monitor
*2.
WARNING
. The Around View Monitor is a con-
venience but it is not a substitute for
proper vehicle operation because it
has areas where objects cannot be
viewed. The four corners of the
vehicle in particular, are blind spots
where objects do not appear in the
bird’s-eye, front, or rear views. Al-
ways look out the windows and
check with your own eyes to be sure
that it is safe to move before
operating the vehicle. Always oper-
ate the vehicle slowly.
. Do not use the Around View Monitor
with the outside mirror in the stored
position, and make sure that the lift
gate is securely closed when oper-
ating the vehicle using the Around
View Monitor.
. The distance between objects
viewed on the Around View Monitor
differs from the actual distance.
. The cameras are installed above the
front grille, the outside mirrors and
above the rear license plate. Do not
put anything on the cameras. .
When washing the vehicle with
highpressure water, be sure not to
spray it around the cameras. Other-
wise, water may enter the camera
unit causing water condensation on
the lens, a malfunction, fire or an
electric shock.
. Do not strike the cameras. They are
precision instruments. Doing so
could cause a malfunction or cause
damage resulting in a fire or an
electric shock.
CAUTION
Do not scratch the lens when cleaning
dirt or snow from the front of the
camera.
Page 215 of 482
4-32Monitor, heater, air conditioner, audio, phone and voice recognition systems
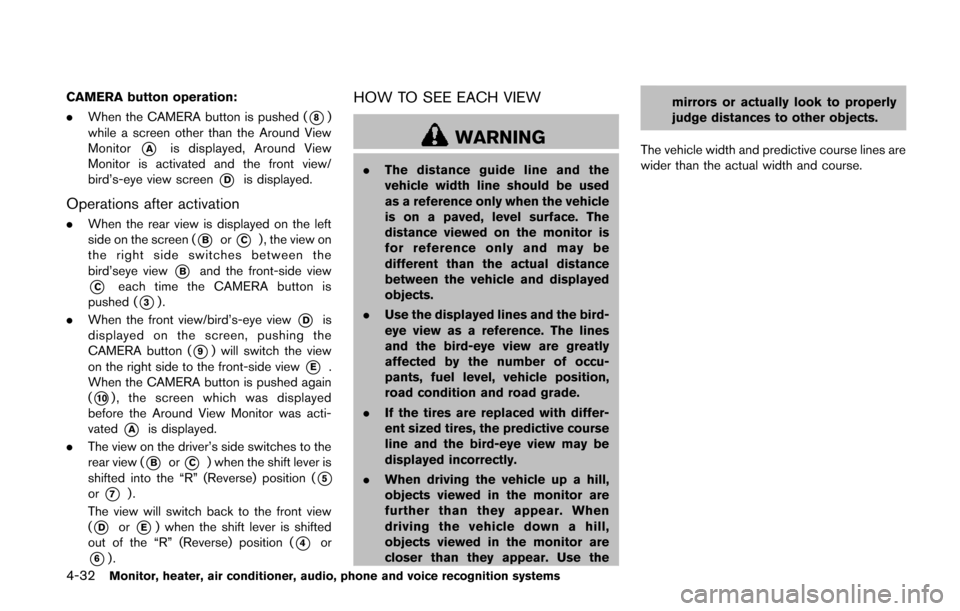
CAMERA button operation:
.When the CAMERA button is pushed (
*8)
while a screen other than the Around View
Monitor
*Ais displayed, Around View
Monitor is activated and the front view/
bird’s-eye view screen
*Dis displayed.
Operations after activation
. When the rear view is displayed on the left
side on the screen (
*Bor*C) , the view on
the right side switches between the
bird’seye view
*Band the front-side view
*Ceach time the CAMERA button is
pushed (
*3).
. When the front view/bird’s-eye view
*Dis
displayed on the screen, pushing the
CAMERA button (
*9) will switch the view
on the right side to the front-side view
*E.
When the CAMERA button is pushed again
(
*10), the screen which was displayed
before the Around View Monitor was acti-
vated
*Ais displayed.
. The view on the driver’s side switches to the
rear view (
*Bor*C) when the shift lever is
shifted into the “R” (Reverse) position (
*5or*7).
The view will switch back to the front view
(
*Dor*E) when the shift lever is shifted
out of the “R” (Reverse) position (
*4or
*6).
HOW TO SEE EACH VIEW
WARNING
. The distance guide line and the
vehicle width line should be used
as a reference only when the vehicle
is on a paved, level surface. The
distance viewed on the monitor is
for reference only and may be
different than the actual distance
between the vehicle and displayed
objects.
. Use the displayed lines and the bird-
eye view as a reference. The lines
and the bird-eye view are greatly
affected by the number of occu-
pants, fuel level, vehicle position,
road condition and road grade.
. If the tires are replaced with differ-
ent sized tires, the predictive course
line and the bird-eye view may be
displayed incorrectly.
. When driving the vehicle up a hill,
objects viewed in the monitor are
further than they appear. When
driving the vehicle down a hill,
objects viewed in the monitor are
closer than they appear. Use the mirrors or actually look to properly
judge distances to other objects.
The vehicle width and predictive course lines are
wider than the actual width and course.
Page 216 of 482
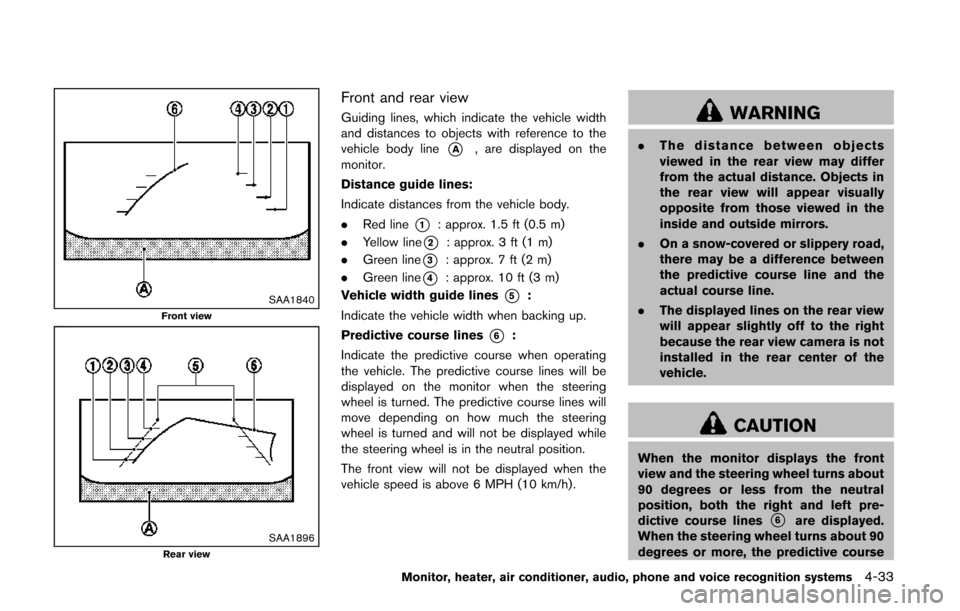
SAA1840Front view
SAA1896Rear view
Front and rear view
Guiding lines, which indicate the vehicle width
and distances to objects with reference to the
vehicle body line
*A, are displayed on the
monitor.
Distance guide lines:
Indicate distances from the vehicle body.
. Red line
*1: approx. 1.5 ft (0.5 m)
. Yellow line
*2: approx. 3 ft (1 m)
. Green line
*3: approx. 7 ft (2 m)
. Green line
*4: approx. 10 ft (3 m)
Vehicle width guide lines
*5:
Indicate the vehicle width when backing up.
Predictive course lines
*6:
Indicate the predictive course when operating
the vehicle. The predictive course lines will be
displayed on the monitor when the steering
wheel is turned. The predictive course lines will
move depending on how much the steering
wheel is turned and will not be displayed while
the steering wheel is in the neutral position.
The front view will not be displayed when the
vehicle speed is above 6 MPH (10 km/h).
WARNING
. The distance between objects
viewed in the rear view may differ
from the actual distance. Objects in
the rear view will appear visually
opposite from those viewed in the
inside and outside mirrors.
. On a snow-covered or slippery road,
there may be a difference between
the predictive course line and the
actual course line.
. The displayed lines on the rear view
will appear slightly off to the right
because the rear view camera is not
installed in the rear center of the
vehicle.
CAUTION
When the monitor displays the front
view and the steering wheel turns about
90 degrees or less from the neutral
position, both the right and left pre-
dictive course lines
*6are displayed.
When the steering wheel turns about 90
degrees or more, the predictive course
Monitor, heater, air conditioner, audio, phone and voice recognition systems4-33
Page 217 of 482
4-34Monitor, heater, air conditioner, audio, phone and voice recognition systems
line is displayed only on the opposite
side of the turn.
JVH0337X
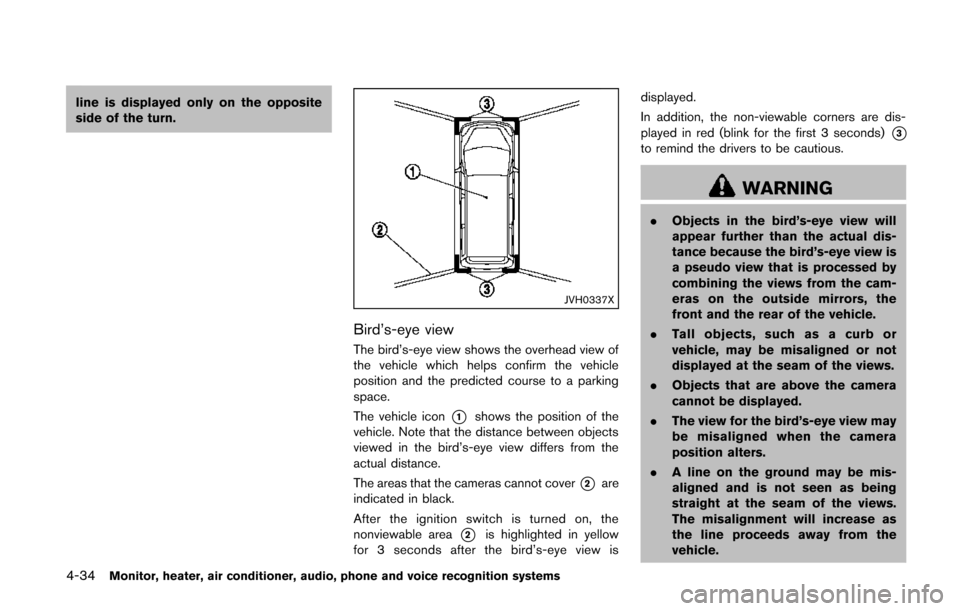
Bird’s-eye view
The bird’s-eye view shows the overhead view of
the vehicle which helps confirm the vehicle
position and the predicted course to a parking
space.
The vehicle icon
*1shows the position of the
vehicle. Note that the distance between objects
viewed in the bird’s-eye view differs from the
actual distance.
The areas that the cameras cannot cover
*2are
indicated in black.
After the ignition switch is turned on, the
nonviewable area
*2is highlighted in yellow
for 3 seconds after the bird’s-eye view is displayed.
In addition, the non-viewable corners are dis-
played in red (blink for the first 3 seconds)
*3to remind the drivers to be cautious.
WARNING
.
Objects in the bird’s-eye view will
appear further than the actual dis-
tance because the bird’s-eye view is
a pseudo view that is processed by
combining the views from the cam-
eras on the outside mirrors, the
front and the rear of the vehicle.
. Tall objects, such as a curb or
vehicle, may be misaligned or not
displayed at the seam of the views.
. Objects that are above the camera
cannot be displayed.
. The view for the bird’s-eye view may
be misaligned when the camera
position alters.
. A line on the ground may be mis-
aligned and is not seen as being
straight at the seam of the views.
The misalignment will increase as
the line proceeds away from the
vehicle.
Page 222 of 482
SAA3676Side
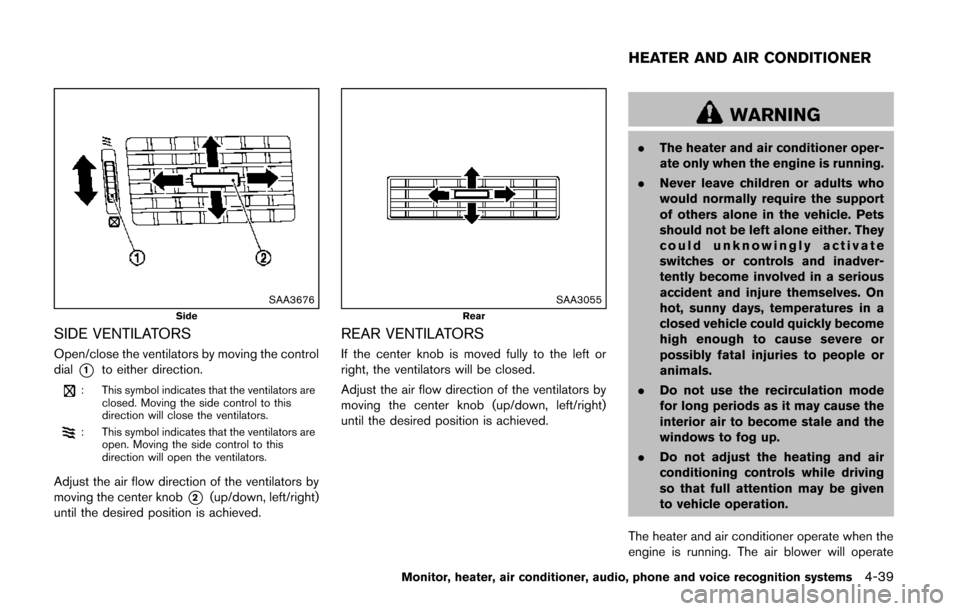
SIDE VENTILATORS
Open/close the ventilators by moving the control
dial
*1to either direction.
: This symbol indicates that the ventilators areclosed. Moving the side control to this
direction will close the ventilators.
: This symbol indicates that the ventilators areopen. Moving the side control to this
direction will open the ventilators.
Adjust the air flow direction of the ventilators by
moving the center knob
*2(up/down, left/right)
until the desired position is achieved.
SAA3055Rear
REAR VENTILATORS
If the center knob is moved fully to the left or
right, the ventilators will be closed.
Adjust the air flow direction of the ventilators by
moving the center knob (up/down, left/right)
until the desired position is achieved.
WARNING
. The heater and air conditioner oper-
ate only when the engine is running.
. Never leave children or adults who
would normally require the support
of others alone in the vehicle. Pets
should not be left alone either. They
could unknowingly activate
switches or controls and inadver-
tently become involved in a serious
accident and injure themselves. On
hot, sunny days, temperatures in a
closed vehicle could quickly become
high enough to cause severe or
possibly fatal injuries to people or
animals.
. Do not use the recirculation mode
for long periods as it may cause the
interior air to become stale and the
windows to fog up.
. Do not adjust the heating and air
conditioning controls while driving
so that full attention may be given
to vehicle operation.
The heater and air conditioner operate when the
engine is running. The air blower will operate
Monitor, heater, air conditioner, audio, phone and voice recognition systems4-39
HEATER AND AIR CONDITIONER
Page 235 of 482
4-52Monitor, heater, air conditioner, audio, phone and voice recognition systems
SAA3517
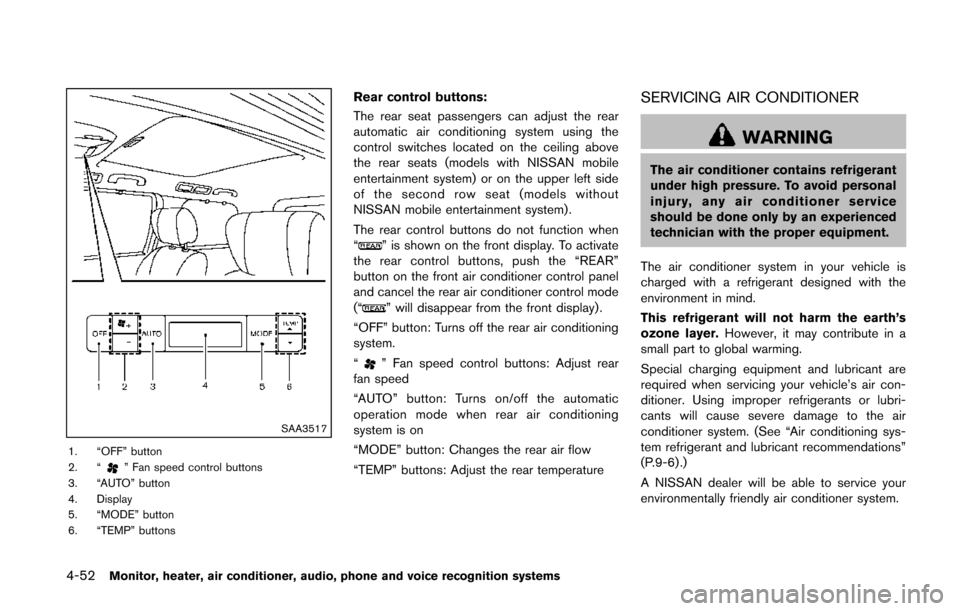
1. “OFF” button
2. “” Fan speed control buttons
3. “AUTO” button
4. Display
5. “MODE” button
6. “TEMP” buttons
Rear control buttons:
The rear seat passengers can adjust the rear
automatic air conditioning system using the
control switches located on the ceiling above
the rear seats (models with NISSAN mobile
entertainment system) or on the upper left side
of the second row seat (models without
NISSAN mobile entertainment system) .
The rear control buttons do not function when
“
” is shown on the front display. To activate
the rear control buttons, push the “REAR”
button on the front air conditioner control panel
and cancel the rear air conditioner control mode
(“
” will disappear from the front display) .
“OFF” button: Turns off the rear air conditioning
system.
“
” Fan speed control buttons: Adjust rear
fan speed
“AUTO” button: Turns on/off the automatic
operation mode when rear air conditioning
system is on
“MODE” button: Changes the rear air flow
“TEMP” buttons: Adjust the rear temperature
SERVICING AIR CONDITIONER
WARNING
The air conditioner contains refrigerant
under high pressure. To avoid personal
injury, any air conditioner service
should be done only by an experienced
technician with the proper equipment.
The air conditioner system in your vehicle is
charged with a refrigerant designed with the
environment in mind.
This refrigerant will not harm the earth’s
ozone layer. However, it may contribute in a
small part to global warming.
Special charging equipment and lubricant are
required when servicing your vehicle’s air con-
ditioner. Using improper refrigerants or lubri-
cants will cause severe damage to the air
conditioner system. (See “Air conditioning sys-
tem refrigerant and lubricant recommendations”
(P.9-6) .)
A NISSAN dealer will be able to service your
environmentally friendly air conditioner system.
Page 240 of 482
— The file is not MP3, WMA, AAC, M4A orDivX®type.
Region Invalid:
— The DVD is not for region 1 or all regions. Use DVDs with a region code “1”, “ALL”
or “1 included” for your DVD entertain-
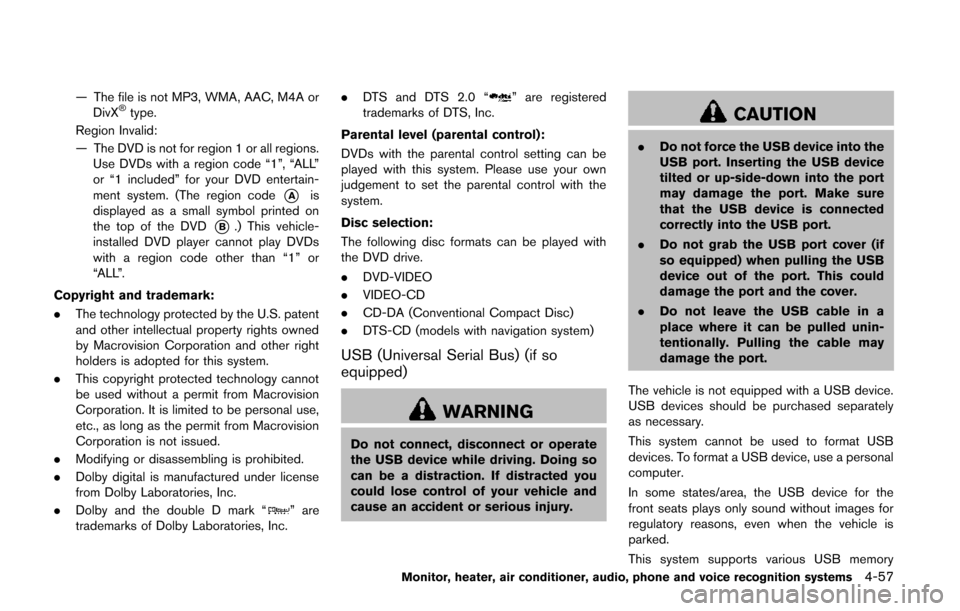
ment system. (The region code
*Ais
displayed as a small symbol printed on
the top of the DVD
*B.) This vehicle-
installed DVD player cannot play DVDs
with a region code other than “1” or
“ALL”.
Copyright and trademark:
. The technology protected by the U.S. patent
and other intellectual property rights owned
by Macrovision Corporation and other right
holders is adopted for this system.
. This copyright protected technology cannot
be used without a permit from Macrovision
Corporation. It is limited to be personal use,
etc., as long as the permit from Macrovision
Corporation is not issued.
. Modifying or disassembling is prohibited.
. Dolby digital is manufactured under license
from Dolby Laboratories, Inc.
. Dolby and the double D mark “
” are
trademarks of Dolby Laboratories, Inc. .
DTS and DTS 2.0 “
” are registered
trademarks of DTS, Inc.
Parental level (parental control):
DVDs with the parental control setting can be
played with this system. Please use your own
judgement to set the parental control with the
system.
Disc selection:
The following disc formats can be played with
the DVD drive.
. DVD-VIDEO
. VIDEO-CD
. CD-DA (Conventional Compact Disc)
. DTS-CD (models with navigation system)
USB (Universal Serial Bus) (if so
equipped)
WARNING
Do not connect, disconnect or operate
the USB device while driving. Doing so
can be a distraction. If distracted you
could lose control of your vehicle and
cause an accident or serious injury.
CAUTION
.Do not force the USB device into the
USB port. Inserting the USB device
tilted or up-side-down into the port
may damage the port. Make sure
that the USB device is connected
correctly into the USB port.
. Do not grab the USB port cover (if
so equipped) when pulling the USB
device out of the port. This could
damage the port and the cover.
. Do not leave the USB cable in a
place where it can be pulled unin-
tentionally. Pulling the cable may
damage the port.
The vehicle is not equipped with a USB device.
USB devices should be purchased separately
as necessary.
This system cannot be used to format USB
devices. To format a USB device, use a personal
computer.
In some states/area, the USB device for the
front seats plays only sound without images for
regulatory reasons, even when the vehicle is
parked.
This system supports various USB memory
Monitor, heater, air conditioner, audio, phone and voice recognition systems4-57