2014 NISSAN QUEST light
[x] Cancel search: lightPage 218 of 482
SAA3571
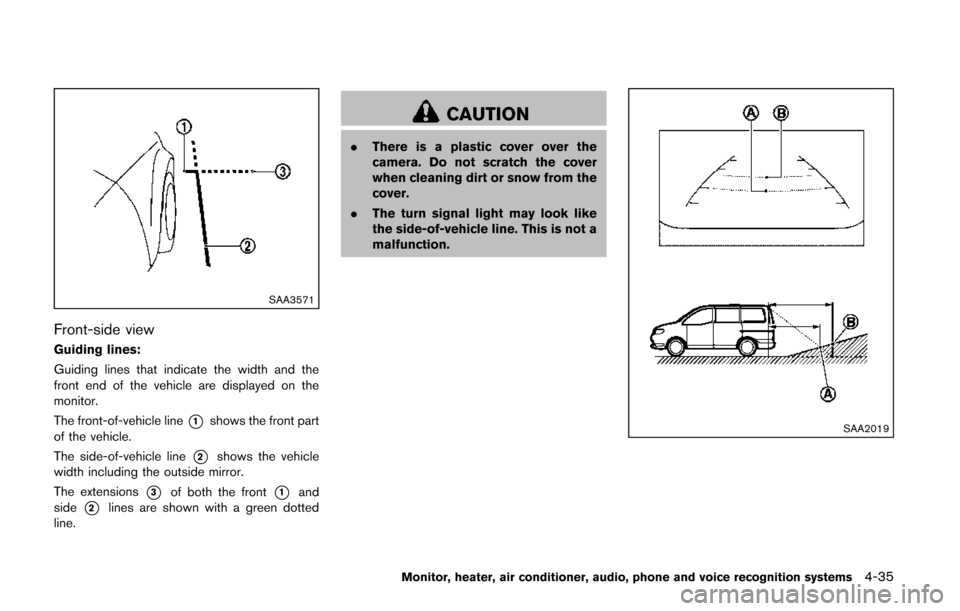
Front-side view
Guiding lines:
Guiding lines that indicate the width and the
front end of the vehicle are displayed on the
monitor.
The front-of-vehicle line
*1shows the front part
of the vehicle.
The side-of-vehicle line
*2shows the vehicle
width including the outside mirror.
The extensions
*3of both the front*1and
side
*2lines are shown with a green dotted
line.
CAUTION
. There is a plastic cover over the
camera. Do not scratch the cover
when cleaning dirt or snow from the
cover.
. The turn signal light may look like
the side-of-vehicle line. This is not a
malfunction.
SAA2019
Monitor, heater, air conditioner, audio, phone and voice recognition systems4-35
Page 221 of 482
4-38Monitor, heater, air conditioner, audio, phone and voice recognition systems
course.
HOW TO ADJUST THE SCREEN
To adjust the Display ON/OFF, Brightness, Tint,
Color, Contrast and Black Level of the Around
View Monitor, push the SETTING button with
the Around View Monitor on, select the item key
and adjust the level using the multi-function
controller.
Do not adjust the Brightness, Tint, Color,
Contrast and Black Level of the Around View
Monitor while the vehicle is moving. Make sure
the parking brake is firmly applied.
The display of the predictive course lines can be
set to ON or OFF. For details, see “Predictive
course line settings” (P.4-28) .
OPERATING TIPS
.The screen displayed on the Around View
Monitor will automatically return to the
previous screen when no operation takes
place for 3 minutes after the CAMERA
button has been pushed while the shift lever
is in a position other than the “R” (Reverse)
position.
. The display of images on the screen may be
delayed after screens are switched.
. When the temperature is extremely high or
low, the screen may not display objects
clearly. This is not a malfunction. .
When strong light directly shines on the
camera, objects may not be displayed
clearly. This is not a malfunction.
. The screen may flicker under fluorescent
light. This is not a malfunction.
. The colors of objects on the Around View
Monitor may differ somewhat from those of
the actual object.
. Objects on the monitor may not be clear and
the color of the object may differ in a dark
location or at night. This is not a malfunction.
. There may be differences in clearness
between each camera view of the bird’s-
eye view.
. If dirt, rain or snow attaches to the camera,
the Around View Monitor may not display
objects clearly. Clean the camera.
. Do not use alcohol, benzine or thinner to
clean the camera. This will cause discolora-
tion. To clean the camera, wipe with a cloth
that has been dampened with a diluted mild
cleaning agent and then wipe with a dry
cloth.
. Do not damage the camera because the
monitor screen may be adversely affected.
. Do not use wax on the camera window.
Wipe off any wax with a clean cloth that has
been dampened with a mild detergent
diluted with water.
SAA3511Center
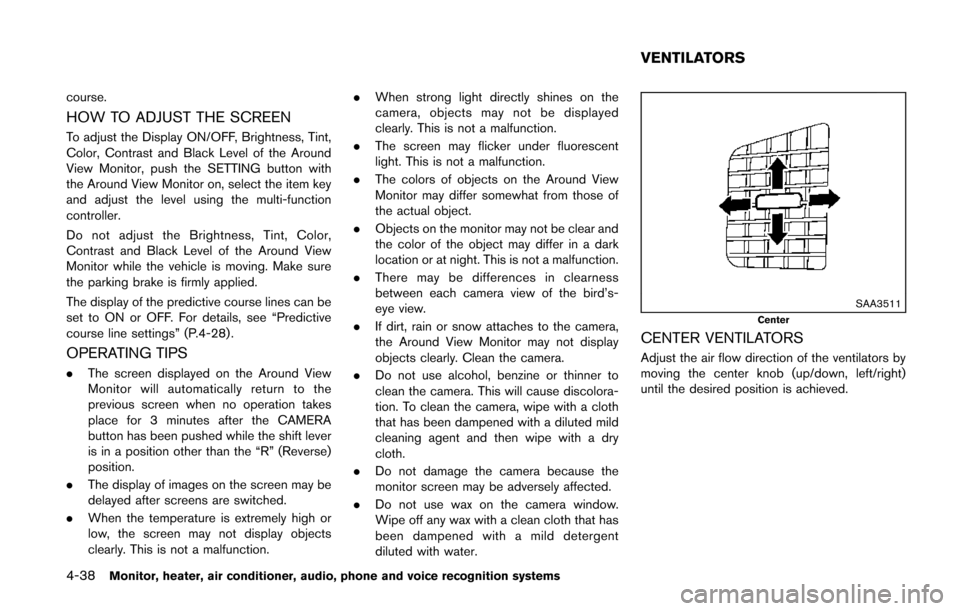
CENTER VENTILATORS
Adjust the air flow direction of the ventilators by
moving the center knob (up/down, left/right)
until the desired position is achieved.
VENTILATORS
Page 225 of 482
4-42Monitor, heater, air conditioner, audio, phone and voice recognition systems
Controls
To turn off the heater and air conditioner, push
the “ON·OFF” button.
Fan speed control:
Push the fan speed control button “
”to
increase the fan speed.
Push the fan speed control button “
”to
decrease the fan speed.
A/C (Air Conditioner) operation:
Push the A/C button to turn on or off the air
conditioner. When the air conditioner is on, the
A/C indicator light on the button illuminates.
Air flow control:
Push the “MODE” button to change the air flow
mode.
: Air flows from the center and side ventila- tors.
: Air flows from the center and side ventila-tors, and foot outlets.
: Air flows mainly from the foot outlets.
: Air flows from the defroster and foot outlets.
Temperature control:
Push the temperature control buttons (“
”
and “”) to set the desired temperature.
Air recirculation:
Push the air recirculation “
” button to recirculate interior air inside the vehicle. The
indicator light on the air recirculation “
”
button will illuminate.
The air recirculation mode cannot be activated
when the air conditioner is in the front defrosting
mode.
Outside air circulation:
Push the outside air circulation “
” button to
draw outside air into the passenger compart-
ment. The indicator light on the outside air
circulation “
” button will turn on.
Heater operation
Heating:
This mode is used to direct heated air to the foot
outlets.
1. Push the outside air circulation “
” button
to switch to the outside air circulation mode.
(The indicator light turns on.)
2. Push the air flow control button to change to the
mode.
3. Push the fan speed control buttons to set the desired fan speed.
4. Push the temperature control buttons to set the desired temperature between the middle
and the hot position. Ventilation:
This mode directs outside air to the side and
center ventilators.
1. Push the outside air circulation “
” button
to switch to the outside air circulation mode.
(The indicator light turns on.)
2. Push the air flow control button to change to the
mode.
3. Push the fan speed control
buttons to
set the desired position.
Bi-level heating:
This mode directs cool air from the side and
center vents and warm air from the foot outlets.
When the temperature is set to the maximum hot
or cool position, the air between the ventilators
and the foot outlets is the same temperature.
1. Push the outside air circulation “
” button
to switch to the outside air circulation mode.
(The indicator light turns on.)
2. Push the air flow control button to change to the
mode.
3. Push the fan speed control buttons to set the desired fan speed.
4. Push the temperature control buttons to set the desired temperature.
Page 226 of 482
Heating and defogging:
This mode heats the interior and defogs the
windows.
1. Push the air flow control button to change tothe
mode.
2. Push the fan speed control
buttons to
set the desired fan speed.
3. Push the temperature control buttons to set the desired temperature.
When the
mode is selected, the air
conditioner will automatically turn on. This will
dehumidify the air and help to defog the
windows. The A/C indicator light will illuminate
when the air conditioner automatically turns on.
The air conditioner and A/C indicator light will
remain on in all flow control modes until the A/C
button is pressed.
Air conditioner operation
The air conditioner system should be operated
for approximately 10 minutes at least once a
month. This helps prevent damage to the air
conditioner system due to the lack of lubrication.
Cooling:
This mode is used to cool and dehumidify the air.
1. Push the outside air circulation “
” button
to switch to the outside air circulation mode.
(The indicator light turns on.) 2. Push the air flow control button to change to
the
mode.
3. Push the fan speed control buttons to set the desired fan speed.
4. Push the A/C button on. (The A/C indicator light will illuminate.)
5. Push the temperature control buttons to set the desired temperature between the middle
and the cool position.
. For quick cooling when the outside tem-
perature is high, push the air recirculation
button to switch to the air recirculation
mode. (The indicator light turns on.) Be sure
to turn off the air recirculation mode for
normal cooling.
. A visible mist may be seen coming from the
ventilators in hot, humid conditions as the air
is cooled rapidly. This does not indicate a
malfunction.
Dehumidified heating:
This mode is used to heat and dehumidify the
air.
1. Push the outside air circulation “
” button
to switch to the outside air circulation mode.
(The indicator light turns on.)
2. Push the air flow control button to change to the
position. 3. Push the fan speed control buttons to the
desired fan speed.
4. Push the A/C button on. (The A/C indicator light will illuminate.)
5. Push the temperature control buttons to set the desired temperature between the middle
and the hot position.
Dehumidified or defrosting/defogging:
This mode is used to defog the windows and
dehumidify the air.
1. Push the front defroster button
on. (The
indicator light turns on.)
2. Push the fan speed control buttons to set the desired fan speed.
3. Push the temperature control buttons to set the desired temperature.
When the
mode is selected, the air
conditioner will automatically turn on. This will
dehumidify the air and help to defog the
windows. The A/C indicator light will illuminate
when the air conditioner automatically turns on.
The air conditioner and A/C indicator light will
remain on in all flow control modes until the A/C
button is pushed.
To remove frost from the outside surface of the
windshield quickly, set the temperature to the
maximum hot position and the fan speed to
maximum position.
Monitor, heater, air conditioner, audio, phone and voice recognition systems4-43
Page 227 of 482
4-44Monitor, heater, air conditioner, audio, phone and voice recognition systems
Rear air conditioning system
Operating from front control buttons:
To control the rear air conditioning system
independently with the front air conditioner
control panel, push the “REAR” button. When
the rear air conditioning system control is on, the
indicator light on the “REAR” button will
illuminate and “REAR” will appear on the display.
In this state, the rear air conditioning system can
be adjusted with the front air conditioner control
panel. However, if no operation is conducted for
approximately 10 seconds after the “REAR”
button is pushed, the front air conditioner
control panel will automatically switch to the
front air conditioning mode.
To cancel the rear air conditioning mode and
switch back to the front air conditioning mode,
push “REAR” button one more time.
.Temperature control
Push the temperature control buttons
(“
” and “”) to set the desired
temperature.
. Fan speed control
Push the fan speed control “
”
button or “” button to control the
fan speed.
. Air flow control
Push the “MODE” button to change the air flow mode.
: The air outlet is fixed at foot level.
: The air outlet is fixed at both the head and
foot level.
: The air outlet is fixed at the head level.
NOTE:
Pushing the “A/C” button when the rear air
conditioning system is turned on and
“REAR” does not appear on the display
will turn off the rear air conditioning
system (except when the air flow is set to
the
position) .
. Rear Heating (A/C off)
1. Push the “REAR” button to display “REAR” on the front display when the rear air
conditioning system is on.
2. Switch the air flow mode to
by pressing
the “MODE” button.
3. If the A/C indicator light illuminates, push the “A/C” button. (The A/C indicator light will
turn off.)
4. Push the temperature control buttons (“
” and “”) to set the desired
temperature between the middle and the
hot position.
. To dehumidify the air, push the “A/C” button
before turning on the heater. .
Air does not blow out from the vents on the
ceiling when the system is used for heating.
Turning the system off:
To turn off the rear air conditioner, push the
“ON·OFF” button when “REAR” is on the
display.
Page 230 of 482
Automatic operation (AUTO)
The AUTO mode may be used year-round as the
system automatically controls constant tempera-
ture, air flow distribution and fan speed after the
desired temperature is set manually.
To turn the heater and air conditioner on or off,
push the “ON·OFF” button.
Cooling and dehumidified heating:
1. Push the “AUTO” button.(The AUTO indicator light will illuminate.)
2. If the A/C indicator light does not illuminate, push the “A/C” button.
(The A/C indicator light will illuminate.)
3. Push the temperature control buttons (“
” and “”) (driver’s side) to set the
desired temperature.
.The temperature can be set within the range of 60 to 908F (18 to 328C) .
.When “DUAL” does not appear on thedisplay:
— Pushing the “AUTO” button changes both the driver’s and front passenger’s
side temperature.
— Pushing the “DUAL” button allows the user to independently change the front
passenger’s side temperature with the
passenger side temperature control but- tons (“
” and “”) . (“DUAL” will
appear on the display.)
To cancel the separate temperature
setting, push the “DUAL” button (“DUAL”
will disappear from the display) and the
driver’s side temperature setting will be
applied to both the driver’s and front
passenger’s sides.
4. Models with Advanced Climate Control System:
.Push the “AUTO” auto-recirculation
button. The indicator light on the “
AUTO” auto-recirculation button will illu-
minate. In this mode, the sensor detects
odors and gas to automatically switch
between the air recirculation mode and
the outside air circulation mode. (See
“Advanced climate control system” (P.4-
50) for details.)
Models without Advanced Climate Control
System:
.Push and hold the air recirculation “”
button or outside air circulation “”
button (the one with the indicator light
on) for more than 2 seconds to set the
automatic control between the air recir-
culation and outside air circulation
modes. (The “
” and “” indicator
lights will blink twice.)
The following conditions need to be met for the automatic air intake control mode to function
properly.
.
The air flow control is not in the front
defroster mode (the indicator light on the
front defroster “
FRONT” button is
turned off).
. The outside temperature is approximately
328F(0 8C) or above.
A visible mist may be seen coming from the
ventilators in hot, humid conditions as the air is
cooled rapidly. This does not indicate a mal-
function.
Heating (A/C off):
1. Push the “AUTO” button.
(The AUTO indicator light will illuminate.)
2. If the A/C indicator light illuminates, push the “A/C” button.
(The A/C indicator light will turn off.)
3. Push the temperature control buttons (“
” and “”) (driver’s side) to set the
desired temperature.
When the DUAL mode is turned off (“DUAL”
does not appear on the display):
.Pushing the “AUTO” button changes both the driver’s and front passenger’s
side temperature.
Monitor, heater, air conditioner, audio, phone and voice recognition systems4-47
Page 231 of 482
4-48Monitor, heater, air conditioner, audio, phone and voice recognition systems
.Pushing the “DUAL” button allows theuser to independently change the front
passenger’s side temperature with the
passenger side temperature control but-
tons (“
”or“”) . (“DUAL” will
appear on the display.)
To cancel the separate temperature
setting, push the “DUAL” button (“DUAL”
will disappear from the display) and the
driver’s side temperature setting will be
applied to both the driver’s and front
passenger’s sides.
4. Models with Advanced Climate Control System:
.Push the “AUTO” auto-recirculation
button. The indicator light on the “
AUTO” auto-recirculation button will illu-
minate. In this mode, the sensor detects
odors and gas to automatically switch
between the air recirculation mode and
the outside air circulation mode. (See
“Advanced climate control system” (P.4-
50) for details.)
Models without Advanced Climate Control
System:
.Push and hold the air recirculation “”
button or outside air circulation “”
button (the one with the indicator light
on) for more than 2 seconds to set the
automatic control between the air recir- culation and outside air circulation
modes. (The “
”or“” indicator
light will blink twice.)
The following conditions need to be met for the
automatic air intake control mode to function
properly.
. The air flow control is not in the front
defroster mode (the indicator light on the
front defroster “
FRONT” button is
turned off).
. The outside temperature is approximately
328F(0 8C) or above.
NOTE:
. Do not set the temperature lower than
the outside air temperature. Doing so
may prevent the temperature from
being controlled properly.
. To dehumidify the air, push the “A/C”
button before turning on the heater.
Dehumidified defrosting/defogging:
1. Push the front defroster “
FRONT”
button. (The indicator light will illuminate.)
2. Push the temperature control buttons (“
” and “”) to set the desired
temperature.
.To remove frost from the outside surface
of the windshield quickly, set the tem-
perature control and fan speed control to their maximum position.
.After the windshield is cleared, push the
“AUTO” button to set to the automatic
mode.
.When the front defroster “FRONT”
button is pushed, the air conditioner will
automatically turn on sensing the outside
air temperature to defog the windshield.
Do not select the air recirculation mode
for the best defogging performance.
NOTE:
Do not set the temperature too low when
the front defroster mode is on (the indi-
cator on the front defroster “
FRONT”
button is illuminated) . Doing so may fog
up the windshield.
Manual operation
The manual mode can be used to control the
heater and air conditioner to your desired
settings.
Fan speed control:
Push the fan speed control button “
”to
increase the fan speed.
Push the fan speed control button “
”to
decrease the fan speed.
Push the “AUTO” button to change the fan
speed to the automatic mode.
Page 232 of 482
Air flow control:
Push the “MODE” button to change the air flow
mode.
: Air flows from the center and side ventila-tors.
: Air flows from the center and side ventila-tors, and foot outlets.
: Air flows mainly from the foot outlets.
: Air flows from the defroster and foot outlets.
Temperature control:
Push the temperature control buttons (“
”
and “”) to set the desired temperature.
The temperature can be set within the range of
60 to 908F (18 to 328C) .
Air recirculation:
Push the air recirculation “
” button to
recirculate interior air inside the vehicle. The
indicator light on the air recirculation “
”
button will illuminate.
The air recirculation mode cannot be activated
when the air conditioner is in the front defrosting
mode.
Outside air circulation:
. Models with Advanced Climate Control
System:
Push the air recirculation “
” button twice
to draw outside air into the passenger compartment. The indicator light on the air
recirculation “
” button will turn off.
. Models without Advanced Climate Control
System:
Push the outside air circulation “
” button
to draw outside air into the passenger
compartment. The indicator light on the
outside air circulation “
” button will turn
on.
Automatic air intake control:
. Models with Advanced Climate Control
System:
Push the “
AUTO” auto-recirculation”
button to switch to the automatic air intake
control mode. The indicator light on the
“
AUTO” auto-recirculation button will
illuminate. In this mode, the sensor detects
odors and gas to automatically switch
between the air recirculation mode and the
outside air circulation mode. (See “Ad-
vanced climate control system” (P.4-50) for
details.)
. Models without Advanced Climate Control
System:
To switch to the automatic control mode,
push the intake air control button for about 2
seconds. The indicator lights (both air
recirculation “
” and outside air circula-
tion “” buttons) will flash twice, and then the intake air will be controlled automatically.
The following conditions need to be met for the
automatic air intake control mode to function
properly.
. The air flow control is not in the front
defroster mode (the indicator light on the
front defroster “
FRONT” button is
turned off).
. The outside temperature is approximately
08C (328F) or above.
Monitor, heater, air conditioner, audio, phone and voice recognition systems4-49