Page 178 of 397
 , place the power
switch in the ON position and push the switch
�1
on. The indicator light will illuminate. Push the
switc")
To defog/defrost the rear window glass and out-
side mirrors (if so equipped) , place the power
switch in the ON position and push the switch
�1
on. The indicator light will illuminate. Push the
switch again to turn the defroster off.
It will automatically turn off in approximately 15
minutes.
CAUTION
When cleaning the inner side of the rear
window, be careful not to scratch or dam-
age the rear window defroster.The instrument brightness control switch can be
operated when the power switch is in the ON
position. When the switch is operated, the ve-
hicle information display switches to the bright-
ness adjustment mode.
Push the switch
�1to display the setting menu of
the brightness control on the vehicle information
display.
Push the
�1button to move the bar to the + side.
If the bar reaches the maximum brightness, a
chime will sound. If the button
�1is pushed again
when the brightness is at the maximum setting,
the instrument lights turn off.If the button
�1is pushed again, the instrument
lights are turned on to the lowest brightness
setting.
Type AType B
REAR WINDOW AND OUTSIDE
MIRROR DEFROSTER SWITCHINSTRUMENT BRIGHTNESS
CONTROL
2-42Instruments and controls
Page 211 of 397
WARNING SIGNALS
To help prevent the vehicle from moving unex-
pectedly by erroneous operation of the Intelligent
Key listed on the following chart or to help pre-
vent the vehicle from being stolen, chime or beep
sounds inside and outside the vehicle and a
warning displays in the vehicle information dis-
play.
When a chime or beep sounds or the warning
displays, be sure to check the vehicle and Intelli-
gent Key.
See “Troubleshooting guide” and “Vehicle infor-
mation display” in the “Instruments and controls”
section.
Pre-driving checks and adjustments3-11
Page 212 of 397

TROUBLESHOOTING GUIDE
Symptom Possible cause Action to take
When opening the driver’s door to
get out of the vehicleThe inside warning chime sounds continuously.The power switch is pushed to the OFF po-
sition while the driver’s door is open.Close the driver’s door.
The power switch is in the ACC position.Push the power switch to the OFF position then
close the driver’s door.
When closing the door after getting
out of the vehicleThe KEY is not detected warning appears on the
display, the outside chime sounds 3 times and the
inside warning chime sounds for a few seconds.The power switch is in the ACC or ON posi-
tion.Push the power switch to the OFF position.
When closing the door with the in-
side lock knob turned to LOCKThe outside chime sounds for a few seconds and
all the doors unlock.The Intelligent Key is inside the vehicle or
cargo area.Carry the Intelligent Key with you.
When pushing the request switch or
the “LOCK”
button on the Intel-
ligent Key to lock the doorThe outside chime sounds for a few seconds.The Intelligent Key is inside the vehicle or a
cargo area.Carry the Intelligent Key with you.
A door is not closed securely. Close the door securely.
When pushing the power switch in
the READY to drive positionThe Intelligent Key battery discharge indicator ap-
pears on the display.The Intelligent Key battery charge is low.Replace the battery with a new one. See “Key
battery replacement” in the “Maintenance and
do-it-yourself” section.
The Key is not detected warning appears on the
display and the inside warning chime sounds for a
few seconds.The Intelligent Key is not in the vehicle. Carry the Intelligent Key with you.
When pushing the power switchThe Intelligent Key system warning indicator ap-
pears on the display.It warns of a malfunction with the Intelligent
Key system.Contact a NISSAN certified LEAF dealer.
3-12Pre-driving checks and adjustments
Page 225 of 397
.............4-2
How to read the displayed lines.............4-3
Difference between predicted and actual
distances..")
4 Heater, air conditioner, audio and phone
systems
Rearview monitor (if so equipped).............4-2
How to read the displayed lines.............4-3
Difference between predicted and actual
distances..........................4-3
Adjusting the screen...................4-5
Operating tips.......................4-5
Vents..............................4-6
Center vents........................4-6
Side vents.........................4-6
Climate control system....................4-7
Automatic climate control (models without
Navigation System)...................4-10
Automatic climate control (models with
Navigation System)...................4-16
Audio system (models without Navigation System). . .4-24
Radio...........................4-24
FM radio reception...................4-25
AM radio reception...................4-25
Satellite radio reception................4-25
Audio operation precautions..............4-26FM-AM-SAT radio with compact disc (CD)
player (models without Navigation System).....4-32
USB memory operation.................4-37
iPod® player operation................4-38
CD Care and cleaning.................4-40
Steering wheel switch for audio control.......4-40
Antenna..........................4-42
Car phone or CB radio.................4-42
Bluetooth® hands-free phone system without
navigation system (if so equipped)............4-43
Regulatory information.................4-44
Using the system....................4-45
Control buttons.....................4-46
Getting started......................4-47
List of voice commands................4-48
Voice adaptation (VA) mode..............4-53
Manual control......................4-54
Troubleshooting guide.................4-54
Page 226 of 397
 position, the monitor display shows a rear-
ward view from the vehicle.
WARNING
Failure to follow the warnings and in-
structions for proper use")
When the shift lever is shifted into the R (Re-
verse) position, the monitor display shows a rear-
ward view from the vehicle.
WARNING
Failure to follow the warnings and in-
structions for proper use of the Rear View
Monitor could result in serious injury or
death.
• The RearView Monitor is a conve-
nience but it is not a substitute for
proper backing. Always turn and look
out the windows, and check mirrors to
be sure that it is safe to move before
operating the vehicle. Always back up
slowly.
• The system is designed as an aid to the
driver in showing large stationary ob-
jects directly behind the vehicle, to
help avoid damaging the vehicle.
• The system will not detect small ob-
jects below the bumper, and may not
detect objects close to the bumper or
on the ground.
• The system cannot completely elimi-
nate blind spots and may not show
every object.• Underneath the bumper and the corner
areas of the bumper cannot be viewed
on the RearView Monitor because of
its monitoring range limitation. The
system will not show objects below
the bumper, and may not show objects
close to the bumper or on the ground.
• Objects viewed in the RearView Moni-
tor differ from actual distance because
a wide-angle lens is used.
• Objects in the RearView Monitor will
appear visually opposite than when
viewed in the rear view and outside
mirrors.
• Make sure that the hatch is securely
closed when backing up.
• Do not put anything on the rearview
camera. The rearview camera is in-
stalled on top of the hatch.
• When washing the vehicle with high
pressure water, be sure not to spray it
around the camera. Otherwise, water
may enter the camera unit causing wa-
ter condensation on the lens, a mal-
function, fire or an electric shock.
• Do not strike the camera. It is a preci-
sion instrument. Otherwise, it may
malfunction or cause damage result-
ing in a fire or an electric shock.
CAUTION
There is a plastic cover over the camera.
Do not scratch the cover when cleaning
dirt or snow from the cover.
REARVIEW MONITOR (IF SO
EQUIPPED)
4-2Heater, air conditioner, audio and phone systems
Page 227 of 397
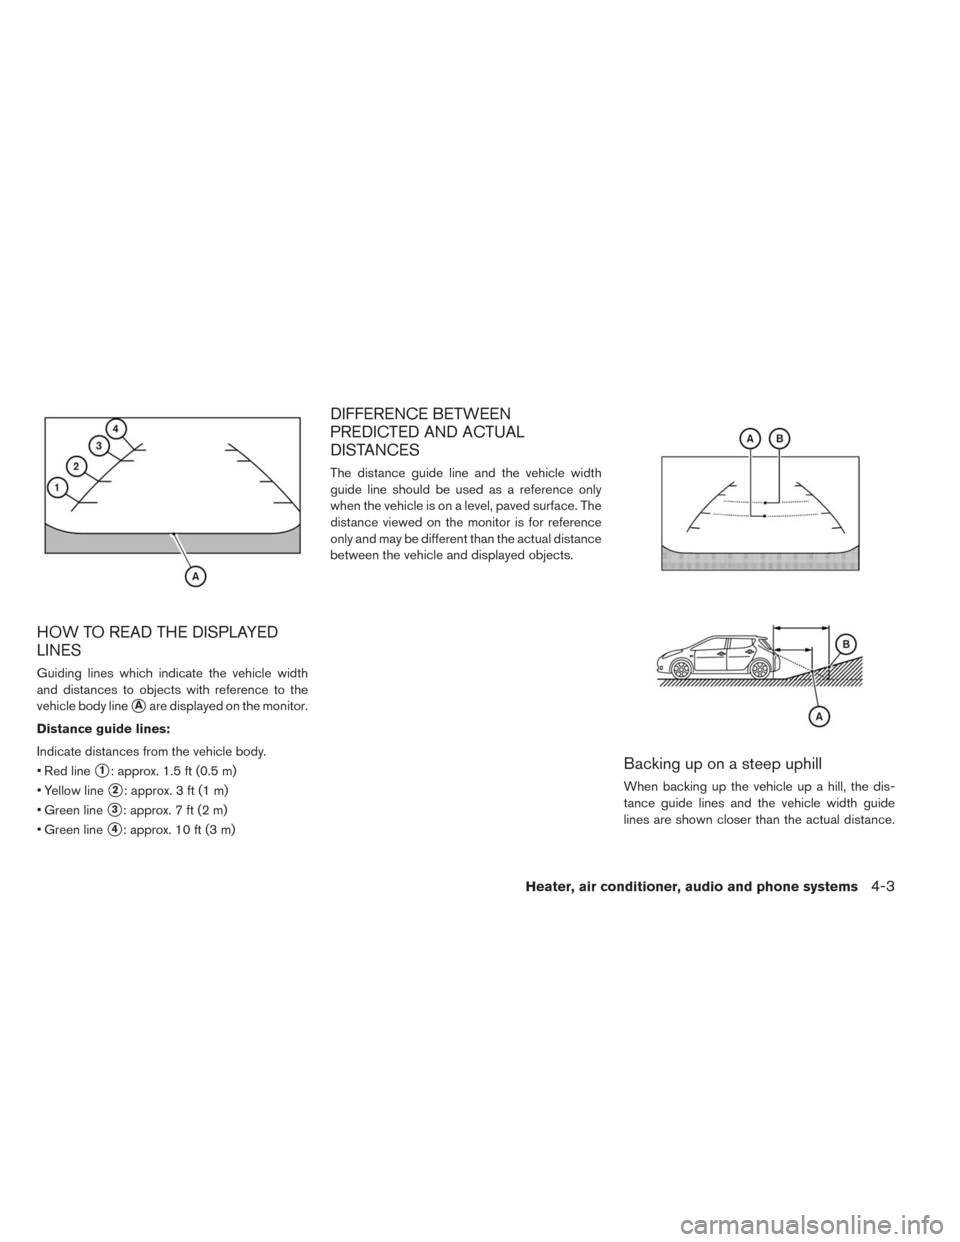
HOW TO READ THE DISPLAYED
LINES
Guiding lines which indicate the vehicle width
and distances to objects with reference to the
vehicle body line
�Aare displayed on the monitor.
Distance guide lines:
Indicate distances from the vehicle body.
• Red line
�1: approx. 1.5 ft (0.5 m)
• Yellow line
�2: approx. 3 ft (1 m)
• Green line
�3: approx. 7 ft (2 m)
• Green line
�4: approx. 10 ft (3 m)
DIFFERENCE BETWEEN
PREDICTED AND ACTUAL
DISTANCES
The distance guide line and the vehicle width
guide line should be used as a reference only
when the vehicle is on a level, paved surface. The
distance viewed on the monitor is for reference
only and may be different than the actual distance
between the vehicle and displayed objects.
Backing up on a steep uphill
When backing up the vehicle up a hill, the dis-
tance guide lines and the vehicle width guide
lines are shown closer than the actual distance.
Heater, air conditioner, audio and phone systems4-3
Page 228 of 397
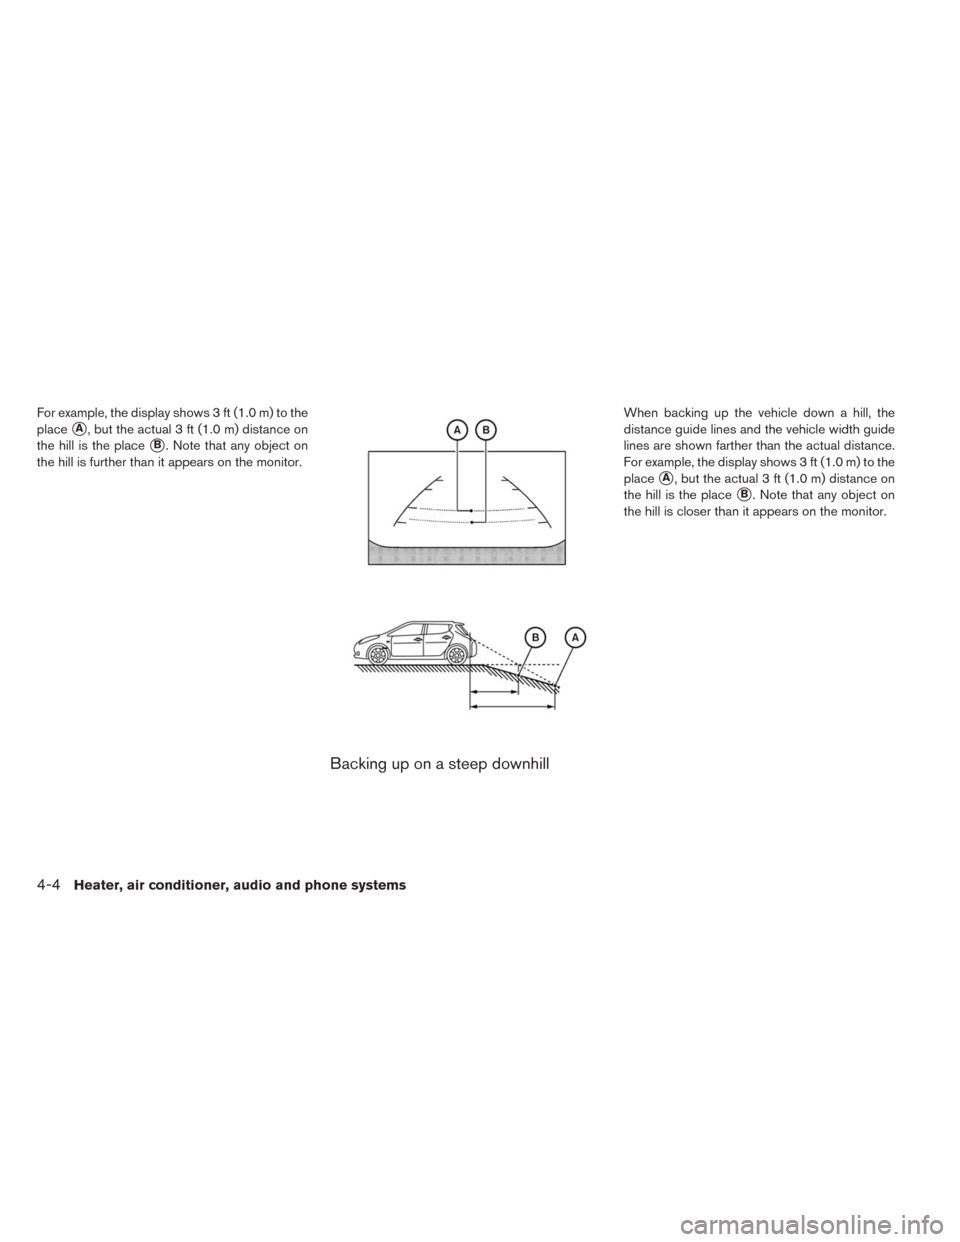
For example, the display shows 3 ft (1.0 m) to the
place
�A, but the actual 3 ft (1.0 m) distance on
the hill is the place
�B. Note that any object on
the hill is further than it appears on the monitor.
Backing up on a steep downhill
When backing up the vehicle down a hill, the
distance guide lines and the vehicle width guide
lines are shown farther than the actual distance.
For example, the display shows 3 ft (1.0 m) to the
place
�A, but the actual 3 ft (1.0 m) distance on
the hill is the place
�B. Note that any object on
the hill is closer than it appears on the monitor.
4-4Heater, air conditioner, audio and phone systems
Page 229 of 397

Backing up behind a projecting object
The position�Cis shown farther than the position
�Bin the display. However, the position�Cis
actually at the same distance as the position
�A.
The vehicle may hit the object when backing up to
the position
�Aif the object projects over the
actual backing up course.
ADJUSTING THE SCREEN
The procedure for adjusting the quality of the
screen differs depending on the type of screen
present on the vehicle.
For vehicles without Navigation System:
1. Press the ENTER/SETTING button.
2. Turn the TUNE-SCROLL knob to highlight the
“Brightness” or “Contrast” key.
3. Press the ENTER/SETTING button.
4. Adjust the level using the TUNE-SCROLL
knob and then press the ENTER/SETTING
button to apply the adjustment.• Do not adjust the Brightness or Contrast of the
RearView Monitor while the vehicle is moving.
OPERATING TIPS
• When the shift lever is shifted to R (Reverse) ,
the monitor screen automatically changes to the
RearView Monitor mode. However, the radio
can be heard.
• It may take some time until the RearView Moni-
tor is displayed after the shift lever has been
shifted to R (Reverse) . Objects may be dis-
torted momentarily until the RearView Monitor
screen is displayed completely. When the shift
lever is returned to a position other than R
(Reverse) , it may take some time until the
screen changes. Objects on the screen may be
distorted until they are completely displayed.
• When the temperature is extremely high or low,
the screen may not clearly display objects. This
is not a malfunction.
• When strong light directly enters the camera,
objects may not be displayed clearly.
• Vertical lines may be seen in objects on the
screen. This is due to strong reflected light from
the bumper. This is not a malfunction.
• The screen may flicker under fluorescent light.
This is not a malfunction.
Heater, air conditioner, audio and phone systems4-5