2014 NISSAN JUKE buttons
[x] Cancel search: buttonsPage 198 of 402
during this 5 seconds period will stop SCAN
tuning and the radio will remain tuned to that
station.
If the SCAN tuning button is not pushed within 5
seconds, SCAN tuning moves to the next
station.
toStation memory operations:
12 stations can be set for the FM band (6 each
for FM1 and FM2) , 18 for SiriusXM Satellite
Radio (6 each for XM1, XM2 and XM3)* and 6
can be set for the AM band for easy access.
1. Choose the radio band using the radio band select button.
2. Tune to the desired station using the SEEK, SCAN or TUNE button.
3. Push and hold the desired radio station preset button
tountil a beep sound is
heard. (The radio mutes when the radio
station preset button is pushed.)
4. The station indicator will then come on and the sound will resume. Memorizing is now
complete.
5. Other buttons can be set in the same manner.
If the battery cable is disconnected, or if the fuse
opens, the radio memory will be erased. In that
case, reset the desired stations. *: if so equipped
Radio Data System (RDS):
RDS stands for Radio Data System, and is a
data information service transmitted by some
radio stations on the FM band (not AM band)
encoded within a regular radio broadcast.
Currently, most RDS stations are in large cities,
but many stations are now considering broad-
casting RDS data.
RDS can display:
.
Station call sign, such as “WHFR 98.3”.
. Station name, such as “The Groove”.
. Music or programming type such as “Clas-
sical”, “Country” or “Rock”.
. Traffic reports about delays or construction.
If the station broadcasts RDS information, the
RDS icon is displayed.
RADIO DISPLAY change:
When the DISP/TEXT button is pushed during
the FM or SAT radio mode, the radio display will
change in the following order.
. For FM radio:
Frequency ↔PS (Programme Service)/PTY
(Programme type)
. For SiriusXM Satellite Radio*:
Category Name ?Channel Name ?Artist/ Feature
?Song/Program
In the FM radio mode, pushing the DISP/TEXT
button will switch the frequency display to the
PTY display (if available) , and if the DISP/TEXT
button is not pushed again within 5 seconds, it
will automatically switch to the PS display. If PTY
is not available, pushing the DISP/TEXT button
will only switch between the frequency display
and the PS display.
*: if so equipped
Heater, air conditioner, audio and phone systems4-43
Page 201 of 402
4-46Heater, air conditioner, audio and phone systems
connecting the iPod®to the vehicle, the iPod®
can only be operated by the vehicle audio
controls.
To disconnect the cable from the vehicle outlet,
fully depress the center connector button to
unlatch the connector and pull the connector
straight out of the outlet. To disconnect the
cable from the iPod
®, fully depress the side
connector buttons and pull the iPod®connector
straight out of the iPod®.
*iPod®, iPhone®and FireWire®are a trademark
of Apple Inc., registered in the U.S. and other
countries.
Compatibility:
The following models are available:
. Third generation iPod
®(Firmware version
2.3 or later) (Audiobook and Podcast are not
available)
. Fourth generation iPod
®(Firmware version
3.1.1 or later)
. Fifth generation iPod
®(Firmware version
1.1.2 or later)
. iPod mini
®(Firmware version 1.41 or later)
. iPod photo®(Firmware version 1.2.1 or
later)
. iPod nano
®(Firmware version 1.2 or later)
The fourth generation iPod nano®, iPod touch®,
the second generation iPod Classic®and iPhone
®3G may not work with the system in
some cases.
Make sure that your iPod
®firmware is updated.
* 12V-charge iPod®s are not chargeable with
this system.
iPod®button:
Place the ignition switch in the ACC or ON
position. Then, push the iPod
®button to switch
to the iPod®mode.
If another audio source is playing and the iPod®
is connected, pushing the iPod®button changes
to the iPod®mode.
If the system has been turned off while the iPod®
was playing, pushing the PWR button will start
the iPod®.
Top menu item selecting:
When the iPod®MENU button is pushed while
the iPod®is connected, the interface for iPod®
operation is shown on the audio display. The
items on the menu list can be scrolled by
pushing the SEEK button
orand the
TUNE buttonorwhile the iPod®is
operational. To select an item, push ENTER. The
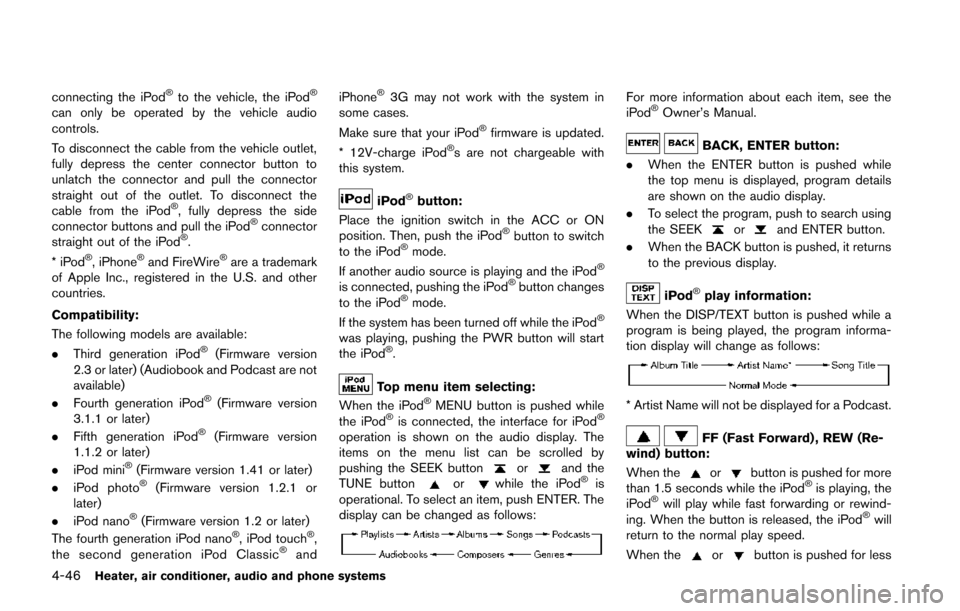
display can be changed as follows:
For more information about each item, see the
iPod®Owner’s Manual.
BACK, ENTER button:
. When the ENTER button is pushed while
the top menu is displayed, program details
are shown on the audio display.
. To select the program, push to search using
the SEEK
orand ENTER button.
. When the BACK button is pushed, it returns
to the previous display.
iPod®play information:
When the DISP/TEXT button is pushed while a
program is being played, the program informa-
tion display will change as follows:
* Artist Name will not be displayed for a Podcast.
FF (Fast Forward) , REW (Re-
wind) button:
When the
orbutton is pushed for more
than 1.5 seconds while the iPod®is playing, the
iPod®will play while fast forwarding or rewind-
ing. When the button is released, the iPod®will
return to the normal play speed.
When the
orbutton is pushed for less
Page 203 of 402
4-48Heater, air conditioner, audio and phone systems
SAA3425
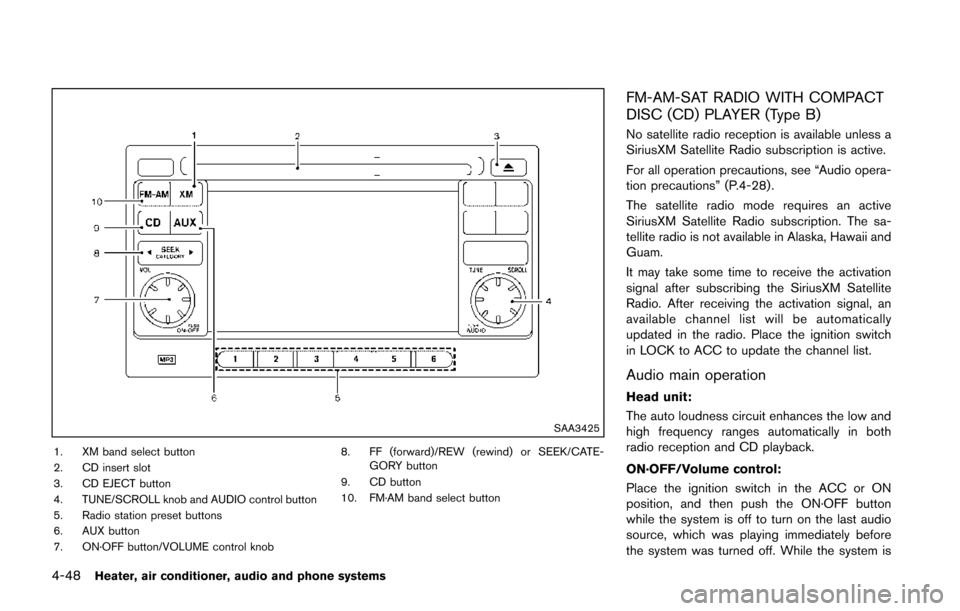
1. XM band select button
2. CD insert slot
3. CD EJECT button
4. TUNE/SCROLL knob and AUDIO control button
5. Radio station preset buttons
6. AUX button
7. ON·OFF button/VOLUME control knob8. FF (forward)/REW (rewind) or SEEK/CATE-
GORY button
9. CD button
10. FM·AM band select button
FM-AM-SAT RADIO WITH COMPACT
DISC (CD) PLAYER (Type B)
No satellite radio reception is available unless a
SiriusXM Satellite Radio subscription is active.
For all operation precautions, see “Audio opera-
tion precautions” (P.4-28) .
The satellite radio mode requires an active
SiriusXM Satellite Radio subscription. The sa-
tellite radio is not available in Alaska, Hawaii and
Guam.
It may take some time to receive the activation
signal after subscribing the SiriusXM Satellite
Radio. After receiving the activation signal, an
available channel list will be automatically
updated in the radio. Place the ignition switch
in LOCK to ACC to update the channel list.
Audio main operation
Head unit:
The auto loudness circuit enhances the low and
high frequency ranges automatically in both
radio reception and CD playback.
ON·OFF/Volume control:
Place the ignition switch in the ACC or ON
position, and then push the ON·OFF button
while the system is off to turn on the last audio
source, which was playing immediately before
the system was turned off. While the system is
Page 205 of 402
4-50Heater, air conditioner, audio and phone systems
frequency. To return to the regular radio display
screen, touch the “OK” key.
toStation memory operations:
12 stations/channels can be set for the FM band
(6 each for FM1 and FM2) , 18 for SiriusXM
Satellite Radio (6 each for XM1, XM2 and XM3)
and 6 stations can be set for the AM band.
1. Choose the radio band using the radio band select button.
2. Tune to the desired station/channel using the SEEK/CATEGORY button or the TUNE
knob.
3. Push and hold the desired station preset button
tountil the beep sound is
heard.
4. The station indicator will then come on and the sound will resume. Memorizing is now
complete.
5. Other buttons can be set in the same manner.
If the battery cable is disconnected, or if the fuse
opens, the radio memory will be erased. In that
case, reset the desired stations/channels.
Channels (SiriusXM Satellite Radio):
When the SiriusXM Satellite Radio is being
played, select “Channels” key to display a list of
channels. Select a preferred channel from the list to change to that channel.
Categories (SiriusXM Satellite Radio):
When the SiriusXM Satellite Radio is being
played, select “Categories” key to display a list
of channels. Select a preferred channel from the
list to display options within that category.
Compact Disc (CD) player operation
Place the ignition switch in the ACC or ON
position and insert the Compact Disc (CD) into
the slot with the label side facing up. The CD will
be guided automatically into the slot and start
playing.
If the radio is already operating, it will auto-
matically turn off and the CD will play.
If the system has been turned off while the CD
was playing, pushing the ON·OFF button will
start the CD.
Do not use 3.1 in (8 cm) discs.
PLAY:
When the CD button is pushed with the system
off and the CD loaded, the system will turn on
and the CD will start to play.
When the CD button is pushed with the CD
loaded and the radio playing, the radio will
automatically be turned off and the CD will start
to play. While listening to a CD or an MP3/WMA CD,
certain text may be displayed (when a CD
encoded with text is being used). Depending on
how the CD or MP3/WMA CD is encoded, the
text is displayed listing the artist, album and
song title.
Next/Previous Track and Fast
Forward/Rewind:
When the
orbutton is pushed for more
than 1.5 seconds while the CD is being played,
the CD will play while fast forwarding or
rewinding. When the button is released, the
CD will return to normal play speed.
When the
orbutton is pushed for less
than 1.5 seconds while the CD is being played,
the next track or the beginning of the current
track on the CD will be played.
When the rewind button is pushed for less than
1.5 seconds within 3 seconds after the current
track starts playing, the previous track will be
played.
Page 210 of 402
WARNING
Do not connect, disconnect or operate
the USB device while driving. Doing so
can be a distraction. If distracted you
could lose control of your vehicle and
cause an accident or serious injury.
CAUTION
.Do not force the USB device into the
USB port. Inserting the USB device
tilted or up-side-down into the port
may damage the port. Make sure
that the USB device is connected
correctly into the USB port.
. Do not grab the USB port cover (if
so equipped) when pulling the USB
device out of the port. This could
damage the port and the cover.
. Do not leave the USB cable in a
place where it can be pulled unin-
tentionally. Pulling the cable may
damage the port.
Refer to your device manufacturer’s owner
information regarding the proper use and care of the device.
Compatibility:
The following models are available:
. Fifth generation iPod
®(version 1.2.3 or
later)
. iPod Classic
®(version 1.1.1 or later)
. First generation iPod touch®(version 2.0.0
or later)
. Second generation iPod touch
®(version
1.2.3 or later)
. First generation iPod nano
®(version 1.3.1 or
later)
. Second generation iPod nano
®(version
1.1.3 or later)
. Third generation iPod nano
®(version 1.1 or
later)
. Fourth generation iPod nano
®(version 1.0.2
or later)
This unit may not control/operate correctly when
connected to some iPod
®versions/firmware and
iPhone®.
Make sure that the iPod®version is updated.
Audio main operation:
Place the ignition switch in the ACC or ON
position. Then, push the
button repeatedly
to switch to the iPod®mode.
If the system has been turned off while the iPod®
was playing, pushing the ON·OFF button will
start the iPod®.
.
PLAY:
When the
button is pushed with the
system off and the iPod®connected, the
system will turn on. If another audio source
is playing and the iPod
®is connected, push
thebutton repeatedly to switch to the
iPod®mode.
. Interface:
The interface for iPod
®operation shown on
the vehicle display is similar to the iPod®
interface. Use the touch screen, BACK
button or the TUNE/SCROLL knob to
navigate the menus on the screen.
The following items can be chosen from the
menu list screen. For further information
about each item, see the iPod
®Owner’s
Manual.
— Playlists
— Artists
— Songs
— Composers
— Audiobooks
— Podcasts
The following touch-panel buttons shown on
the screen are also available:
Heater, air conditioner, audio and phone systems4-55
Page 214 of 402
SiriusXM Satellite Radio service subscription is
active. Satellite radio is not available in Alaska,
Hawaii and Guam.
If a compact disc is playing when the SXM
button is pushed, the compact disc will auto-
matically be turned off and the last radio station
played will come on.
While the radio is in SXM mode, the operation
can be controlled through the touch-screen.
Touch the “Channels” key to display a list of
channels. Touch a channel displayed on the list
to change to that channel. Touch the “Cate-
gories” key to display a list of categories. Touch
a category displayed on the list to display
options within that category.
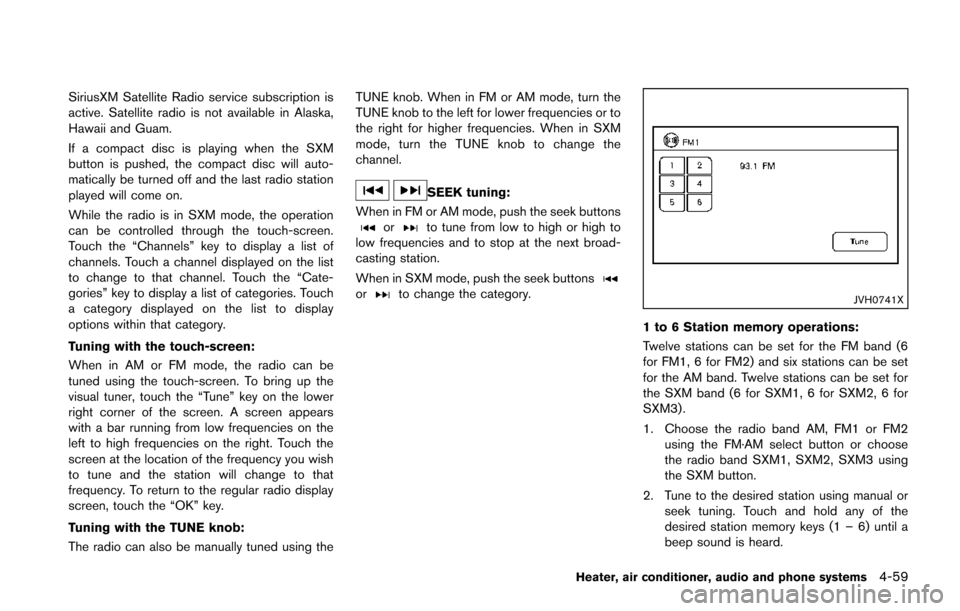
Tuning with the touch-screen:
When in AM or FM mode, the radio can be
tuned using the touch-screen. To bring up the
visual tuner, touch the “Tune” key on the lower
right corner of the screen. A screen appears
with a bar running from low frequencies on the
left to high frequencies on the right. Touch the
screen at the location of the frequency you wish
to tune and the station will change to that
frequency. To return to the regular radio display
screen, touch the “OK” key.
Tuning with the TUNE knob:
The radio can also be manually tuned using theTUNE knob. When in FM or AM mode, turn the
TUNE knob to the left for lower frequencies or to
the right for higher frequencies. When in SXM
mode, turn the TUNE knob to change the
channel.
SEEK tuning:
When in FM or AM mode, push the seek buttons
orto tune from low to high or high to
low frequencies and to stop at the next broad-
casting station.
When in SXM mode, push the seek buttons
orto change the category.JVH0741X
1 to 6 Station memory operations:
Twelve stations can be set for the FM band (6
for FM1, 6 for FM2) and six stations can be set
for the AM band. Twelve stations can be set for
the SXM band (6 for SXM1, 6 for SXM2, 6 for
SXM3) .
1. Choose the radio band AM, FM1 or FM2 using the FM·AM select button or choose
the radio band SXM1, SXM2, SXM3 using
the SXM button.
2. Tune to the desired station using manual or seek tuning. Touch and hold any of the
desired station memory keys (1 – 6) until a
beep sound is heard.
Heater, air conditioner, audio and phone systems4-59
Page 216 of 402
SEEK (Fast Forward/Rewind)
buttons:
Push and hold the seek buttons
orfor
1.5 seconds while the compact disc is playing to
reverse or fast forward the track being played.
The compact disc plays at an increased speed
while reversing or fast forwarding. When the
button is released, the compact disc returns to
normal play speed.
SEEK (Previous/Next Track)
buttons:
Push the seek button
while a CD or MP3/
WMA CD is playing to return to the beginning of
the current track. Push the seek button
several times to skip backward several tracks.
Push the seek button
while a CD or MP3/
WMA CD is playing to advance one track. Push
the seek button
several times to skip
forward several tracks. If the last track on a
CD is skipped, the first track on the disc is
played. If the last track in a folder of an MP3/
WMA CD is skipped, the first track of the next
folder is played.
CD eject button:
When the button is pushed with a compact disc
loaded, the compact disc will eject and the last
source will be played. If the disc is not removed within 10 seconds, the
disc will reload.
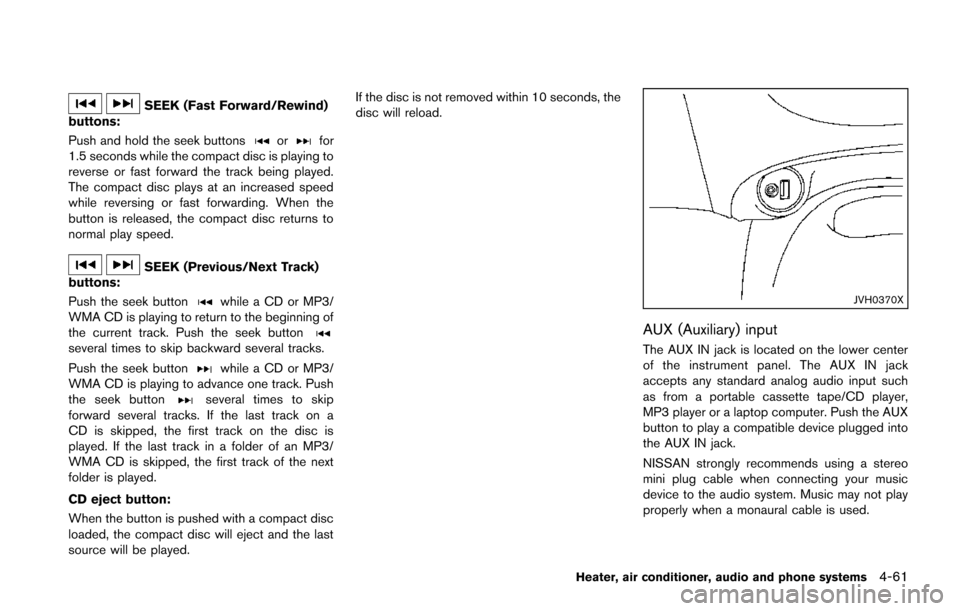
JVH0370X
AUX (Auxiliary) input
The AUX IN jack is located on the lower center
of the instrument panel. The AUX IN jack
accepts any standard analog audio input such
as from a portable cassette tape/CD player,
MP3 player or a laptop computer. Push the AUX
button to play a compatible device plugged into
the AUX IN jack.
NISSAN strongly recommends using a stereo
mini plug cable when connecting your music
device to the audio system. Music may not play
properly when a monaural cable is used.
Heater, air conditioner, audio and phone systems4-61
Page 231 of 402
4-76Heater, air conditioner, audio and phone systems
INFO
.If you are controlling the telephone system
by voice command for the first time or do not
know the appropriate voice command,
speak “Help”. The system announces the
available commands.
. When you speak numbers, you can speak
both “zero” or “oh” for “0”.
Manual command selection
Commands can be selected manually. While the
commands are displayed on the audio screen,
select a command by operating the audio tuning
switch, and then push the
switch. Once a
command is manually selected, the voice
command function is cancelled. To return to
voice command mode, push the
switch to
cancel the current operation, and then perform
the first procedure of voice command.
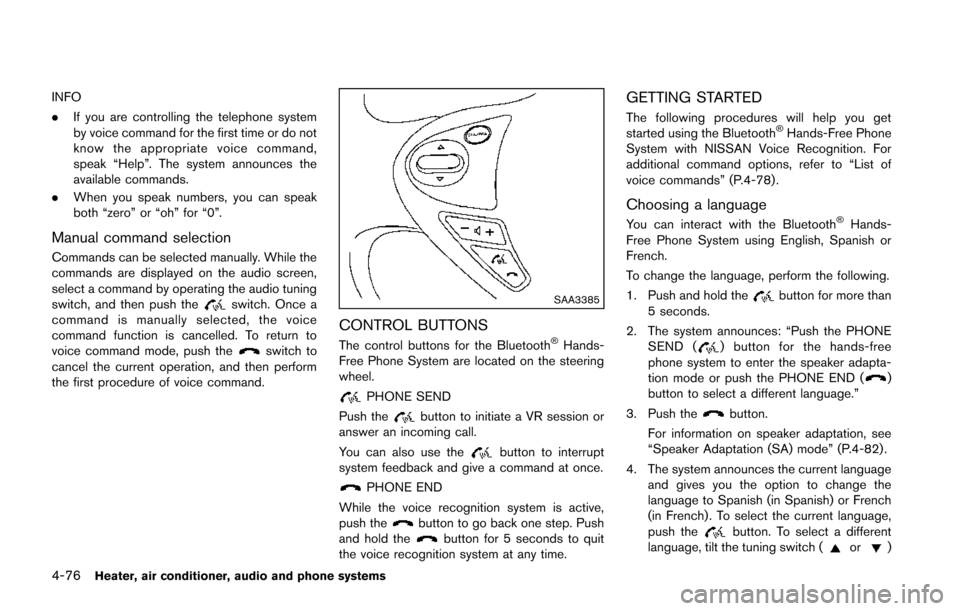
SAA3385
CONTROL BUTTONS
The control buttons for the Bluetooth®Hands-
Free Phone System are located on the steering
wheel.
PHONE SEND
Push the
button to initiate a VR session or
answer an incoming call.
You can also use the
button to interrupt
system feedback and give a command at once.
PHONE END
While the voice recognition system is active,
push the
button to go back one step. Push
and hold thebutton for 5 seconds to quit
the voice recognition system at any time.
GETTING STARTED
The following procedures will help you get
started using the Bluetooth®Hands-Free Phone
System with NISSAN Voice Recognition. For
additional command options, refer to “List of
voice commands” (P.4-78) .
Choosing a language
You can interact with the Bluetooth®Hands-
Free Phone System using English, Spanish or
French.
To change the language, perform the following.
1. Push and hold the
button for more than
5 seconds.
2. The system announces: “Push the PHONE SEND (
) button for the hands-free
phone system to enter the speaker adapta-
tion mode or push the PHONE END (
)
button to select a different language.”
3. Push the
button.
For information on speaker adaptation, see
“Speaker Adaptation (SA) mode” (P.4-82) .
4. The system announces the current language and gives you the option to change the
language to Spanish (in Spanish) or French
(in French) . To select the current language,
push the
button. To select a different
language, tilt the tuning switch (or)