2014 NISSAN JUKE heater
[x] Cancel search: heaterPage 8 of 402
Illustrated table of contents0
Safety — Seats, seat belts and supplemental
restraint system1
Instruments and controls
Pre-driving checks and adjustments
Heater, air conditioner, audio and phone systems
Starting and driving
In case of emergency
Appearance and care
Maintenance and do-it-yourself
Technical and consumer information
Index
2
3
4
5
6
7
8
9
10
Table of
Contents
Page 17 of 402
0-8Illustrated table of contents
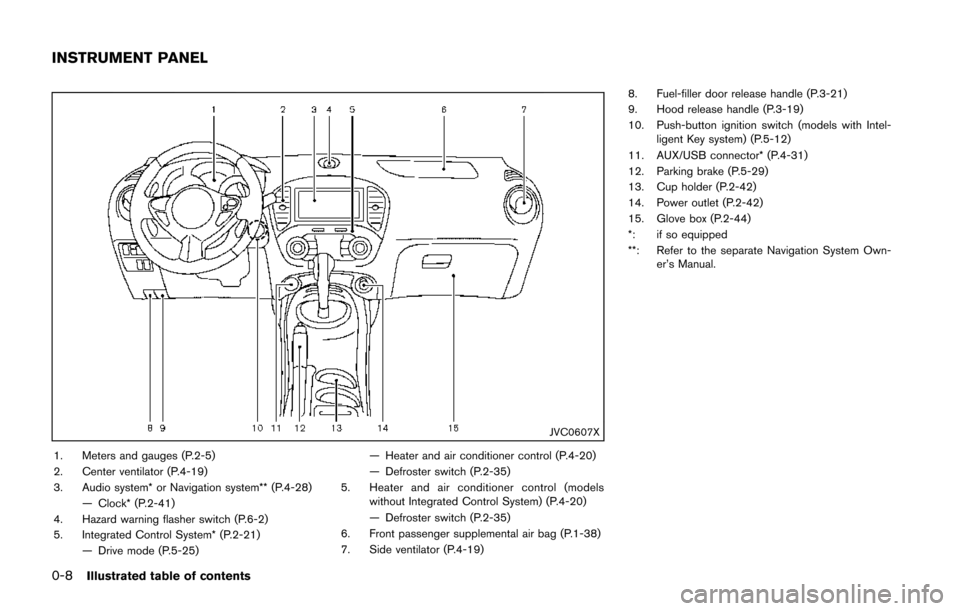
JVC0607X
1. Meters and gauges (P.2-5)
2. Center ventilator (P.4-19)
3. Audio system* or Navigation system** (P.4-28)— Clock* (P.2-41)
4. Hazard warning flasher switch (P.6-2)
5. Integrated Control System* (P.2-21) — Drive mode (P.5-25) — Heater and air conditioner control (P.4-20)
— Defroster switch (P.2-35)
5. Heater and air conditioner control (models without Integrated Control System) (P.4-20)
— Defroster switch (P.2-35)
6. Front passenger supplemental air bag (P.1-38)
7. Side ventilator (P.4-19) 8. Fuel-filler door release handle (P.3-21)
9. Hood release handle (P.3-19)
10. Push-button ignition switch (models with Intel-
ligent Key system) (P.5-12)
11. AUX/USB connector* (P.4-31)
12. Parking brake (P.5-29)
13. Cup holder (P.2-42)
14. Power outlet (P.2-42)
15. Glove box (P.2-44)
*: if so equipped
**: Refer to the separate Navigation System Own- er’s Manual.
INSTRUMENT PANEL
Page 79 of 402
2-4Instruments and controls
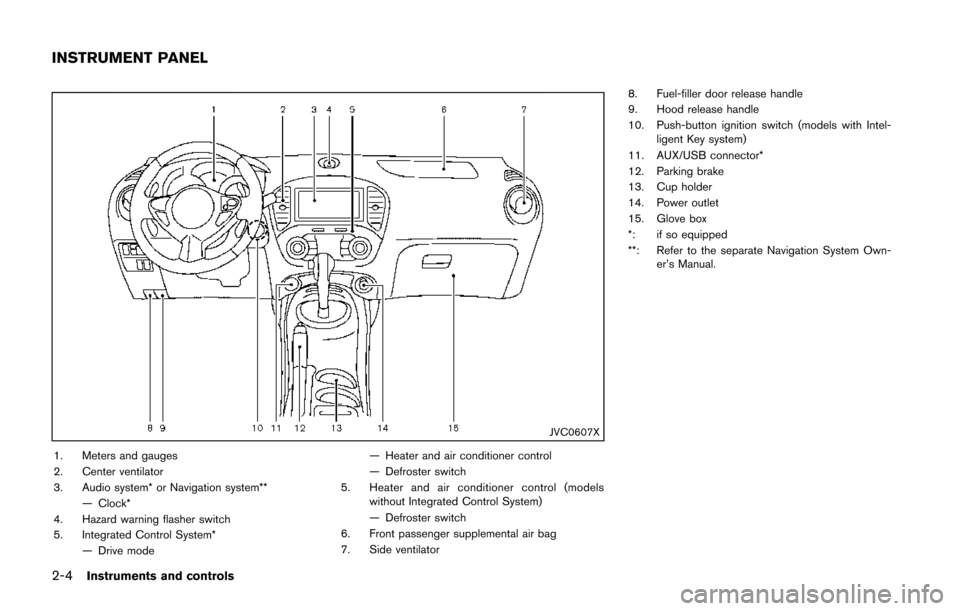
JVC0607X
1. Meters and gauges
2. Center ventilator
3. Audio system* or Navigation system**— Clock*
4. Hazard warning flasher switch
5. Integrated Control System* — Drive mode — Heater and air conditioner control
— Defroster switch
5. Heater and air conditioner control (models without Integrated Control System)
— Defroster switch
6. Front passenger supplemental air bag
7. Side ventilator 8. Fuel-filler door release handle
9. Hood release handle
10. Push-button ignition switch (models with Intel-
ligent Key system)
11. AUX/USB connector*
12. Parking brake
13. Cup holder
14. Power outlet
15. Glove box
*: if so equipped
**: Refer to the separate Navigation System Own- er’s Manual.
INSTRUMENT PANEL
Page 115 of 402
2-40Instruments and controls
WARNING
Do not use or allow occupants to use
the seat heater if you or the occupants
cannot monitor elevated seat tempera-
tures or have an inability to feel pain in
body parts that contact the seat. Use of
the seat heater by such people could
result in serious injury.
CAUTION
.The battery could run down if the
seat heater is operated while the
engine is not running.
. Do not use the seat heater for
extended periods or when no one
is using the seat.
. Do not put anything on the seat
which insulates heat, such as a
blanket, cushion, seat cover, etc.
Otherwise, the seat may become
overheated.
. Do not place anything hard or heavy
on the seat or pierce it with a pin or
similar object. This may result in damage to the heater.
. Any liquid spilled on the heated seat
should be removed immediately
with a dry cloth.
. When cleaning the seat, never use
gasoline, thinner, or any similar
materials.
. If any malfunctions are found or the
heated seat does not operate, turn
the switch off and have the system
checked by a NISSAN dealer.
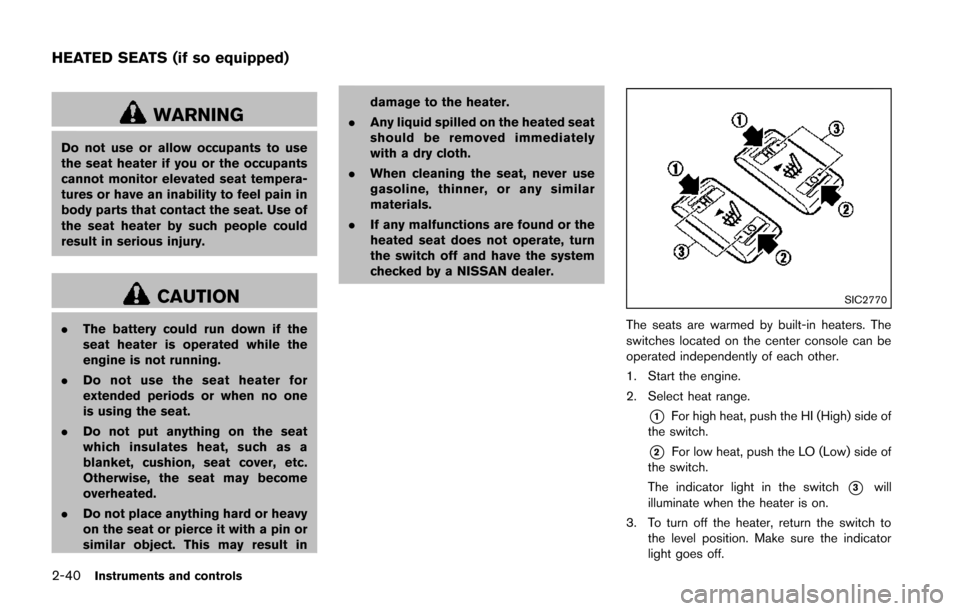
SIC2770
The seats are warmed by built-in heaters. The
switches located on the center console can be
operated independently of each other.
1. Start the engine.
2. Select heat range.
*1For high heat, push the HI (High) side of
the switch.
*2For low heat, push the LO (Low) side of
the switch.
The indicator light in the switch
*3will
illuminate when the heater is on.
3. To turn off the heater, return the switch to the level position. Make sure the indicator
light goes off.
HEATED SEATS (if so equipped)
Page 116 of 402
The heater is controlled by a thermostat,
automatically turning the heater on and off.
The indicator light will remain on as long as
the switch is on.
When the vehicle’s interior is warmed, or
before you leave the vehicle, be sure to turn
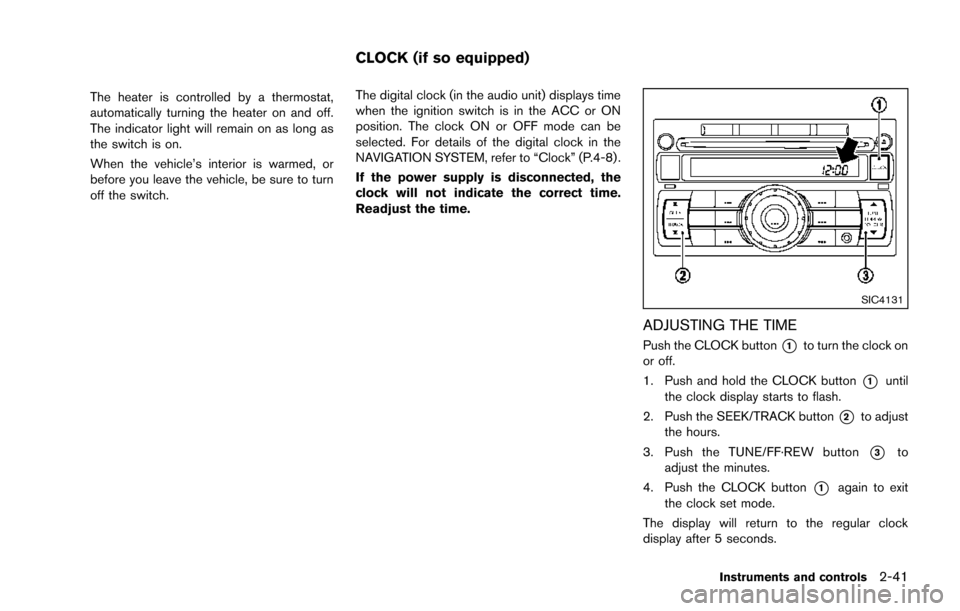
off the switch.The digital clock (in the audio unit) displays time
when the ignition switch is in the ACC or ON
position. The clock ON or OFF mode can be
selected. For details of the digital clock in the
NAVIGATION SYSTEM, refer to “Clock” (P.4-8) .
If the power supply is disconnected, the
clock will not indicate the correct time.
Readjust the time.
SIC4131
ADJUSTING THE TIME
Push the CLOCK button*1to turn the clock on
or off.
1. Push and hold the CLOCK button
*1until
the clock display starts to flash.
2. Push the SEEK/TRACK button
*2to adjust
the hours.
3. Push the TUNE/FF·REW button
*3to
adjust the minutes.
4. Push the CLOCK button
*1again to exit
the clock set mode.
The display will return to the regular clock
display after 5 seconds.
Instruments and controls2-41
CLOCK (if so equipped)
Page 156 of 402
4 Heater, air conditioner, audio and phone sys-tems
Safety note ........................................................................\
.......... 4-3
Control panel buttons — color screen (Type A) ............... 4-3
How to use touch screen ................................................. 4-4
How to use the BACK button ......................................... 4-6
How to use brightness control and display
ON/OFF button ................................................................... 4-6
How to use the SETUP button ....................................... 4-6
Control panel buttons — color screen (Type B) ........... 4-10 How to use touch screen .............................................. 4-10
How to use the BACK button ...................................... 4-11
How to use the APPS·i button ..................................... 4-12
How to use brightness control button ........................ 4-15
How to use the ON·OFF button/Volume
control knob ....................................................................... 4-15
How to use the CAMERA button ................................ 4-15
RearView monitor (if so equipped) ................................... 4-15
How to read the displayed lines .................................. 4-16
Difference between predictive and
actual distances ................................................................ 4-17
Adjusting the screen (if so equipped) ........................ 4-19
Operating tips ................................................................... 4-19
Ventilators ........................................................................\
......... 4-19 Center ventilators ............................................................. 4-19
Side ventilators ................................................................. 4-20 Heater and air conditioner .................................................. 4-20
Manual air conditioner (if so equipped) ................... 4-21
Automatic air conditioner (with Integrated
Control System) ............................................................. 4-24
Operating tips (for automatic air conditioner) ........ 4-27
In-cabin microfilter ......................................................... 4-27
Servicing air conditioner .............................................. 4-27
Audio system ........................................................................\
.. 4-28 Audio operation precautions ....................................... 4-28
FM-AM-SAT radio with Compact Disc (CD) player
(Type A) ........................................................................\
.... 4-41
FM-AM-SAT radio with Compact Disc (CD) player
(Type B) ........................................................................\
.... 4-48
FM-AM-SAT radio with Compact Disc (CD) player
(Type C) ........................................................................\
... 4-57
CD/USB memory care and cleaning ........................ 4-68
Steering wheel switch for audio control .................. 4-69
Antenna ........................................................................\
.... 4-70
NissanConnect
TMApp smartphone integration (if
so equipped) ........................................................................\
.. 4-71
Registering with NissanConnect
TMApp .................. 4-71
Connect phone ............................................................... 4-71
Application download ................................................... 4-71
Car phone or CB radio ........................................................ 4-71
Page 158 of 402
WARNING
.Do not disassemble or modify this
system. If you do, it may result in
accidents, fire, or electric shock.
. Do not use this system if you notice
any abnormality, such as a frozen
screen or lack of sound. Continued
use of the system may result in
accident, fire or electric shock.
. In case you notice any foreign
object in the system hardware, spill
liquid on it, or notice smoke or smell
coming from it, stop using the
system immediately and contact
your nearest NISSAN dealer. Ignor-
ing such conditions may lead to
accidents, fire, or electric shock.
Do not attempt to operate the system in
extreme temperature conditions [below
− 48F( −208 C) and above 1588 F (708C)].
Operating this system under these condi-
tions may result in system malfunctions.
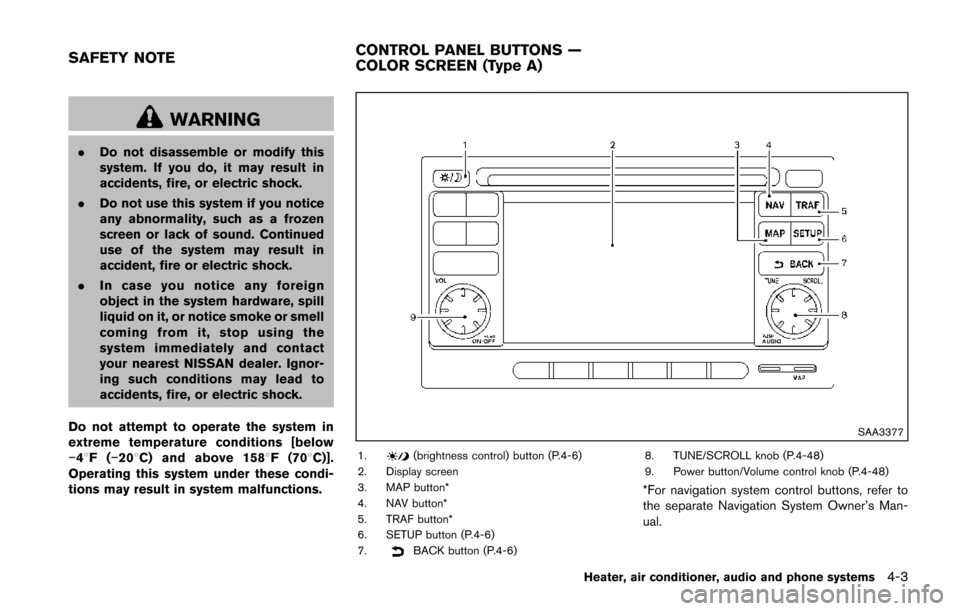
SAA3377
1.(brightness control) button (P.4-6)
2. Display screen
3. MAP button*
4. NAV button*
5. TRAF button*
6. SETUP button (P.4-6)
7.
BACK button (P.4-6) 8. TUNE/SCROLL knob (P.4-48)
9. Power button/Volume control knob (P.4-48)
*For navigation system control buttons, refer to
the separate Navigation System Owner’s Man-
ual.
Heater, air conditioner, audio and phone systems4-3
SAFETY NOTE
CONTROL PANEL BUTTONS —
COLOR SCREEN (Type A)
Page 159 of 402
4-4Heater, air conditioner, audio and phone systems
When you use this system, make sure the
engine is running.
If you use the system with the engine not
running (ignition ON or ACC) for a long
time, it will discharge the battery, and the
engine will not start.
Reference symbols:
“Example” — Words marked in quotes refer to a
key shown only on the display. These keys can
be selected by touching the screen.
HOW TO USE TOUCH SCREEN
CAUTION
.The glass screen on the liquid
crystal display may break if it is hit
with a hard or sharp object. If the
glass screen breaks, do not touch it.
Doing so could result in an injury.
. To clean the display, never use a
rough cloth, alcohol, benzine, thin-
ner or any kind of solvent or paper
towel with a chemical cleaning
agent. They will scratch or deterio-
rate the panel.
. Do not splash any liquid such as
water or car fragrance on the dis-
play. Contact with liquid will cause the system to malfunction.
To help ensure safe driving, some functions
cannot be operated while driving.
The on-screen functions that are not available
while driving will be “grayed out” or muted.
Park the vehicle in a safe location and then
operate the navigation system.
WARNING
. ALWAYS give your full attention to
driving.
. Avoid using vehicle features that
could distract you. If distracted,
you could lose control of your
vehicle and cause an accident.SAA3422
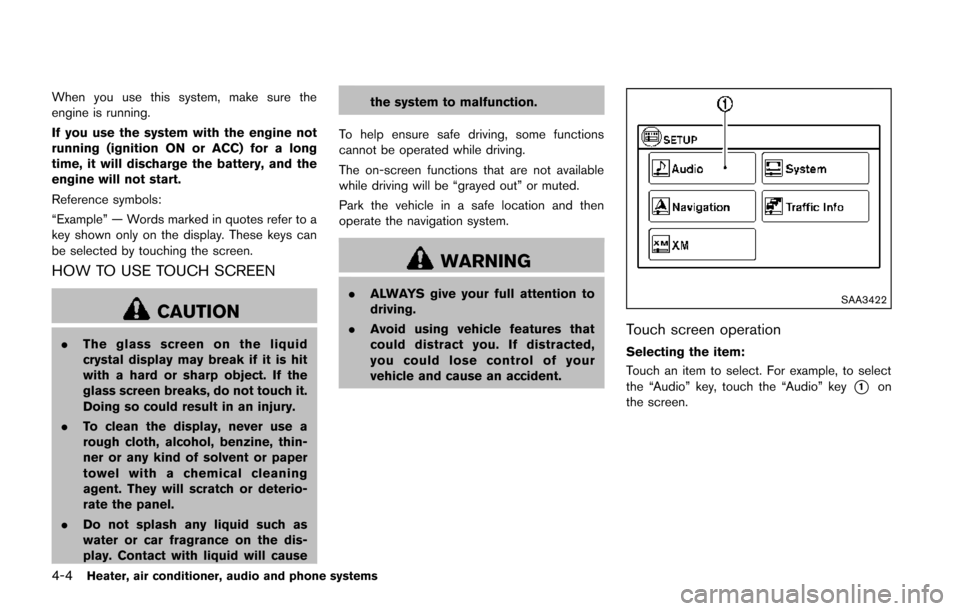
Touch screen operation
Selecting the item:
Touch an item to select. For example, to select
the “Audio” key, touch the “Audio” key
*1on
the screen.