2014 NISSAN GT-R engine oil
[x] Cancel search: engine oilPage 127 of 354
2-30Instruments and controls
.The supplemental air bag warning light
remains on after approximately 7 seconds.
. The supplemental air bag warning light
flashes intermittently.
. The supplemental air bag warning light does
not come on at all.
Unless checked and repaired, the supplemental
restraint system (air bag system) and/or the
pretensioners may not function properly.
(
“Supplemental restraint system” page 1-
34)
WARNING
If the supplemental air bag warning
light is on, it could mean that the front
air bag, side air bag, curtain air bag
and/or pretensioner systems will not
operate in an accident. To help avoid
injury to yourself or others, have your
vehicle checked by a GT-R certified
NISSAN dealer as soon as possible.
Transmission warning light
This light warns of the following malfunctions.
Transmission system malfunction:
The light blinks if a malfunction in the transmis-
sion system occurs. If the light blinks, certain
gear positions may become unusable, so that
the vehicle may become undrivable. Have the
system inspected promptly by a GT-R certified
NISSAN dealer.
Transmission oil temperature high:
The light illuminates if the transmission oil
temperature becomes unusually high. If the light
illuminates, avoid driving at high speed or at high
engine speed until the light turns off. The light
will turn off after a short period of time and the
vehicle can then be driven normally. If the light
illuminates frequently, contact a GT-R certified
NISSAN dealer.
NOTICE
If the light continues to illuminate, the
engine output may be reduced to pre-
vent transmission damage. Transmission clutch temperature high:
The light illuminates if clutch temperature
becomes unusually high. If the light illuminates,
pull off the road in a safe area and idle the
engine. When the light turns off, driving can be
resumed. If the light illuminates frequently,
contact a GT-R certified NISSAN dealer.
NOTICE
.
Continuing to drive with the light on
could cause serious damage to the
transmission.
. If the light continues to illuminate,
the vehicle cannot be driven be-
cause the engine output may be
reduced and the clutch may be
reduced to keep the clutch disen-
gaged.
R mode start function:
If the R mode start function is used 4 times
continuously, the function may be disabled and
cannot be turned on for protection. While the
function is disabled, the warning light illumi-
nates. When the warning light goes off, the
function can be used again. (
“R mode start
function” page 5-31)
Page 128 of 354
When the warning light illuminates, perform cool
down driving (driving 1.3 mile (2 km) in 5th or
6th gear at a speed of approximately 37 - 50
MPH (60 - 80 km/h) while checking the
temperature of the transmission oil until the
warning light goes off.
NOTICE
While the warning light is illuminated,
the engine output is controlled so that
it does not increase.
Vehicle Dynamic Control (VDC)
warning light
The light will blink when the VDC system or the
traction control system is operating, thus alerting
the driver that the vehicle is nearing its traction
limits. The road surface may be slippery.
If the VDC warning light illuminates when the
VDC system is turned on, this light alerts the
driver to the fact that the VDC system’s fail-safe
mode is operating, for example the VDC or hill
start assist system may not be functioning
properly. Have the system checked by a GT-R
certified NISSAN dealer. If a malfunction occurs
in the system, the VDC system function will be
canceled but the vehicle is still driveable. (
“Vehicle Dynamic Control (VDC) system”
page 5-49)
INDICATOR LIGHTS
Cruise main switch indicator
light
The light comes on when the cruise control is
pushed. The light turns off when the main switch
is pushed again. While the cruise control system
main switch indicator light is on, the cruise
control system is operational.
Cruise set switch indicator
light
The light comes on while the vehicle speed is
controlled by the cruise control system. If the
light blinks while the engine is running, it may
indicate the cruise control system is not
functioning properly. Have the system checked
by a GT-R certified NISSAN dealer.
Exterior light indicator
This indicator illuminates when the headlight
switch is turned to the AUTO,orposition and the front parking lights, instrument
panel lights, rear combination lights, license
plate lights or headlights are on. The indicator
turns off when these lights are turned off.
Front passenger air bag status
light
The front passenger air bag status light ()
will be lit and the passenger front air bag will be
OFF depending on how the front passenger
seat is being used. (
“NISSAN Advanced
Air Bag System (front seats)” page 1-40)
High beam indicator light
This light comes on when the headlight high
beam is on and goes out when the low beam is
selected.
Malfunction Indicator Light
(MIL)
If the malfunction indicator light comes on
steady or blinks while the engine is running, it
may indicate a potential emission control mal-
function.
The malfunction indicator light may also come on
steady if the fuel-filler cap is loose or missing, or
if the vehicle runs out of fuel. Check to make
sure the fuel-filler cap is installed and closed
tightly, and that the vehicle has at least 3 US
gallons (12 liters) of fuel in the fuel tank.
After a few driving trips, the
light should
turn off if no other potential emission control
system malfunction exists.
If this indicator light remains on for 20 seconds
Instruments and controls2-31
Page 131 of 354
2-34Instruments and controls
If there are multiple warnings, the warning lights
remain lit or continue to blink and the warnings
displayed in the vehicle information display are
switched at regular intervals. The warnings
displayed in the vehicle information display can
be switched voluntarily by pushing the ENTER
switch
.
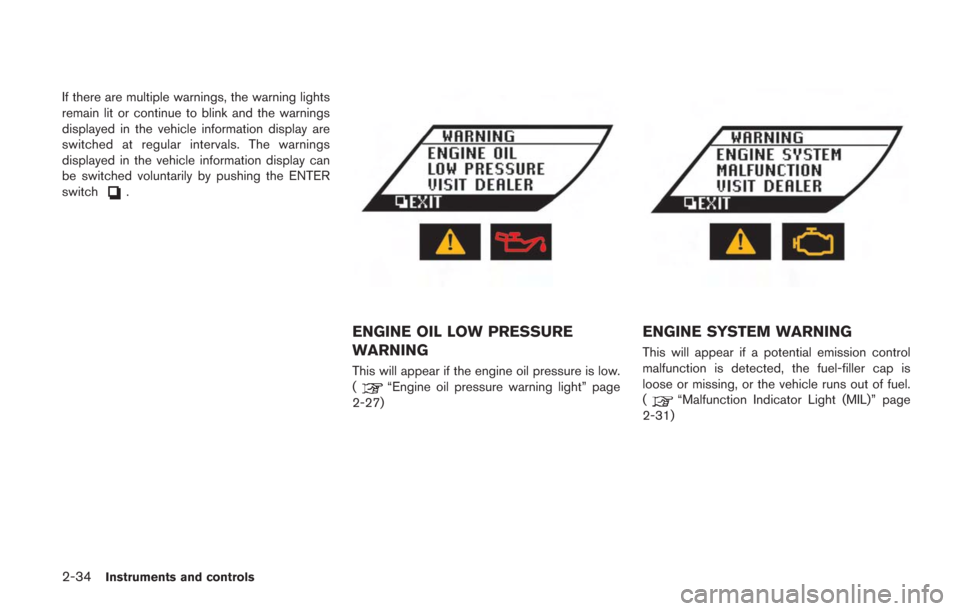
ENGINE OIL LOW PRESSURE
WARNING
This will appear if the engine oil pressure is low.
(“Engine oil pressure warning light” page
2-27)
ENGINE SYSTEM WARNING
This will appear if a potential emission control
malfunction is detected, the fuel-filler cap is
loose or missing, or the vehicle runs out of fuel.
(
“Malfunction Indicator Light (MIL)” page
2-31)
Page 188 of 354
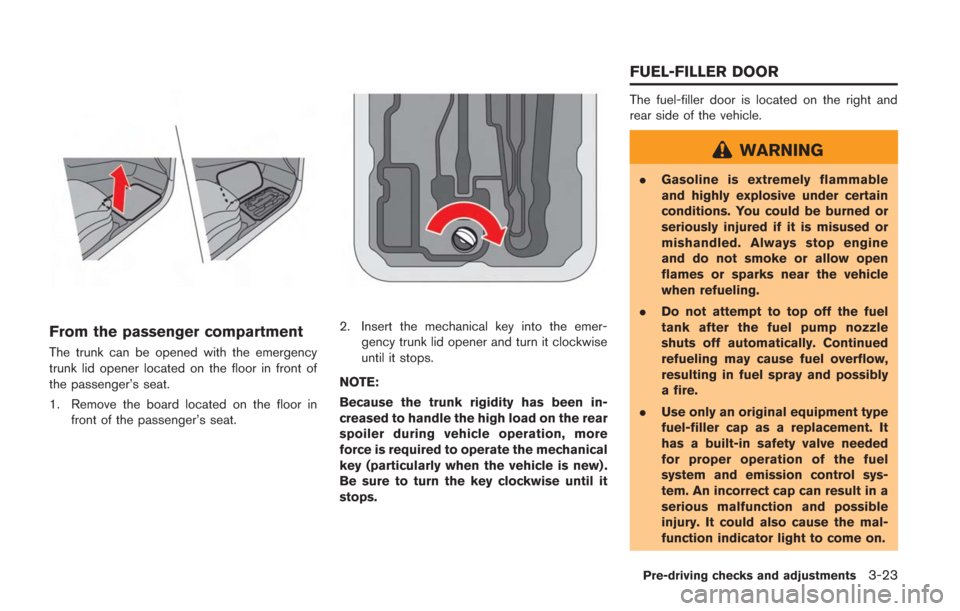
From the passenger compartment
The trunk can be opened with the emergency
trunk lid opener located on the floor in front of
the passenger’s seat.
1. Remove the board located on the floor infront of the passenger’s seat.
2. Insert the mechanical key into the emer-gency trunk lid opener and turn it clockwise
until it stops.
NOTE:
Because the trunk rigidity has been in-
creased to handle the high load on the rear
spoiler during vehicle operation, more
force is required to operate the mechanical
key (particularly when the vehicle is new) .
Be sure to turn the key clockwise until it
stops.
The fuel-filler door is located on the right and
rear side of the vehicle.
WARNING
. Gasoline is extremely flammable
and highly explosive under certain
conditions. You could be burned or
seriously injured if it is misused or
mishandled. Always stop engine
and do not smoke or allow open
flames or sparks near the vehicle
when refueling.
. Do not attempt to top off the fuel
tank after the fuel pump nozzle
shuts off automatically. Continued
refueling may cause fuel overflow,
resulting in fuel spray and possibly
a fire.
. Use only an original equipment type
fuel-filler cap as a replacement. It
has a built-in safety valve needed
for proper operation of the fuel
system and emission control sys-
tem. An incorrect cap can result in a
serious malfunction and possible
injury. It could also cause the mal-
function indicator light to come on.
Pre-driving checks and adjustments3-23
FUEL-FILLER DOOR
Page 210 of 354
.Make sure the area around the vehicle is
clear.
. Check fluid levels such as engine oil, cool-
ant, brake fluid and window washer fluid as
frequently as possible, or at least whenever
you refuel.
. Check that all windows and lights are clean.
. Visually inspect tires for their appearance
and condition. Also check tires for proper
inflation.
. Lock all doors.
. Position seat.
. Adjust inside and outside mirrors.
. Fasten seat belts and ask all passengers to
do likewise.
. Check the operation of warning lights when
the ignition switch is pushed to the ON
position. (
“Warning/indicator lights
and audible reminders” page 2-25)
NOTE:
. This vehicle includes spark plugs that
are designed for maximum perfor-
mance. If the start time becomes long-
er, the plugs may be fouled, making the
engine difficult to start. If this occurs,
start the engine using the procedure
described in this section.
. A click sound may be heard when the
brake pedal is depressed and released.
This is normal.
. A low rattling operating sound may
occur when the engine is started or
stopped. This is because of the trans-
mission gear design, light flywheel and
dry sump lubrication system used in
this transmission. This does not indi-
cate that there is a malfunction. This
sound is likely to occur in particular if
the engine is stopped when the tem-
perature of the transmission oil is high.
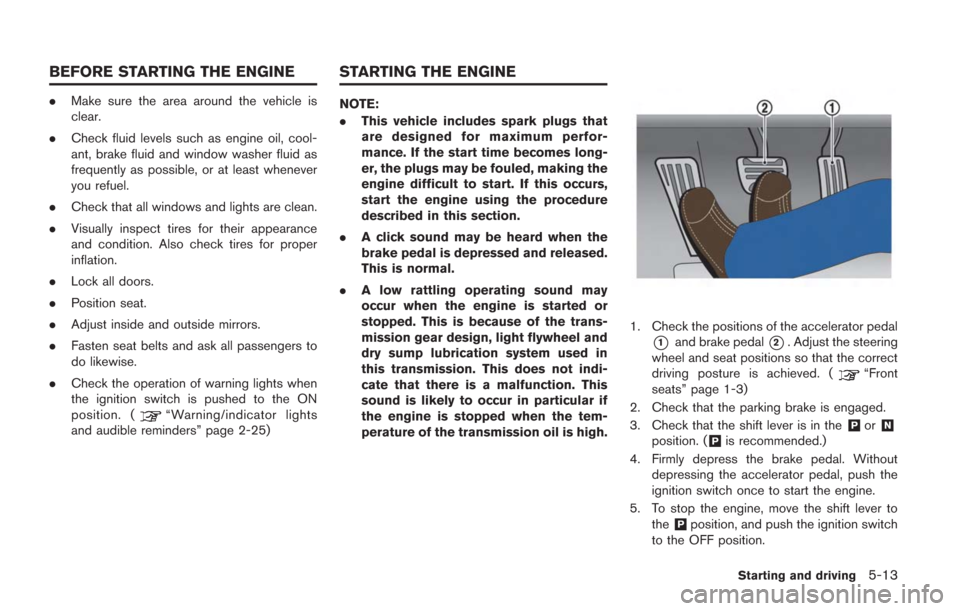
1. Check the positions of the accelerator pedal
*1and brake pedal*2. Adjust the steering
wheel and seat positions so that the correct
driving posture is achieved. (
“Front
seats” page 1-3)
2. Check that the parking brake is engaged.
3. Check that the shift lever is in the
&Por&N
position. (&Pis recommended.)
4. Firmly depress the brake pedal. Without depressing the accelerator pedal, push the
ignition switch once to start the engine.
5. To stop the engine, move the shift lever to the
&Pposition, and push the ignition switch
to the OFF position.
Starting and driving5-13
BEFORE STARTING THE ENGINE STARTING THE ENGINE
Page 211 of 354
5-14Starting and driving
NOTE:
.Care should be taken to avoid situa-
tions that can lead to potential battery
discharge and potential no-start condi-
tions such as:
a. Installation or extended use of elec-
tronic accessories that consume
battery power when the engine is
not running (Phone chargers, GPS,
DVD players, etc.)
b. Vehicle is not driven regularly and/
or only driven short distances.
In these cases, the battery may need to
be charged to maintain battery health.
. If the engine is difficult to start, de-
press the accelerator pedal all the way
to the floor and hold it. Push the
ignition switch with the brake pedal
depressed to start cranking the engine.
After 5 or 6 seconds, stop cranking by
pushing the ignition switch to the OFF
position, and then release the accel-
erator pedal. Then perform steps 1 to 5
to start the engine. If the engine starts,
but fails to run, repeat this procedure.
. Starting and stopping the engine over a
short period of time may make the
vehicle more difficult to start. If this
occurs, wait for more than 3 minutes, and then push the ignition switch again
to start the engine.
. To maintain high performance over a
long period of time, the engine speed is
limited to 5,000 rpm when the engine is
revved with the shift lever in the
&Nor
&Pposition, and to 4,000 rpm when the
engine oil or coolant temperature is
low or higher than normal.
. If the ignition switch is pushed before
the shift lever is moved to the
&P
position, the ignition switch will not
change to the OFF position. If this
occurs, the SHIFT
&Pwarning display
appears on the vehicle information
display. When stopping the engine, be
sure to move the shift lever to the
&P
position and then push the ignition
switch. Failure to do so may result in
discharge of the battery. (
“Shift
“P” warning” page 2-43)
. If the shift lever was in the
&A↔&Mor&R
position when the engine was stopped,
then be sure to move the shift lever to
the
&Pposition before starting the
engine the next time. If the engine is
started with the shift lever in the
&N
position, then it may not be possible to drive the vehicle even when the shift
lever is moved to the
&A↔&Mor&R
position. If this occurs, the SHIFT&P
warning appears on the vehicle infor-
mation display. (“Shift “P” warn-
ing” page 2-43)
CAUTION
If the engine was stopped soon when
the engine is hot, the cooling fan may
operate for approximately 2 minutes
after the engine was stopped to cool
the components in the engine compart-
ment. When the cooling fan is operat-
ing, be sure that hands or other items
do not get caught in it.
Page 213 of 354
5-16Starting and driving
partially engaged. Keep the brake
pedal firmly depressed when the
vehicle is stopped. In some circum-
stances the vehicle may not start
moving on its own, however this
does not indicate that there is a
malfunction.
NOTICE
.When the vehicle is stopped on a
hill, do not hold the vehicle in place
by depressing the accelerator pedal.
Doing so may cause the clutch to
overheat and result in transmission
damage. Use the brakes to prevent
the vehicle from moving.
. The GT-R dual clutch transmission is
provided with a dry sump lubrication
system that improves efficiency and
ensures reliability under high g-
force conditions. When oil viscosity
is high at low temperatures, it takes
longer for all components to be
sufficiently lubricated. Thus, when
the transmission temperature is low
(approximately 104 8F (408C) , do not
accelerate rapidly or run the engine faster than 4,000 rpm.
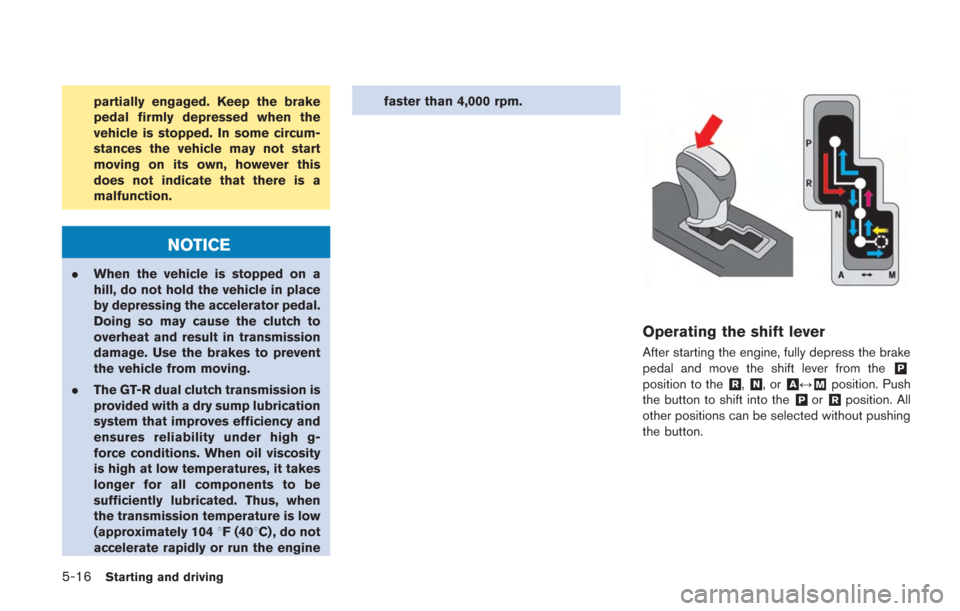
Operating the shift lever
After starting the engine, fully depress the brake
pedal and move the shift lever from the&P
position to the&R,&N,or&A↔&Mposition. Push
the button to shift into the&Por&Rposition. All
other positions can be selected without pushing
the button.
Page 216 of 354
Shift lock release
If the battery charge is low or discharged, the
shift lever may not be moved from the&P
position even with the brake pedal depressed
and the shift lever button pushed.
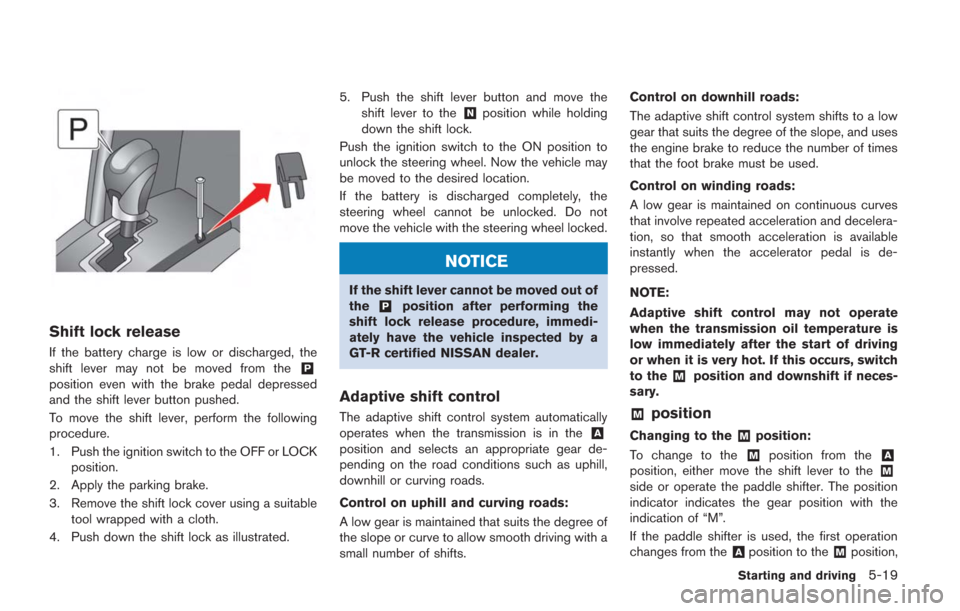
To move the shift lever, perform the following
procedure.
1. Push the ignition switch to the OFF or LOCKposition.
2. Apply the parking brake.
3. Remove the shift lock cover using a suitable tool wrapped with a cloth.
4. Push down the shift lock as illustrated. 5. Push the shift lever button and move the
shift lever to the
&Nposition while holding
down the shift lock.
Push the ignition switch to the ON position to
unlock the steering wheel. Now the vehicle may
be moved to the desired location.
If the battery is discharged completely, the
steering wheel cannot be unlocked. Do not
move the vehicle with the steering wheel locked.
NOTICE
If the shift lever cannot be moved out of
the&Pposition after performing the
shift lock release procedure, immedi-
ately have the vehicle inspected by a
GT-R certified NISSAN dealer.
Adaptive shift control
The adaptive shift control system automatically
operates when the transmission is in the&A
position and selects an appropriate gear de-
pending on the road conditions such as uphill,
downhill or curving roads.
Control on uphill and curving roads:
A low gear is maintained that suits the degree of
the slope or curve to allow smooth driving with a
small number of shifts. Control on downhill roads:
The adaptive shift control system shifts to a low
gear that suits the degree of the slope, and uses
the engine brake to reduce the number of times
that the foot brake must be used.
Control on winding roads:
A low gear is maintained on continuous curves
that involve repeated acceleration and decelera-
tion, so that smooth acceleration is available
instantly when the accelerator pedal is de-
pressed.
NOTE:
Adaptive shift control may not operate
when the transmission oil temperature is
low immediately after the start of driving
or when it is very hot. If this occurs, switch
to the
&Mposition and downshift if neces-
sary.
&Mposition
Changing to the&Mposition:
To change to the
&Mposition from the&A
position, either move the shift lever to the&M
side or operate the paddle shifter. The position
indicator indicates the gear position with the
indication of “M”.
If the paddle shifter is used, the first operation
changes from the
&Aposition to the&Mposition,
Starting and driving5-19