2014 NISSAN GT-R horn
[x] Cancel search: hornPage 44 of 354
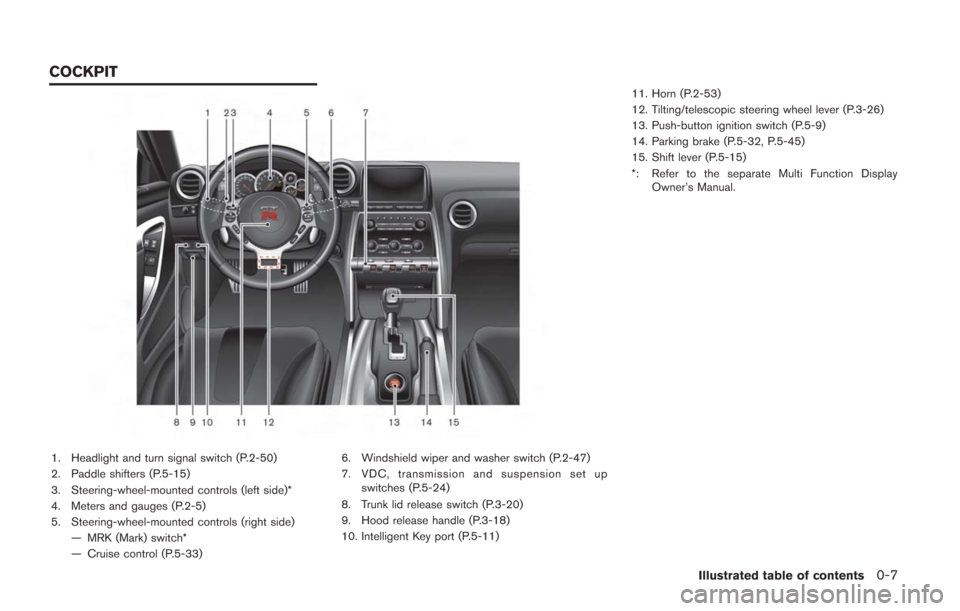
1. Headlight and turn signal switch (P.2-50)
2. Paddle shifters (P.5-15)
3. Steering-wheel-mounted controls (left side)*
4. Meters and gauges (P.2-5)
5. Steering-wheel-mounted controls (right side)— MRK (Mark) switch*
— Cruise control (P.5-33) 6. Windshield wiper and washer switch (P.2-47)
7. VDC, transmission and suspension set up
switches (P.5-24)
8. Trunk lid release switch (P.3-20)
9. Hood release handle (P.3-18)
10. Intelligent Key port (P.5-11) 11. Horn (P.2-53)
12. Tilting/telescopic steering wheel lever (P.3-26)
13. Push-button ignition switch (P.5-9)
14. Parking brake (P.5-32, P.5-45)
15. Shift lever (P.5-15)
*: Refer to the separate Multi Function Display
Owner’s Manual.
Illustrated table of contents0-7
COCKPIT
Page 99 of 354
Low fuel warning ............................................................. 2-40
Door/trunk open warning .............................................. 2-41
Low washer fluid warning ............................................. 2-41
No key warning ................................................................ 2-41
Operation displays ................................................................ 2-42 Engine start operation indicator .................................. 2-42
Shift “P” warning ............................................................. 2-43
“PUSH” warning .............................................................. 2-43
Steering lock release malfunction indicator ............. 2-43
Intelligent Key insertion indicator ................................ 2-44
Intelligent Key removal indicator .................................. 2-44
Intelligent Key battery discharge indicator ................ 2-44
Security systems ................................................................... 2-45 Vehicle security system ................................................. 2-45
NISSAN Vehicle Immobilizer System ......................... 2-46
Windshield wiper and washer switch .............................. 2-47 Using the wipers ............................................................. 2-48
Using the washer ............................................................ 2-49
Rear window defroster switch ........................................... 2-49
Headlight and turn signal switch ...................................... 2-50 Xenon headlights ............................................................. 2-50
Headlight switch .............................................................. 2-50
Horn ........................................................................\
.................. 2-53
Heated seats (if so equipped) .......................................... 2-53
Turning on the heaters ................................................... 2-53Turning off the heaters ................................................... 2-54 Power outlets ........................................................................\
2-54
Storage ........................................................................\
........... 2-56
Cup holders .................................................................... 2-56
Sunglasses holder ........................................................ 2-57
Door pocket .................................................................... 2-57
Glove box ........................................................................\
2-58Console box ................................................................... 2-58
Coat hooks ..................................................................... 2-59
Windows ........................................................................\
........ 2-59 Power windows ............................................................. 2-59
Interior lights ........................................................................\
.. 2-62
Map lights ....................................................................... 2-62
Interior light control switch ......................................... 2-62
Vanity mirror lights ................................................................ 2-63
HomeLink
®Universal Transceiver .................................... 2-63
Programming HomeLink®............................................ 2-64
Programming HomeLink®for
Canadian customers .................................................... 2-65
Operating the HomeLink
®universal transceiver ... 2-66
Programming trouble-diagnosis ................................ 2-66
Clearing the programmed information ..................... 2-66
Reprogramming a single HomeLink
®button ......... 2-66
If your vehicle is stolen ................................................ 2-66
Page 100 of 354
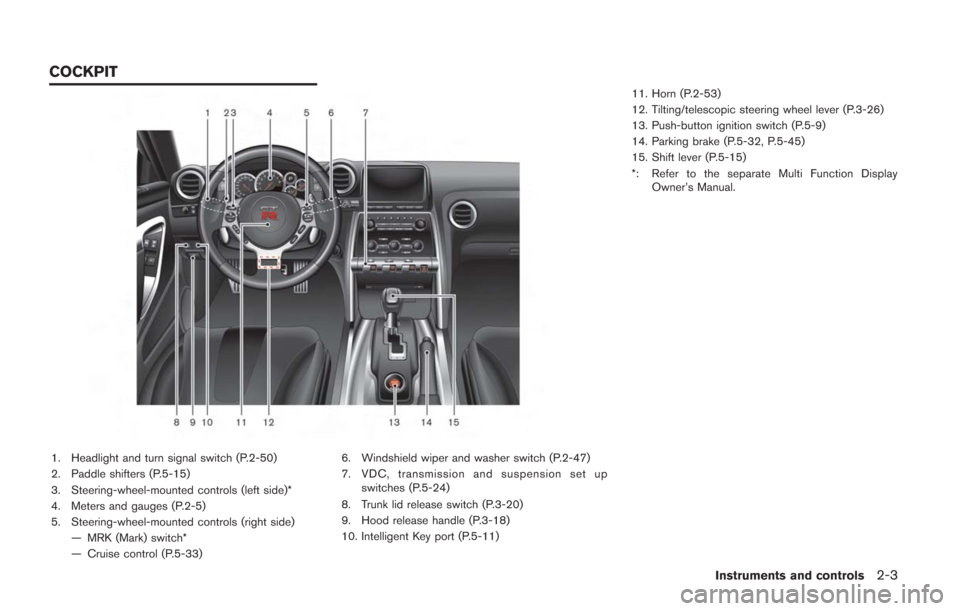
1. Headlight and turn signal switch (P.2-50)
2. Paddle shifters (P.5-15)
3. Steering-wheel-mounted controls (left side)*
4. Meters and gauges (P.2-5)
5. Steering-wheel-mounted controls (right side)— MRK (Mark) switch*
— Cruise control (P.5-33) 6. Windshield wiper and washer switch (P.2-47)
7. VDC, transmission and suspension set up
switches (P.5-24)
8. Trunk lid release switch (P.3-20)
9. Hood release handle (P.3-18)
10. Intelligent Key port (P.5-11) 11. Horn (P.2-53)
12. Tilting/telescopic steering wheel lever (P.3-26)
13. Push-button ignition switch (P.5-9)
14. Parking brake (P.5-32, P.5-45)
15. Shift lever (P.5-15)
*: Refer to the separate Multi Function Display
Owner’s Manual.
Instruments and controls2-3
COCKPIT
Page 143 of 354
2-46Instruments and controls
5. Confirm that the security indicator lightcomes on. The security indicator light stays
on for about 30 seconds. The vehicle
security system is now pre-armed. After
about 30 seconds the vehicle security
system automatically shifts into the armed
phase. The security light begins to flash
once every approximately 3 seconds. If,
during this 30-second pre-arm time period,
the door is unlocked, or the ignition switch is
pushed to ACC or ON, the system will not
arm.
Even when the driver and/or passengers
are in the vehicle, the system will activate
with all doors, hood, and trunk lid locked
with the ignition switch in the LOCK
position. When pushing the ignition switch
to the ACC or ON position, the system will
be released.
Vehicle security system activation
The vehicle security system will give the follow-
ing alarm:
. The headlights blink and the horn sounds
intermittently.
. The alarm automatically turns off after
approximately 1 minute. However, the alarm
reactivates if the vehicle is tampered with
again. The alarm is activated by:
.
Opening the door or the trunk lid without
using the button on the Intelligent Key, the
door handle request switch or the mechan-
ical key. (Even if the door is opened by
releasing the door inside lock knob, the
alarm will activate.)
. Opening the hood.
How to stop an activated alarm
The alarm will stop by:
.Unlocking a door by pushing the UNLOCK
button on the Intelligent Key.
. Unlocking a door by pushing the door
handle request switch.
. Pushing the ignition switch to the ACC or
ON position.
If the system does not operate as de-
scribed above, have it checked by a GT-R
certified NISSAN dealer.
NISSAN VEHICLE IMMOBILIZER
SYSTEM
The NISSAN Vehicle Immobilizer System will not
allow the engine to start without the use of the
registered Intelligent Key. Never leave these
keys in the vehicle. FCC Notice:
For USA:
This device complies with Part 15 of the
FCC Rules. Operation is subject to the
following two conditions: (1) This device
may not cause harmful interference, and
(2) this device must accept any interfer-
ence received, including interference that
may cause undesired operation.
Note: Changes or modifications not ex-
pressly approved by the party responsible
for compliance could void the user’s
authority to operate the equipment.
For Canada:
This device complies with RSS-210 of
Industry Canada. Operation is subject to
the following two conditions: (1) this
device may not cause interference, and
(2) this device must accept any interfer-
ence, including interference that may
cause undesired operation of the device.
Page 150 of 354
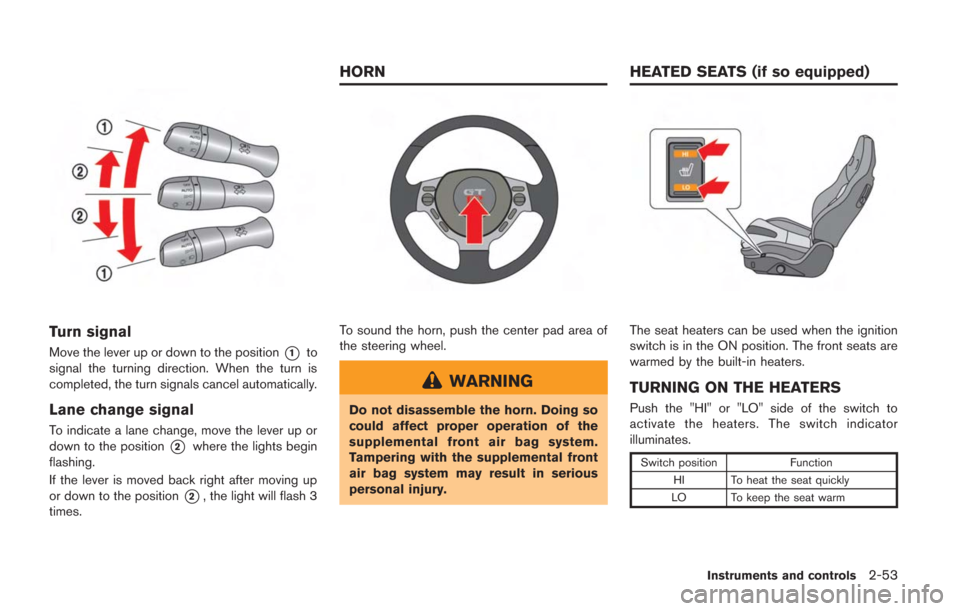
Turn signal
Move the lever up or down to the position*1to
signal the turning direction. When the turn is
completed, the turn signals cancel automatically.
Lane change signal
To indicate a lane change, move the lever up or
down to the position
*2where the lights begin
flashing.
If the lever is moved back right after moving up
or down to the position
*2, the light will flash 3
times.
To sound the horn, push the center pad area of
the steering wheel.
WARNING
Do not disassemble the horn. Doing so
could affect proper operation of the
supplemental front air bag system.
Tampering with the supplemental front
air bag system may result in serious
personal injury.
The seat heaters can be used when the ignition
switch is in the ON position. The front seats are
warmed by the built-in heaters.
TURNING ON THE HEATERS
Push the "HI" or "LO" side of the switch to
activate the heaters. The switch indicator
illuminates.
Switch position Function
HI To heat the seat quickly
LO To keep the seat warm
Instruments and controls2-53
HORN HEATED SEATS (if so equipped)
Page 166 of 354
3 Pre-driving checks and adjustments
Keys ........................................................................\
..................... 3-2Intelligent Key ...................................................................... 3-2
Doors ........................................................................\
................... 3-4
Locking with inside lock knob ........................................ 3-5
Locking with power door lock switch ........................... 3-5
Automatic door lock system ............................................ 3-5
Locking with mechanical key ........................................... 3-6
Opening the doors ............................................................ 3-7
Intelligent Key system ............................................................. 3-8 Intelligent Key functions .................................................... 3-9
Remote keyless entry functions ................................... 3-12
Setting hazard indicator and horn mode .................. 3-13
Warning signals ............................................................... 3-16
Troubleshooting guide ................................................... 3-17
Hood ........................................................................\
................. 3-18 Opening the hood ........................................................... 3-18
Closing the hood ............................................................. 3-19 Trunk ........................................................................\
................ 3-20
Trunk open request switch ......................................... 3-20
Trunk lid release switch ............................................... 3-20
Trunk release power cancel switch .......................... 3-21Opening and closing the trunk .................................. 3-21
Emergency trunk lid release ....................................... 3-22
Fuel-filler door ....................................................................... 3-23 Opening the fuel filler door ........................................ 3-24
Closing the fuel-filler door .......................................... 3-25
Steering wheel ...................................................................... 3-26
Tilt/telescopic steering column .................................. 3-26
Sun visors ........................................................................\
....... 3-27
Mirrors ........................................................................\
............. 3-27
Inside mirror .................................................................... 3-27
Outside mirrors .............................................................. 3-28
Vanity mirror .................................................................... 3-29
Page 175 of 354
3-10Pre-driving checks and adjustments
.If the Intelligent Key is too close to the
door glass, handle or rear bumper, the
request switches may not function.
. When the Intelligent Key is within the
operating range, it is possible for any-
one who does not carry the Intelligent
Key to push the request switch to lock/
unlock the doors.
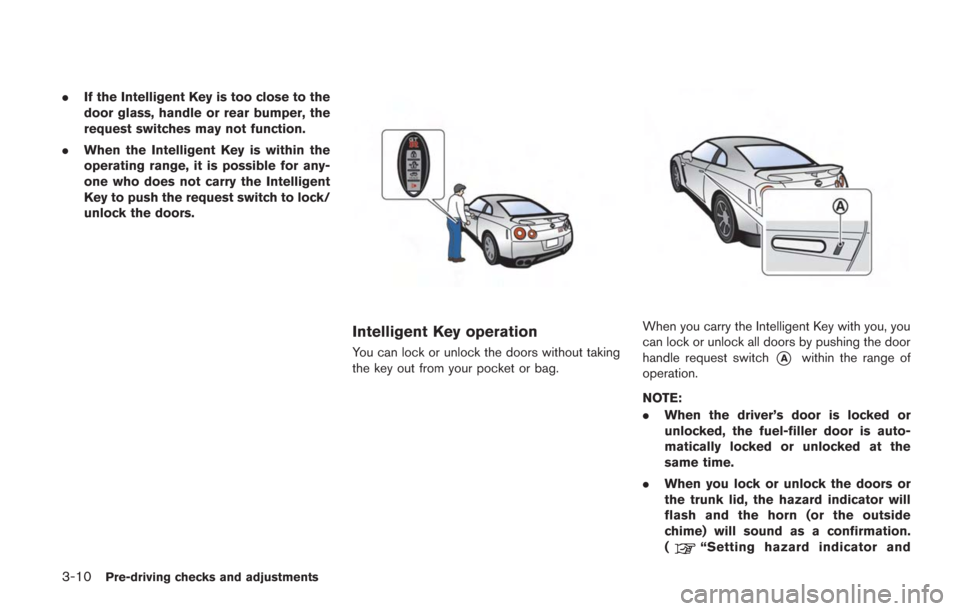
Intelligent Key operation
You can lock or unlock the doors without taking
the key out from your pocket or bag.
When you carry the Intelligent Key with you, you
can lock or unlock all doors by pushing the door
handle request switch
*Awithin the range of
operation.
NOTE:
. When the driver’s door is locked or
unlocked, the fuel-filler door is auto-
matically locked or unlocked at the
same time.
. When you lock or unlock the doors or
the trunk lid, the hazard indicator will
flash and the horn (or the outside
chime) will sound as a confirmation.
(
“Setting hazard indicator and
Page 176 of 354
horn mode” page 3-13)
Locking doors:
1. Move the shift lever to the
&Pposition, push
the ignition switch to the OFF position and
make sure you carry the Intelligent Key with
you.
2. Close all the doors.
3. Push the driver’s or front passenger’s door handle request switch while carrying the
Intelligent Key with you.
4. All the doors will lock.
5. The hazard indicator flashes twice and the outside chime sounds twice.
NOTE:
. Doors will lock with the Intelligent Key
while the ignition switch is in the ACC
or ON position.
. Doors will not lock with the Intelligent
Key while any door is open.
. Doors will not lock by pushing the door
handle request switch with the Intelli-
gent Key inside the vehicle.
However, when an Intelligent Key is
inside the vehicle, doors can be locked
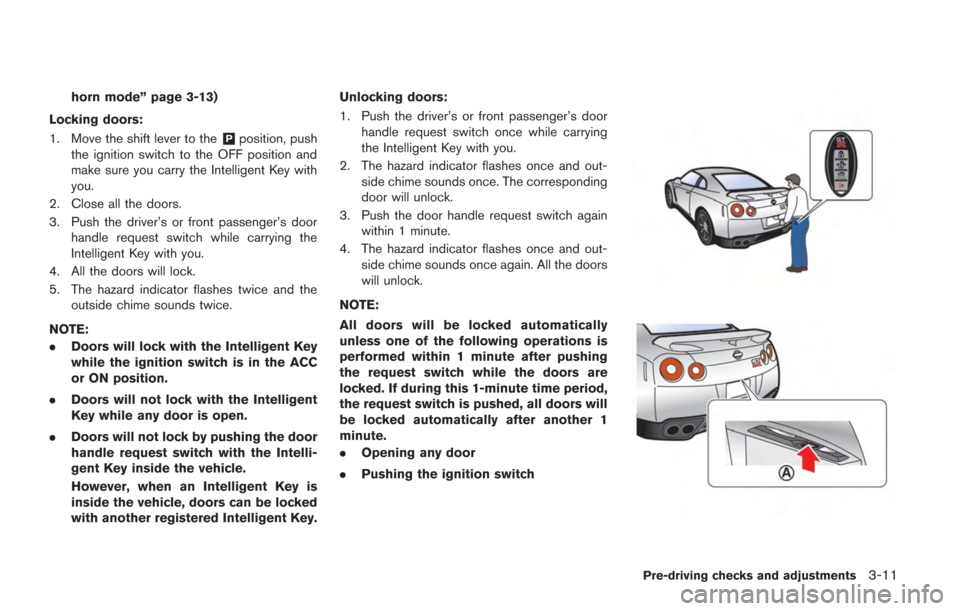
with another registered Intelligent Key. Unlocking doors:
1. Push the driver’s or front passenger’s door
handle request switch once while carrying
the Intelligent Key with you.
2. The hazard indicator flashes once and out- side chime sounds once. The corresponding
door will unlock.
3. Push the door handle request switch again within 1 minute.
4. The hazard indicator flashes once and out- side chime sounds once again. All the doors
will unlock.
NOTE:
All doors will be locked automatically
unless one of the following operations is
performed within 1 minute after pushing
the request switch while the doors are
locked. If during this 1-minute time period,
the request switch is pushed, all doors will
be locked automatically after another 1
minute.
. Opening any door
. Pushing the ignition switch
Pre-driving checks and adjustments3-11