2014 NISSAN GT-R Suspension
[x] Cancel search: SuspensionPage 92 of 354
Other supplemental front air bag
precautions
WARNING
.Do not place any objects on the
steering wheel pad or on the instru-
ment panel. Also, do not place any
objects between any occupant and
the steering wheel or instrument
panel. Such objects may become
dangerous projectiles and cause
injury if the front air bag inflates.
. Do not place objects with sharp
edges on the seat. Also, do not
place heavy objects on the seat that
will leave permanent impressions in
the seat. Such objects can damage
the seat or occupant classification
sensor (pattern sensor) . This can
affect the operation of the air bag
system and result in serious perso-
nal injury.
. Do not use water or acidic cleaners
(hot steam cleaners) on the seat.
This can damage the seat or occu-
pant classification sensor. This can
also affect the operation of the air bag system and result in serious
personal injury.
. Immediately after inflation, several
front air bag system components
will be hot. Do not touch them; you
may severely burn yourself.
. No unauthorized changes should be
made to any components or wiring
of the supplemental air bag system.
This is to prevent accidental infla-
tion of the supplemental air bag or
damage to the supplemental air bag
system.
. Do not make unauthorized changes
to your vehicle’s electrical system,
suspension system or front end
structure. This could affect proper
operation of the front air bag sys-
tem.
. Tampering with the supplemental
air bag system may result in serious
personal injury. Tampering includes
changes to the steering wheel and
the instrument panel assembly by
placing material over the steering
wheel pad and above the instrument
panel or by installing additional trim
material around the air bag system. .
Modifying or tampering with the
front passenger seat may result in
serious personal injury. For exam-
ple, do not change the front seats by
placing material on the seat cushion
or by installing additional trim ma-
terial, such as seat covers, on the
seat that is not specifically designed
to assure proper air bag operation.
Additionally, do not stow any ob-
jects under the front passenger seat
or the seat cushion and seatback.
Such objects may interfere with the
proper operation of the occupant
classification sensor.
. No unauthorized changes should be
made to any components or wiring
of the seat belt system. This may
affect the front air bag system.
Tampering with the seat belt system
may result in serious personal in-
jury.
. Work on and around the front air
bag system should be done by a
GT-R certified NISSAN dealer. In-
stallation of electrical equipment
should also be done by a GT-R
certified NISSAN dealer. The Sup-
plemental Restraint System (SRS)
Safety — Seats, seat belts and supplemental restraint system1-43
Page 94 of 354
practical away from the side air bags. The side
air bags and curtain air bags inflate quickly in
order to help protect occupants. Because of
this, the force of the side air bags and curtain air
bags inflating can increase the risk of injury if the
occupant is too close to, or is against, these air
bag modules during inflation. The side air bags
and curtain air bags will deflate quickly after the
collision is over.
The side air bags and curtain air bags operate
only when the ignition switch is in the ON
position.
After pushing the ignition switch to the ON
position, the supplemental air bag warning
light illuminates. The air bag warning light
will turn off after about 7 seconds if the
systems are operational.
WARNING
.Do not place any objects near the
seatback of the front seats. Also, do
not place any objects (an umbrella,
bag, etc.) between the front door
finisher and the front seat. Such
objects may become dangerous
projectiles and cause injury if a side
air bag inflates.
. Right after inflation, several side air bag and curtain air bag system
components will be hot. Do not
touch them; you may severely burn
yourself.
. No unauthorized changes should be
made to any components or wiring
of the side air bags and curtain air
bags. This is to prevent damage to
or accidental inflation of the side air
bag and curtain air bag systems.
. Do not make unauthorized changes
to your vehicle’s electrical system,
suspension system or side panel.
This could affect proper operation
of the side air bag and curtain air
bag systems.
. Tampering with the side air bag
system may result in serious perso-
nal injury. For example, do not
change the front seat by placing
material near the seatback or by
installing additional trim material,
such as seat covers, around the side
air bags.
. Work around and on the side air bag
and curtain air bag systems should
be done by a GT-R certified NISSAN
dealer. Installation of electrical equipment should also be done by
a GT-R certified NISSAN dealer. The
SRS wiring harnesses* should not
be modified or disconnected. Un-
authorized electrical test equipment
and probing devices should not be
used on the side air bag and curtain
air bag systems.
* The SRS wiring harness connectors are
yellow and orange for easy identification.
When selling your vehicle, we request that you
inform the buyer about the side air bag and
curtain air bag systems and guide the buyer to
the appropriate sections in this Owner’s Manual.
SEAT BELTS WITH PRETEN-
SIONERS (front seats)
WARNING
. The pretensioners cannot be reused
after activation. They must be re-
placed together with the retractor
and buckle as a unit.
. If the vehicle becomes involved in a
collision but the pretensioner is not
activated, be sure to have the pre-
tensioner system checked and, if
Safety — Seats, seat belts and supplemental restraint system1-45
Page 100 of 354
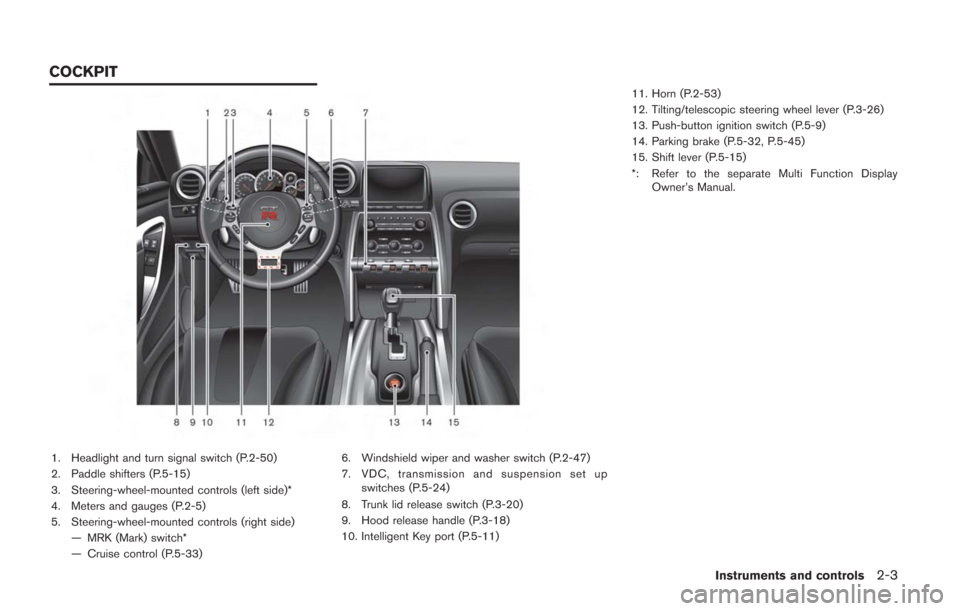
1. Headlight and turn signal switch (P.2-50)
2. Paddle shifters (P.5-15)
3. Steering-wheel-mounted controls (left side)*
4. Meters and gauges (P.2-5)
5. Steering-wheel-mounted controls (right side)— MRK (Mark) switch*
— Cruise control (P.5-33) 6. Windshield wiper and washer switch (P.2-47)
7. VDC, transmission and suspension set up
switches (P.5-24)
8. Trunk lid release switch (P.3-20)
9. Hood release handle (P.3-18)
10. Intelligent Key port (P.5-11) 11. Horn (P.2-53)
12. Tilting/telescopic steering wheel lever (P.3-26)
13. Push-button ignition switch (P.5-9)
14. Parking brake (P.5-32, P.5-45)
15. Shift lever (P.5-15)
*: Refer to the separate Multi Function Display
Owner’s Manual.
Instruments and controls2-3
COCKPIT
Page 129 of 354
2-32Instruments and controls
and then blinks for 10 seconds when the engine
is not running, it indicates that the vehicle is not
ready for an emission control system inspection/
maintenance test. (
“Readiness for Inspec-
tion/Maintenance (I/M) test (US only)” page 9-
20)
Operation:
The malfunction indicator light will come on in
one of two ways:
. Malfunction indicator light on steady — An
emission control system malfunction has
been detected. Check the fuel-filler cap. If
the fuel-filler cap is loose or missing, tighten
or install the cap and continue to drive the
vehicle. The
light should turn off after a
few driving trips. If thelight does not
turn off after a few driving trips, have the
vehicle inspected by a GT-R certified
NISSAN dealer. You do not need to have
your vehicle towed to the dealer.
. Malfunction indicator light blinking — An
engine misfire has been detected which may
damage the emission control system.
To reduce or avoid emission control system
damage:
a. Do not drive at speeds above 45 MPH
(72 km/h). b. Avoid hard acceleration or deceleration.
c. Avoid steep uphill grades.
d. If possible, reduce the amount of cargo
being hauled or towed.
The malfunction indicator light may stop
blinking and remain on.
Have the vehicle inspected by a GT-R
certified NISSAN dealer. You do not need
to have your vehicle towed to the dealer.
NOTICE
Continued vehicle operation without
having the emission control system
checked and repaired as necessary
could lead to poor driveability, reduced
fuel economy, and possible damage to
the emission control system.
Turn signal/hazard indicator
lights
The light flashes when the turn signal switch
lever or hazard switch is turned on.
Vehicle Dynamic Control (VDC)
off indicator light
The light comes on when the Vehicle Dynamic
Control (VDC) set up switch is pushed to OFF for more than 1 second. (
“VDC, transmis-
sion and suspension setup switches” page 5-
24)
This indicates that the vehicle dynamic control
system and traction control system are not
operating. (
“Vehicle Dynamic Control
(VDC) system” page 5-49)
AUDIBLE REMINDERS
Key reminder chime
A chime will sound if the driver side door is
opened while the ignition switch is pushed to
the ACC position or pushed to the OFF or
LOCK position with the Intelligent Key left in the
Intelligent Key port. Make sure the ignition
switch is pushed to the OFF position, and take
the Intelligent Key with you when leaving the
vehicle.
Light reminder chime
A chime will sound when the driver side door is
opened with the light switch in theorposition and the ignition switch in the ACC, OFF
or LOCK position.
Turn the light switch off when you leave the
vehicle.
Page 198 of 354
5 Starting and driving
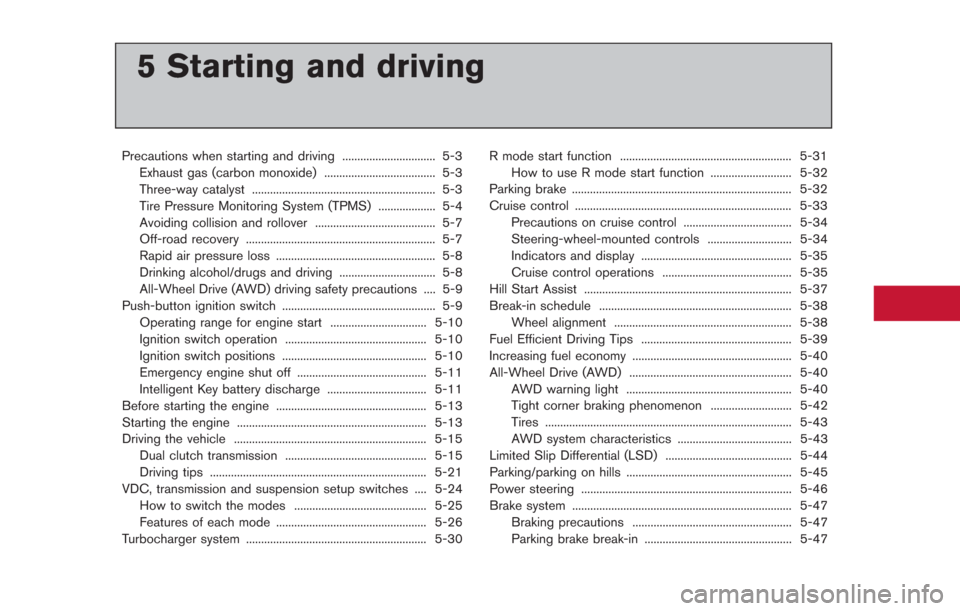
Precautions when starting and driving ............................... 5-3Exhaust gas (carbon monoxide) ..................................... 5-3Three-way catalyst ............................................................. 5-3
Tire Pressure Monitoring System (TPMS) ................... 5-4
Avoiding collision and rollover ........................................ 5-7
Off-road recovery ............................................................... 5-7
Rapid air pressure loss ..................................................... 5-8
Drinking alcohol/drugs and driving ................................ 5-8All-Wheel Drive (AWD) driving safety precautions .... 5-9
Push-button ignition switch ................................................... 5-9
Operating range for engine start ................................ 5-10
Ignition switch operation ............................................... 5-10
Ignition switch positions ................................................ 5-10
Emergency engine shut off ........................................... 5-11
Intelligent Key battery discharge ................................. 5-11
Before starting the engine .................................................. 5-13
Starting the engine ............................................................... 5-13
Driving the vehicle ................................................................ 5-15 Dual clutch transmission ............................................... 5-15
Driving tips ........................................................................\
5-21
VDC, transmission and suspension setup switches .... 5-24 How to switch the modes ............................................ 5-25
Features of each mode .................................................. 5-26
Turbocharger system ............................................................ 5-30 R mode start function ......................................................... 5-31
How to use R mode start function ........................... 5-32
Parking brake ........................................................................\
. 5-32
Cruise control ........................................................................\
5-33 Precautions on cruise control .................................... 5-34Steering-wheel-mounted controls ............................ 5-34
Indicators and display .................................................. 5-35
Cruise control operations ........................................... 5-35
Hill Start Assist ..................................................................... 5-37
Break-in schedule ................................................................ 5-38
Wheel alignment ........................................................... 5-38
Fuel Efficient Driving Tips .................................................. 5-39
Increasing fuel economy ..................................................... 5-40
All-Wheel Drive (AWD) ...................................................... 5-40 AWD warning light ....................................................... 5-40
Tight corner braking phenomenon ........................... 5-42
Tires ........................................................................\
.......... 5-43AWD system characteristics ...................................... 5-43
Limited Slip Differential (LSD) .......................................... 5-44
Parking/parking on hills ....................................................... 5-45
Power steering ...................................................................... 5-46
Brake system ........................................................................\
. 5-47 Braking precautions ..................................................... 5-47
Parking brake break-in ................................................. 5-47
Page 221 of 354
5-24Starting and driving
the brakes normally based on traffic and road
conditions.
The metallic brake pads and brake disc rotor
may rust together when the brakes are not
applied:
.If the vehicle is not idled for 20 seconds
without the brakes applied, or if the brakes
are applied when the vehicle is shut off, the
rotor and pads can rust together, even when
the brake pads are dry.
. If the brakes are wet when the vehicle is
parked and the parking brake is applied for a
long time.
Contact a GT-R certified NISSAN dealer if the
brake pads and brake rotor have rusted
together.
1. Bring the vehicle to a complete stop.
2. With the foot brake pedal depressed, apply the parking brake.
3. Move the shift lever to the
&Pposition.
4. Check the shift lever position indicator on the instrument panel to confirm that the
&P
position is selected.
5. Push the ignition switch to stop the engine.
WARNING
Before exiting the vehicle, be sure to
move the shift lever to the&Pposition
and stop the engine. If the engine is
running and the shift lever is not in the
&Pposition, the vehicle may start mov-
ing due to partial engagement of the
clutch or to the effects of gravity on a
slope, or the vehicle may suddenly
accelerate due to accidental operation
of the accelerator pedal, possibly caus-
ing an accident.
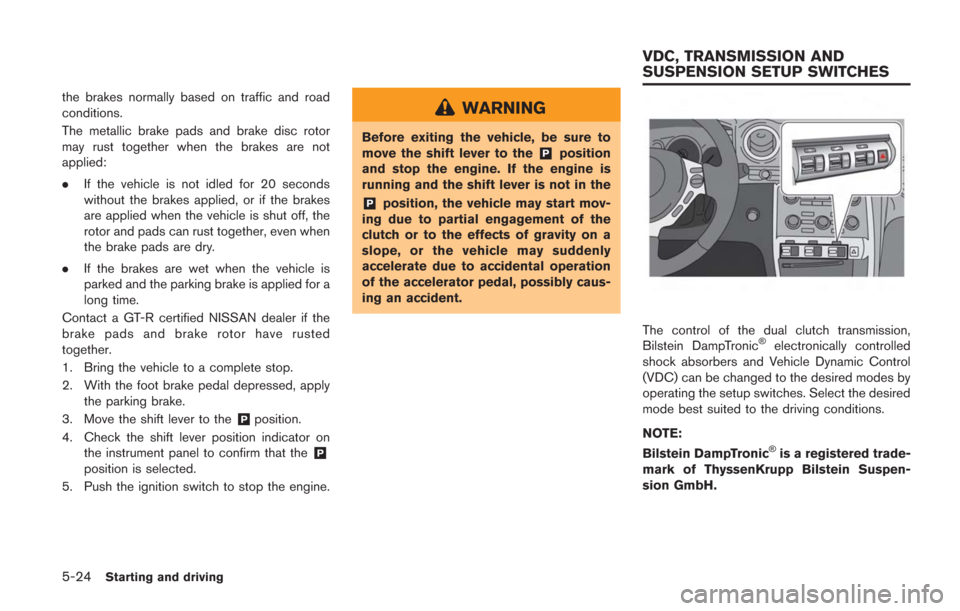
The control of the dual clutch transmission,
Bilstein DampTronic®electronically controlled
shock absorbers and Vehicle Dynamic Control
(VDC) can be changed to the desired modes by
operating the setup switches. Select the desired
mode best suited to the driving conditions.
NOTE:
Bilstein DampTronic
®is a registered trade-
mark of ThyssenKrupp Bilstein Suspen-
sion GmbH.
VDC, TRANSMISSION AND
SUSPENSION SETUP SWITCHES
Page 222 of 354
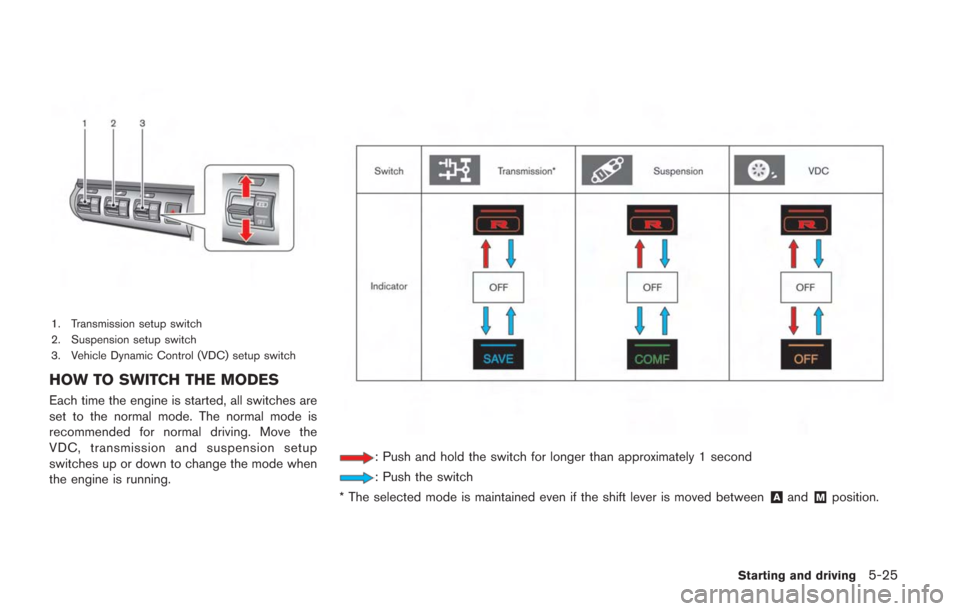
1. Transmission setup switch
2. Suspension setup switch
3. Vehicle Dynamic Control (VDC) setup switch
HOW TO SWITCH THE MODES
Each time the engine is started, all switches are
set to the normal mode. The normal mode is
recommended for normal driving. Move the
VDC, transmission and suspension setup
switches up or down to change the mode when
the engine is running.
: Push and hold the switch for longer than approximately 1 second
: Push the switch
* The selected mode is maintained even if the shift lever is moved between
&Aand&Mposition.
Starting and driving5-25
Page 225 of 354
5-28Starting and driving
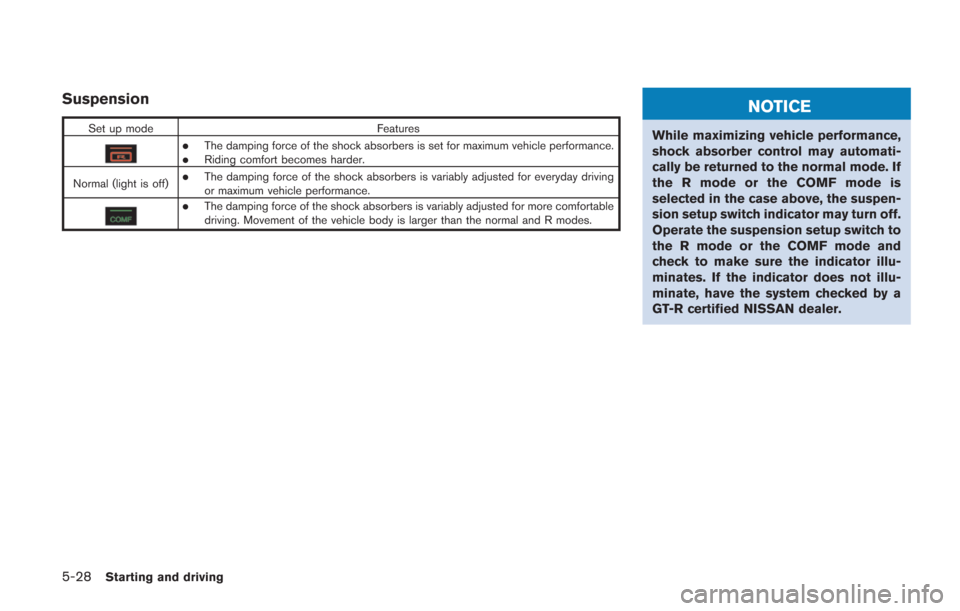
Suspension
Set up modeFeatures
.The damping force of the shock absorbers is set for maximum vehicle performance..Riding comfort becomes harder.
Normal (light is off)
.The damping force of the shock absorbers is variably adjusted for everyday driving
or maximum vehicle performance.
.The damping force of the shock absorbers is variably adjusted for more comfortable
driving. Movement of the vehicle body is larger than the normal and R modes.
NOTICE
While maximizing vehicle performance,
shock absorber control may automati-
cally be returned to the normal mode. If
the R mode or the COMF mode is
selected in the case above, the suspen-
sion setup switch indicator may turn off.
Operate the suspension setup switch to
the R mode or the COMF mode and
check to make sure the indicator illu-
minates. If the indicator does not illu-
minate, have the system checked by a
GT-R certified NISSAN dealer.