2014 NISSAN GT-R headlight
[x] Cancel search: headlightPage 41 of 354
0-4Illustrated table of contents
FRONT
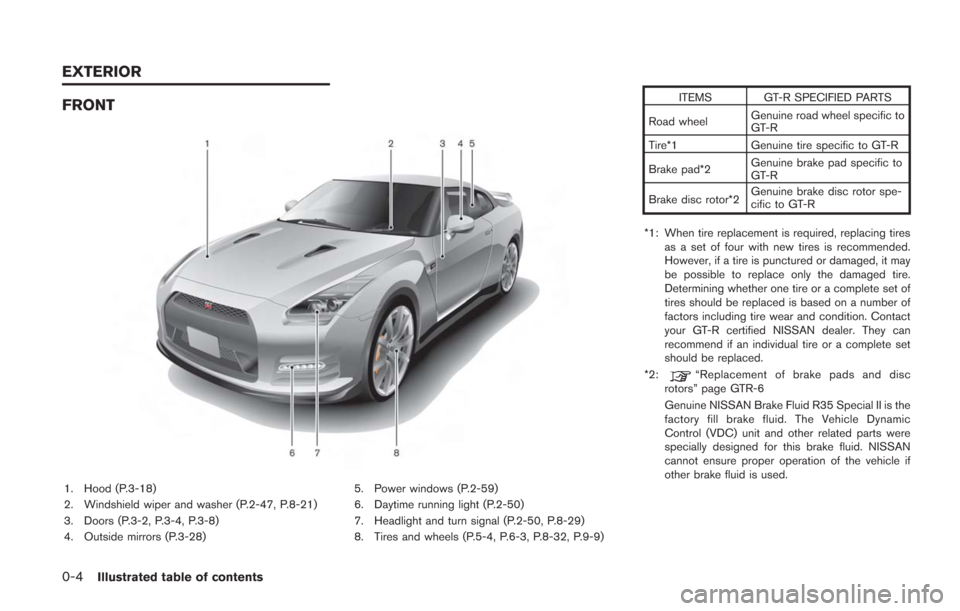
1. Hood (P.3-18)
2. Windshield wiper and washer (P.2-47, P.8-21)
3. Doors (P.3-2, P.3-4, P.3-8)
4. Outside mirrors (P.3-28)5. Power windows (P.2-59)
6. Daytime running light (P.2-50)
7. Headlight and turn signal (P.2-50, P.8-29)
8. Tires and wheels (P.5-4, P.6-3, P.8-32, P.9-9) ITEMS GT-R SPECIFIED PARTS
Road wheel Genuine road wheel specific to
GT-R
Tire*1 Genuine tire specific to GT-R
Brake pad*2 Genuine brake pad specific to
GT-R
Brake disc rotor*2 Genuine brake disc rotor spe-
cific to GT-R
*1: When tire replacement is required, replacing tires as a set of four with new tires is recommended.
However, if a tire is punctured or damaged, it may
be possible to replace only the damaged tire.
Determining whether one tire or a complete set of
tires should be replaced is based on a number of
factors including tire wear and condition. Contact
your GT-R certified NISSAN dealer. They can
recommend if an individual tire or a complete set
should be replaced.
*2:
“Replacement of brake pads and disc
rotors” page GTR-6
Genuine NISSAN Brake Fluid R35 Special II is the
factory fill brake fluid. The Vehicle Dynamic
Control (VDC) unit and other related parts were
specially designed for this brake fluid. NISSAN
cannot ensure proper operation of the vehicle if
other brake fluid is used.
EXTERIOR
Page 44 of 354
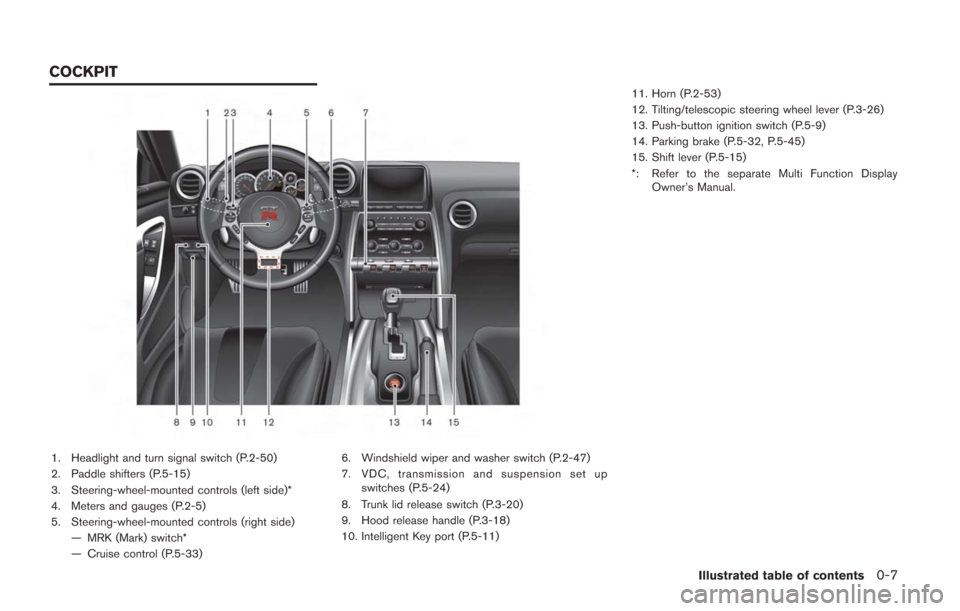
1. Headlight and turn signal switch (P.2-50)
2. Paddle shifters (P.5-15)
3. Steering-wheel-mounted controls (left side)*
4. Meters and gauges (P.2-5)
5. Steering-wheel-mounted controls (right side)— MRK (Mark) switch*
— Cruise control (P.5-33) 6. Windshield wiper and washer switch (P.2-47)
7. VDC, transmission and suspension set up
switches (P.5-24)
8. Trunk lid release switch (P.3-20)
9. Hood release handle (P.3-18)
10. Intelligent Key port (P.5-11) 11. Horn (P.2-53)
12. Tilting/telescopic steering wheel lever (P.3-26)
13. Push-button ignition switch (P.5-9)
14. Parking brake (P.5-32, P.5-45)
15. Shift lever (P.5-15)
*: Refer to the separate Multi Function Display
Owner’s Manual.
Illustrated table of contents0-7
COCKPIT
Page 99 of 354
Low fuel warning ............................................................. 2-40
Door/trunk open warning .............................................. 2-41
Low washer fluid warning ............................................. 2-41
No key warning ................................................................ 2-41
Operation displays ................................................................ 2-42 Engine start operation indicator .................................. 2-42
Shift “P” warning ............................................................. 2-43
“PUSH” warning .............................................................. 2-43
Steering lock release malfunction indicator ............. 2-43
Intelligent Key insertion indicator ................................ 2-44
Intelligent Key removal indicator .................................. 2-44
Intelligent Key battery discharge indicator ................ 2-44
Security systems ................................................................... 2-45 Vehicle security system ................................................. 2-45
NISSAN Vehicle Immobilizer System ......................... 2-46
Windshield wiper and washer switch .............................. 2-47 Using the wipers ............................................................. 2-48
Using the washer ............................................................ 2-49
Rear window defroster switch ........................................... 2-49
Headlight and turn signal switch ...................................... 2-50 Xenon headlights ............................................................. 2-50
Headlight switch .............................................................. 2-50
Horn ........................................................................\
.................. 2-53
Heated seats (if so equipped) .......................................... 2-53
Turning on the heaters ................................................... 2-53Turning off the heaters ................................................... 2-54 Power outlets ........................................................................\
2-54
Storage ........................................................................\
........... 2-56
Cup holders .................................................................... 2-56
Sunglasses holder ........................................................ 2-57
Door pocket .................................................................... 2-57
Glove box ........................................................................\
2-58Console box ................................................................... 2-58
Coat hooks ..................................................................... 2-59
Windows ........................................................................\
........ 2-59 Power windows ............................................................. 2-59
Interior lights ........................................................................\
.. 2-62
Map lights ....................................................................... 2-62
Interior light control switch ......................................... 2-62
Vanity mirror lights ................................................................ 2-63
HomeLink
®Universal Transceiver .................................... 2-63
Programming HomeLink®............................................ 2-64
Programming HomeLink®for
Canadian customers .................................................... 2-65
Operating the HomeLink
®universal transceiver ... 2-66
Programming trouble-diagnosis ................................ 2-66
Clearing the programmed information ..................... 2-66
Reprogramming a single HomeLink
®button ......... 2-66
If your vehicle is stolen ................................................ 2-66
Page 100 of 354
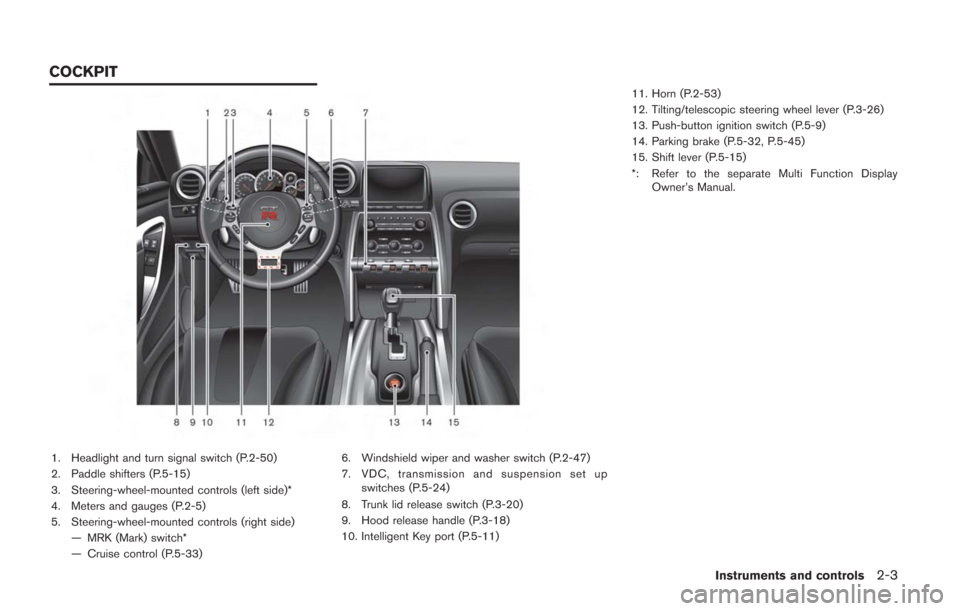
1. Headlight and turn signal switch (P.2-50)
2. Paddle shifters (P.5-15)
3. Steering-wheel-mounted controls (left side)*
4. Meters and gauges (P.2-5)
5. Steering-wheel-mounted controls (right side)— MRK (Mark) switch*
— Cruise control (P.5-33) 6. Windshield wiper and washer switch (P.2-47)
7. VDC, transmission and suspension set up
switches (P.5-24)
8. Trunk lid release switch (P.3-20)
9. Hood release handle (P.3-18)
10. Intelligent Key port (P.5-11) 11. Horn (P.2-53)
12. Tilting/telescopic steering wheel lever (P.3-26)
13. Push-button ignition switch (P.5-9)
14. Parking brake (P.5-32, P.5-45)
15. Shift lever (P.5-15)
*: Refer to the separate Multi Function Display
Owner’s Manual.
Instruments and controls2-3
COCKPIT
Page 108 of 354
to go to ALERT > UPSHIFT. The current
status of the upshift indicator will be shown on
the UPSHIFT screen. Note that the function is
set to AUTO as the factory default setting.
To change the upshift indicator mode, choose
SETTING on the UPSHIFT screen. Set one of
the following modes by pushing the NEXT
switch
, and then push ENTERto
complete.
. AUTO
. 3,000 to 6,300 RPM (MANUAL)
. OFF
The number will increase by 100 RPM. To
increase the number by 500 RPM, push and
hold the NEXT switch
.
Example
When the maximum engine speed is
desired:
Set the upshift indicator to AUTO. The yellow
indicator illuminates approximately 700 RPM
before the red zone, and the red indicator
illuminates just before the red zone.
When the maximum engine torque is
desired:
Set the figure at 6,000 RPM. The green
indicator starts flashing from approximately 5,500 RPM and illuminates at 6,000 RPM.
When breaking-in the vehicle:
To help avoid high engine speeds during break-
in, set the upshift indicator to less than 3,500
RPM. The green indicator starts flashing ap-
proximately 500 RPM before the set figure and
illuminates from the set figure. (
“Break-in
schedule” page 5-38)
NOTE:
. There may be a slight difference be-
tween the timing of the upshift indica-
tor illumination and the tachometer
indication.
. When the battery terminal is discon-
nected, the set memory will be erased
and the mode returns to the default.
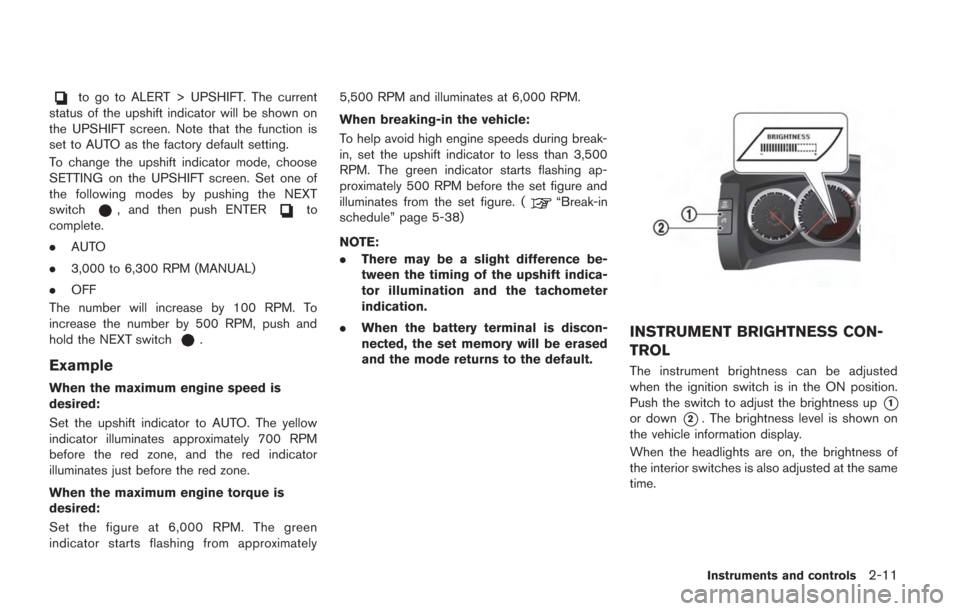
INSTRUMENT BRIGHTNESS CON-
TROL
The instrument brightness can be adjusted
when the ignition switch is in the ON position.
Push the switch to adjust the brightness up
*1
or down*2. The brightness level is shown on
the vehicle information display.
When the headlights are on, the brightness of
the interior switches is also adjusted at the same
time.
Instruments and controls2-11
Page 128 of 354
When the warning light illuminates, perform cool
down driving (driving 1.3 mile (2 km) in 5th or
6th gear at a speed of approximately 37 - 50
MPH (60 - 80 km/h) while checking the
temperature of the transmission oil until the
warning light goes off.
NOTICE
While the warning light is illuminated,
the engine output is controlled so that
it does not increase.
Vehicle Dynamic Control (VDC)
warning light
The light will blink when the VDC system or the
traction control system is operating, thus alerting
the driver that the vehicle is nearing its traction
limits. The road surface may be slippery.
If the VDC warning light illuminates when the
VDC system is turned on, this light alerts the
driver to the fact that the VDC system’s fail-safe
mode is operating, for example the VDC or hill
start assist system may not be functioning
properly. Have the system checked by a GT-R
certified NISSAN dealer. If a malfunction occurs
in the system, the VDC system function will be
canceled but the vehicle is still driveable. (
“Vehicle Dynamic Control (VDC) system”
page 5-49)
INDICATOR LIGHTS
Cruise main switch indicator
light
The light comes on when the cruise control is
pushed. The light turns off when the main switch
is pushed again. While the cruise control system
main switch indicator light is on, the cruise
control system is operational.
Cruise set switch indicator
light
The light comes on while the vehicle speed is
controlled by the cruise control system. If the
light blinks while the engine is running, it may
indicate the cruise control system is not
functioning properly. Have the system checked
by a GT-R certified NISSAN dealer.
Exterior light indicator
This indicator illuminates when the headlight
switch is turned to the AUTO,orposition and the front parking lights, instrument
panel lights, rear combination lights, license
plate lights or headlights are on. The indicator
turns off when these lights are turned off.
Front passenger air bag status
light
The front passenger air bag status light ()
will be lit and the passenger front air bag will be
OFF depending on how the front passenger
seat is being used. (
“NISSAN Advanced
Air Bag System (front seats)” page 1-40)
High beam indicator light
This light comes on when the headlight high
beam is on and goes out when the low beam is
selected.
Malfunction Indicator Light
(MIL)
If the malfunction indicator light comes on
steady or blinks while the engine is running, it
may indicate a potential emission control mal-
function.
The malfunction indicator light may also come on
steady if the fuel-filler cap is loose or missing, or
if the vehicle runs out of fuel. Check to make
sure the fuel-filler cap is installed and closed
tightly, and that the vehicle has at least 3 US
gallons (12 liters) of fuel in the fuel tank.
After a few driving trips, the
light should
turn off if no other potential emission control
system malfunction exists.
If this indicator light remains on for 20 seconds
Instruments and controls2-31
Page 143 of 354
2-46Instruments and controls
5. Confirm that the security indicator lightcomes on. The security indicator light stays
on for about 30 seconds. The vehicle
security system is now pre-armed. After
about 30 seconds the vehicle security
system automatically shifts into the armed
phase. The security light begins to flash
once every approximately 3 seconds. If,
during this 30-second pre-arm time period,
the door is unlocked, or the ignition switch is
pushed to ACC or ON, the system will not
arm.
Even when the driver and/or passengers
are in the vehicle, the system will activate
with all doors, hood, and trunk lid locked
with the ignition switch in the LOCK
position. When pushing the ignition switch
to the ACC or ON position, the system will
be released.
Vehicle security system activation
The vehicle security system will give the follow-
ing alarm:
. The headlights blink and the horn sounds
intermittently.
. The alarm automatically turns off after
approximately 1 minute. However, the alarm
reactivates if the vehicle is tampered with
again. The alarm is activated by:
.
Opening the door or the trunk lid without
using the button on the Intelligent Key, the
door handle request switch or the mechan-
ical key. (Even if the door is opened by
releasing the door inside lock knob, the
alarm will activate.)
. Opening the hood.
How to stop an activated alarm
The alarm will stop by:
.Unlocking a door by pushing the UNLOCK
button on the Intelligent Key.
. Unlocking a door by pushing the door
handle request switch.
. Pushing the ignition switch to the ACC or
ON position.
If the system does not operate as de-
scribed above, have it checked by a GT-R
certified NISSAN dealer.
NISSAN VEHICLE IMMOBILIZER
SYSTEM
The NISSAN Vehicle Immobilizer System will not
allow the engine to start without the use of the
registered Intelligent Key. Never leave these
keys in the vehicle. FCC Notice:
For USA:
This device complies with Part 15 of the
FCC Rules. Operation is subject to the
following two conditions: (1) This device
may not cause harmful interference, and
(2) this device must accept any interfer-
ence received, including interference that
may cause undesired operation.
Note: Changes or modifications not ex-
pressly approved by the party responsible
for compliance could void the user’s
authority to operate the equipment.
For Canada:
This device complies with RSS-210 of
Industry Canada. Operation is subject to
the following two conditions: (1) this
device may not cause interference, and
(2) this device must accept any interfer-
ence, including interference that may
cause undesired operation of the device.
Page 147 of 354
2-50Instruments and controls
XENON HEADLIGHTS
WARNING
HIGH VOLTAGE
. When xenon headlights are on, they
produce a high voltage. To prevent
an electric shock, never attempt to
modify or disassemble. Always have
your xenon headlights replaced at a
GT-R certified NISSAN dealer.
. Xenon headlights provide consider-
ably more light than conventional
headlights. If they are not correctly
aimed, they might temporarily blind
an oncoming driver or the driver
ahead of you and cause a serious
accident. If headlights are not aimed
correctly, immediately take your ve-
hicle to a GT-R certified NISSAN
dealer and have the headlights
adjusted correctly.
When the xenon headlight is initially turned on,
its brightness or color varies slightly. However,
the color and brightness will soon stabilize. NOTE:
.
The life of xenon headlights will be
shortened by frequent on-off opera-
tion. It is generally desirable not to turn
off the headlights for short intervals
(for example, when the vehicle stops at
a traffic signal) . Even when the daytime
running lights are active, the xenon
headlights do not turn on. This way the
life of the xenon headlights is not
reduced.
. If the xenon headlight bulb is close to
burning out, the brightness will drasti-
cally decrease, the light will start
blinking, or the color of the light will
become reddish. If one or more of the
above signs appear, contact a GT-R
certified NISSAN dealer.
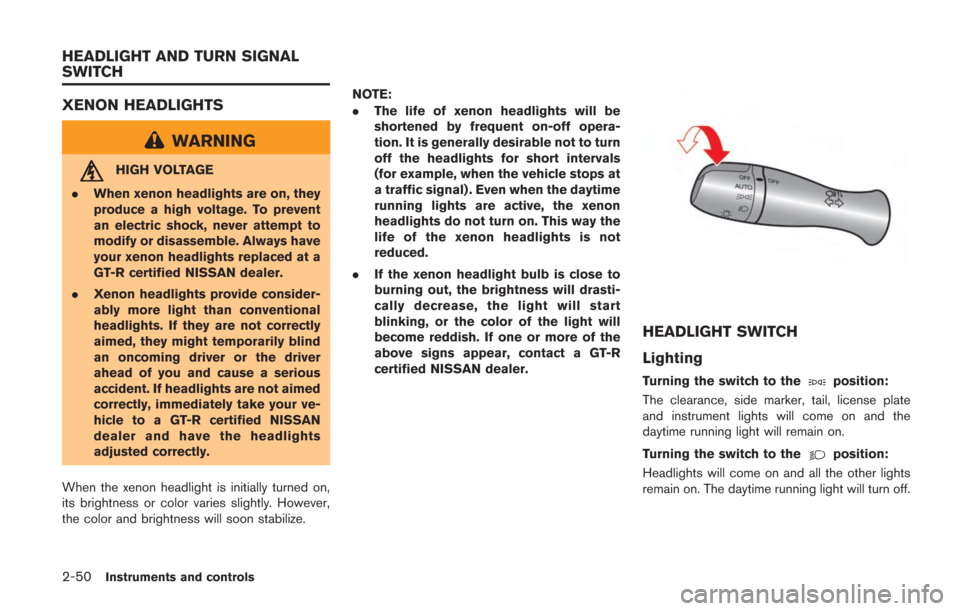
HEADLIGHT SWITCH
Lighting
Turning the switch to theposition:
The clearance, side marker, tail, license plate
and instrument lights will come on and the
daytime running light will remain on.
Turning the switch to the
position:
Headlights will come on and all the other lights
remain on. The daytime running light will turn off.
HEADLIGHT AND TURN SIGNAL
SWITCH