2014 NISSAN GT-R headlight
[x] Cancel search: headlightPage 148 of 354
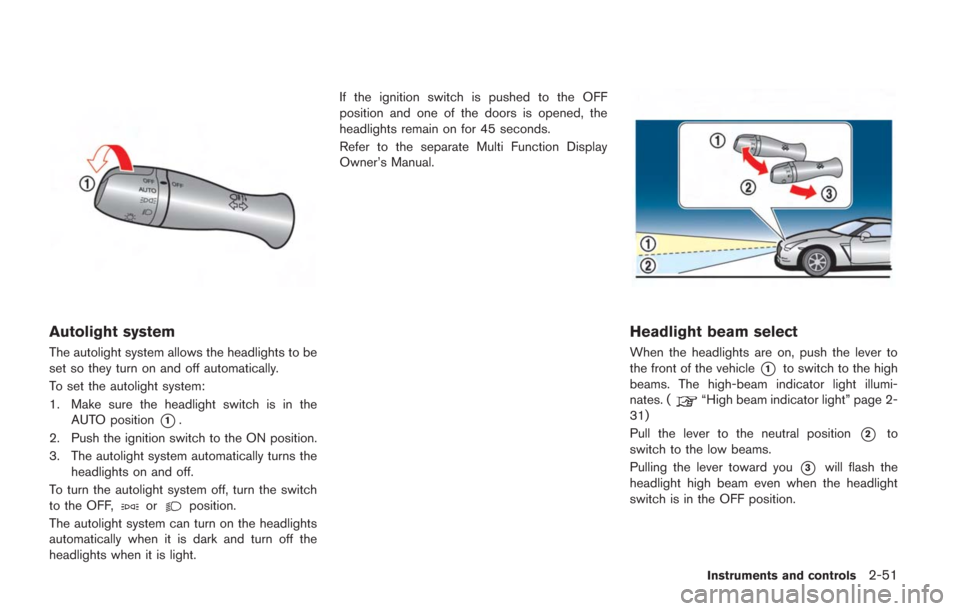
Autolight system
The autolight system allows the headlights to be
set so they turn on and off automatically.
To set the autolight system:
1. Make sure the headlight switch is in theAUTO position
*1.
2. Push the ignition switch to the ON position.
3. The autolight system automatically turns the headlights on and off.
To turn the autolight system off, turn the switch
to the OFF,
orposition.
The autolight system can turn on the headlights
automatically when it is dark and turn off the
headlights when it is light. If the ignition switch is pushed to the OFF
position and one of the doors is opened, the
headlights remain on for 45 seconds.
Refer to the separate Multi Function Display
Owner’s Manual.
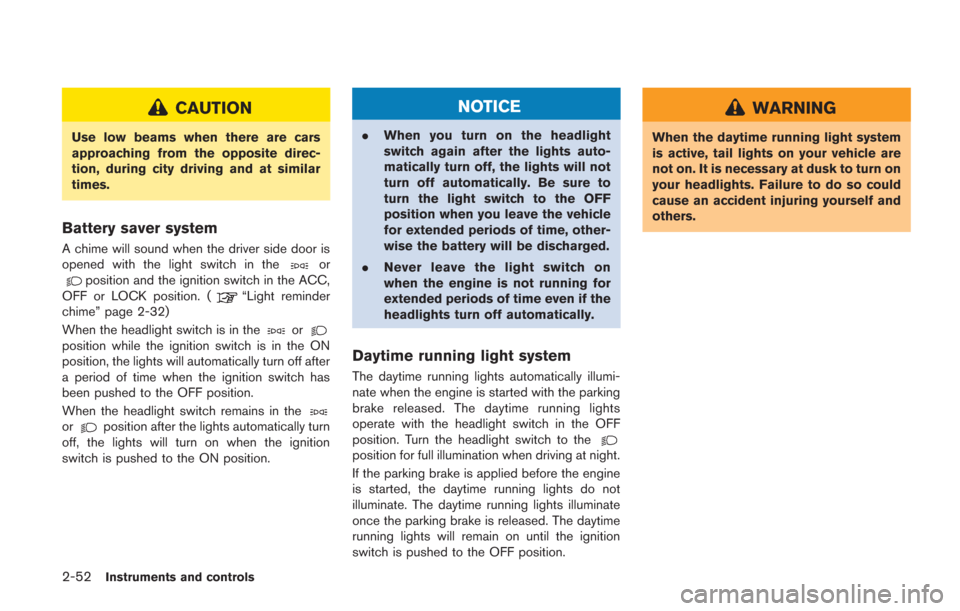
Headlight beam select
When the headlights are on, push the lever to
the front of the vehicle
*1to switch to the high
beams. The high-beam indicator light illumi-
nates. (
“High beam indicator light” page 2-
31)
Pull the lever to the neutral position
*2to
switch to the low beams.
Pulling the lever toward you
*3will flash the
headlight high beam even when the headlight
switch is in the OFF position.
Instruments and controls2-51
Page 149 of 354
2-52Instruments and controls
CAUTION
Use low beams when there are cars
approaching from the opposite direc-
tion, during city driving and at similar
times.
Battery saver system
A chime will sound when the driver side door is
opened with the light switch in theorposition and the ignition switch in the ACC,
OFF or LOCK position. (“Light reminder
chime” page 2-32)
When the headlight switch is in the
orposition while the ignition switch is in the ON
position, the lights will automatically turn off after
a period of time when the ignition switch has
been pushed to the OFF position.
When the headlight switch remains in the
orposition after the lights automatically turn
off, the lights will turn on when the ignition
switch is pushed to the ON position.
NOTICE
. When you turn on the headlight
switch again after the lights auto-
matically turn off, the lights will not
turn off automatically. Be sure to
turn the light switch to the OFF
position when you leave the vehicle
for extended periods of time, other-
wise the battery will be discharged.
. Never leave the light switch on
when the engine is not running for
extended periods of time even if the
headlights turn off automatically.
Daytime running light system
The daytime running lights automatically illumi-
nate when the engine is started with the parking
brake released. The daytime running lights
operate with the headlight switch in the OFF
position. Turn the headlight switch to the
position for full illumination when driving at night.
If the parking brake is applied before the engine
is started, the daytime running lights do not
illuminate. The daytime running lights illuminate
once the parking brake is released. The daytime
running lights will remain on until the ignition
switch is pushed to the OFF position.
WARNING
When the daytime running light system
is active, tail lights on your vehicle are
not on. It is necessary at dusk to turn on
your headlights. Failure to do so could
cause an accident injuring yourself and
others.
Page 151 of 354
2-54Instruments and controls
TURNING OFF THE HEATERS
Move the switch to the level position. The switch
indicator turns off.
WARNING
Do not use or allow occupants to use
the seat heater if you or the occupants
cannot monitor elevated seat tempera-
tures or have an inability to feel pain in
those body parts in contact with the
seat. Use of the seat heater by such
people could result in serious injury.
CAUTION
.Do not put anything on the seat
which insulates heat, such as a
blanket, cushion, seat cover, etc.
Otherwise, the seat may become
overheated.
. Do not place anything hard or heavy
on the seat or pierce it with a pin or
similar object. This may result in
damage to the heater.
. Any liquid spilled on the heated seat
should be removed immediately with a dry cloth.
. If any malfunctions are found or the
heated seat does not operate, turn
the switch off and have the system
checked by a GT-R certified NISSAN
dealer.
NOTICE
.The battery could run down if the
seat heater is operated while the
engine is not running.
. Do not use the seat heater for
extended periods or when no one
is using the seat.
. When cleaning the seat, never use
gasoline, thinner, or any similar
materials.
CAUTION
.The outlet and plug may be hot
during or immediately after use.
. Do not use with accessories that
exceed a 12 volt, 120W (10A) power
draw. Do not use double adapters or
more than one electrical accessory.
. This power outlet is not designed
for use with a cigarette lighter unit.
. Before inserting or disconnecting a
plug, be sure the electrical acces-
sory being used is turned OFF.
. When not in use, be sure to close
the cap. Do not allow water to
contact the outlet.
NOTICE
.Use power outlet with the engine
running to avoid discharging the
vehicle battery.
. Avoid using power outlet when the
air conditioner, headlights or rear
window defroster is on.
POWER OUTLETS
Page 178 of 354
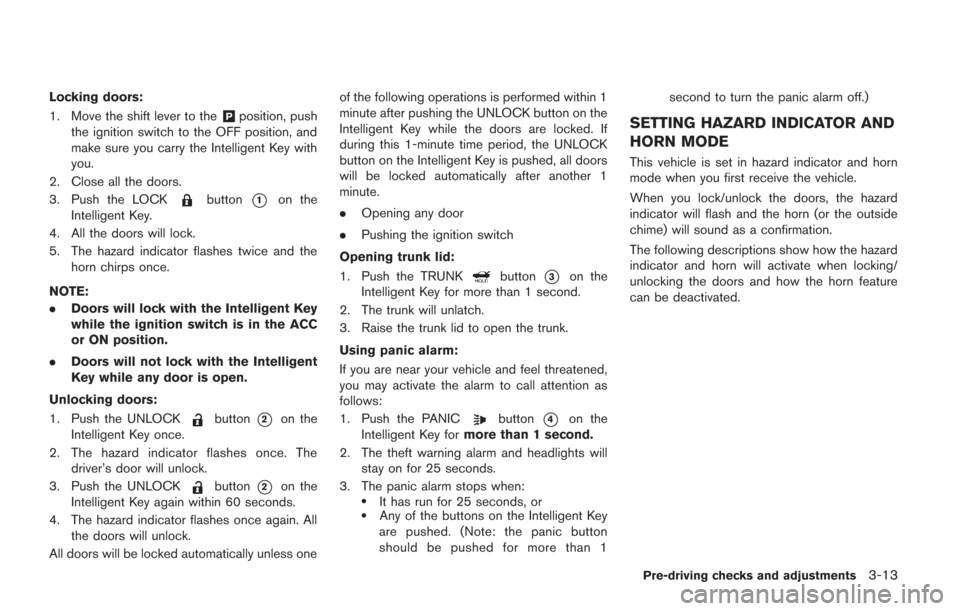
Locking doors:
1. Move the shift lever to the
&Pposition, push
the ignition switch to the OFF position, and
make sure you carry the Intelligent Key with
you.
2. Close all the doors.
3. Push the LOCK
button*1on the
Intelligent Key.
4. All the doors will lock.
5. The hazard indicator flashes twice and the horn chirps once.
NOTE:
. Doors will lock with the Intelligent Key
while the ignition switch is in the ACC
or ON position.
. Doors will not lock with the Intelligent
Key while any door is open.
Unlocking doors:
1. Push the UNLOCK
button*2on the
Intelligent Key once.
2. The hazard indicator flashes once. The driver’s door will unlock.
3. Push the UNLOCK
button*2on the
Intelligent Key again within 60 seconds.
4. The hazard indicator flashes once again. All the doors will unlock.
All doors will be locked automatically unless one of the following operations is performed within 1
minute after pushing the UNLOCK button on the
Intelligent Key while the doors are locked. If
during this 1-minute time period, the UNLOCK
button on the Intelligent Key is pushed, all doors
will be locked automatically after another 1
minute.
.
Opening any door
. Pushing the ignition switch
Opening trunk lid:
1. Push the TRUNK
button*3on the
Intelligent Key for more than 1 second.
2. The trunk will unlatch.
3. Raise the trunk lid to open the trunk.
Using panic alarm:
If you are near your vehicle and feel threatened,
you may activate the alarm to call attention as
follows:
1. Push the PANIC
button*4on the
Intelligent Key for more than 1 second.
2. The theft warning alarm and headlights will stay on for 25 seconds.
3. The panic alarm stops when:
.It has run for 25 seconds, or.Any of the buttons on the Intelligent Key
are pushed. (Note: the panic button
should be pushed for more than 1 second to turn the panic alarm off.)
SETTING HAZARD INDICATOR AND
HORN MODE
This vehicle is set in hazard indicator and horn
mode when you first receive the vehicle.
When you lock/unlock the doors, the hazard
indicator will flash and the horn (or the outside
chime) will sound as a confirmation.
The following descriptions show how the hazard
indicator and horn will activate when locking/
unlocking the doors and how the horn feature
can be deactivated.
Pre-driving checks and adjustments3-13
Page 192 of 354
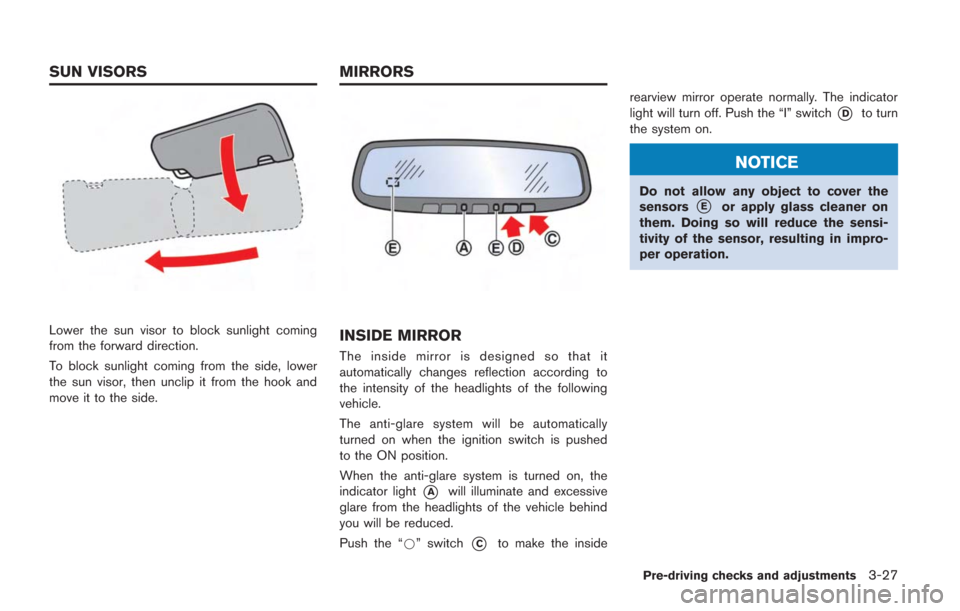
Lower the sun visor to block sunlight coming
from the forward direction.
To block sunlight coming from the side, lower
the sun visor, then unclip it from the hook and
move it to the side.INSIDE MIRROR
The inside mirror is designed so that it
automatically changes reflection according to
the intensity of the headlights of the following
vehicle.
The anti-glare system will be automatically
turned on when the ignition switch is pushed
to the ON position.
When the anti-glare system is turned on, the
indicator light
*Awill illuminate and excessive
glare from the headlights of the vehicle behind
you will be reduced.
Push the “*” switch
*Cto make the inside rearview mirror operate normally. The indicator
light will turn off. Push the “I” switch
*Dto turn
the system on.
NOTICE
Do not allow any object to cover the
sensors*Eor apply glass cleaner on
them. Doing so will reduce the sensi-
tivity of the sensor, resulting in impro-
per operation.
Pre-driving checks and adjustments3-27
SUN VISORS MIRRORS
Page 272 of 354
8 Maintenance and do-it-yourself
Maintenance requirement ....................................................... 8-3Scheduled maintenance ................................................... 8-3
General maintenance ........................................................ 8-3
Where to go for service ................................................... 8-3
General maintenance .............................................................. 8-4 Explanation of maintenance items ................................. 8-4
Maintenance precautions ....................................................... 8-6
Engine compartment check locations ................................. 8-8 Removing the cowl top cover ......................................... 8-9
Engine cooling system ......................................................... 8-10
Checking engine coolant level ..................................... 8-11
Changing engine coolant .............................................. 8-12
Engine oil ........................................................................\
........ 8-12
Checking engine oil level .............................................. 8-12
Changing engine oil and filter ...................................... 8-13
Transmission oil ..................................................................... 8-14
Power steering fluid .............................................................. 8-14
Brake fluid ........................................................................\
....... 8-15
Window washer fluid ........................................................... 8-16
Battery ........................................................................\
.............. 8-17
Precautions ....................................................................... 8-17
Fluid level check .............................................................. 8-17
Jump starting .................................................................... 8-19 Drive belts ........................................................................\
...... 8-19
Spark plugs ........................................................................\
.... 8-20
Replacing spark plugs ................................................. 8-20
Air cleaner ........................................................................\
...... 8-20
Windshield wiper blades .................................................... 8-21 Cleaning ........................................................................\
.. 8-21
Replacing the wiper blades ....................................... 8-22
Brakes ........................................................................\
............. 8-23 Self-adjusting brakes ................................................... 8-23
Brake pad wear warning ............................................. 8-23
High performance brake system ............................... 8-23
Replacing the brake pads ........................................... 8-23
Fuses ........................................................................\
............... 8-24
Engine compartment .................................................... 8-24
Passenger compartment ............................................. 8-25
Intelligent Key battery replacement .................................. 8-27
Lights ........................................................................\
............... 8-29 Headlights ....................................................................... 8-30Exterior and interior lights ........................................... 8-30
Wheels and tires .................................................................. 8-32
Tire pressure .................................................................. 8-32
Tire and loading information label ............................ 8-34
Checking the tire pressure ......................................... 8-35
Page 275 of 354
8-4Maintenance and do-it-yourself
During the normal day-to-day operation of the
vehicle, general maintenance should be per-
formed regularly as prescribed in this section. If
you detect any unusual sounds, vibrations or
smell, be sure to check for the cause or have a
GT-R certified NISSAN dealer do it promptly. In
addition, you should notify a GT-R certified
NISSAN dealer if you think that repairs are
required. (
“Maintenance precautions”
page 8-6)
EXPLANATION OF MAINTENANCE
ITEMS
Additional information on the following
items with “*” is found later in this section.
Outside the vehicle
The maintenance items listed here should be
performed from time to time, unless otherwise
specified.
Doors and engine hood: Check that all doors
and the engine hood, operate properly. Also
ensure that all latches lock securely. Lubricate
hinges, latches, latch pins, rollers and links if
necessary. Make sure that the secondary latch
keeps the hood from opening when the primary
latch is released.
When driving in areas using road salt or other
corrosive materials, check lubrication frequently. Lights*:
Clean the headlights on a regular basis.
Make sure that the headlights, stop lights, tail
lights, turn signal lights, and other lights are all
operating properly and installed securely. Also
check headlight aim.
Road wheel nuts (lug nuts)*: When checking
the tires, make sure no wheel nuts are missing,
and check for any loose wheel nuts. Tighten if
necessary.
Tire rotation*: Tires cannot be rotated because
your vehicle is equipped with different sized tires
in the front and rear.
Tires*: Check the pressure with a gauge often
and always prior to long distance trips. If
necessary, adjust the pressure in all tires to the
pressure specified. Check carefully for damage,
cuts or excessive wear.
NOTE:
. You can check the pressure of all four
tires on the multi function display. See
the separate Multi Function Display
Owner’s Manual.
. The tires of this vehicle are filled with
nitrogen gas. When the tire pressure is
low, fill the tires with nitrogen. Contact
a GT-R certified NISSAN dealer for
information on filling the tires with
nitrogen. .
If nitrogen is not available, compressed
air may be safely used under normal
driving conditions. However, NISSAN
recommends refilling with nitrogen for
maximum tire performance.
Tire Pressure Monitoring System (TPMS)
transmitter components: Replace grommet
seal of transmitter in TPMS, when replacing
each tire by reaching the wear limit.
Tire, wheel alignment and balance: If the
vehicle should pull to either side while driving on
a straight and level road, or if you detect uneven
or abnormal tire wear, there may be a need for
wheel alignment.
If the steering wheel or seat vibrates at normal
highway speeds, wheel balancing may be
needed.
For additional information regarding tires, refer
to “Important Tire Safety Information” (US) or
“Tire Safety Information” (Canada) in the War-
ranty Information Booklet.
Windshield: Clean the windshield on a regular
basis. Check the windshield at least every six
months for cracks or other damage. Have a
damaged windshield repaired by a qualified
repair facility.
Windshield wiper blades*: Check for cracks
or wear if they do not wipe properly.
GENERAL MAINTENANCE
Page 295 of 354
8-24Maintenance and do-it-yourself
If the inside of the disc rotors are cold during the
winter and the surface becomes hot due to a
heavy force being applied repeatedly to the
brakes, cracks may occur near the coolant hole
on the surface of the disc rotor. Cracks may also
occur due to a heavy force being repeatedly
applied to the brakes during high performance
driving. In these cases it may be necessary to
replace the disc rotors or brake pads depending
on the condition of the crack. Contact a GT-R
certified NISSAN dealer for replacement.
ENGINE COMPARTMENT
CAUTION
Never use a fuse of a higher or lower
amperage rating than that specified on
the fuse box cover. This could damage
the electrical system or cause a fire.
If any electrical equipment does not operate,
check for an open fuse.
1. Be sure the ignition switch is pushed to the OFF or LOCK position and the headlight
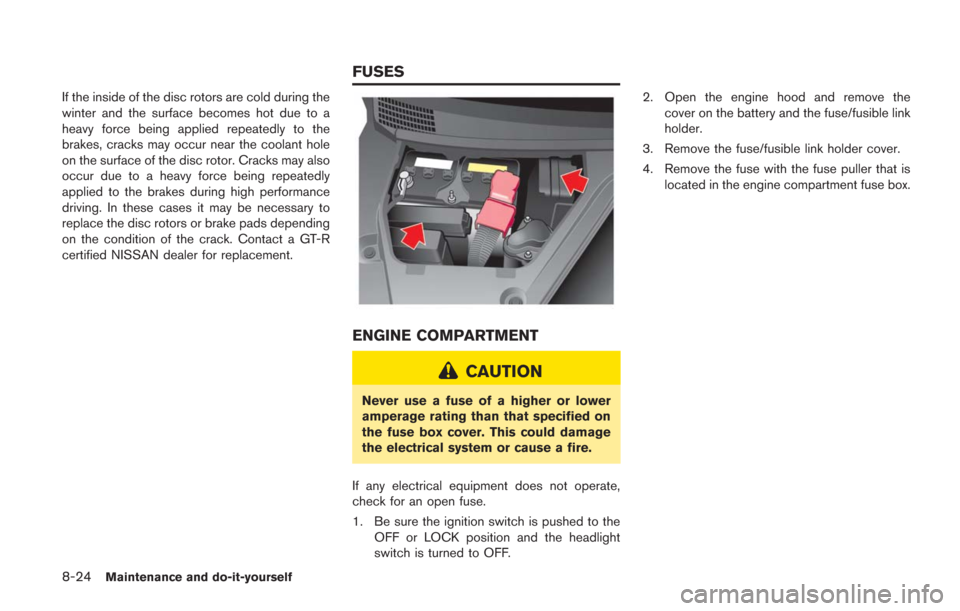
switch is turned to OFF. 2. Open the engine hood and remove the
cover on the battery and the fuse/fusible link
holder.
3. Remove the fuse/fusible link holder cover.
4. Remove the fuse with the fuse puller that is located in the engine compartment fuse box.
FUSES