2014 NISSAN GT-R warning
[x] Cancel search: warningPage 183 of 354
3-18Pre-driving checks and adjustments
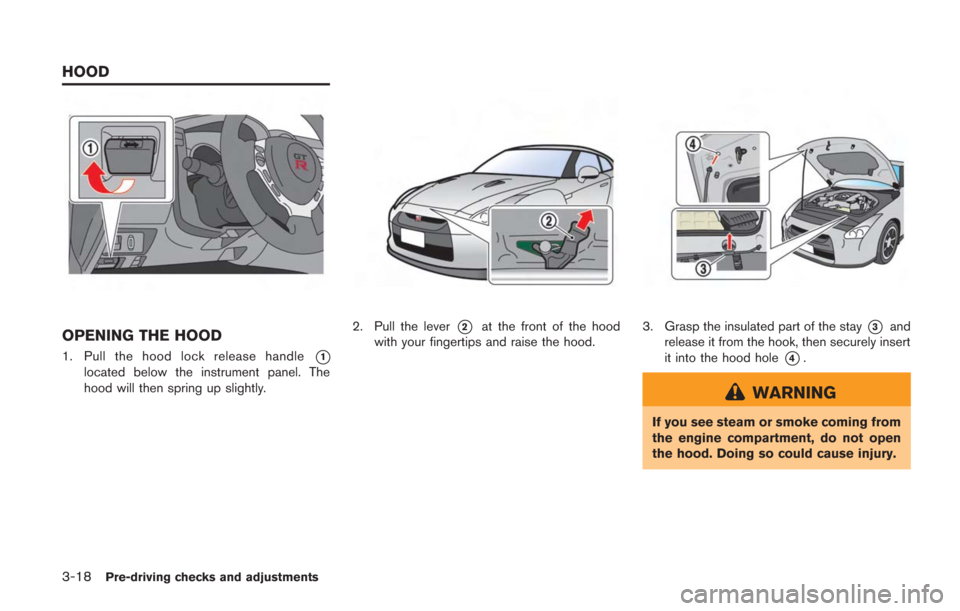
OPENING THE HOOD
1. Pull the hood lock release handle*1
located below the instrument panel. The
hood will then spring up slightly.
2. Pull the lever*2at the front of the hood
with your fingertips and raise the hood.3. Grasp the insulated part of the stay*3and
release it from the hook, then securely insert
it into the hood hole
*4.
WARNING
If you see steam or smoke coming from
the engine compartment, do not open
the hood. Doing so could cause injury.
HOOD
Page 184 of 354
CAUTION
.Do not insert hands, clothing, tools
or other items into the engine
compartment while the engine is
running.
. Do not touch the exhaust system
parts, radiator or other hot parts
until the engine and the parts have
cooled.
NOTICE
Do not open the hood while the wiper
arms are lifted away from the wind-
shield. The hood and wipers will be
damaged.CLOSING THE HOOD
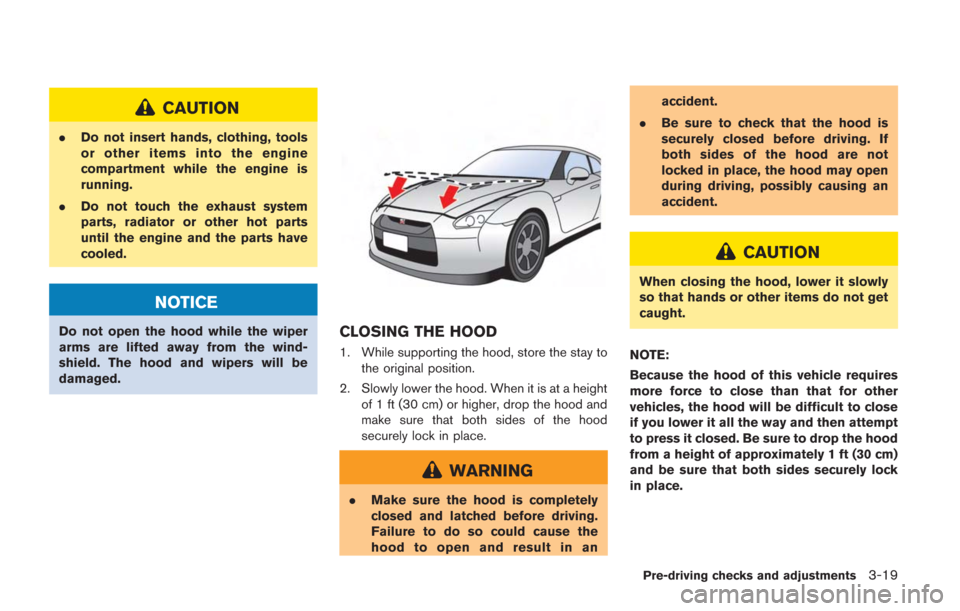
1. While supporting the hood, store the stay to
the original position.
2. Slowly lower the hood. When it is at a height of 1 ft (30 cm) or higher, drop the hood and
make sure that both sides of the hood
securely lock in place.
WARNING
. Make sure the hood is completely
closed and latched before driving.
Failure to do so could cause the
hood to open and result in an accident.
. Be sure to check that the hood is
securely closed before driving. If
both sides of the hood are not
locked in place, the hood may open
during driving, possibly causing an
accident.
CAUTION
When closing the hood, lower it slowly
so that hands or other items do not get
caught.
NOTE:
Because the hood of this vehicle requires
more force to close than that for other
vehicles, the hood will be difficult to close
if you lower it all the way and then attempt
to press it closed. Be sure to drop the hood
from a height of approximately 1 ft (30 cm)
and be sure that both sides securely lock
in place.
Pre-driving checks and adjustments3-19
Page 185 of 354
3-20Pre-driving checks and adjustments
WARNING
.Do not drive with the trunk lid open.
This could allow dangerous exhaust
gases to be drawn into the vehicle.
(
“Exhaust gas (carbon monox-
ide)” page 5-3)
. Closely supervise children when
they are around cars to prevent
them from playing and becoming
locked in the trunk where they could
be seriously injured. Keep the car
locked, with the trunk closed, when
not in use, and prevent children’s
access to Intelligent Keys.
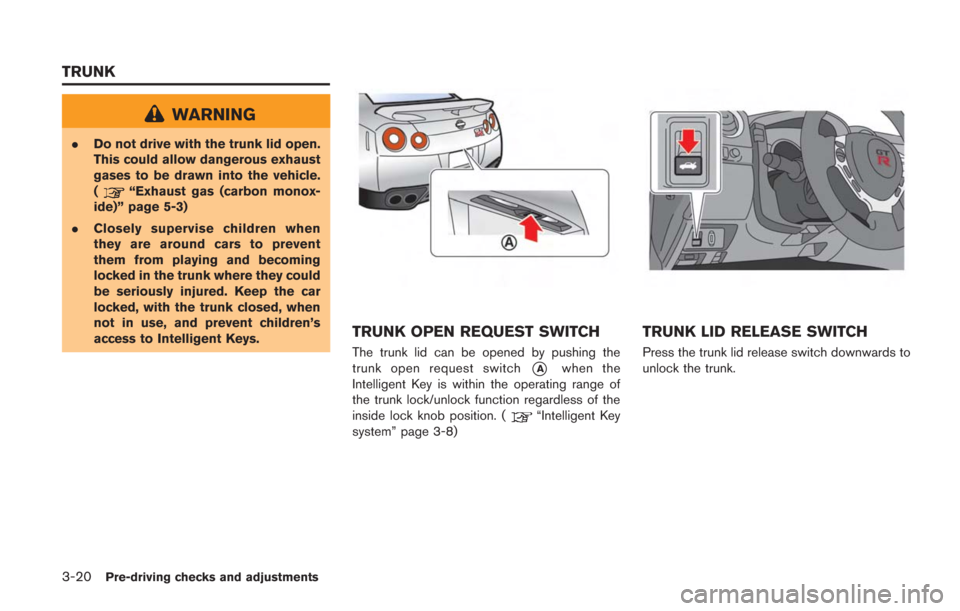
TRUNK OPEN REQUEST SWITCH
The trunk lid can be opened by pushing the
trunk open request switch
*Awhen the
Intelligent Key is within the operating range of
the trunk lock/unlock function regardless of the
inside lock knob position. (
“Intelligent Key
system” page 3-8)
TRUNK LID RELEASE SWITCH
Press the trunk lid release switch downwards to
unlock the trunk.
TRUNK
Page 187 of 354
3-22Pre-driving checks and adjustments
.Do not leave the key inside the
trunk.
NOTE:
. To prevent the Intelligent Key from
being accidentally locked in the trunk,
lockout protection is equipped with the
Intelligent Key system. When the trunk
lid is closed with the Intelligent Key
inside the trunk, the outside buzzer will
sound and the trunk will open.
. The trunk of this vehicle is slightly
more difficult to close than an ordinary
vehicle (particularly when the vehicle is
new) . This is because the trunk rigidity
has been increased to handle the high
load on the rear spoiler during vehicle
operation. This does not indicate that
there is a malfunction. Check that the
trunk is securely locked.
EMERGENCY TRUNK LID RELEASE
WARNING
Closely supervise children when they
are around cars to prevent them from
playing and becoming locked in the
trunk where they could be seriously
injured. Keep the car locked, with the
trunk lid securely latched, when not in
use, and prevent children’s access to
Intelligent Keys.
The emergency trunk lid release mechanism allows opening of the trunk lid in the event that
people become locked inside the trunk or in the
event of the loss of electrical power such as a
discharged battery.
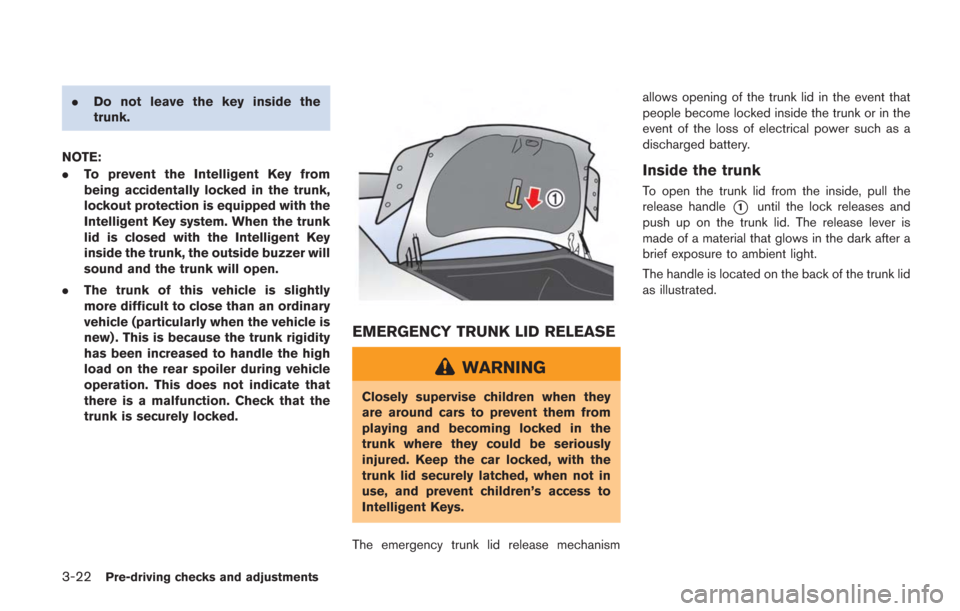
Inside the trunk
To open the trunk lid from the inside, pull the
release handle
*1until the lock releases and
push up on the trunk lid. The release lever is
made of a material that glows in the dark after a
brief exposure to ambient light.
The handle is located on the back of the trunk lid
as illustrated.
Page 188 of 354
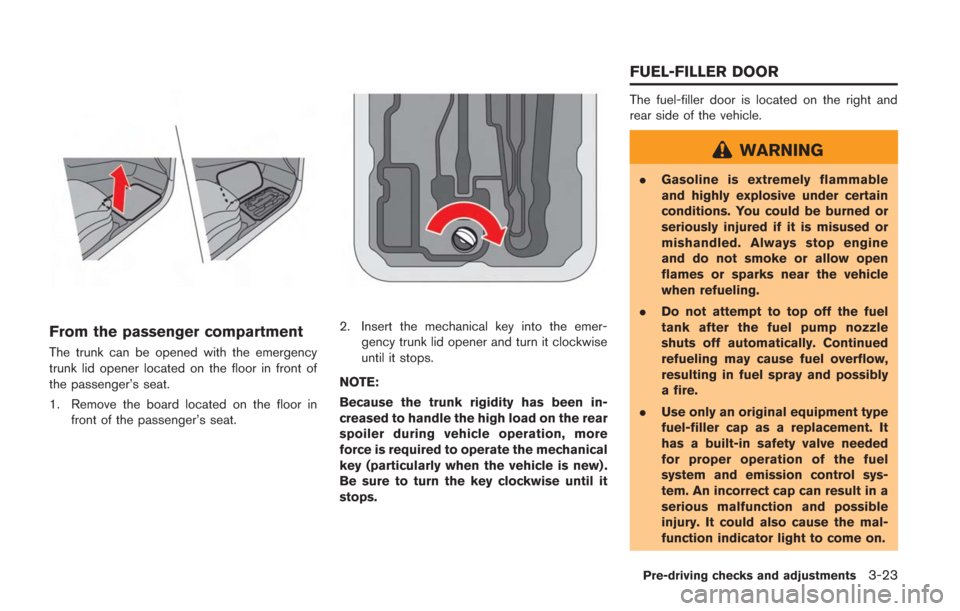
From the passenger compartment
The trunk can be opened with the emergency
trunk lid opener located on the floor in front of
the passenger’s seat.
1. Remove the board located on the floor infront of the passenger’s seat.
2. Insert the mechanical key into the emer-gency trunk lid opener and turn it clockwise
until it stops.
NOTE:
Because the trunk rigidity has been in-
creased to handle the high load on the rear
spoiler during vehicle operation, more
force is required to operate the mechanical
key (particularly when the vehicle is new) .
Be sure to turn the key clockwise until it
stops.
The fuel-filler door is located on the right and
rear side of the vehicle.
WARNING
. Gasoline is extremely flammable
and highly explosive under certain
conditions. You could be burned or
seriously injured if it is misused or
mishandled. Always stop engine
and do not smoke or allow open
flames or sparks near the vehicle
when refueling.
. Do not attempt to top off the fuel
tank after the fuel pump nozzle
shuts off automatically. Continued
refueling may cause fuel overflow,
resulting in fuel spray and possibly
a fire.
. Use only an original equipment type
fuel-filler cap as a replacement. It
has a built-in safety valve needed
for proper operation of the fuel
system and emission control sys-
tem. An incorrect cap can result in a
serious malfunction and possible
injury. It could also cause the mal-
function indicator light to come on.
Pre-driving checks and adjustments3-23
FUEL-FILLER DOOR
Page 191 of 354
3-26Pre-driving checks and adjustments
WARNING
.Do not adjust the steering wheel
while driving. You could lose control
of your vehicle and cause an acci-
dent.
. Do not adjust the steering wheel
any closer to you than is necessary
for proper steering operation and
comfort. The driver’s air bag inflates
with great force. If you are unrest-
rained, leaning forward, sitting side-
ways or out of position in any way,
you are at greater risk of injury or
death in a crash. You may also
receive serious or fatal injuries from
the air bag if you are up against it
when it inflates. Always sit back
against the seatback and as far
away as practical from the steering
wheel. Always use the seat belts.
TILT/TELESCOPIC STEERING COL-
UMN
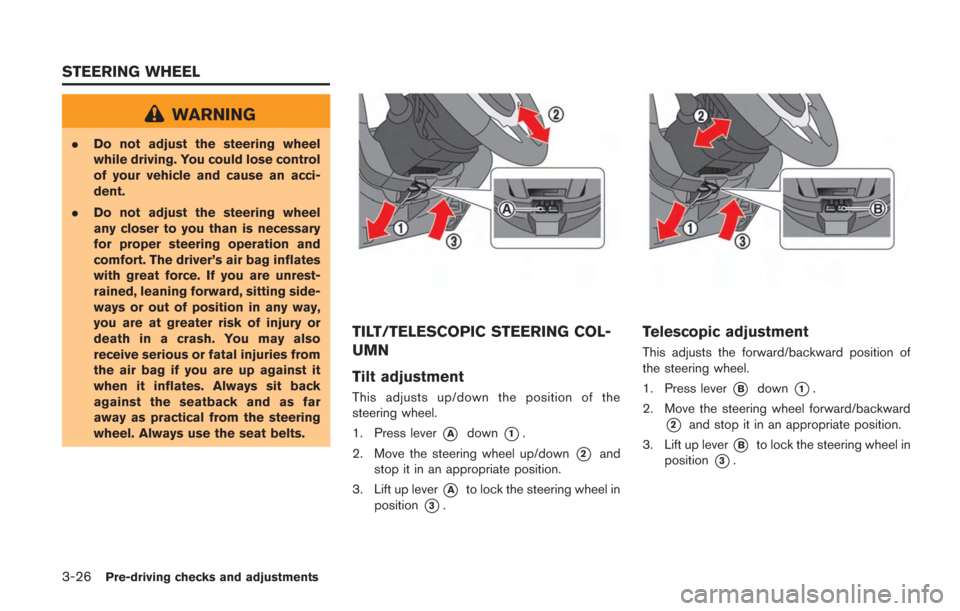
Tilt adjustment
This adjusts up/down the position of the
steering wheel.
1. Press lever
*Adown*1.
2. Move the steering wheel up/down
*2and
stop it in an appropriate position.
3. Lift up lever
*Ato lock the steering wheel in
position
*3.
Telescopic adjustment
This adjusts the forward/backward position of
the steering wheel.
1. Press lever
*Bdown*1.
2. Move the steering wheel forward/backward
*2and stop it in an appropriate position.
3. Lift up lever
*Bto lock the steering wheel in
position
*3.
STEERING WHEEL
Page 193 of 354
3-28Pre-driving checks and adjustments
OUTSIDE MIRRORS
WARNING
Objects viewed in the outside mirror on
the passenger side are closer than they
appear. Be careful when moving to the
right. Using only this mirror could cause
an accident. Use the inside mirror or
glance over your shoulder to properly
judge distances to other objects.
The outside mirror will operate only when the
ignition switch is in the ACC or ON position.
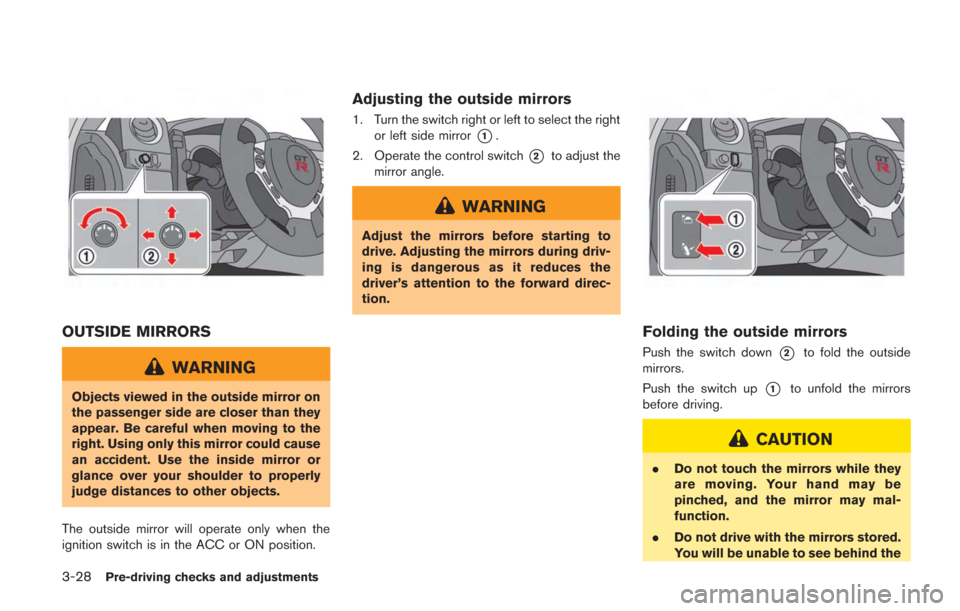
Adjusting the outside mirrors
1. Turn the switch right or left to select the right or left side mirror
*1.
2. Operate the control switch
*2to adjust the
mirror angle.
WARNING
Adjust the mirrors before starting to
drive. Adjusting the mirrors during driv-
ing is dangerous as it reduces the
driver’s attention to the forward direc-
tion.
Folding the outside mirrors
Push the switch down*2to fold the outside
mirrors.
Push the switch up
*1to unfold the mirrors
before driving.
CAUTION
. Do not touch the mirrors while they
are moving. Your hand may be
pinched, and the mirror may mal-
function.
. Do not drive with the mirrors stored.
You will be unable to see behind the
Page 198 of 354
5 Starting and driving
Precautions when starting and driving ............................... 5-3Exhaust gas (carbon monoxide) ..................................... 5-3Three-way catalyst ............................................................. 5-3
Tire Pressure Monitoring System (TPMS) ................... 5-4
Avoiding collision and rollover ........................................ 5-7
Off-road recovery ............................................................... 5-7
Rapid air pressure loss ..................................................... 5-8
Drinking alcohol/drugs and driving ................................ 5-8All-Wheel Drive (AWD) driving safety precautions .... 5-9
Push-button ignition switch ................................................... 5-9
Operating range for engine start ................................ 5-10
Ignition switch operation ............................................... 5-10
Ignition switch positions ................................................ 5-10
Emergency engine shut off ........................................... 5-11
Intelligent Key battery discharge ................................. 5-11
Before starting the engine .................................................. 5-13
Starting the engine ............................................................... 5-13
Driving the vehicle ................................................................ 5-15 Dual clutch transmission ............................................... 5-15
Driving tips ........................................................................\
5-21
VDC, transmission and suspension setup switches .... 5-24 How to switch the modes ............................................ 5-25
Features of each mode .................................................. 5-26
Turbocharger system ............................................................ 5-30 R mode start function ......................................................... 5-31
How to use R mode start function ........................... 5-32
Parking brake ........................................................................\
. 5-32
Cruise control ........................................................................\
5-33 Precautions on cruise control .................................... 5-34Steering-wheel-mounted controls ............................ 5-34
Indicators and display .................................................. 5-35
Cruise control operations ........................................... 5-35
Hill Start Assist ..................................................................... 5-37
Break-in schedule ................................................................ 5-38
Wheel alignment ........................................................... 5-38
Fuel Efficient Driving Tips .................................................. 5-39
Increasing fuel economy ..................................................... 5-40
All-Wheel Drive (AWD) ...................................................... 5-40 AWD warning light ....................................................... 5-40
Tight corner braking phenomenon ........................... 5-42
Tires ........................................................................\
.......... 5-43AWD system characteristics ...................................... 5-43
Limited Slip Differential (LSD) .......................................... 5-44
Parking/parking on hills ....................................................... 5-45
Power steering ...................................................................... 5-46
Brake system ........................................................................\
. 5-47 Braking precautions ..................................................... 5-47
Parking brake break-in ................................................. 5-47