2014 NISSAN GT-R warning light
[x] Cancel search: warning lightPage 256 of 354
6. Have all passengers get out of the vehicleand stand in a safe place, away from traffic
and clear of the vehicle.
For the tire removing procedure, see the
following section. (
“Jacking vehicle and
removing wheels” page 8-43)
The following circumstances indicate that the
battery is discharged.
. The starter motor does not turn or it turns
weakly and the engine does not start.
. The vehicle lights are much dimmer than
usual.
. The sound of the horn is weak. The horn
makes no sound.
NOTICE
When the battery is discharged, do not
close either of the front doors. The
automatic window adjusting function
will not work, and the side roof panel
may be damaged.
To start your engine with a booster battery, the
instructions and precautions below must be
followed.
For the battery maintenance information, see the
following section. (
“Battery” page 8-17)
WARNING
. If done incorrectly, jump starting
can lead to a battery explosion,
resulting in severe injury or death.
It could also damage your vehicle.
. Explosive hydrogen gas is always
present in the vicinity of the battery.
Keep all sparks and flames away
from the battery.
. Do not allow battery fluid to come
into contact with eyes, skin, clothing
or painted surfaces. Battery fluid is
a corrosive sulphuric acid solution
which can cause severe burns. If the
fluid should come into contact with
anything, immediately flush the con-
tacted area with water.
. Keep the battery out of the reach of
children.
. The booster battery must be rated at
12 volts. Use of an improperly rated
battery can damage your vehicle.
. Whenever working on or near a
battery, always wear suitable eye
protectors (for example, goggles or
industrial safety spectacles) and
In case of emergency6-5
JUMP STARTING
Page 268 of 354
carbon fiber parts become dirty,
dilute one cap of mild detergent
with a bucket of water and use that
mixture to clean the carbon fiber
parts.
. The dry carbon fiber parts may turn
yellow due to age deterioration
because of the characteristics of
the material. Storing the vehicle
outside in direct sunlight for ex-
tended periods of time may cause
discoloration and deterioration.
NISSAN recommends that you do
not store the vehicle in direct sun-
light to protect the rear spoiler.
NOTE:
The surfaces of the dry carbon fiber parts
are lightly coated like a race car so that
you can feel the proper texture of real
carbon, which may feel rough. This is
normal.Occasionally remove loose dust from the interior
trim, plastic parts and seats using a vacuum
cleaner or soft bristled brush. Wipe the vinyl and
leather surfaces with a clean, soft cloth dam-
pened in mild soap solution, then wipe clean
with a dry soft cloth.
Regular care and cleaning is required in order to
maintain the appearance of the leather.
Before using any fabric protector, read the
manufacturer’s recommendations. Some fabric
protectors contain chemicals that may stain or
bleach the seat material.
Use a cloth dampened only with water, to clean
the meter and gauge lens.
WARNING
Do not use water or acidic cleaners (hot
steam cleaners) on the seat. This can
damage the seat or occupant classifica-
tion sensor. This can also affect the
operation of the air bag system and
result in serious personal injury.
CAUTION
. Never use benzine, thinner, or any
similar material.
. For cleaning, use a soft cloth, dam-
pened with water. Never use a rough
cloth, alcohol, benzine, thinner or
any kind of solvent or paper towel
with a chemical cleaning agent.
They will scratch or cause discolora-
tion to the lens.
. Do not spray any liquid such as
water on the meter lens. Spraying
liquid may cause the system to
malfunction.
NOTICE
.Small dirt particles can be abrasive
and damaging to the leather sur-
faces and should be removed
promptly. Do not use saddle soap,
car waxes, polishes, oils, cleaning
fluids, solvents, detergents or am-
monia-based cleaners as they may
damage the leather’s natural finish.
. Never use fabric protectors unless
Appearance and care7-5
CLEANING INTERIOR
Page 272 of 354
8 Maintenance and do-it-yourself
Maintenance requirement ....................................................... 8-3Scheduled maintenance ................................................... 8-3
General maintenance ........................................................ 8-3
Where to go for service ................................................... 8-3
General maintenance .............................................................. 8-4 Explanation of maintenance items ................................. 8-4
Maintenance precautions ....................................................... 8-6
Engine compartment check locations ................................. 8-8 Removing the cowl top cover ......................................... 8-9
Engine cooling system ......................................................... 8-10
Checking engine coolant level ..................................... 8-11
Changing engine coolant .............................................. 8-12
Engine oil ........................................................................\
........ 8-12
Checking engine oil level .............................................. 8-12
Changing engine oil and filter ...................................... 8-13
Transmission oil ..................................................................... 8-14
Power steering fluid .............................................................. 8-14
Brake fluid ........................................................................\
....... 8-15
Window washer fluid ........................................................... 8-16
Battery ........................................................................\
.............. 8-17
Precautions ....................................................................... 8-17
Fluid level check .............................................................. 8-17
Jump starting .................................................................... 8-19 Drive belts ........................................................................\
...... 8-19
Spark plugs ........................................................................\
.... 8-20
Replacing spark plugs ................................................. 8-20
Air cleaner ........................................................................\
...... 8-20
Windshield wiper blades .................................................... 8-21 Cleaning ........................................................................\
.. 8-21
Replacing the wiper blades ....................................... 8-22
Brakes ........................................................................\
............. 8-23 Self-adjusting brakes ................................................... 8-23
Brake pad wear warning ............................................. 8-23
High performance brake system ............................... 8-23
Replacing the brake pads ........................................... 8-23
Fuses ........................................................................\
............... 8-24
Engine compartment .................................................... 8-24
Passenger compartment ............................................. 8-25
Intelligent Key battery replacement .................................. 8-27
Lights ........................................................................\
............... 8-29 Headlights ....................................................................... 8-30Exterior and interior lights ........................................... 8-30
Wheels and tires .................................................................. 8-32
Tire pressure .................................................................. 8-32
Tire and loading information label ............................ 8-34
Checking the tire pressure ......................................... 8-35
Page 276 of 354
Inside the vehicle
The maintenance items listed here should be
checked on a regular basis, such as when
performing scheduled maintenance, cleaning
the vehicle, etc.
Accelerator pedal:Check the pedal for
smooth operation and make sure the pedal
does not catch or require uneven effort. Keep
the floor mat away from the pedal.
Transmission
&Pmechanism: On a fairly
steep hill, check that your vehicle is held
securely with the shift lever in the
&Pposition
without applying any brakes.
Brake pedal: Check the pedal for smooth
operation. If the brake pedal suddenly goes
down further than normal, the pedal feels
spongy or the vehicle seems to take longer to
stop, see a GT-R certified NISSAN dealer
immediately. Keep the floor mat away from the
pedal.
Brakes: Check that the brakes do not pull the
vehicle to one side when applied.
Parking brake: Check the parking brake
operation regularly. The vehicle should be
securely held on a fairly steep hill with only the
parking brake applied. If the parking brake needs
to be adjusted, see a GT-R certified NISSAN
dealer. Seat belts:
Check that all parts of the seat belt
system (for example, buckles, anchors, adjuster
and retractors) operate properly and smoothly,
and are installed securely. Check the belt
webbing for cuts, fraying, wear or damage.
Seats: Check seat position controls such as
seat adjusters, seatback recliner, etc. to ensure
they operate smoothly and that all latches lock
securely in every position.
Steering wheel: Check for changes in the
steering conditions, such as excessive free play,
hard steering or strange noises.
Warning lights and chimes: Make sure that
all warning lights and chimes are operating
properly.
Windshield defroster: Check that the air
comes out of the defroster outlets properly and
in sufficient quantity when operating the heater
or air conditioner.
Windshield wiper and washer*: Check that
the wipers and washer operate properly and that
the wipers do not streak.
Under the hood and vehicle
The maintenance items listed here should be
checked periodically (for example, each time you
check the engine oil or refuel) . Battery*:
Check the fluid level in each cell. It
should be between the MAX and MIN lines.
Vehicles operated in high temperatures or under
severe condition require frequent checks of the
battery fluid level.
Brake fluid level*: Make sure that the brake
fluid level is between the MAX and MIN lines on
the reservoir.
Engine coolant level*: Check the coolant level
when the engine is cold.
Engine drive belts*: Make sure that no belt is
frayed, worn, cracked or oily.
Engine oil level*: Check the level after parking
the vehicle on a level spot and turning off the
engine. Wait at least 5 minutes for the oil to
drain back into the oil pan before checking the
oil.
Exhaust system: Make sure there are no loose
supports, cracks or holes. If the sound of the
exhaust seems unusual or there is a smell of
exhaust fumes in the engine compartment,
immediately have the exhaust system inspected
by a GT-R certified NISSAN dealer.
(“Exhaust gas (carbon monoxide)” page
5-3)
Fluid leaks: Check under the vehicle for fuel,
oil, water or other fluid leaks after the vehicle has
been parked for a while. Water dripping from the
Maintenance and do-it-yourself8-5
Page 286 of 354
For further brake fluid information, see the
following section. (“Capacities and recom-
mended fuel/lubricants” page 9-2)
WARNING
. Use only new fluid from a sealed
container. Old, inferior or contami-
nated fluid may damage the brake
system. The use of improper fluids
can damage the brake system and
affect the vehicle’s stopping ability.
. Clean the filler cap before removing.
. Brake fluid is poisonous and should
be stored carefully in marked con-
tainers out of the reach of children.
CAUTION
Genuine NISSAN Brake Fluid R35 Spe-
cial II is the factory fill brake fluid. The
Vehicle Dynamic Control (VDC) unit and
other related parts were specially de-
signed for this brake fluid and NISSAN
cannot ensure proper operation of the
vehicle if other brake fluid is used.
NOTICE
Do not spill the fluid on any painted
surfaces. This will damage the paint. If
fluid is spilled, wash the surface with
water.
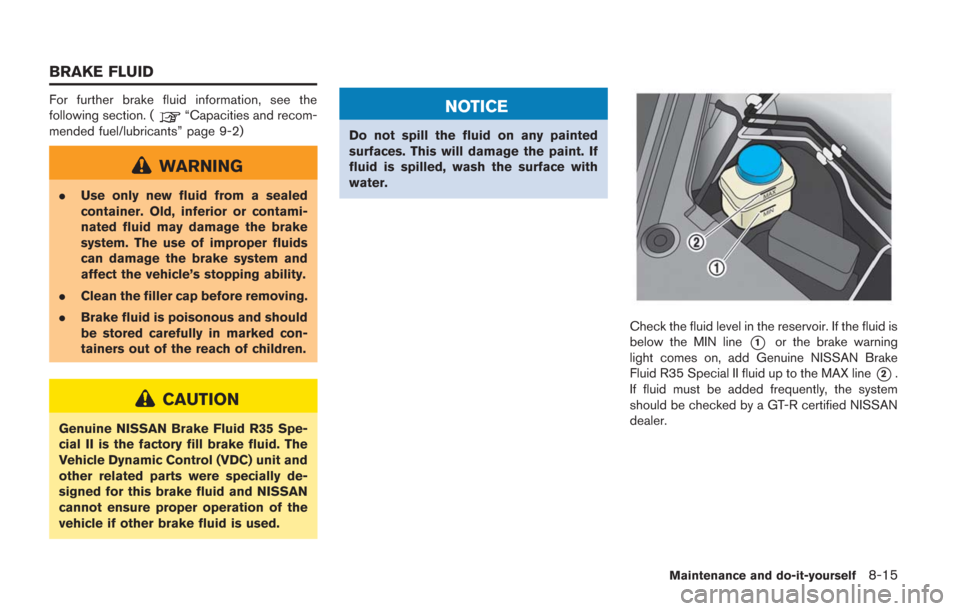
Check the fluid level in the reservoir. If the fluid is
below the MIN line
*1or the brake warning
light comes on, add Genuine NISSAN Brake
Fluid R35 Special II fluid up to the MAX line
*2.
If fluid must be added frequently, the system
should be checked by a GT-R certified NISSAN
dealer.
Maintenance and do-it-yourself8-15
BRAKE FLUID
Page 294 of 354
If the brakes do not operate properly, have the
brakes checked by a GT-R certified NISSAN
dealer.
SELF-ADJUSTING BRAKES
Your vehicle is equipped with self-adjusting
brakes.
The disc-type brakes self-adjust every time the
brake pedal is applied.
WARNING
See a GT-R certified NISSAN dealer for
a brake system check if the brake pedal
height does not return to normal.
BRAKE PAD WEAR WARNING
The disc brake pads have audible wear warn-
ings. When a brake pad requires replacement, it
will make a high pitched scraping sound when
the vehicle is in motion. This scraping sound will
first occur only when the brake pedal is
depressed. After more wear of the brake pad,
the sound will always be heard even if the brake
pedal is not depressed. Have the brakes
checked as soon as possible if the wear warning
sound is heard.
Under some driving or climate conditions,occasional brake squeak, squeal or other noise
may be heard. Occasional brake noise during
light to moderate stops is normal and does not
affect the function or performance of the brake
system.
Proper brake inspection intervals should
be followed.
For additional information, see the
maintenance log section of your NISSAN
Service and Maintenance Guide for mainte-
nance intervals.
HIGH PERFORMANCE BRAKE SYS-
TEM
This vehicle is equipped with high performance
brake pads that provide appropriate braking
force in a broad range of driving environments.
Due to the material used for the brake pads, the
road wheels may become more easily covered
by brake dust, however this does not indicate
that there is a malfunction.
The GT-R brake pads use material that contains
a lot of iron to maintain steady braking perfor-
mance even in high and low temperatures.
However, if the brake system is wet and the
parking brake is applied for a long time, the iron
in this material may get rusty and the brake pad
and disc rotor may be fixed together. This may
cause noise and vibration while driving. Before
parking the vehicle, dry the brake by driving on a dry road, especially after washing the vehicle or
driving in rain. Contact a GT-R certified NISSAN
dealer if the noise and vibration continue.
Frequent hard braking may cause scorching of
the brake pads. This will require the brake pads
to be replaced, even if the wear limit has not
been reached. Have the brake pads and disc
rotors inspected at the regular vehicle inspec-
tions.
For more details, contact a GT-R certified
NISSAN dealer.
REPLACING THE BRAKE PADS
NISSAN generally recommends to replace all
four sets of brake pads and disc rotors at the
same time to maintain maximum brake perfor-
mance.
However, replacing only the brake pads may be
allowed in some cases (four wheels or only front
wheels depending on the conditions). A GT-R
certified technician must inspect the vehicle and
determine that only the brake pads need to be
replaced. In this case, replacing all brake pads
and disc rotors as a set is not necessary.
Note that the replacement of brake pads and the
disc rotors as a set on all four wheels should be
performed when a GT-R certified technician
determines that this is the correct repair.
Maintenance and do-it-yourself8-23
BRAKES
Page 301 of 354
8-30Maintenance and do-it-yourself
HEADLIGHTS
Replacing
Xenon headlight bulb:
WARNING
HIGH VOLTAGE
When xenon headlights are on, they
produce a high voltage. To prevent an
electric shock, never attempt to modify
or disassemble. Always have your xe-
non headlights replaced at a GT-R
certified NISSAN dealer.
(
“Headlight and turn signal
switch” page 2-50)
Fog may temporarily form inside the lens of the
exterior lights in the rain or in a car wash. A
temperature difference between the inside and
the outside of the lens causes the fog. This does
not indicate that there is a malfunction. If large
drops of water collect inside the lens, contact a
GT-R certified NISSAN dealer.
EXTERIOR AND INTERIOR LIGHTS
Item Wattage (W)Bulb No.
Headlight assembly
low-beam (Xenon) 35 D2S
high-beam (Halogen) 65 H9
Front turn signal light* 28 7444NA
Front parking light* 5 W5W
Daytime running light* LED —
Front side marker light* 3.8 T10
Rear combination light* back-up 16W16W
turn signal 21WY21W
stop/tail LED—
Rear side marker light* LED—
License plate light* 5W5W
Map light 8—
Vanity mirror light 2—
Step light* 8—
Trunk light* 3.4—
High-mounted stop light* LED—
*: See a GT-R certified NISSAN dealer for replacement.
Page 303 of 354
8-32Maintenance and do-it-yourself
If you have a flat tire, see the following
section. (“Flat tire” page 6-3)
CAUTION
A GT-R certified NISSAN dealer should
perform a tire change. It will be neces-
sary to reset the tire pressure sensors.
To change the tires, contact a GT-R
certified NISSAN dealer.
Be sure to use the tires and wheels together as
a set that are designated for use with this
vehicle.
When tire replacement is required, replacing the
tires as a set of four with new tires is
recommended. However, if a tire is punctured
or damaged, it may be possible to replace only
the damaged tire. Determining whether one tire
or a complete set of tires should be replaced is
based on a number of factors including tire wear
and condition. Contact your GT-R certified
NISSAN dealer. They can recommend if an
individual tire or a complete set should be
replaced.
NOTICE
Make sure the tire valve stem cap is
installed and that the valve stem is
tight. When installing the cap, make
sure to tighten the cap by hand. If a tool
is used to tighten the cap, the cap may
be damaged.
TIRE PRESSURE
Tire Pressure Monitoring System
(TPMS)
This vehicle is equipped with the Tire Pressure
Monitoring System (TPMS) . It monitors tire
pressure of all tires. When the low tire pressure
warning light is lit, one or more of your tires is
significantly under-inflated. The system also
displays pressure of all tires on the multi function
display by sending a signal from a sensor that is
installed in each wheel.
The TPMS will activate only when the vehicle is
driven at speeds above 16 MPH (25 km/h).
Also, this system may not detect a sudden drop
in tire pressure. (
“Low tire pressure warn-
ing light” page 2-27) (“Tire Pressure
Monitoring System (TPMS)” page 5-4)
(
“Flat tire” page 6-3)
Tire inflation pressure
Check the tire pressure often and always
prior to long distance trips. The recom-
mended tire pressure specifications are
shown on the F.M.V.S.S./C.M.V.S.S. label
or the Tire and Loading Information label (if
so equipped) under the “Cold Tire Pres-
sure” heading. The Tire and Loading
Information label is affixed to the driver
side door end. Tire pressures should be
checked regularly because:
.Most tires naturally lose air over time.
.Tires can lose air suddenly when driven
over potholes or other objects or if the
vehicle strikes a curb while parking.
NOTE:
. You can check the pressure of all four
tires on the multi function display. See
the separate Multi Function Display
Owner’s Manual.
. The tires of this vehicle are filled with
nitrogen gas. When the tire pressure is
low, fill the tires with nitrogen. Contact
a GT-R certified NISSAN dealer for
information on filling the tires with
nitrogen.
WHEELS AND TIRES