2014 NISSAN CUBE key
[x] Cancel search: keyPage 12 of 332
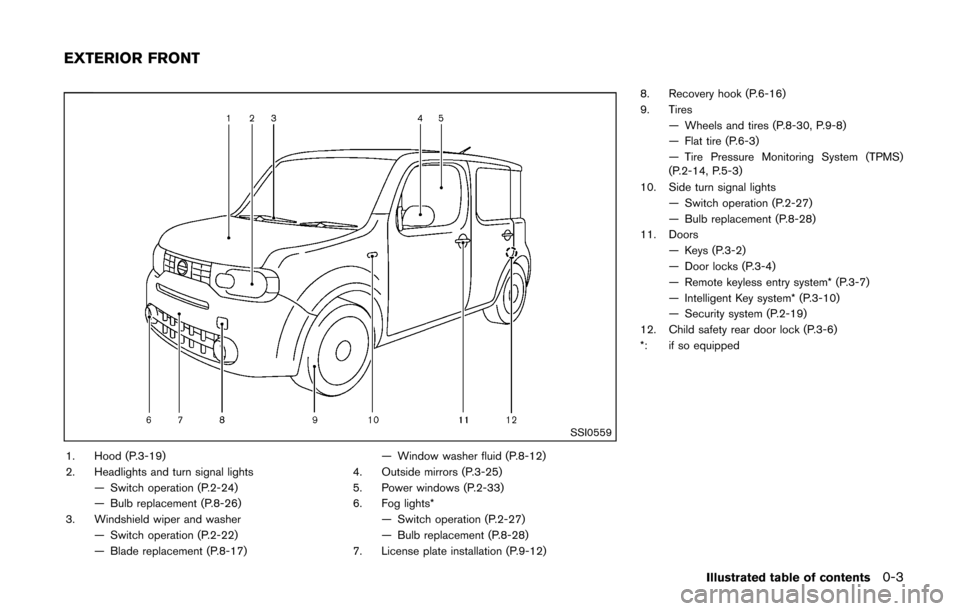
SSI0559
1. Hood (P.3-19)
2. Headlights and turn signal lights— Switch operation (P.2-24)
— Bulb replacement (P.8-26)
3. Windshield wiper and washer — Switch operation (P.2-22)
— Blade replacement (P.8-17) — Window washer fluid (P.8-12)
4. Outside mirrors (P.3-25)
5. Power windows (P.2-33)
6. Fog lights* — Switch operation (P.2-27)
— Bulb replacement (P.8-28)
7. License plate installation (P.9-12) 8. Recovery hook (P.6-16)
9. Tires
— Wheels and tires (P.8-30, P.9-8)
— Flat tire (P.6-3)
— Tire Pressure Monitoring System (TPMS)
(P.2-14, P.5-3)
10. Side turn signal lights — Switch operation (P.2-27)
— Bulb replacement (P.8-28)
11. Doors — Keys (P.3-2)
— Door locks (P.3-4)
— Remote keyless entry system* (P.3-7)
— Intelligent Key system* (P.3-10)
— Security system (P.2-19)
12. Child safety rear door lock (P.3-6)
*: if so equipped
Illustrated table of contents0-3
EXTERIOR FRONT
Page 13 of 332
0-4Illustrated table of contents
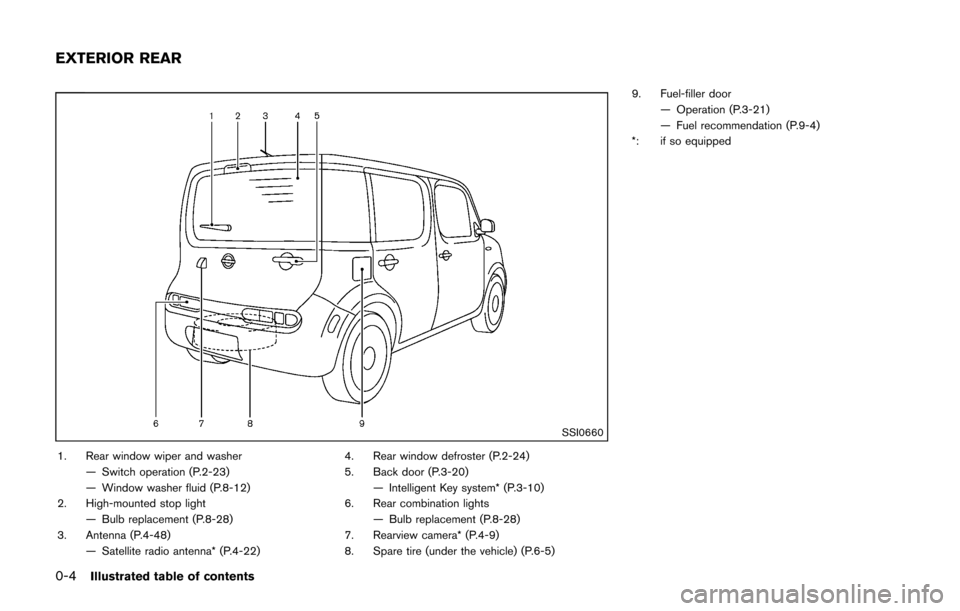
SSI0660
1. Rear window wiper and washer— Switch operation (P.2-23)
— Window washer fluid (P.8-12)
2. High-mounted stop light
— Bulb replacement (P.8-28)
3. Antenna (P.4-48) — Satellite radio antenna* (P.4-22) 4. Rear window defroster (P.2-24)
5. Back door (P.3-20)
— Intelligent Key system* (P.3-10)
6. Rear combination lights
— Bulb replacement (P.8-28)
7. Rearview camera* (P.4-9)
8. Spare tire (under the vehicle) (P.6-5) 9. Fuel-filler door
— Operation (P.3-21)
— Fuel recommendation (P.9-4)
*: if so equipped
EXTERIOR REAR
Page 16 of 332
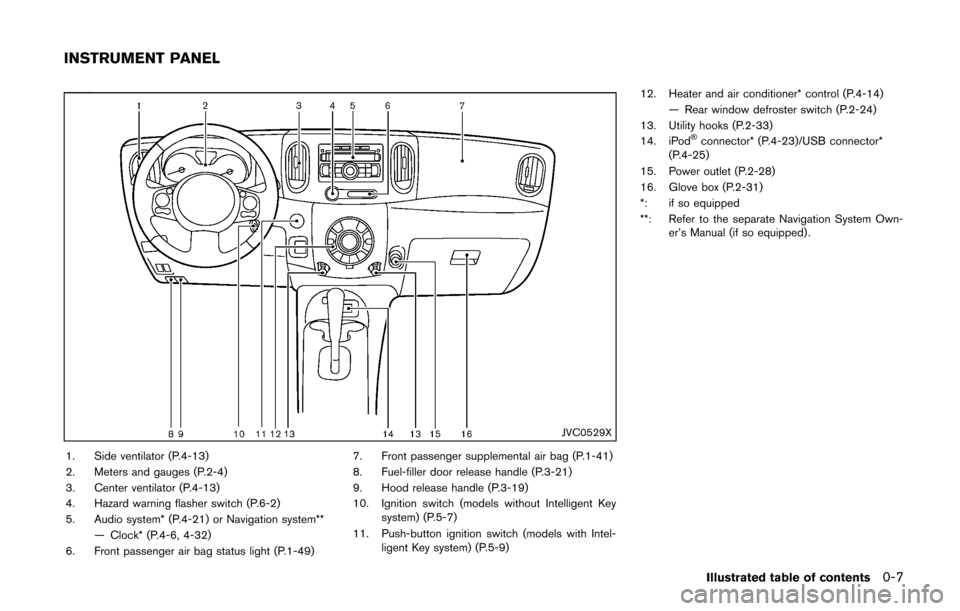
JVC0529X
1. Side ventilator (P.4-13)
2. Meters and gauges (P.2-4)
3. Center ventilator (P.4-13)
4. Hazard warning flasher switch (P.6-2)
5. Audio system* (P.4-21) or Navigation system**— Clock* (P.4-6, 4-32)
6. Front passenger air bag status light (P.1-49) 7. Front passenger supplemental air bag (P.1-41)
8. Fuel-filler door release handle (P.3-21)
9. Hood release handle (P.3-19)
10. Ignition switch (models without Intelligent Key
system) (P.5-7)
11. Push-button ignition switch (models with Intel- ligent Key system) (P.5-9) 12. Heater and air conditioner* control (P.4-14)
— Rear window defroster switch (P.2-24)
13. Utility hooks (P.2-33)
14. iPod
®connector* (P.4-23)/USB connector*
(P.4-25)
15. Power outlet (P.2-28)
16. Glove box (P.2-31)
*: if so equipped
**: Refer to the separate Navigation System Own- er’s Manual (if so equipped) .
Illustrated table of contents0-7
INSTRUMENT PANEL
Page 19 of 332
0-10Illustrated table of contents
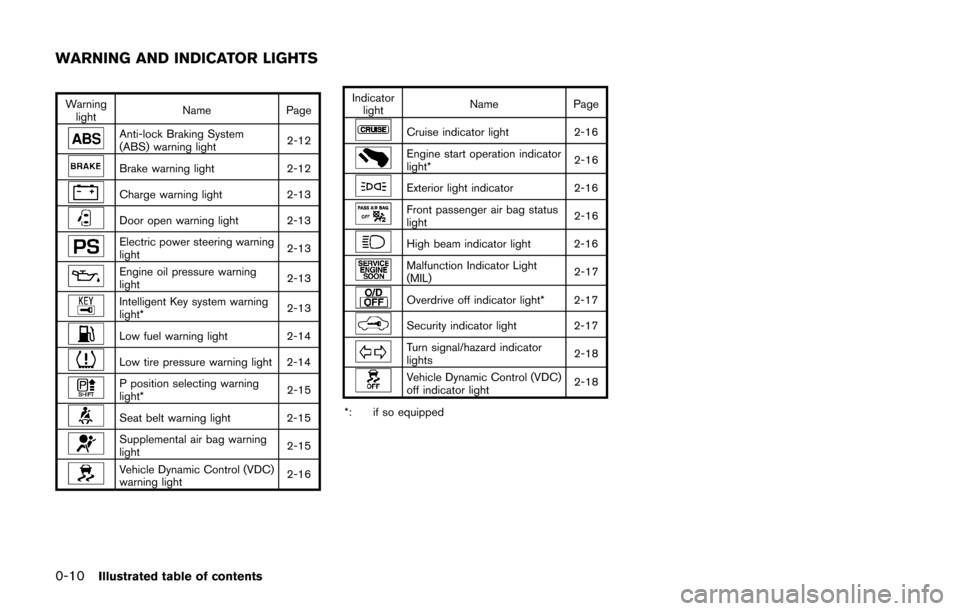
Warninglight Name
Page
Anti-lock Braking System
(ABS) warning light 2-12
Brake warning light
2-12
Charge warning light2-13
Door open warning light 2-13
Electric power steering warning
light 2-13
Engine oil pressure warning
light2-13
Intelligent Key system warning
light*
2-13
Low fuel warning light
2-14
Low tire pressure warning light 2-14
P position selecting warning
light* 2-15
Seat belt warning light 2-15
Supplemental air bag warning
light2-15
Vehicle Dynamic Control (VDC)
warning light2-16Indicator
light Name
Page
Cruise indicator light 2-16
Engine start operation indicator
light* 2-16
Exterior light indicator
2-16
Front passenger air bag status
light 2-16
High beam indicator light 2-16
Malfunction Indicator Light
(MIL)2-17
Overdrive off indicator light* 2-17
Security indicator light 2-17
Turn signal/hazard indicator
lights2-18
Vehicle Dynamic Control (VDC)
off indicator light2-18
*: if so equipped
WARNING AND INDICATOR LIGHTS
Page 33 of 332
1-14Safety — Seats, seat belts and supplemental restraint system
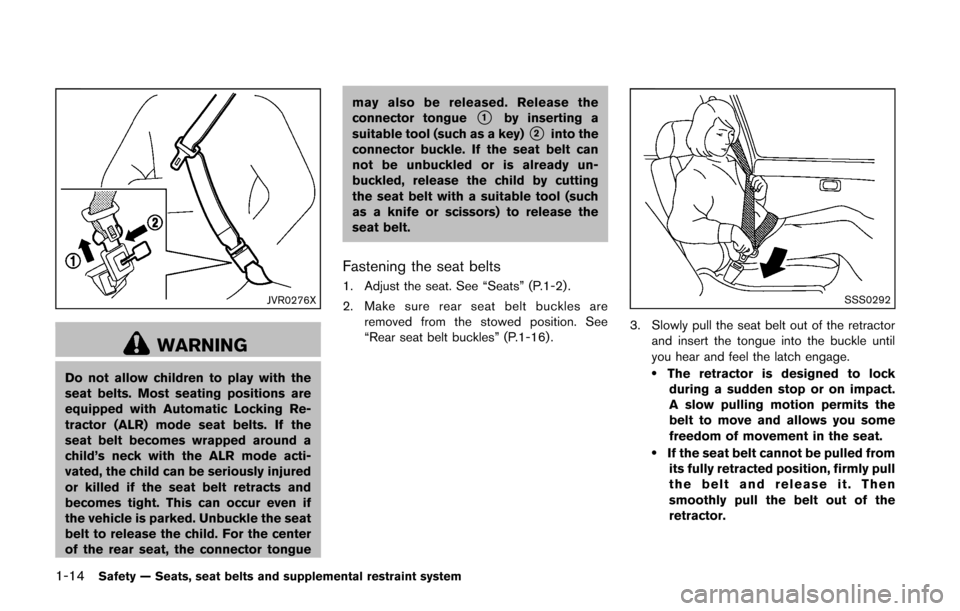
JVR0276X
WARNING
Do not allow children to play with the
seat belts. Most seating positions are
equipped with Automatic Locking Re-
tractor (ALR) mode seat belts. If the
seat belt becomes wrapped around a
child’s neck with the ALR mode acti-
vated, the child can be seriously injured
or killed if the seat belt retracts and
becomes tight. This can occur even if
the vehicle is parked. Unbuckle the seat
belt to release the child. For the center
of the rear seat, the connector tonguemay also be released. Release the
connector tongue
*1by inserting a
suitable tool (such as a key)*2into the
connector buckle. If the seat belt can
not be unbuckled or is already un-
buckled, release the child by cutting
the seat belt with a suitable tool (such
as a knife or scissors) to release the
seat belt.
Fastening the seat belts
1. Adjust the seat. See “Seats” (P.1-2) .
2. Make sure rear seat belt buckles are
removed from the stowed position. See
“Rear seat belt buckles” (P.1-16) .SSS0292
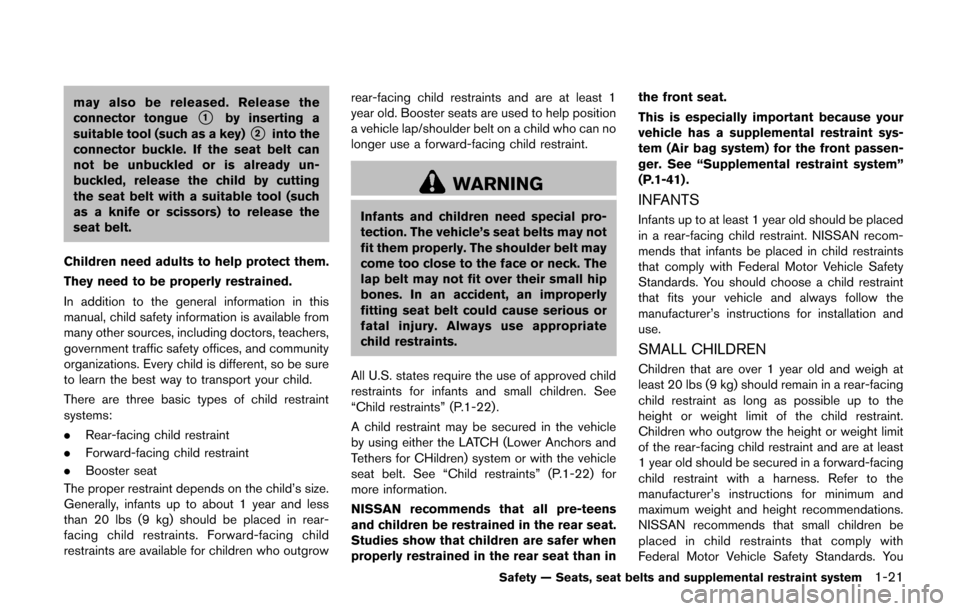
3. Slowly pull the seat belt out of the retractorand insert the tongue into the buckle until
you hear and feel the latch engage.
.The retractor is designed to lockduring a sudden stop or on impact.
A slow pulling motion permits the
belt to move and allows you some
freedom of movement in the seat.
.If the seat belt cannot be pulled from its fully retracted position, firmly pull
the belt and release it. Then
smoothly pull the belt out of the
retractor.
Page 38 of 332
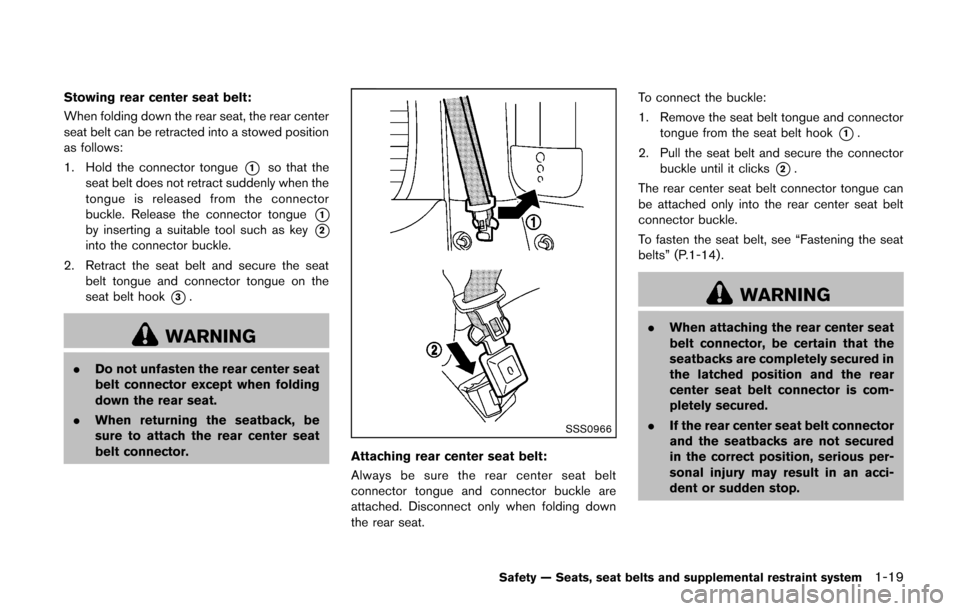
Stowing rear center seat belt:
When folding down the rear seat, the rear center
seat belt can be retracted into a stowed position
as follows:
1. Hold the connector tongue
*1so that the
seat belt does not retract suddenly when the
tongue is released from the connector
buckle. Release the connector tongue
*1by inserting a suitable tool such as key*2into the connector buckle.
2. Retract the seat belt and secure the seat belt tongue and connector tongue on the
seat belt hook
*3.
WARNING
.Do not unfasten the rear center seat
belt connector except when folding
down the rear seat.
. When returning the seatback, be
sure to attach the rear center seat
belt connector.
SSS0966
Attaching rear center seat belt:
Always be sure the rear center seat belt
connector tongue and connector buckle are
attached. Disconnect only when folding down
the rear seat. To connect the buckle:
1. Remove the seat belt tongue and connector
tongue from the seat belt hook
*1.
2. Pull the seat belt and secure the connector buckle until it clicks
*2.
The rear center seat belt connector tongue can
be attached only into the rear center seat belt
connector buckle.
To fasten the seat belt, see “Fastening the seat
belts” (P.1-14) .
WARNING
. When attaching the rear center seat
belt connector, be certain that the
seatbacks are completely secured in
the latched position and the rear
center seat belt connector is com-
pletely secured.
. If the rear center seat belt connector
and the seatbacks are not secured
in the correct position, serious per-
sonal injury may result in an acci-
dent or sudden stop.
Safety — Seats, seat belts and supplemental restraint system1-19
Page 40 of 332
may also be released. Release the
connector tongue*1by inserting a
suitable tool (such as a key)*2into the
connector buckle. If the seat belt can
not be unbuckled or is already un-
buckled, release the child by cutting
the seat belt with a suitable tool (such
as a knife or scissors) to release the
seat belt.
Children need adults to help protect them.
They need to be properly restrained.
In addition to the general information in this
manual, child safety information is available from
many other sources, including doctors, teachers,
government traffic safety offices, and community
organizations. Every child is different, so be sure
to learn the best way to transport your child.
There are three basic types of child restraint
systems:
. Rear-facing child restraint
. Forward-facing child restraint
. Booster seat
The proper restraint depends on the child’s size.
Generally, infants up to about 1 year and less
than 20 lbs (9 kg) should be placed in rear-
facing child restraints. Forward-facing child
restraints are available for children who outgrow rear-facing child restraints and are at least 1
year old. Booster seats are used to help position
a vehicle lap/shoulder belt on a child who can no
longer use a forward-facing child restraint.
WARNING
Infants and children need special pro-
tection. The vehicle’s seat belts may not
fit them properly. The shoulder belt may
come too close to the face or neck. The
lap belt may not fit over their small hip
bones. In an accident, an improperly
fitting seat belt could cause serious or
fatal injury. Always use appropriate
child restraints.
All U.S. states require the use of approved child
restraints for infants and small children. See
“Child restraints” (P.1-22) .
A child restraint may be secured in the vehicle
by using either the LATCH (Lower Anchors and
Tethers for CHildren) system or with the vehicle
seat belt. See “Child restraints” (P.1-22) for
more information.
NISSAN recommends that all pre-teens
and children be restrained in the rear seat.
Studies show that children are safer when
properly restrained in the rear seat than in the front seat.
This is especially important because your
vehicle has a supplemental restraint sys-
tem (Air bag system) for the front passen-
ger. See “Supplemental restraint system”
(P.1-41) .INFANTS
Infants up to at least 1 year old should be placed
in a rear-facing child restraint. NISSAN recom-
mends that infants be placed in child restraints
that comply with Federal Motor Vehicle Safety
Standards. You should choose a child restraint
that fits your vehicle and always follow the
manufacturer’s instructions for installation and
use.
SMALL CHILDREN
Children that are over 1 year old and weigh at
least 20 lbs (9 kg) should remain in a rear-facing
child restraint as long as possible up to the
height or weight limit of the child restraint.
Children who outgrow the height or weight limit
of the rear-facing child restraint and are at least
1 year old should be secured in a forward-facing
child restraint with a harness. Refer to the
manufacturer’s instructions for minimum and
maximum weight and height recommendations.
NISSAN recommends that small children be
placed in child restraints that comply with
Federal Motor Vehicle Safety Standards. You
Safety — Seats, seat belts and supplemental restraint system1-21
Page 78 of 332
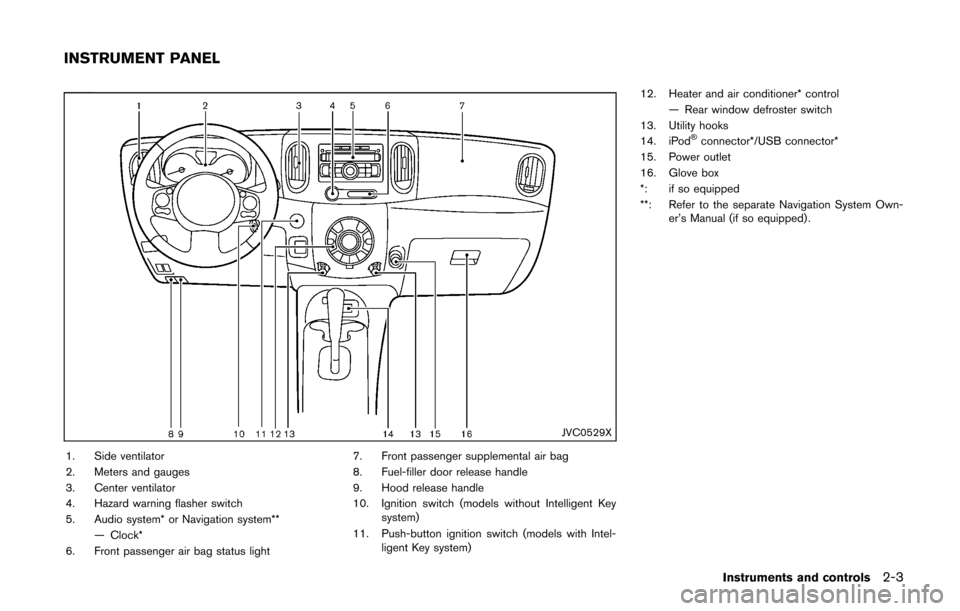
JVC0529X
1. Side ventilator
2. Meters and gauges
3. Center ventilator
4. Hazard warning flasher switch
5. Audio system* or Navigation system**— Clock*
6. Front passenger air bag status light 7. Front passenger supplemental air bag
8. Fuel-filler door release handle
9. Hood release handle
10. Ignition switch (models without Intelligent Key
system)
11. Push-button ignition switch (models with Intel- ligent Key system) 12. Heater and air conditioner* control
— Rear window defroster switch
13. Utility hooks
14. iPod
®connector*/USB connector*
15. Power outlet
16. Glove box
*: if so equipped
**: Refer to the separate Navigation System Own- er’s Manual (if so equipped) .
Instruments and controls2-3
INSTRUMENT PANEL