2014 NISSAN CUBE old port
[x] Cancel search: old portPage 29 of 332
1-10Safety — Seats, seat belts and supplemental restraint system
SSS1036
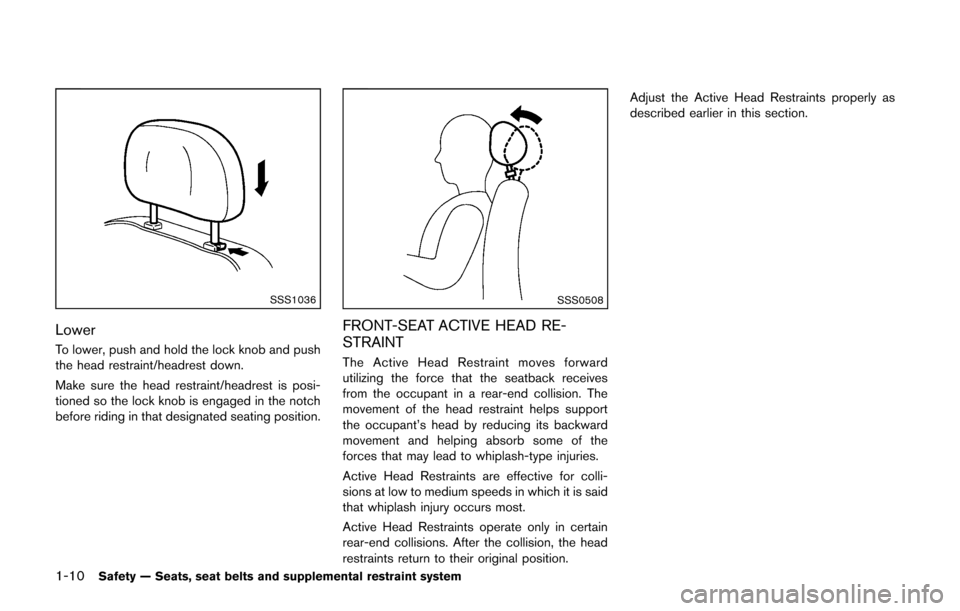
Lower
To lower, push and hold the lock knob and push
the head restraint/headrest down.
Make sure the head restraint/headrest is posi-
tioned so the lock knob is engaged in the notch
before riding in that designated seating position.
SSS0508
FRONT-SEAT ACTIVE HEAD RE-
STRAINT
The Active Head Restraint moves forward
utilizing the force that the seatback receives
from the occupant in a rear-end collision. The
movement of the head restraint helps support
the occupant’s head by reducing its backward
movement and helping absorb some of the
forces that may lead to whiplash-type injuries.
Active Head Restraints are effective for colli-
sions at low to medium speeds in which it is said
that whiplash injury occurs most.
Active Head Restraints operate only in certain
rear-end collisions. After the collision, the head
restraints return to their original position.Adjust the Active Head Restraints properly as
described earlier in this section.
Page 40 of 332
may also be released. Release the
connector tongue*1by inserting a
suitable tool (such as a key)*2into the
connector buckle. If the seat belt can
not be unbuckled or is already un-
buckled, release the child by cutting
the seat belt with a suitable tool (such
as a knife or scissors) to release the
seat belt.
Children need adults to help protect them.
They need to be properly restrained.
In addition to the general information in this
manual, child safety information is available from
many other sources, including doctors, teachers,
government traffic safety offices, and community
organizations. Every child is different, so be sure
to learn the best way to transport your child.
There are three basic types of child restraint
systems:
. Rear-facing child restraint
. Forward-facing child restraint
. Booster seat
The proper restraint depends on the child’s size.
Generally, infants up to about 1 year and less
than 20 lbs (9 kg) should be placed in rear-
facing child restraints. Forward-facing child
restraints are available for children who outgrow rear-facing child restraints and are at least 1
year old. Booster seats are used to help position
a vehicle lap/shoulder belt on a child who can no
longer use a forward-facing child restraint.
WARNING
Infants and children need special pro-
tection. The vehicle’s seat belts may not
fit them properly. The shoulder belt may
come too close to the face or neck. The
lap belt may not fit over their small hip
bones. In an accident, an improperly
fitting seat belt could cause serious or
fatal injury. Always use appropriate
child restraints.
All U.S. states require the use of approved child
restraints for infants and small children. See
“Child restraints” (P.1-22) .
A child restraint may be secured in the vehicle
by using either the LATCH (Lower Anchors and
Tethers for CHildren) system or with the vehicle
seat belt. See “Child restraints” (P.1-22) for
more information.
NISSAN recommends that all pre-teens
and children be restrained in the rear seat.
Studies show that children are safer when
properly restrained in the rear seat than in the front seat.
This is especially important because your
vehicle has a supplemental restraint sys-
tem (Air bag system) for the front passen-
ger. See “Supplemental restraint system”
(P.1-41) .INFANTS
Infants up to at least 1 year old should be placed
in a rear-facing child restraint. NISSAN recom-
mends that infants be placed in child restraints
that comply with Federal Motor Vehicle Safety
Standards. You should choose a child restraint
that fits your vehicle and always follow the
manufacturer’s instructions for installation and
use.
SMALL CHILDREN
Children that are over 1 year old and weigh at
least 20 lbs (9 kg) should remain in a rear-facing
child restraint as long as possible up to the
height or weight limit of the child restraint.
Children who outgrow the height or weight limit
of the rear-facing child restraint and are at least
1 year old should be secured in a forward-facing
child restraint with a harness. Refer to the
manufacturer’s instructions for minimum and
maximum weight and height recommendations.
NISSAN recommends that small children be
placed in child restraints that comply with
Federal Motor Vehicle Safety Standards. You
Safety — Seats, seat belts and supplemental restraint system1-21
Page 132 of 332
WARNING
.Make sure the hood is completely
closed and latched before driving.
Failure to do so could cause the
hood to fly open and result in an
accident.
. If you see steam or smoke coming
from the engine compartment, to
avoid injury do not open the hood.
SPA2607
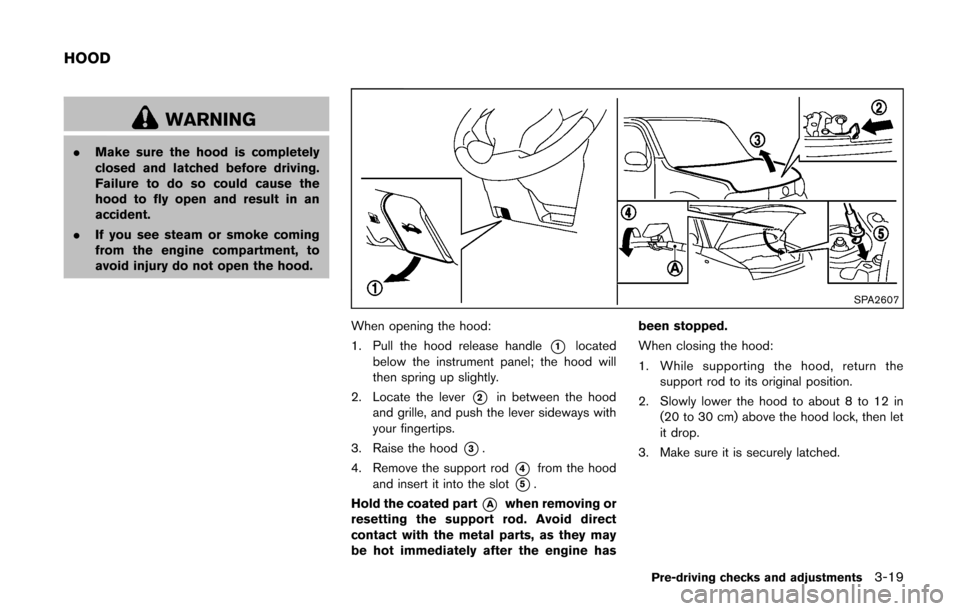
When opening the hood:
1. Pull the hood release handle
*1located
below the instrument panel; the hood will
then spring up slightly.
2. Locate the lever
*2in between the hood
and grille, and push the lever sideways with
your fingertips.
3. Raise the hood
*3.
4. Remove the support rod
*4from the hood
and insert it into the slot
*5.
Hold the coated part
*Awhen removing or
resetting the support rod. Avoid direct
contact with the metal parts, as they may
be hot immediately after the engine has been stopped.
When closing the hood:
1. While supporting the hood, return the
support rod to its original position.
2. Slowly lower the hood to about 8 to 12 in (20 to 30 cm) above the hood lock, then let
it drop.
3. Make sure it is securely latched.
Pre-driving checks and adjustments3-19
HOOD
Page 169 of 332
4-28Center display, heater, air conditioner, audio and phone systems
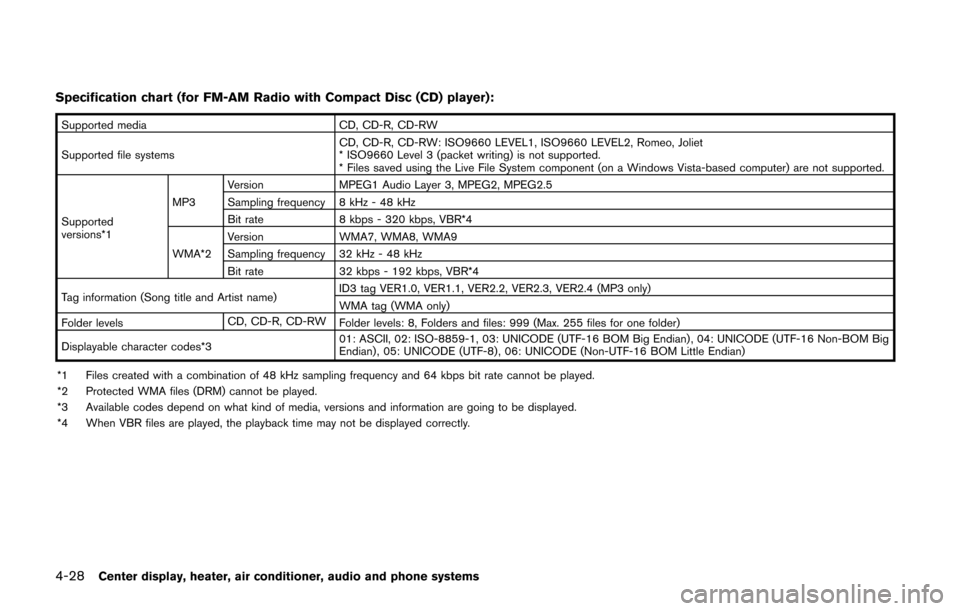
Specification chart (for FM-AM Radio with Compact Disc (CD) player):
Supported mediaCD, CD-R, CD-RW
Supported file systems CD, CD-R, CD-RW: ISO9660 LEVEL1, ISO9660 LEVEL2, Romeo, Joliet
* ISO9660 Level 3 (packet writing) is not supported.
* Files saved using the Live File System component (on a Windows Vista-based computer) are not supported.
Supported
versions*1 MP3
Version
MPEG1 Audio Layer 3, MPEG2, MPEG2.5
Sampling frequency 8 kHz - 48 kHz
Bit rate 8 kbps - 320 kbps, VBR*4
WMA*2 Version
WMA7, WMA8, WMA9
Sampling frequency 32 kHz - 48 kHz
Bit rate 32 kbps - 192 kbps, VBR*4
Tag information (Song title and Artist name) ID3 tag VER1.0, VER1.1, VER2.2, VER2.3, VER2.4 (MP3 only)
WMA tag (WMA only)
Folder levels CD, CD-R, CD-RW
Folder levels: 8, Folders and files: 999 (Max. 255 files for one folder)
Displayable character codes*3 01: ASCII, 02: ISO-8859-1, 03: UNICODE (UTF-16 BOM Big Endian) , 04: UNICODE (UTF-16 Non-BOM Big
Endian) , 05: UNICODE (UTF-8), 06: UNICODE (Non-UTF-16 BOM Little Endian)
*1 Files created with a combination of 48 kHz sampling frequency and 64 kbps bit rate cannot be played.
*2 Protected WMA files (DRM) cannot be played.
*3 Available codes depend on what kind of media, versions and information are going to be displayed.
*4 When VBR files are played, the playback time may not be displayed correctly.
Page 170 of 332
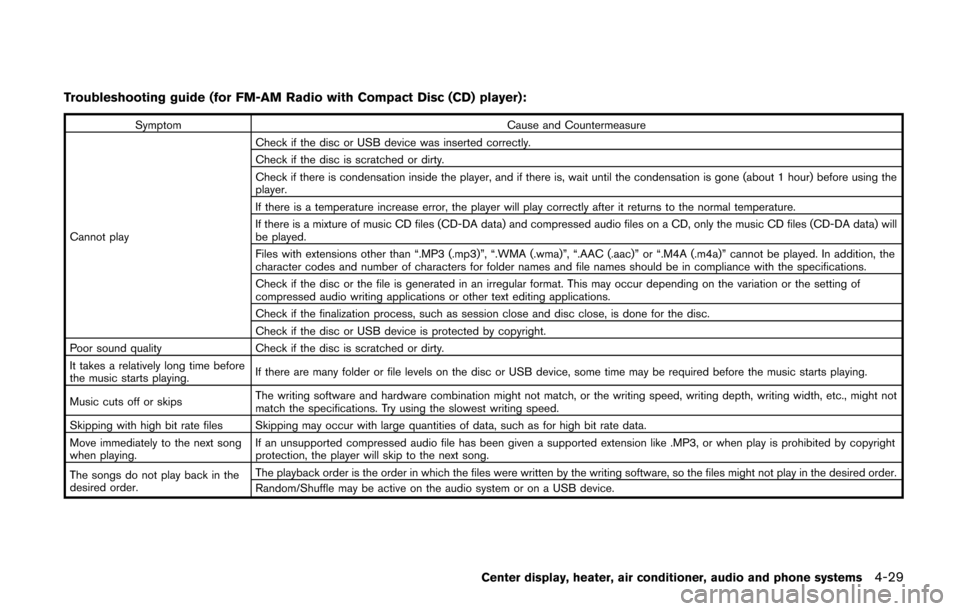
Troubleshooting guide (for FM-AM Radio with Compact Disc (CD) player):
SymptomCause and Countermeasure
Cannot play Check if the disc or USB device was inserted correctly.
Check if the disc is scratched or dirty.
Check if there is condensation inside the player, and if there is, wait until the condensation is gone (about 1 hour) before using the
player.
If there is a temperature increase error, the player will play correctly after it returns to the normal temperature.
If there is a mixture of music CD files (CD-DA data) and compressed audio files on a CD, only the music CD files (CD-DA data) will
be played.
Files with extensions other than “.MP3 (.mp3)”, “.WMA (.wma)”, “.AAC (.aac)” or “.M4A (.m4a)” cannot be played. In addition, the
character codes and number of characters for folder names and file names should be in compliance with the specifications.
Check if the disc or the file is generated in an irregular format. This may occur depending on the variation or the setting of
compressed audio writing applications or other text editing applications.
Check if the finalization process, such as session close and disc close, is done for the disc.
Check if the disc or USB device is protected by copyright.
Poor sound quality Check if the disc is scratched or dirty.
It takes a relatively long time before
the music starts playing. If there are many folder or file levels on the disc or USB device, some time may be required before the music starts playing.
Music cuts off or skips The writing software and hardware combination might not match, or the writing speed, writing depth, writing width, etc., might not
match the specifications. Try using the slowest writing speed.
Skipping with high bit rate files Skipping may occur with large quantities of data, such as for high bit rate data.
Move immediately to the next song
when playing. If an unsupported compressed audio file has been given a supported extension like .MP3, or when play is prohibited by copyright
protection, the player will skip to the next song.
The songs do not play back in the
desired order. The playback order is the order in which the files were written by the writing software, so the files might not play in the desired order.
Random/Shuffle may be active on the audio system or on a USB device.
Center display, heater, air conditioner, audio and phone systems4-29
Page 171 of 332
4-30Center display, heater, air conditioner, audio and phone systems
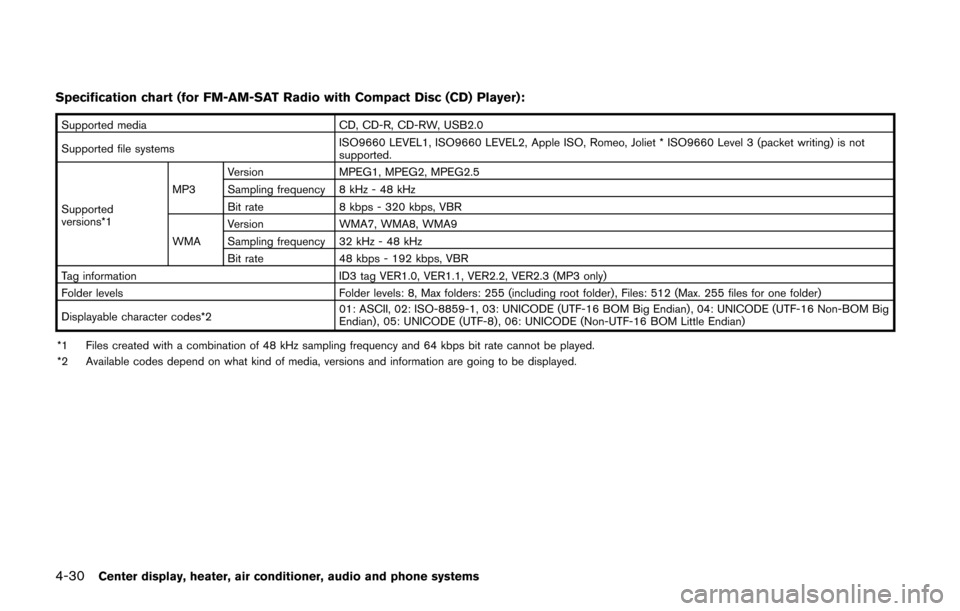
Specification chart (for FM-AM-SAT Radio with Compact Disc (CD) Player):
Supported mediaCD, CD-R, CD-RW, USB2.0
Supported file systems ISO9660 LEVEL1, ISO9660 LEVEL2, Apple ISO, Romeo, Joliet * ISO9660 Level 3 (packet writing) is not
supported.
Supported
versions*1 MP3
Version
MPEG1, MPEG2, MPEG2.5
Sampling frequency 8 kHz - 48 kHz
Bit rate 8 kbps - 320 kbps, VBR
WMA Version
WMA7, WMA8, WMA9
Sampling frequency 32 kHz - 48 kHz
Bit rate 48 kbps - 192 kbps, VBR
Tag information ID3 tag VER1.0, VER1.1, VER2.2, VER2.3 (MP3 only)
Folder levels Folder levels: 8, Max folders: 255 (including root folder) , Files: 512 (Max. 255 files for one folder)
Displayable character codes*2 01: ASCII, 02: ISO-8859-1, 03: UNICODE (UTF-16 BOM Big Endian) , 04: UNICODE (UTF-16 Non-BOM Big
Endian) , 05: UNICODE (UTF-8), 06: UNICODE (Non-UTF-16 BOM Little Endian)
*1 Files created with a combination of 48 kHz sampling frequency and 64 kbps bit rate cannot be played.
*2 Available codes depend on what kind of media, versions and information are going to be displayed.
Page 175 of 332
4-34Center display, heater, air conditioner, audio and phone systems
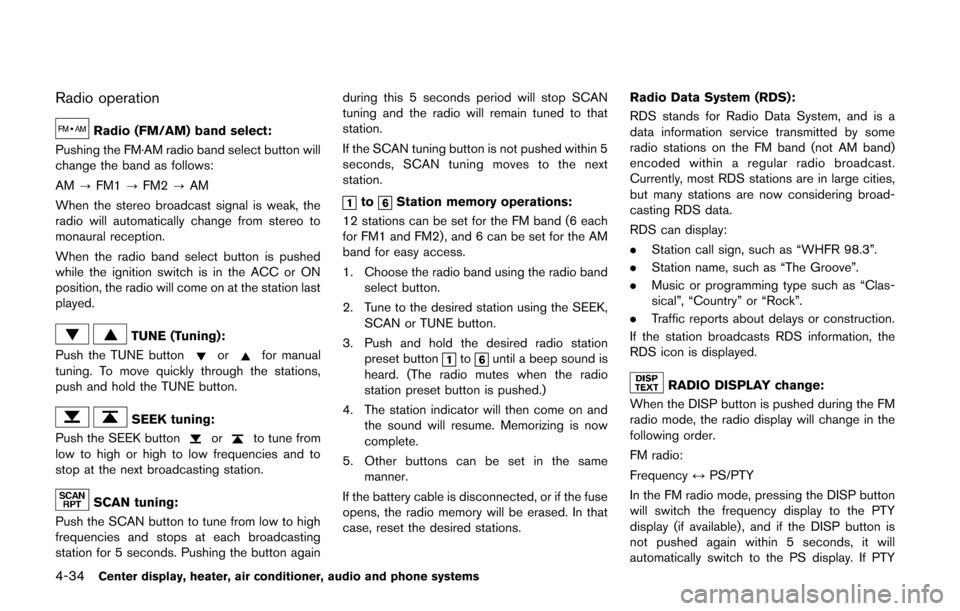
Radio operation
Radio (FM/AM) band select:
Pushing the FM·AM radio band select button will
change the band as follows:
AM ?FM1 ?FM2 ?AM
When the stereo broadcast signal is weak, the
radio will automatically change from stereo to
monaural reception.
When the radio band select button is pushed
while the ignition switch is in the ACC or ON
position, the radio will come on at the station last
played.
TUNE (Tuning):
Push the TUNE button
orfor manual
tuning. To move quickly through the stations,
push and hold the TUNE button.
SEEK tuning:
Push the SEEK button
orto tune from
low to high or high to low frequencies and to
stop at the next broadcasting station.
SCAN tuning:
Push the SCAN button to tune from low to high
frequencies and stops at each broadcasting
station for 5 seconds. Pushing the button again during this 5 seconds period will stop SCAN
tuning and the radio will remain tuned to that
station.
If the SCAN tuning button is not pushed within 5
seconds, SCAN tuning moves to the next
station.
toStation memory operations:
12 stations can be set for the FM band (6 each
for FM1 and FM2), and 6 can be set for the AM
band for easy access.
1. Choose the radio band using the radio band select button.
2. Tune to the desired station using the SEEK, SCAN or TUNE button.
3. Push and hold the desired radio station preset button
tountil a beep sound is
heard. (The radio mutes when the radio
station preset button is pushed.)
4. The station indicator will then come on and the sound will resume. Memorizing is now
complete.
5. Other buttons can be set in the same manner.
If the battery cable is disconnected, or if the fuse
opens, the radio memory will be erased. In that
case, reset the desired stations. Radio Data System (RDS):
RDS stands for Radio Data System, and is a
data information service transmitted by some
radio stations on the FM band (not AM band)
encoded within a regular radio broadcast.
Currently, most RDS stations are in large cities,
but many stations are now considering broad-
casting RDS data.
RDS can display:
.
Station call sign, such as “WHFR 98.3”.
. Station name, such as “The Groove”.
. Music or programming type such as “Clas-
sical”, “Country” or “Rock”.
. Traffic reports about delays or construction.
If the station broadcasts RDS information, the
RDS icon is displayed.
RADIO DISPLAY change:
When the DISP button is pushed during the FM
radio mode, the radio display will change in the
following order.
FM radio:
Frequency ↔PS/PTY
In the FM radio mode, pressing the DISP button
will switch the frequency display to the PTY
display (if available) , and if the DISP button is
not pushed again within 5 seconds, it will
automatically switch to the PS display. If PTY
Page 183 of 332
4-42Center display, heater, air conditioner, audio and phone systems
the list to begin playing that song. If an MP3 CD
is playing, touching the “Browse” key will also
list the folders on the disc. Follow the procedure
for selecting a song with the touchscreen to
choose a folder.
CD EJECT:
When the CD EJECT button is pushed with the
CD loaded, the CD will be ejected.
When this button is pushed while the CD is
being played, the CD will be ejected.
If the CD is ejected and is not removed, it
will be pulled back into the slot to protect
it.
AUX (Auxiliary) input
AUX IN jack:
The AUX IN jack is located on the lower center
of the instrument panel. The AUX IN audio input
jack accepts any standard analog audio input
such as from a portable cassette tape/CD
player, MP3 player or laptop computer.
NISSAN strongly recommends using a stereo
mini plug cable when connecting your music
device to the audio system. Music may not play
properly when a monaural cable is used.
AUX (Auxiliary) button:
To switch to the AUX mode, push the AUX
button when a compatible audio device is
connected into the AUX IN jack.
When the AUX button is pushed with no device
plugged into the jack, the audio system does not
change to the AUX mode.
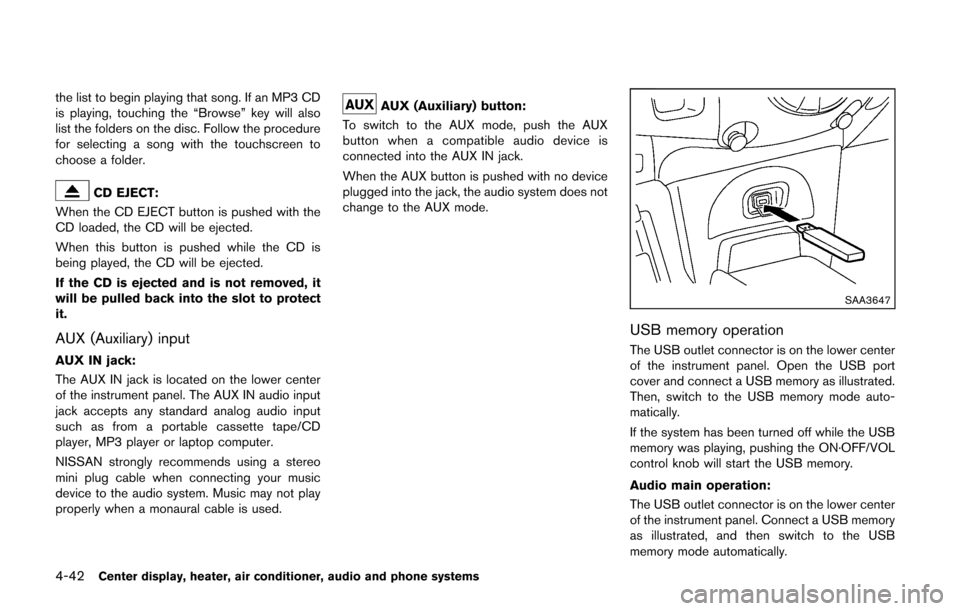
SAA3647
USB memory operation
The USB outlet connector is on the lower center
of the instrument panel. Open the USB port
cover and connect a USB memory as illustrated.
Then, switch to the USB memory mode auto-
matically.
If the system has been turned off while the USB
memory was playing, pushing the ON·OFF/VOL
control knob will start the USB memory.
Audio main operation:
The USB outlet connector is on the lower center
of the instrument panel. Connect a USB memory
as illustrated, and then switch to the USB
memory mode automatically.