Page 130 of 332
SPA2252
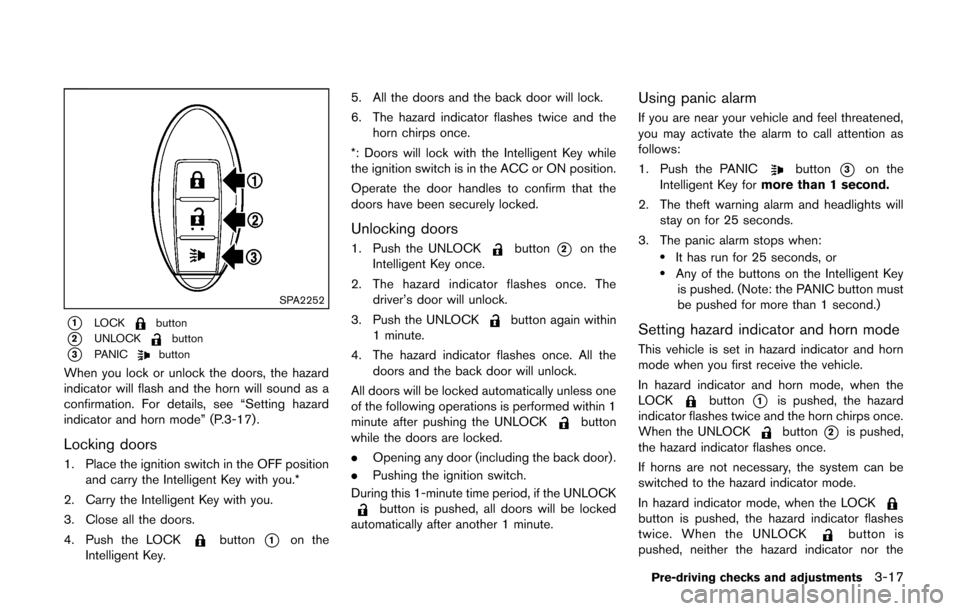
*1LOCKbutton
*2UNLOCKbutton
*3PANICbutton
When you lock or unlock the doors, the hazard
indicator will flash and the horn will sound as a
confirmation. For details, see “Setting hazard
indicator and horn mode” (P.3-17) .
Locking doors
1. Place the ignition switch in the OFF positionand carry the Intelligent Key with you.*
2. Carry the Intelligent Key with you.
3. Close all the doors.
4. Push the LOCK
button*1on the
Intelligent Key. 5. All the doors and the back door will lock.
6. The hazard indicator flashes twice and the
horn chirps once.
*: Doors will lock with the Intelligent Key while
the ignition switch is in the ACC or ON position.
Operate the door handles to confirm that the
doors have been securely locked.
Unlocking doors
1. Push the UNLOCKbutton*2on the
Intelligent Key once.
2. The hazard indicator flashes once. The driver’s door will unlock.
3. Push the UNLOCK
button again within
1 minute.
4. The hazard indicator flashes once. All the doors and the back door will unlock.
All doors will be locked automatically unless one
of the following operations is performed within 1
minute after pushing the UNLOCK
button
while the doors are locked.
. Opening any door (including the back door) .
. Pushing the ignition switch.
During this 1-minute time period, if the UNLOCK
button is pushed, all doors will be locked
automatically after another 1 minute.
Using panic alarm
If you are near your vehicle and feel threatened,
you may activate the alarm to call attention as
follows:
1. Push the PANIC
button*3on the
Intelligent Key for more than 1 second.
2. The theft warning alarm and headlights will stay on for 25 seconds.
3. The panic alarm stops when:
.It has run for 25 seconds, or.Any of the buttons on the Intelligent Key is pushed. (Note: the PANIC button must
be pushed for more than 1 second.)
Setting hazard indicator and horn mode
This vehicle is set in hazard indicator and horn
mode when you first receive the vehicle.
In hazard indicator and horn mode, when the
LOCK
button*1is pushed, the hazard
indicator flashes twice and the horn chirps once.
When the UNLOCK
button*2is pushed,
the hazard indicator flashes once.
If horns are not necessary, the system can be
switched to the hazard indicator mode.
In hazard indicator mode, when the LOCK
button is pushed, the hazard indicator flashes
twice. When the UNLOCKbutton is
pushed, neither the hazard indicator nor the
Pre-driving checks and adjustments3-17
Page 131 of 332
3-18Pre-driving checks and adjustments
horn operates.Hazard indicator and horn mode:
Operation
DOOR LOCK DOOR UNLOCK
Pushing door handle request switch or back door request switch HAZARD -
twice
OUTSIDE CHIME - twiceHAZARD -
once
OUTSIDE CHIME - once
Pushing
orbutton HAZARD -
twice
HORN - once HAZARD -
once
HORN - none
Hazard indicator mode:
Operation DOOR LOCK DOOR UNLOCK
Pushing door handle request switch or back door request switch HAZARD -
twice
OUTSIDE CHIME - none HAZARD - none
OUTSIDE CHIME - none
Pushing
orbutton HAZARD -
twice
HORN - none HAZARD - none
HORN - none
Switching procedure:
To switch the hazard indicator and horn (chime)
operation, push the LOCK
*1and UN-
LOCK
*2buttons on the Intelligent Key
simultaneously for more than 2 seconds.
. When the hazard indicator mode is set, the
hazard indicator flashes 3 times.
. When the hazard indicator and horn mode is
set, the hazard indicator flashes once and
the horn chirps once.
Page 133 of 332
3-20Pre-driving checks and adjustments
WARNING
.Always be sure the back door has
been closed securely to prevent it
from opening while driving.
. Do not drive with the back door
open. This could allow dangerous
exhaust gases to be drawn into the
vehicle. See “Exhaust gas (carbon
monoxide)” (P.5-2) of this manual.
. Make sure that all passengers have
their hands, etc. inside the vehicle
before closing the back door.
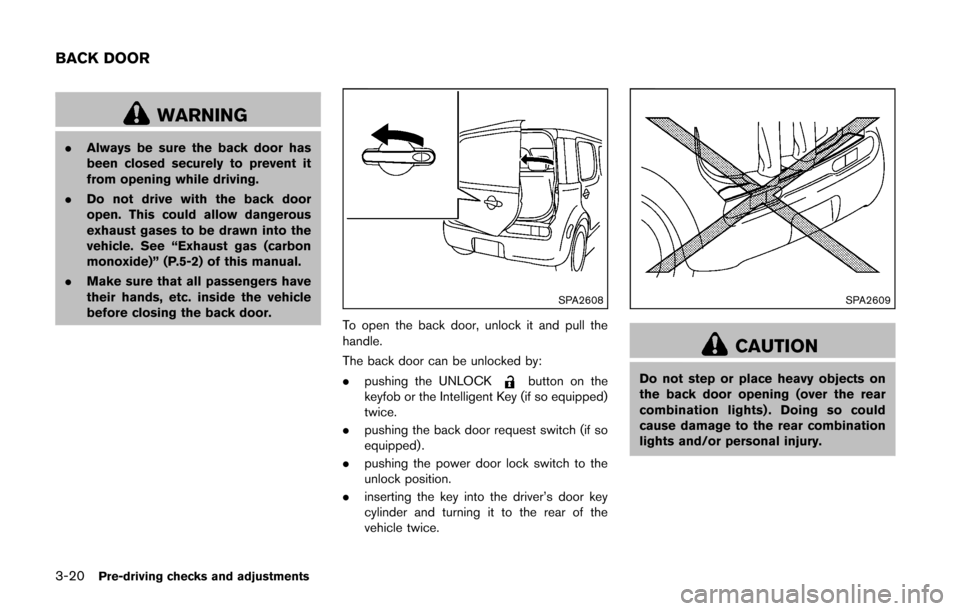
SPA2608
To open the back door, unlock it and pull the
handle.
The back door can be unlocked by:
. pushing the UNLOCK
button on the
keyfob or the Intelligent Key (if so equipped)
twice.
. pushing the back door request switch (if so
equipped) .
. pushing the power door lock switch to the
unlock position.
. inserting the key into the driver’s door key
cylinder and turning it to the rear of the
vehicle twice.
SPA2609
CAUTION
Do not step or place heavy objects on
the back door opening (over the rear
combination lights) . Doing so could
cause damage to the rear combination
lights and/or personal injury.
BACK DOOR
Page 144 of 332
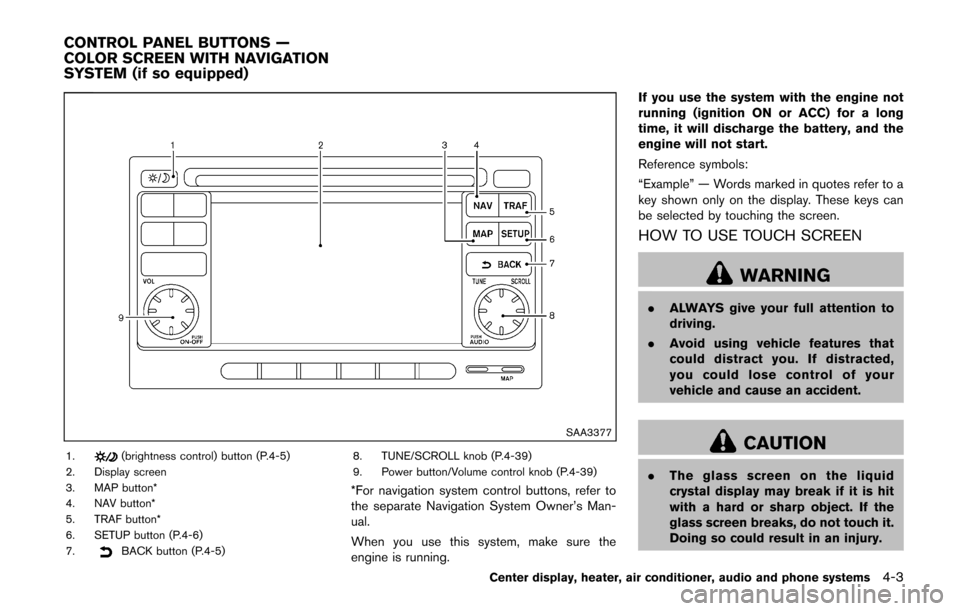
SAA3377
1.(brightness control) button (P.4-5)
2. Display screen
3. MAP button*
4. NAV button*
5. TRAF button*
6. SETUP button (P.4-6)
7.
BACK button (P.4-5) 8. TUNE/SCROLL knob (P.4-39)
9. Power button/Volume control knob (P.4-39)
*For navigation system control buttons, refer to
the separate Navigation System Owner’s Man-
ual.
When you use this system, make sure the
engine is running. If you use the system with the engine not
running (ignition ON or ACC) for a long
time, it will discharge the battery, and the
engine will not start.
Reference symbols:
“Example” — Words marked in quotes refer to a
key shown only on the display. These keys can
be selected by touching the screen.
HOW TO USE TOUCH SCREEN
WARNING
.
ALWAYS give your full attention to
driving.
. Avoid using vehicle features that
could distract you. If distracted,
you could lose control of your
vehicle and cause an accident.
CAUTION
.The glass screen on the liquid
crystal display may break if it is hit
with a hard or sharp object. If the
glass screen breaks, do not touch it.
Doing so could result in an injury.
Center display, heater, air conditioner, audio and phone systems4-3
CONTROL PANEL BUTTONS —
COLOR SCREEN WITH NAVIGATION
SYSTEM (if so equipped)
Page 145 of 332
4-4Center display, heater, air conditioner, audio and phone systems
.To clean the display, never use a
rough cloth, alcohol, benzine, thin-
ner or any kind of solvent or paper
towel with a chemical cleaning
agent. They will scratch or deterio-
rate the panel.
. Do not splash any liquid such as
water or car fragrance on the dis-
play. Contact with liquid will cause
the system to malfunction.
To help ensure safe driving, some functions
cannot be operated while driving.
The on-screen functions that are not available
while driving will be “grayed out” or muted.
Park the vehicle in a safe location and then
operate the navigation system.
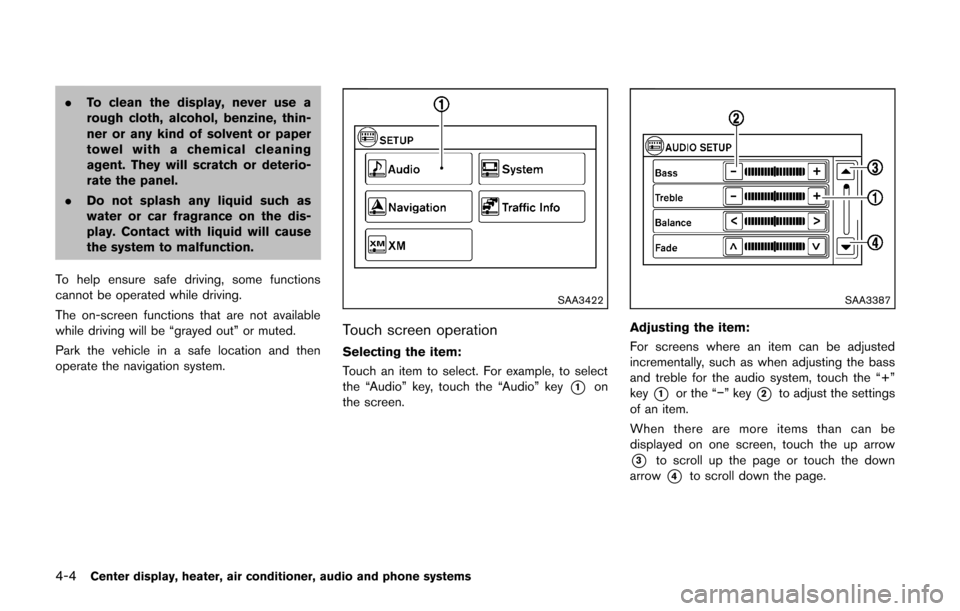
SAA3422
Touch screen operation
Selecting the item:
Touch an item to select. For example, to select
the “Audio” key, touch the “Audio” key
*1on
the screen.
SAA3387
Adjusting the item:
For screens where an item can be adjusted
incrementally, such as when adjusting the bass
and treble for the audio system, touch the “+”
key
*1or the “−” key*2to adjust the settings
of an item.
When there are more items than can be
displayed on one screen, touch the up arrow
*3to scroll up the page or touch the down
arrow
*4to scroll down the page.
Page 146 of 332
SAA3388
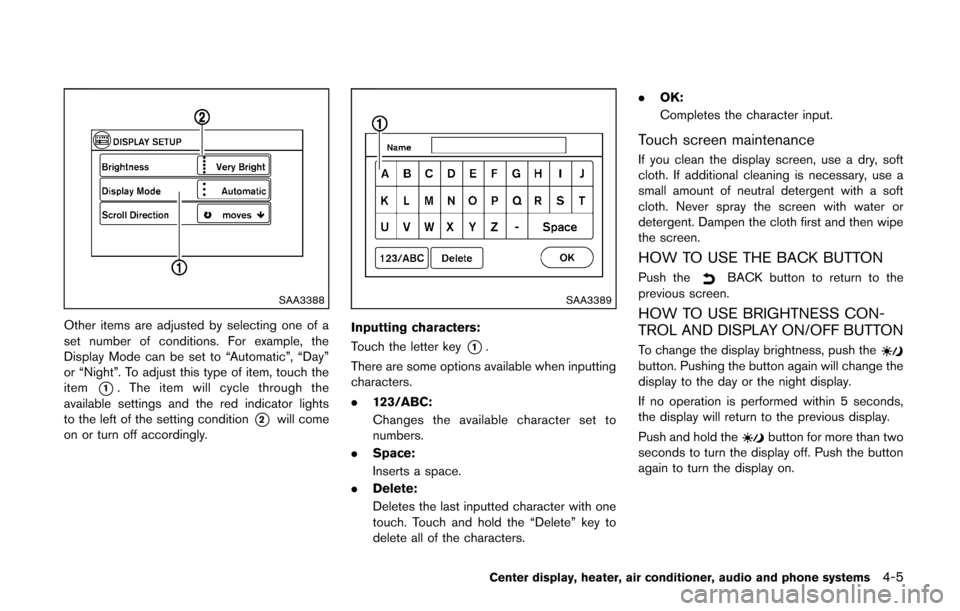
Other items are adjusted by selecting one of a
set number of conditions. For example, the
Display Mode can be set to “Automatic”, “Day”
or “Night”. To adjust this type of item, touch the
item
*1. The item will cycle through the
available settings and the red indicator lights
to the left of the setting condition
*2will come
on or turn off accordingly.
SAA3389
Inputting characters:
Touch the letter key
*1.
There are some options available when inputting
characters.
. 123/ABC:
Changes the available character set to
numbers.
. Space:
Inserts a space.
. Delete:
Deletes the last inputted character with one
touch. Touch and hold the “Delete” key to
delete all of the characters. .
OK:
Completes the character input.
Touch screen maintenance
If you clean the display screen, use a dry, soft
cloth. If additional cleaning is necessary, use a
small amount of neutral detergent with a soft
cloth. Never spray the screen with water or
detergent. Dampen the cloth first and then wipe
the screen.
HOW TO USE THE BACK BUTTON
Push theBACK button to return to the
previous screen.
HOW TO USE BRIGHTNESS CON-
TROL AND DISPLAY ON/OFF BUTTON
To change the display brightness, push thebutton. Pushing the button again will change the
display to the day or the night display.
If no operation is performed within 5 seconds,
the display will return to the previous display.
Push and hold the
button for more than two
seconds to turn the display off. Push the button
again to turn the display on.
Center display, heater, air conditioner, audio and phone systems4-5
Page 147 of 332
4-6Center display, heater, air conditioner, audio and phone systems
SAA3390
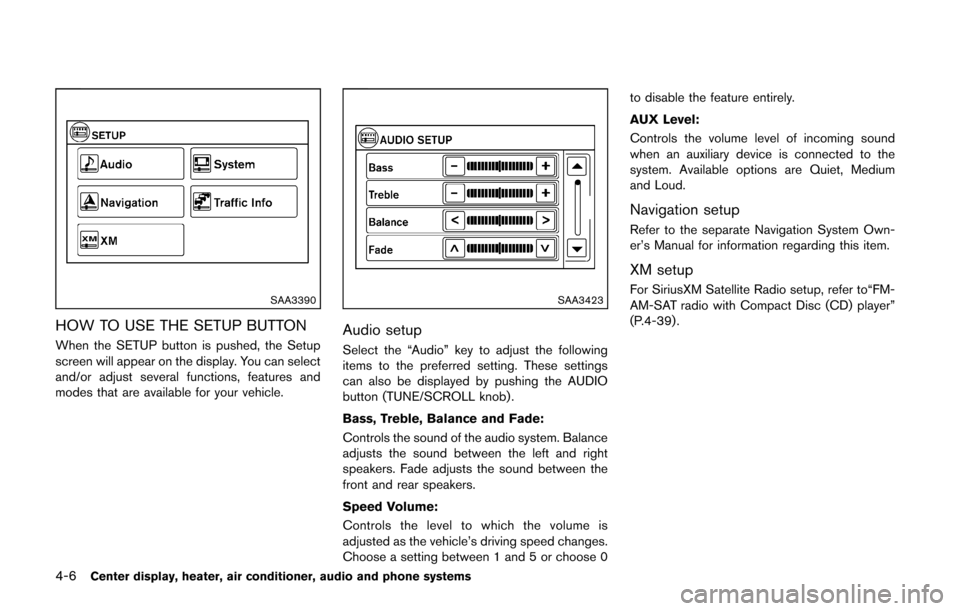
HOW TO USE THE SETUP BUTTON
When the SETUP button is pushed, the Setup
screen will appear on the display. You can select
and/or adjust several functions, features and
modes that are available for your vehicle.
SAA3423
Audio setup
Select the “Audio” key to adjust the following
items to the preferred setting. These settings
can also be displayed by pushing the AUDIO
button (TUNE/SCROLL knob).
Bass, Treble, Balance and Fade:
Controls the sound of the audio system. Balance
adjusts the sound between the left and right
speakers. Fade adjusts the sound between the
front and rear speakers.
Speed Volume:
Controls the level to which the volume is
adjusted as the vehicle’s driving speed changes.
Choose a setting between 1 and 5 or choose 0to disable the feature entirely.
AUX Level:
Controls the volume level of incoming sound
when an auxiliary device is connected to the
system. Available options are Quiet, Medium
and Loud.
Navigation setup
Refer to the separate Navigation System Own-
er’s Manual for information regarding this item.
XM setup
For SiriusXM Satellite Radio setup, refer to“FM-
AM-SAT radio with Compact Disc (CD) player”
(P.4-39) .
Page 148 of 332
SAA3391
System setup
Select the “System” key to select and/or adjust
various functions of the system. A screen with
additional options will appear.
SAA3392
Display:
Select the “Display” key to adjust the appear-
ance of the display. The following settings can
be adjusted:
.Brightness:
The brightness of the display can be set to Very
Bright, Bright, Default, Dark or Very Dark. Touch
the “Brightness” key to cycle through the
options.
. Display Mode:
The display can be adjusted to fit the level of
lighting in the vehicle. Touch the “Display Mode”
key to cycle through the options. “Day” and
“Night” modes are suited for the respective times of day, while “Automatic” controls the
display automatically.
.
Scroll Direction:
The direction that menus scroll can be adjusted.
Choose either “up” or “down”.
Center display, heater, air conditioner, audio and phone systems4-7