2014 NISSAN CUBE ECO mode
[x] Cancel search: ECO modePage 167 of 332
4-26Center display, heater, air conditioner, audio and phone systems
.An iPod nano®(2nd Generation) will con-
tinue to fast-forward or rewind if it is
disconnected during a seek operation.
. An incorrect song title may appear when the
Play Mode is changed while using an iPod
nano
®(2nd Generation)
. Audiobooks may not play in the same order
as they appear on an iPod
®.
. Large video files cause slow responses in an
iPod
®. The vehicle center display may
momentarily black out, but will soon recover.
. If an iPod
®automatically selects large video
files while in the shuffle mode, the vehicle
center display may momentarily black out,
but will soon recover.
Compressed Audio Files (MP3/WMA/
AAC) (if so equipped)
Explanation of terms:
. MP3 — MP3 is short for Moving Pictures
Experts Group Audio Layer 3. MP3 is the
most well known compressed digital audio
file format. This format allows for near “CD
quality” sound, but at a fraction of the size of
normal audio files. MP3 conversion of an
audio track can reduce the file size by
approximately a 10:1 ratio (Sampling: 44.1
kHz, Bit rate: 128 kbps) with virtually no
perceptible loss in quality. The compression reduces certain parts of sound that seem
inaudible to most people.
. WMA — Windows Media Audio (WMA) is a
compressed audio format created by Micro-
soft as an alternative to MP3. The WMA
codec offers greater file compression than
the MP3 codec, enabling storage of more
digital audio tracks in the same amount of
space when compared to MP3s at the same
level of quality.
. AAC/M4A — Advanced Audio Coding
(AAC) is a lossy audio compression format.
Audio files that have been encoded with
AAC are generally smaller in size and deliver
a higher quality of sound than MP3.
. Bit rate — Bit rate denotes the number of
bits per second used by a digital music file.
The size and quality of a compressed digital
audio file is determined by the bit rate used
when encoding the file.
. Sampling frequency — Sampling frequency
is the rate at which the samples of a signal
are converted from analog to digital (A/D
conversion) per second.
. Multisession — Multisession is one of the
methods for writing data to media. Writing
data once to the media is called a single
session, and writing more than once is
called a multisession. .
ID3/WMA Tag — The ID3/WMA tag is the
part of the encoded MP3 or WMA file that
contains information about the digital music
file such as song title, artist, album title,
encoding bit rate, track time duration, etc.
ID3 tag information is displayed on the
Album/Artist/Track title line on the display.
* Windows
®and Windows Media®are regis-
tered trademarks or trademarks of Microsoft
Corporation in the United States of America
and/or other countries.
Page 174 of 332
setting.
AUDIO button:
Push the AUDIO button to change the selecting
mode as follows.
Push the TUNE (,) or SEEK (,)
button to adjust Bass and Treble to the desired
level. Use the TUNE or SEEK button also to
adjust Fade or Balance modes. Fade adjusts the
sound level between the front and rear speakers
and Balance adjusts the sound between the
right and left speakers.
To turn the beep sound off or on, push the TUNE
or SEEK button until the desired mode is
displayed. This turns on or off the beep sound
when audio buttons are pushed.
To change the Speed Sensitive Volume (Spd
Sen Vol) mode to OFF, LOW, MID or HIGH,
push the TUNE or SEEK button until the desired
mode is displayed.
Once you have adjusted the sound quality to the
desired level, push the AUDIO button repeatedly
until the normal mode display reappears. Other-
wise, the normal mode display will automatically
reappear after approximately 5 seconds.
CLOCK button:
Push the CLOCK button to turn on or off the
CLOCK display.
SIC4131
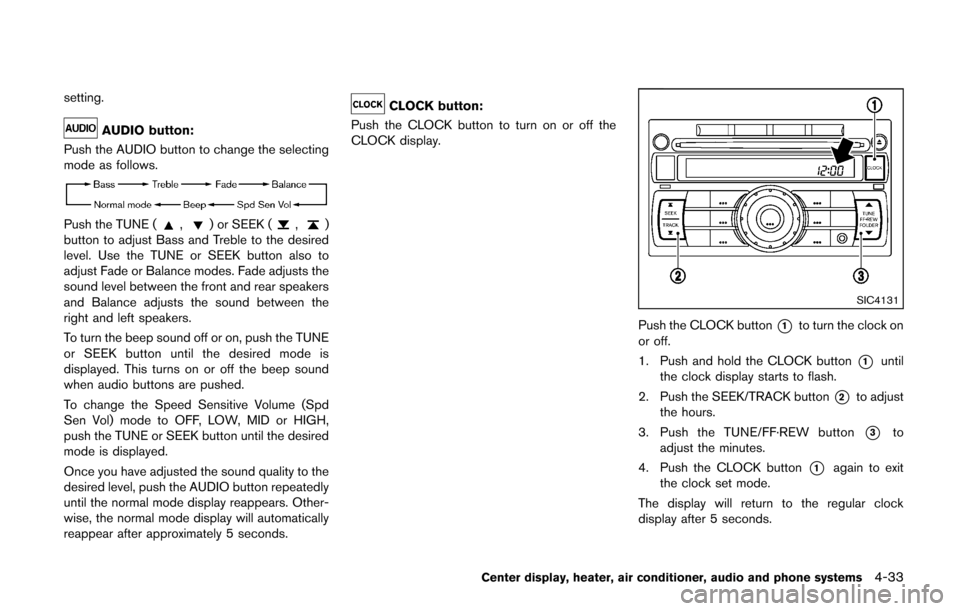
Push the CLOCK button*1to turn the clock on
or off.
1. Push and hold the CLOCK button
*1until
the clock display starts to flash.
2. Push the SEEK/TRACK button
*2to adjust
the hours.
3. Push the TUNE/FF·REW button
*3to
adjust the minutes.
4. Push the CLOCK button
*1again to exit
the clock set mode.
The display will return to the regular clock
display after 5 seconds.
Center display, heater, air conditioner, audio and phone systems4-33
Page 175 of 332
4-34Center display, heater, air conditioner, audio and phone systems
Radio operation
Radio (FM/AM) band select:
Pushing the FM·AM radio band select button will
change the band as follows:
AM ?FM1 ?FM2 ?AM
When the stereo broadcast signal is weak, the
radio will automatically change from stereo to
monaural reception.
When the radio band select button is pushed
while the ignition switch is in the ACC or ON
position, the radio will come on at the station last
played.
TUNE (Tuning):
Push the TUNE button
orfor manual
tuning. To move quickly through the stations,
push and hold the TUNE button.
SEEK tuning:
Push the SEEK button
orto tune from
low to high or high to low frequencies and to
stop at the next broadcasting station.
SCAN tuning:
Push the SCAN button to tune from low to high
frequencies and stops at each broadcasting
station for 5 seconds. Pushing the button again during this 5 seconds period will stop SCAN
tuning and the radio will remain tuned to that
station.
If the SCAN tuning button is not pushed within 5
seconds, SCAN tuning moves to the next
station.
toStation memory operations:
12 stations can be set for the FM band (6 each
for FM1 and FM2), and 6 can be set for the AM
band for easy access.
1. Choose the radio band using the radio band select button.
2. Tune to the desired station using the SEEK, SCAN or TUNE button.
3. Push and hold the desired radio station preset button
tountil a beep sound is
heard. (The radio mutes when the radio
station preset button is pushed.)
4. The station indicator will then come on and the sound will resume. Memorizing is now
complete.
5. Other buttons can be set in the same manner.
If the battery cable is disconnected, or if the fuse
opens, the radio memory will be erased. In that
case, reset the desired stations. Radio Data System (RDS):
RDS stands for Radio Data System, and is a
data information service transmitted by some
radio stations on the FM band (not AM band)
encoded within a regular radio broadcast.
Currently, most RDS stations are in large cities,
but many stations are now considering broad-
casting RDS data.
RDS can display:
.
Station call sign, such as “WHFR 98.3”.
. Station name, such as “The Groove”.
. Music or programming type such as “Clas-
sical”, “Country” or “Rock”.
. Traffic reports about delays or construction.
If the station broadcasts RDS information, the
RDS icon is displayed.
RADIO DISPLAY change:
When the DISP button is pushed during the FM
radio mode, the radio display will change in the
following order.
FM radio:
Frequency ↔PS/PTY
In the FM radio mode, pressing the DISP button
will switch the frequency display to the PTY
display (if available) , and if the DISP button is
not pushed again within 5 seconds, it will
automatically switch to the PS display. If PTY
Page 177 of 332
4-36Center display, heater, air conditioner, audio and phone systems
RANDOM (RDM)/REPEAT (RPT):
When the RPT button is pushed for less than
1.5 seconds while the CD is being played, the
play pattern can be changed as follows:
CD:
CD with MP3 or WMA:
CD EJECT:
When the CD EJECT button is pushed with the
CD loaded, the CD will be ejected.
When this button is pushed while the CD is
being played, the CD will be ejected and the
system will turn off.
If the CD is ejected and is not removed, it
will be pulled back into the slot to protect
it.SAA2352
Interface system for iPod®operation
Connecting iPod®:
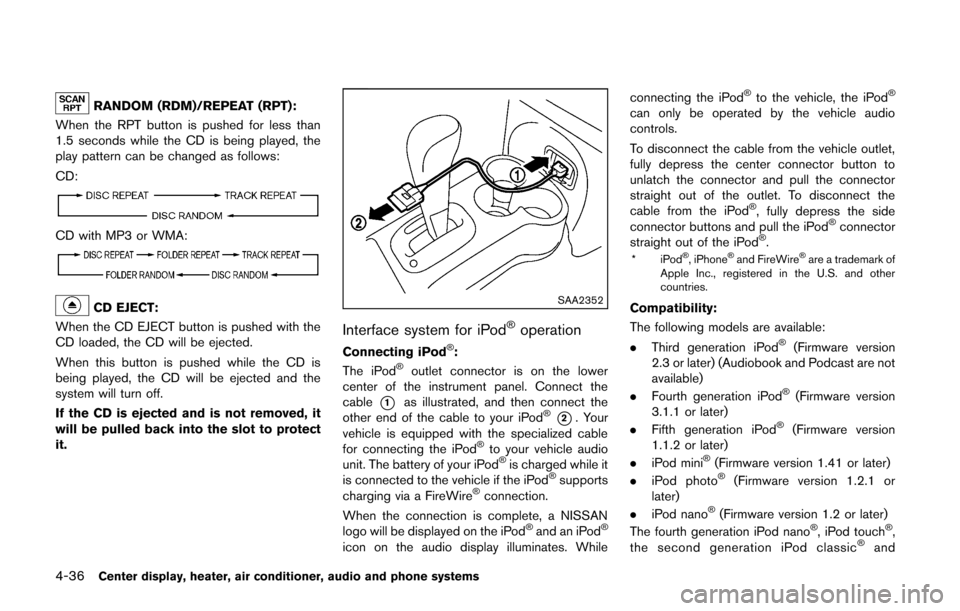
The iPod®outlet connector is on the lower
center of the instrument panel. Connect the
cable
*1as illustrated, and then connect the
other end of the cable to your iPod®*2. Your
vehicle is equipped with the specialized cable
for connecting the iPod
®to your vehicle audio
unit. The battery of your iPod®is charged while it
is connected to the vehicle if the iPod®supports
charging via a FireWire®connection.
When the connection is complete, a NISSAN
logo will be displayed on the iPod
®and an iPod®
icon on the audio display illuminates. While connecting the iPod
®to the vehicle, the iPod®
can only be operated by the vehicle audio
controls.
To disconnect the cable from the vehicle outlet,
fully depress the center connector button to
unlatch the connector and pull the connector
straight out of the outlet. To disconnect the
cable from the iPod
®, fully depress the side
connector buttons and pull the iPod®connector
straight out of the iPod®.
*iPod®, iPhone®and FireWire®are a trademark of
Apple Inc., registered in the U.S. and other
countries.
Compatibility:
The following models are available:
. Third generation iPod
®(Firmware version
2.3 or later) (Audiobook and Podcast are not
available)
. Fourth generation iPod
®(Firmware version
3.1.1 or later)
. Fifth generation iPod
®(Firmware version
1.1.2 or later)
. iPod mini
®(Firmware version 1.41 or later)
. iPod photo®(Firmware version 1.2.1 or
later)
. iPod nano
®(Firmware version 1.2 or later)
The fourth generation iPod nano®, iPod touch®,
the second generation iPod classic®and
Page 178 of 332
iPhone®3G may not work with the system in
some cases.
Make sure that your iPod
®firmware is updated.
* 12V-charge iPod®s are not chargeable with this
system.
iPod®button:
Place the ignition switch in the ACC or ON
position. Then, push the iPod
®button to switch
to the iPod®mode.
If another audio source is playing and the iPod®
is connected, pushing the iPod®button changes
to the iPod®mode.
If the system has been turned off while the iPod®
was playing, pushing the PWR button will start
the iPod®.
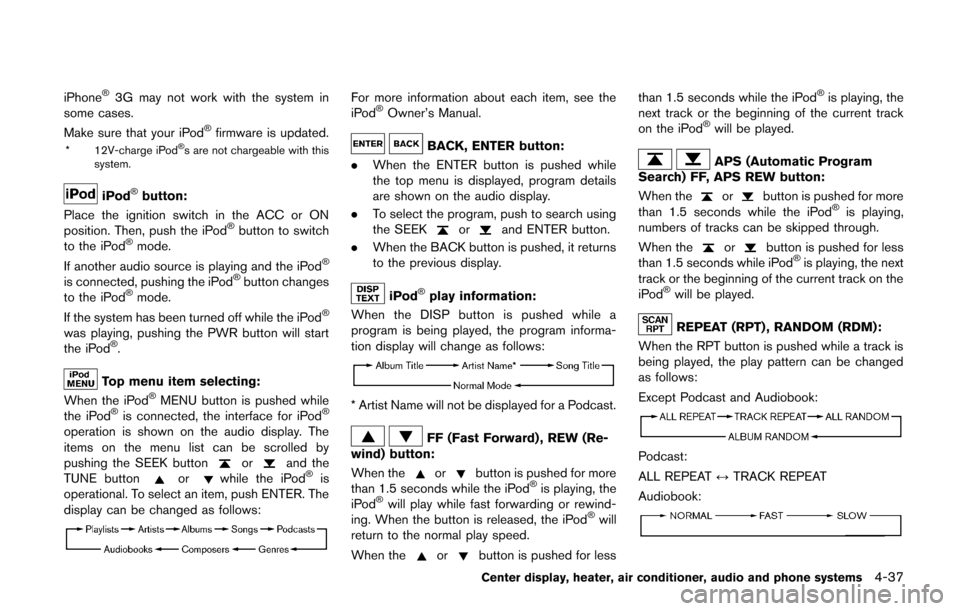
Top menu item selecting:
When the iPod®MENU button is pushed while
the iPod®is connected, the interface for iPod®
operation is shown on the audio display. The
items on the menu list can be scrolled by
pushing the SEEK button
orand the
TUNE buttonorwhile the iPod®is
operational. To select an item, push ENTER. The
display can be changed as follows:
For more information about each item, see the
iPod®Owner’s Manual.
BACK, ENTER button:
. When the ENTER button is pushed while
the top menu is displayed, program details
are shown on the audio display.
. To select the program, push to search using
the SEEK
orand ENTER button.
. When the BACK button is pushed, it returns
to the previous display.
iPod®play information:
When the DISP button is pushed while a
program is being played, the program informa-
tion display will change as follows:
* Artist Name will not be displayed for a Podcast.
FF (Fast Forward) , REW (Re-
wind) button:
When the
orbutton is pushed for more
than 1.5 seconds while the iPod®is playing, the
iPod®will play while fast forwarding or rewind-
ing. When the button is released, the iPod®will
return to the normal play speed.
When the
orbutton is pushed for less than 1.5 seconds while the iPod
®is playing, the
next track or the beginning of the current track
on the iPod
®will be played.
APS (Automatic Program
Search) FF, APS REW button:
When the
orbutton is pushed for more
than 1.5 seconds while the iPod®is playing,
numbers of tracks can be skipped through.
When the
orbutton is pushed for less
than 1.5 seconds while iPod®is playing, the next
track or the beginning of the current track on the
iPod
®will be played.
REPEAT (RPT) , RANDOM (RDM):
When the RPT button is pushed while a track is
being played, the play pattern can be changed
as follows:
Except Podcast and Audiobook:
Podcast:
ALL REPEAT ↔TRACK REPEAT
Audiobook:
Center display, heater, air conditioner, audio and phone systems4-37
Page 179 of 332
4-38Center display, heater, air conditioner, audio and phone systems
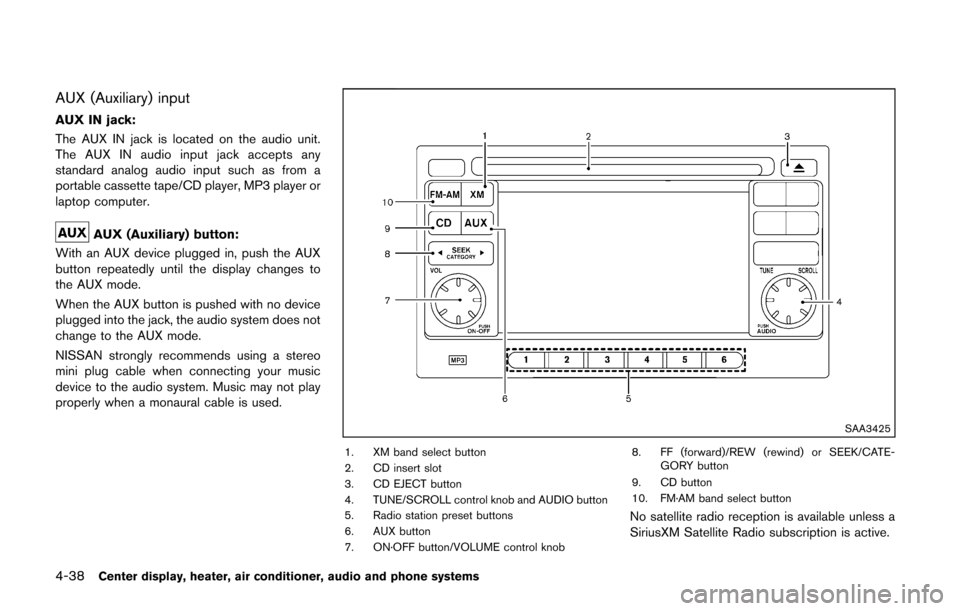
AUX (Auxiliary) input
AUX IN jack:
The AUX IN jack is located on the audio unit.
The AUX IN audio input jack accepts any
standard analog audio input such as from a
portable cassette tape/CD player, MP3 player or
laptop computer.
AUX (Auxiliary) button:
With an AUX device plugged in, push the AUX
button repeatedly until the display changes to
the AUX mode.
When the AUX button is pushed with no device
plugged into the jack, the audio system does not
change to the AUX mode.
NISSAN strongly recommends using a stereo
mini plug cable when connecting your music
device to the audio system. Music may not play
properly when a monaural cable is used.
SAA3425
1. XM band select button
2. CD insert slot
3. CD EJECT button
4. TUNE/SCROLL control knob and AUDIO button
5. Radio station preset buttons
6. AUX button
7. ON·OFF button/VOLUME control knob 8. FF (forward)/REW (rewind) or SEEK/CATE-
GORY button
9. CD button
10. FM·AM band select button
No satellite radio reception is available unless a
SiriusXM Satellite Radio subscription is active.
Page 182 of 332
to play.
While listening to a CD or an MP3/WMA CD,
certain text may be displayed (when a CD
encoded with text is being used). Depending on
how the CD or MP3/WMA CD is encoded, the
text is displayed listing the artist, album and
song title.
Next/Previous Track and Fast
Forward/Rewind:
When the
orbutton is pushed for more
than 1.5 seconds while the CD is being played,
the CD will play while fast forwarding or
rewinding. When the button is released, the
CD will return to normal play speed.
When the
orbutton is pushed for less
than 1.5 seconds while the CD is being played,
the next track or the beginning of the current
track on the CD will be played.
When the rewind button is pushed for less than
1.5 seconds within 3 seconds after the current
track starts playing, the previous track will be
played.
SAA3401
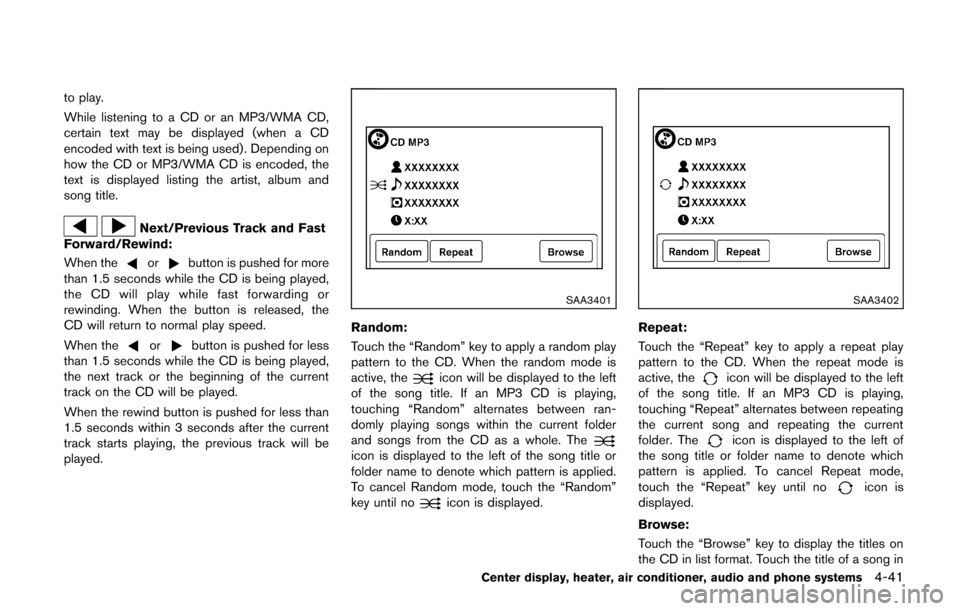
Random:
Touch the “Random” key to apply a random play
pattern to the CD. When the random mode is
active, the
icon will be displayed to the left
of the song title. If an MP3 CD is playing,
touching “Random” alternates between ran-
domly playing songs within the current folder
and songs from the CD as a whole. The
icon is displayed to the left of the song title or
folder name to denote which pattern is applied.
To cancel Random mode, touch the “Random”
key until no
icon is displayed.
SAA3402
Repeat:
Touch the “Repeat” key to apply a repeat play
pattern to the CD. When the repeat mode is
active, the
icon will be displayed to the left
of the song title. If an MP3 CD is playing,
touching “Repeat” alternates between repeating
the current song and repeating the current
folder. The
icon is displayed to the left of
the song title or folder name to denote which
pattern is applied. To cancel Repeat mode,
touch the “Repeat” key until no
icon is
displayed.
Browse:
Touch the “Browse” key to display the titles on
the CD in list format. Touch the title of a song in
Center display, heater, air conditioner, audio and phone systems4-41
Page 183 of 332
4-42Center display, heater, air conditioner, audio and phone systems
the list to begin playing that song. If an MP3 CD
is playing, touching the “Browse” key will also
list the folders on the disc. Follow the procedure
for selecting a song with the touchscreen to
choose a folder.
CD EJECT:
When the CD EJECT button is pushed with the
CD loaded, the CD will be ejected.
When this button is pushed while the CD is
being played, the CD will be ejected.
If the CD is ejected and is not removed, it
will be pulled back into the slot to protect
it.
AUX (Auxiliary) input
AUX IN jack:
The AUX IN jack is located on the lower center
of the instrument panel. The AUX IN audio input
jack accepts any standard analog audio input
such as from a portable cassette tape/CD
player, MP3 player or laptop computer.
NISSAN strongly recommends using a stereo
mini plug cable when connecting your music
device to the audio system. Music may not play
properly when a monaural cable is used.
AUX (Auxiliary) button:
To switch to the AUX mode, push the AUX
button when a compatible audio device is
connected into the AUX IN jack.
When the AUX button is pushed with no device
plugged into the jack, the audio system does not
change to the AUX mode.
SAA3647
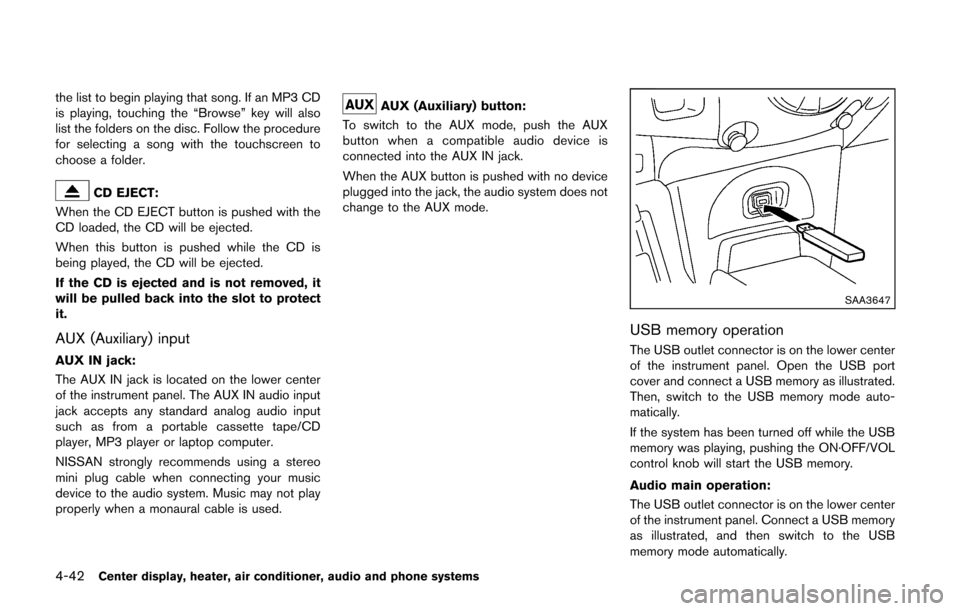
USB memory operation
The USB outlet connector is on the lower center
of the instrument panel. Open the USB port
cover and connect a USB memory as illustrated.
Then, switch to the USB memory mode auto-
matically.
If the system has been turned off while the USB
memory was playing, pushing the ON·OFF/VOL
control knob will start the USB memory.
Audio main operation:
The USB outlet connector is on the lower center
of the instrument panel. Connect a USB memory
as illustrated, and then switch to the USB
memory mode automatically.