2014 NISSAN CUBE ECO mode
[x] Cancel search: ECO modePage 249 of 332
6-12In case of emergency
wait 10 seconds before trying again.
9. After starting your engine, carefully discon- nect the negative cable and then the positive
cable (
*4?*3?*2?*1).
10. Replace the vent caps (if so equipped). Be sure to dispose of the cloth used to cover
the vent holes as it may be contaminated
with corrosive acid. Do not attempt to start the engine by pushing.
CAUTION
.
Continuously Variable Transmission
(CVT) models cannot be push-
started or tow-started. Attempting
to do so may cause transmission
damage.
. Three-way catalyst equipped mod-
els should not be started by pushing
since the three way catalyst may be
damaged.
. Never try to start the vehicle by
towing it; when the engine starts,
the forward surge could cause the
vehicle to collide with the tow
vehicle.
CAUTION
.Do not continue to drive if your
vehicle overheats. Doing so could
cause engine damage or a vehicle
fire.
. To avoid the danger of being
scalded, never remove the radiator
cap while the engine is still hot.
When the radiator cap is removed,
pressurized hot water will spurt out,
possibly causing serious injury.
. Do not open the hood if steam is
coming out.
If your vehicle is overheating (indicated by an
extremely high temperature gauge reading) , or if
you feel a lack of engine power, detect abnormal
noise, etc., take the following steps:
1. Move the vehicle safely off the road and apply the parking brake.
2. Continuously Variable Transmission
(CVT) models:
Move the shift lever to the P (Park) position.
Manual Transmission (MT) models:
Move the shift lever to the N (Neutral)
position.
PUSH STARTING IF YOUR VEHICLE OVERHEATS
Page 252 of 332
SCE0814
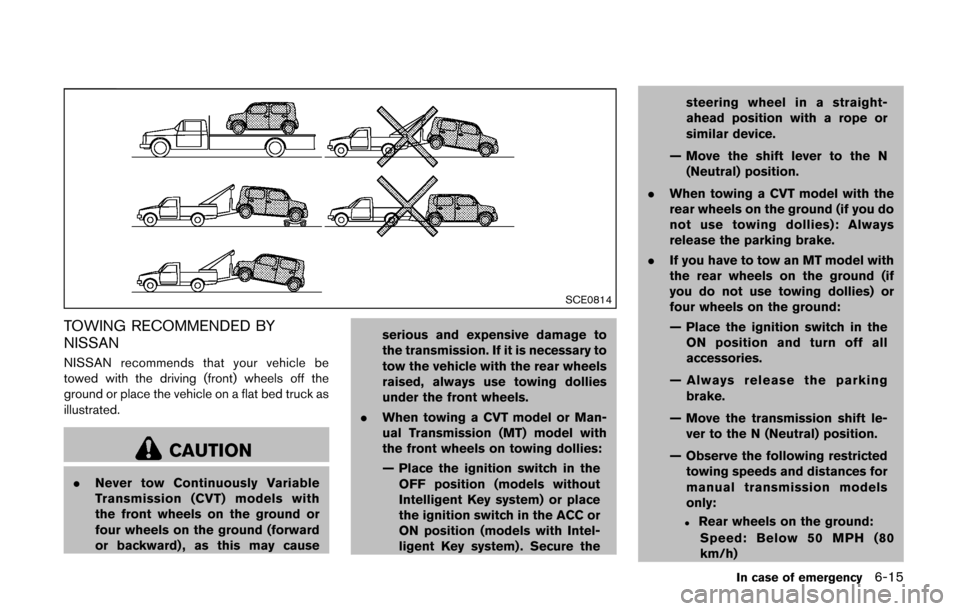
TOWING RECOMMENDED BY
NISSAN
NISSAN recommends that your vehicle be
towed with the driving (front) wheels off the
ground or place the vehicle on a flat bed truck as
illustrated.
CAUTION
.Never tow Continuously Variable
Transmission (CVT) models with
the front wheels on the ground or
four wheels on the ground (forward
or backward) , as this may cause serious and expensive damage to
the transmission. If it is necessary to
tow the vehicle with the rear wheels
raised, always use towing dollies
under the front wheels.
. When towing a CVT model or Man-
ual Transmission (MT) model with
the front wheels on towing dollies:
— Place the ignition switch in the
OFF position (models without
Intelligent Key system) or place
the ignition switch in the ACC or
ON position (models with Intel-
ligent Key system) . Secure the steering wheel in a straight-
ahead position with a rope or
similar device.
— Move the shift lever to the N (Neutral) position.
. When towing a CVT model with the
rear wheels on the ground (if you do
not use towing dollies): Always
release the parking brake.
. If you have to tow an MT model with
the rear wheels on the ground (if
you do not use towing dollies) or
four wheels on the ground:
— Place the ignition switch in the
ON position and turn off all
accessories.
— Always release the parking brake.
— Move the transmission shift le- ver to the N (Neutral) position.
— Observe the following restricted towing speeds and distances for
manual transmission models
only:
.Rear wheels on the ground:
Speed: Below 50 MPH (80
km/h)
In case of emergency6-15
Page 254 of 332
SCE0678Rear
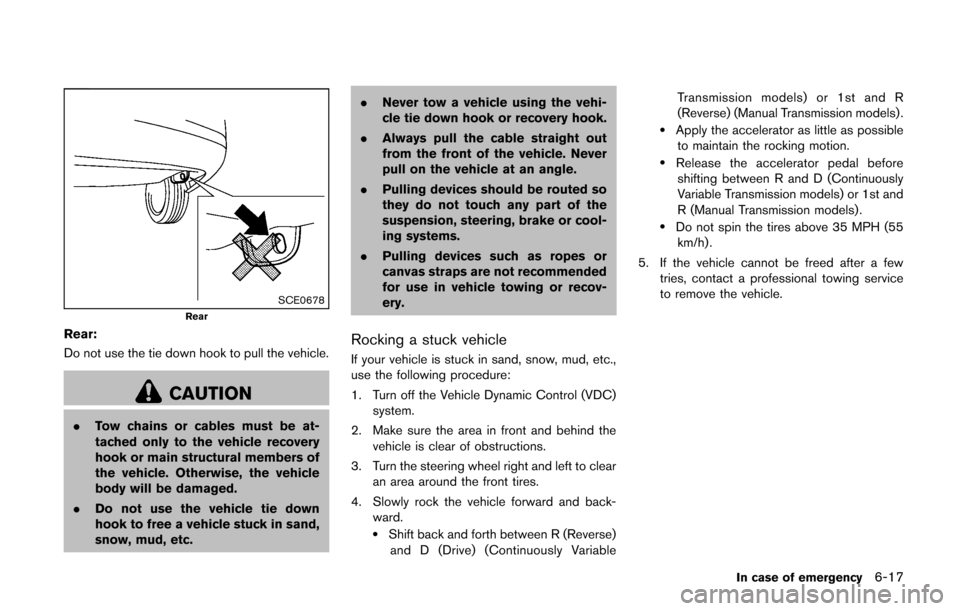
Rear:
Do not use the tie down hook to pull the vehicle.
CAUTION
.Tow chains or cables must be at-
tached only to the vehicle recovery
hook or main structural members of
the vehicle. Otherwise, the vehicle
body will be damaged.
. Do not use the vehicle tie down
hook to free a vehicle stuck in sand,
snow, mud, etc. .
Never tow a vehicle using the vehi-
cle tie down hook or recovery hook.
. Always pull the cable straight out
from the front of the vehicle. Never
pull on the vehicle at an angle.
. Pulling devices should be routed so
they do not touch any part of the
suspension, steering, brake or cool-
ing systems.
. Pulling devices such as ropes or
canvas straps are not recommended
for use in vehicle towing or recov-
ery.
Rocking a stuck vehicle
If your vehicle is stuck in sand, snow, mud, etc.,
use the following procedure:
1. Turn off the Vehicle Dynamic Control (VDC)
system.
2. Make sure the area in front and behind the vehicle is clear of obstructions.
3. Turn the steering wheel right and left to clear an area around the front tires.
4. Slowly rock the vehicle forward and back- ward.
.Shift back and forth between R (Reverse)and D (Drive) (Continuously Variable Transmission models) or 1st and R
(Reverse) (Manual Transmission models) .
.Apply the accelerator as little as possible
to maintain the rocking motion.
.Release the accelerator pedal beforeshifting between R and D (Continuously
Variable Transmission models) or 1st and
R (Manual Transmission models).
.Do not spin the tires above 35 MPH (55
km/h).
5. If the vehicle cannot be freed after a few tries, contact a professional towing service
to remove the vehicle.
In case of emergency6-17
Page 260 of 332
may damage the lens cover.
AIR FRESHENERS
Most air fresheners use a solvent that could
affect the vehicle interior. If you use an air
freshener, take the following precautions:
.Hanging-type air fresheners can cause
permanent discoloration when they contact
vehicle interior surfaces. Place the air
freshener in a location that allows it to hang
free and not contact an interior surface.
. Liquid-type air fresheners typically clip on
the vents. These products can cause
immediate damage and discoloration when
spilled on interior surfaces.
Carefully read and follow the manufacturer’s
instructions before using air fresheners.
FLOOR MATS
WARNING
To avoid potential pedal interference
that may result in a collision or injury:
. NEVER place a floor mat on top of
another floor mat in the driver front
position.
. Use only genuine NISSAN floor
mats specifically designed for use
in your vehicle model. See your
NISSAN dealer for more informa-
tion.
. Properly position the mats in the
floorwell using the floor mat posi-
tioning aid. See “Floor mat posi-
tioning aid (driver’s side only)” (P.7-
5) .
The use of genuine NISSAN floor mats can
extend the life of your vehicle carpet and make it
easier to clean the interior. Mats should be
maintained with regular cleaning and replaced if
they become excessively worn.
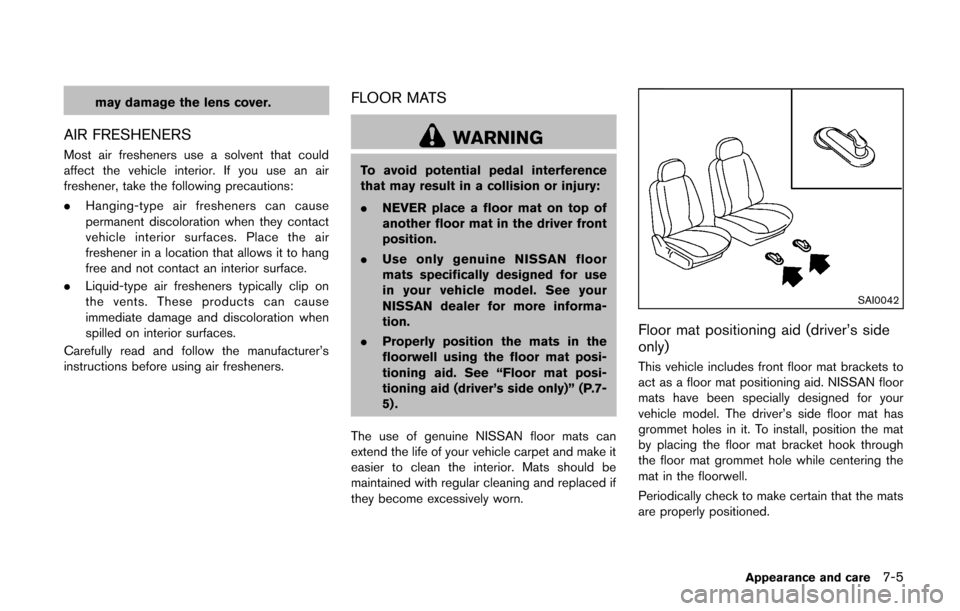
SAI0042
Floor mat positioning aid (driver’s side
only)
This vehicle includes front floor mat brackets to
act as a floor mat positioning aid. NISSAN floor
mats have been specially designed for your
vehicle model. The driver’s side floor mat has
grommet holes in it. To install, position the mat
by placing the floor mat bracket hook through
the floor mat grommet hole while centering the
mat in the floorwell.
Periodically check to make certain that the mats
are properly positioned.
Appearance and care7-5
Page 269 of 332
8-6Maintenance and do-it-yourself
improper servicing may result in operating
difficulties or excessive emissions, and could
affect your warranty coverage.If in doubt
about any servicing, we recommend that
it be done by a NISSAN dealer.
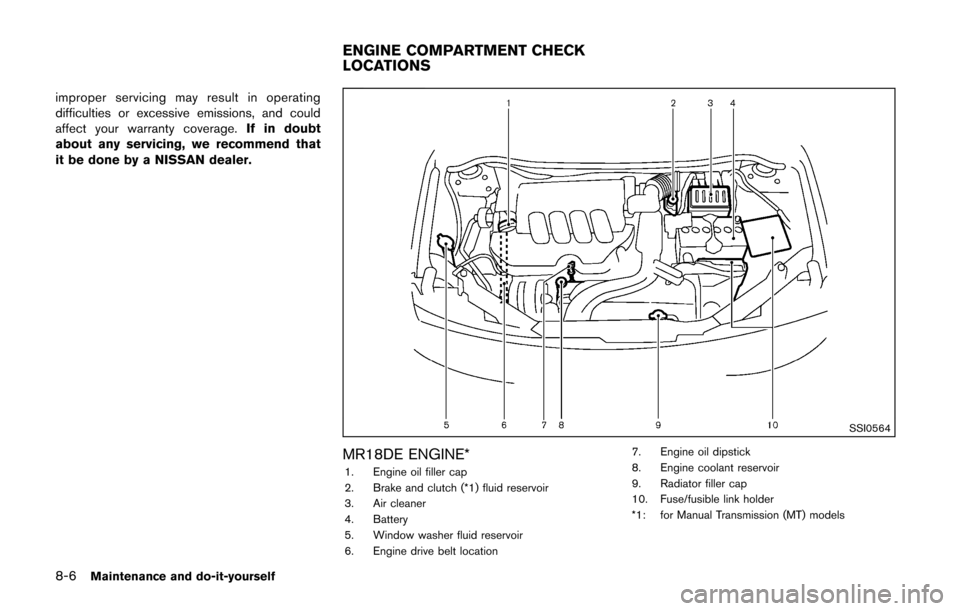
SSI0564
MR18DE ENGINE*1. Engine oil filler cap
2. Brake and clutch (*1) fluid reservoir
3. Air cleaner
4. Battery
5. Window washer fluid reservoir
6. Engine drive belt location 7. Engine oil dipstick
8. Engine coolant reservoir
9. Radiator filler cap
10. Fuse/fusible link holder
*1: for Manual Transmission (MT) models
ENGINE COMPARTMENT CHECK
LOCATIONS
Page 293 of 332
8-30Maintenance and do-it-yourself
If you have a flat tire, see “Flat tire” (P.6-3) .
TIRE PRESSURE
Tire Pressure Monitoring System (TPMS)
This vehicle is equipped with the Tire Pressure
Monitoring System (TPMS) . It monitors tire
pressure of all tires except the spare. When
the low tire pressure warning light is lit, and the
CHECK TIRE PRES (pressure) warning mes-
sage is displayed in the vehicle information
display, one or more of your tires is significantly
under-inflated.
The TPMS will activate only when the vehicle is
driven at speeds above 16 MPH (25 km/h).
Also, this system may not detect a sudden drop
in tire pressure (for example a flat tire while
driving) .
For more details, see “Low tire pressure warning
light” (P.2-14) , “Tire Pressure Monitoring Sys-
tem (TPMS)” (P.5-3) and “Tire Pressure Mon-
itoring System (TPMS)” (P.6-3) .
Tire inflation pressure
Check the pressure of the tires (including
the spare) often and always prior to long
distance trips. The recommended tire
pressure specifications are shown on the
Tire and Loading Information label under
the “Cold Tire Pressure” heading. The Tireand Loading Information label is affixed to
the driver side center pillar. Tire pressures
should be checked regularly because:
.
Most tires naturally lose air over time.
. Tires can lose air suddenly when driven
over potholes or other objects or if the
vehicle strikes a curb while parking.
The tire pressures should be checked
when the tires are cold. The tires are
considered COLD after the vehicle has
been parked for 3 or more hours, or driven
less than 1 mile (1.6 km) at moderate
speeds.
Incorrect tire pressure, including un-
der inflation, may adversely affect tire
life and vehicle handling.
WARNING
. Improperly inflated tires can fail
suddenly and cause an accident.
. The Gross Vehicle Weight rating
(GVWR) is located on the F.M.V.
S.S. certification label. The ve-
hicle weight capacity is indi-
cated on the Tire and Loading Information label. Do not load
your vehicle beyond this capa-
city. Overloading your vehicle
may result in reduced tire life,
unsafe operating conditions due
to premature tire failure, or un-
favorable handling characteris-
tics and could also lead to a
serious accident. Loading be-
yond the specified capacity may
also result in failure of other
vehicle components.
. Before taking a long trip, or
whenever you heavily load your
vehicle, use a tire pressure
gauge to ensure that the tire
pressures are at the specified
level.
. For additional information re-
garding tires, refer to “Important
Tire Safety Information” in the
Warranty Information Booklet.
WHEELS AND TIRES
Page 294 of 332
SDI2503
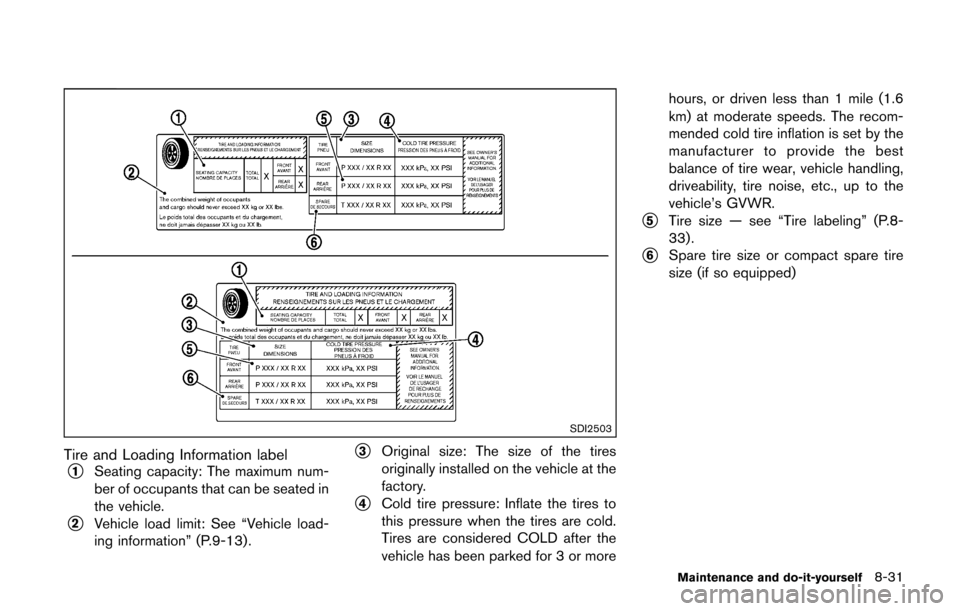
Tire and Loading Information label
*1Seating capacity: The maximum num-
ber of occupants that can be seated in
the vehicle.
*2Vehicle load limit: See “Vehicle load-
ing information” (P.9-13).
*3Original size: The size of the tires
originally installed on the vehicle at the
factory.
*4Cold tire pressure: Inflate the tires to
this pressure when the tires are cold.
Tires are considered COLD after the
vehicle has been parked for 3 or morehours, or driven less than 1 mile (1.6
km) at moderate speeds. The recom-
mended cold tire inflation is set by the
manufacturer to provide the best
balance of tire wear, vehicle handling,
driveability, tire noise, etc., up to the
vehicle’s GVWR.
*5Tire size — see “Tire labeling” (P.8-
33).
*6Spare tire size or compact spare tire
size (if so equipped)
Maintenance and do-it-yourself8-31
Page 298 of 332
TYPES OF TIRES
WARNING
.When changing or replacing tires,
be sure all four tires are of the same
type (Example: Summer, All Season
or Snow) and construction. A
NISSAN dealer may be able to help
you with information about tire type,
size, speed rating and availability.
. Replacement tires may have a lower
speed rating than the factory
equipped tires, and may not match
the potential maximum vehicle
speed. Never exceed the maximum
speed rating of the tire.
. Replacing tires with those not ori-
ginally specified by NISSAN could
affect the proper operation of the
TPMS.
. For additional information regard-
ing tires, refer to “Important Tire
Safety Information” in the Warranty
Information Booklet.
All season tires
NISSAN specifies all season tires on some
models to provide good performance all year,
including snowy and icy road conditions. All
Season tires are identified by ALL SEASON
and/or M&S (Mud and Snow) on the tire
sidewall. Snow tires have better snow traction
than All Season tires and may be more appro-
priate in some areas.
Summer tires
NISSAN specifies summer tires on some
models to provide superior performance on dry
roads. Summer tire performance is substantially
reduced in snow and ice. Summer tires do not
have the tire traction rating M&S on the tire
sidewall.
If you plan to operate your vehicle in snowy or
icy conditions, NISSAN recommends the use of
SNOW tires or ALL SEASON tires on all four
wheels.
Snow tires
If snow tires are needed, it is necessary to select
tires equivalent in size and load rating to the
original equipment tires. If you do not, it can
adversely affect the safety and handling of your
vehicle.
Generally, snow tires will have lower speed
ratings than factory equipped tires and may not match the potential maximum vehicle speed.
Never exceed the maximum speed rating of the
tire.
If you install snow tires, they must be the same
size, brand, construction and tread pattern on all
four wheels.
For additional traction on icy roads, studded
tires may be used. However, some U.S. states
prohibit their use. Check local and state laws
before installing studded tires. Skid and traction
capabilities of studded snow tires, on wet or dry
surfaces, may be poorer than that of non-
studded snow tires.
TIRE CHAINS
Use of tire chains may be prohibited according
to location. Check the local laws before instal-
ling tire chains. When installing tire chains, make
sure they are the proper size for the tires on your
vehicle and are installed according to the chain
manufacturer’s suggestions.
Use only SAE
Class S chains. Class “S” chains are used on
vehicles with restricted tire to vehicle clearance.
Vehicles that can use Class “S” chains are
designed to meet the SAE standard minimum
clearances between the tire and the closest
vehicle suspension or body component required
to accommodate the use of a winter traction
device (tire chains or cables) . The minimum
clearances are determined using the factory
Maintenance and do-it-yourself8-35