2014 MITSUBISHI OUTLANDER PHEV air condition
[x] Cancel search: air conditionPage 276 of 442

The air selection and air conditioningswitches can be customized (function setting
changed), and the automatic switching of out-
side air and the air conditioner according to operating conditions can be changed as de-
sired.
For further information, we recommend you to consult a MITSUBISHI MOTORS Au-
thorized Service Point.
Refer to “Customizing the air conditioning
switch” on page 8-10.
Refer to “Customizing the air selection” on page 8-08.
Synchronized mode and dual mode
The driver’s side and the passenger’s side
temperature can be controlled independently. At this time, the “DUAL” indicator will be shown in the display (A).
l Synchronized mode
If the driver’s side temperature control switch is pressed, the passenger’s side temperature will also be controlled to the
same setting temperature as the driver’s
side.
l Dual mode
If the passenger’s side temperature con-
trol switch is pressed under synchron- ized mode, the system will switch to du-
al mode. In dual mode, the driver’s side
and the passenger’s side temperature can
be set separately by using each tempera-
ture control switch.
Press the AUTO switch to return to
synchronized mode.Air selection switch
E00703401808
To change the air selection, simply press the air selection switch.
l Outside air: Indication lamp (A) is OFF
Outside air is introduced into the passen- ger compartment.
l Recirculated air: Indication lamp (A) is
ON
Air is recirculated inside the passenger
compartment.CAUTIONl Use of the recirculation position for exten-
ded time may cause the windows to fog up.NOTEl Normally, use the outside position to keep
the windscreen and side windows clear and
quickly remove fog or frost from the wind- screen.
If high cooling performance is desired, or if
the outside air is dusty or otherwise contami- nated use the recirculation position. Switch
to the outside position periodically to in- crease ventilation so that the windows do notbecome fogged up.
Automatic climate control air conditioner
8-08OGGE14E5For pleasant driving8
Page 277 of 442

NOTElWhen the engine coolant temperature rises
to a certain level, the air selection is auto-
matically switched to the recirculation posi- tion and the indication lamp (A) comes on.
At this time, the system will not switch to the outside position even if the air selection
switch is pushed.
l When the outside air temperature is high, the
system will not switch to the outside posi- tion even if the air selection switch is press-ed or the air conditioner is operating. This is
to protect the air conditioner compressor and is not a failure.Customizing the air selection
E00739600051
Functions can be changed as desired, as sta-
ted below.
l Enable automatic air selection control
When the AUTO switch is pressed, the
air selection switch is also controlled au- tomatically.
l Disable automatic air selection control
Even when the AUTO switch is pressed, the air selection switch is not controlled
automatically.
l Setting change method
Hold down the air selection switch for about 10 seconds or more.
• When the setting is changed from ena-
ble to disable
3 sounds are emitted and the indica- tion lamp flashes 3 times.
• When the setting is changed from dis-
able to enable
2 sounds are emitted and the indica- tion lamp flashes 3 times.
On vehicles equipped with MITSUBISHI Multi-Communication
System (MMCS), screen operations can
also be used to change the setting. Refer
to the separate owner’s manual for de-
tails.NOTEl The factory setting is “Enable automatic air
selection control.”
l When the demister switch is pressed, in or-
der to prevent misting of the windows the
ventilator automatically switches to outside air even if “Disable automatic air selection
control” is set.AUTO switch
E00702601047
When the AUTO switch is pressed, the indi-
cation lamp (A) comes on and the mode se- lection, blower speed adjustment, recircula-
ted/outside air selection, temperature adjust- ment, and air conditioner ON/OFF status are all controlled automatically.
Automatic climate control air conditioner
8-09OGGE14E5For pleasant driving8
Page 278 of 442

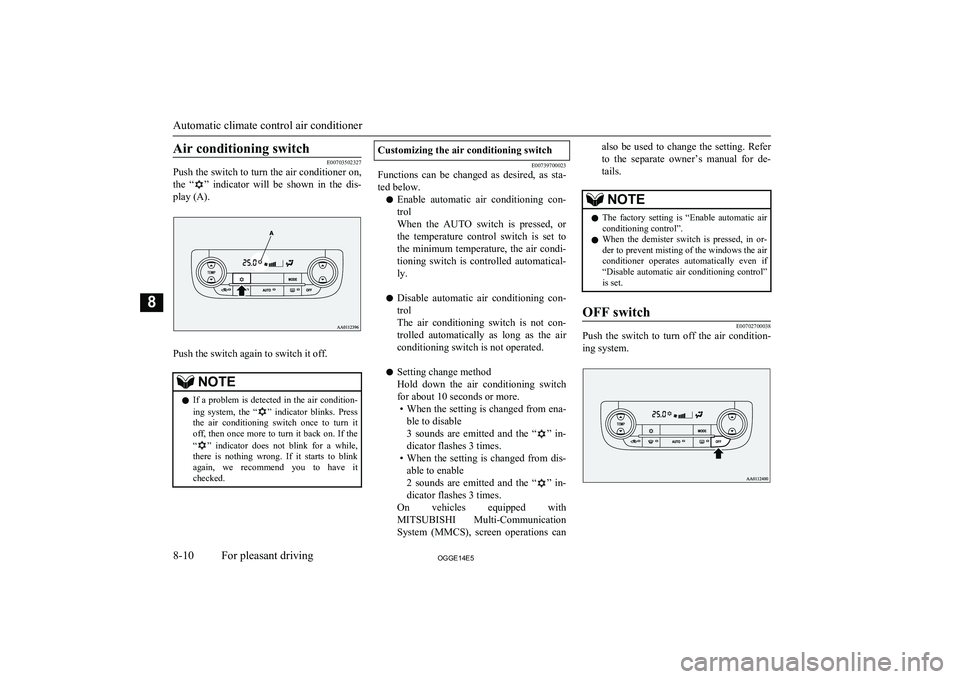
Air conditioning switch
E00703502327
Push the switch to turn the air conditioner on,
the “
” indicator will be shown in the dis-
play (A).
Push the switch again to switch it off.
NOTEl If a problem is detected in the air condition-
ing system, the “” indicator blinks. Press
the air conditioning switch once to turn it off, then once more to turn it back on. If the
“
” indicator does not blink for a while,
there is nothing wrong. If it starts to blink again, we recommend you to have it
checked.
Customizing the air conditioning switch
E00739700023
Functions can be changed as desired, as sta-
ted below.
l Enable automatic air conditioning con-
trol
When the AUTO switch is pressed, or the temperature control switch is set to
the minimum temperature, the air condi- tioning switch is controlled automatical-
ly.
l Disable automatic air conditioning con-
trol
The air conditioning switch is not con-
trolled automatically as long as the air
conditioning switch is not operated.
l Setting change method
Hold down the air conditioning switch
for about 10 seconds or more. • When the setting is changed from ena-
ble to disable
3 sounds are emitted and the “
” in-
dicator flashes 3 times.
• When the setting is changed from dis-
able to enable
2 sounds are emitted and the “
” in-
dicator flashes 3 times.
On vehicles equipped with MITSUBISHI Multi-Communication
System (MMCS), screen operations can
also be used to change the setting. Refer
to the separate owner’s manual for de-
tails.NOTEl The factory setting is “Enable automatic air
conditioning control”.
l When the demister switch is pressed, in or-
der to prevent misting of the windows the air
conditioner operates automatically even if “Disable automatic air conditioning control”
is set.OFF switch
E00702700038
Push the switch to turn off the air condition-
ing system.
Automatic climate control air conditioner
8-10OGGE14E5For pleasant driving8
Page 279 of 442

MODE switch
E00703300031
Each time the MODE switch is pressed, the
mode changes to the next one in the follow-
ing sequence: “
” → “” → “” →
“
” → “”. The selected mode is shown
in the display (A). (Refer to “Mode selec- tion” on page 8-03.)
Demister switch
E00703901106
When this switch is pressed, the mode
changes to the “
” mode. The indication
lamp (A) will come on. The selected mode is shown in the display (B). (Refer to “Mode se-lection” on page 8-03.)
NOTEl When the demister switch is pressed, the air
conditioning system automatically operates and outside air (as opposed to recirculated air) is selected. This automatic switching control is carried out to prevent misting of
the windows even if “Disable automatic air conditioning control” or “Disable automaticair selection control” is set. (Refer to “Cus-
tomizing the air conditioning switch” on page 8-10, “Customizing the air selection”
on page 8-09.)NOTEl When the demister switch is pressed, the en-
gine may start running (except vehicles with
electric heater).Operating the system in auto-
matic mode
E00704102261
In normal conditions, use the system in the
AUTO mode and follow these procedures: 1. Push the AUTO switch.
2. Set the temperature control switch to the
desired temperature.
The mode selection, blower speed ad- justment, recirculated/outside air selec-tion, temperature adjustment, and air
conditioner ON/OFF status are all con- trolled automatically.
Automatic climate control air conditioner
8-11OGGE14E5For pleasant driving8
Page 280 of 442

NOTElIf the blower speed selection switch, air con-
ditioning switch, Mode switch, or air selec- tion switch is operated while the system is
operating in the AUTO mode, the activated
function overrides the corresponding func- tion of automatic control. All other functions
remain under automatic control.Operating the system in man-
ual mode
E00704200239
Blower speed and ventilator mode may be
controlled manually by setting the blower speed selection switch and the MODE switchto the desired positions.
To return to automatic operation, press the AUTO switch.
Demisting of the windscreen
and door windows
E00704302016
CAUTIONl For safety, make sure you have a clear view
through all the windows.For ordinary demisting
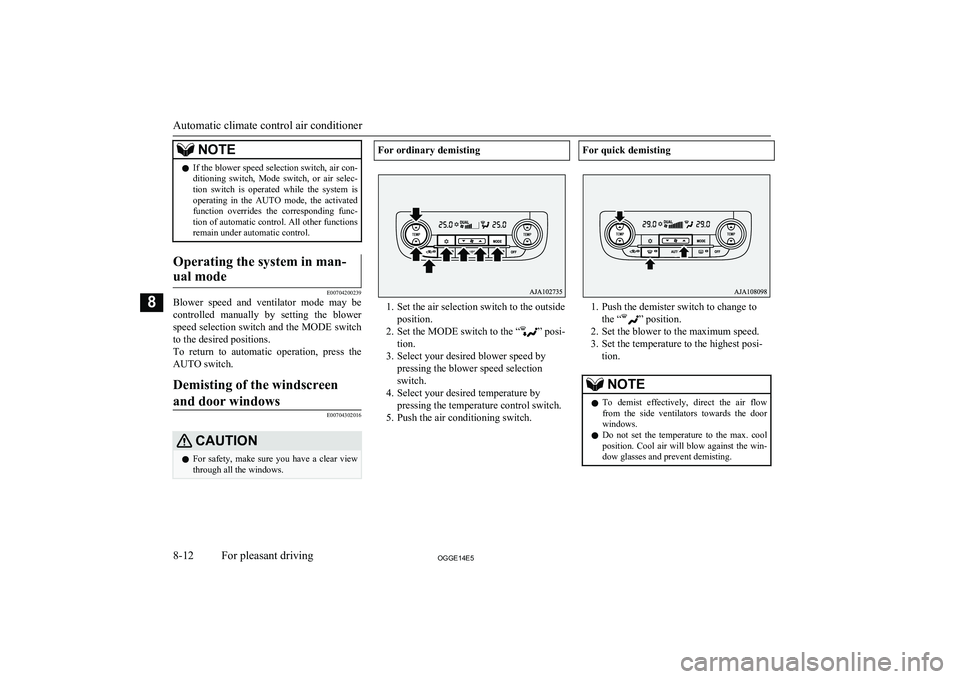
1. Set the air selection switch to the outside
position.
2. Set the MODE switch to the “
” posi-
tion.
3. Select your desired blower speed by pressing the blower speed selection
switch.
4. Select your desired temperature by pressing the temperature control switch.
5. Push the air conditioning switch.
For quick demisting
1. Push the demister switch to change to the “
” position.
2. Set the blower to the maximum speed.
3. Set the temperature to the highest posi- tion.
NOTEl To demist effectively, direct the air flow
from the side ventilators towards the door windows.
l Do not set the temperature to the max. cool
position. Cool air will blow against the win-
dow glasses and prevent demisting.
Automatic climate control air conditioner
8-12OGGE14E5For pleasant driving8
Page 281 of 442

Important operation tips forthe air conditioner E00708302098
l Park the vehicle in the shade.
Parking in the hot sun will make the ve-
hicle inside extremely hot, and it will re-
quire more time to cool the interior.
If it is necessary to park in the sun, open
the windows for the first few minutes of air conditioning operation to expel the
hot air.
l Close the windows when the air condi-
tioner is in use. The entry of outside air
through open windows will reduce the cooling efficiency.
l Too much cooling is not good for the
health. Keep the difference between the
vehicle interior temperature and outside
temperature to 5 to 6 °C.
l When operating the system, make sure
the air intake, which is located in front of the windscreen, is free of obstructionssuch as leaves and snow. Leaves collec-
ted in the air-intake plenum may reduce
air flow and plug the plenum water drains.
l Too much cooling/heating can affect the
EV cruising range, so maintain an appro-
priate temperature to extend the EV
cruising range.Air conditioning system refrig-
erant and lubricant recommen-dations
If the air conditioner seems less effective than usual, the cause might be a refrigerant leak. We recommend you to have the system
inspected.
The air conditioning system in your vehicle must be charged with the refrigerant
HFC-134a and the lubricant POE MA68EV.
Use of any other refrigerant or lubricant will cause severe damage which will result in the
need to replace your vehicle’s entire air con- ditioning system. The release of refrigerantinto the atmosphere is not recommended.
The new refrigerant HFC-134a in your vehi-
cle will not harm the ozone layer.
We recommend you to recover and recycle the refrigerant for reuse.
During a long period of disuse
The air conditioner should be operated for atleast five minutes each week, even in cold
weather. This is to prevent the compressor from seizing and to maintain the air condi-
tioner in the best operating condition.
Air purifier
E00708400718
An air filter has been incorporated into this air conditioner so that dirt and dust are
cleaned from the air.
Replace the air filter periodically as its ability
to clean the air will be reduced as it collects pollen and dirt. For the maintenance interval,
refer to the “SERVICE BOOKLET”.NOTEl Operation in certain conditions such as driv-
ing on a dusty road and frequent use of the air conditioner can lead to reduction of serv-
ice life of the filter. When you feel that the air flow is lower than normal or when the
windscreen or windows start to fog up easi- ly, replace the air filter.
We recommend you to have it checked.Remote Climate Control
E00735401045
You can run the air conditioner in advance ofusing the vehicle.
For details, refer to “Remote Climate Con- trol” on page 3-23.
Important operation tips for the air conditioner
8-13OGGE14E5For pleasant driving8
Page 347 of 442

If the vehicle breaks down.................................................................. 9-02Emergency starting............................................................................. 9-02
Engine overheating............................................................................. 9-04
Tools and jack..................................................................................... 9-06
Tyre repair kit......................................................................................9-07
How to change a tyre.......................................................................... 9-13
Towing................................................................................................ 9-18
Operation under adverse driving conditions....................................... 9-21For emergencies
OGGE14E59
Page 355 of 442

CAUTIONlIf there is any air left in the tyre when you
remove the valve insert, the valve insert may
fly out and injure you. Make sure the tyre
contains no air before removing the valve in- sert.
8. Shake the tyre sealant bottle well.
NOTEl In cold conditions (when the ambient tem-
perature is 0 °C or lower), thickening of the
tyre sealant can make the tyre sealant hard to squeeze out of the bottle. Warm the bottleinside the vehicle.
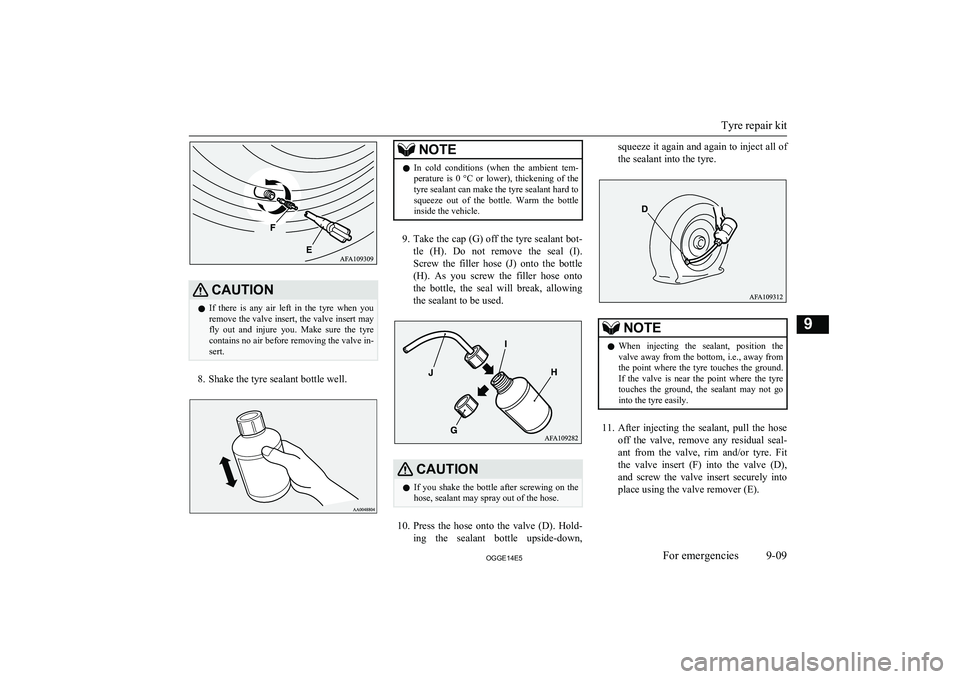
9. Take the cap (G) off the tyre sealant bot-
tle (H). Do not remove the seal (I).
Screw the filler hose (J) onto the bottle
(H). As you screw the filler hose onto
the bottle, the seal will break, allowing
the sealant to be used.
CAUTIONl If you shake the bottle after screwing on the
hose, sealant may spray out of the hose.
10. Press the hose onto the valve (D). Hold-
ing the sealant bottle upside-down,
squeeze it again and again to inject all of
the sealant into the tyre.NOTEl When injecting the sealant, position the
valve away from the bottom, i.e., away from
the point where the tyre touches the ground. If the valve is near the point where the tyre touches the ground, the sealant may not gointo the tyre easily.
11. After injecting the sealant, pull the hose
off the valve, remove any residual seal- ant from the valve, rim and/or tyre. Fit the valve insert (F) into the valve (D),
and screw the valve insert securely into
place using the valve remover (E).
Tyre repair kit
9-09OGGE14E5For emergencies9