2014 MITSUBISHI OUTLANDER PHEV wheel size
[x] Cancel search: wheel sizePage 348 of 442

If the vehicle breaks downE00800102381
If the vehicle breaks down on the road, move it to the shoulder and use the hazard warning
flashers and/or the warning triangle etc.
Refer to “Hazard warning flasher switch” on page 6-50.
When the vehicle is faulty and will not move,
get help from passengers or bystanders to
push the vehicle and move it to a safe place.
At this time, put the operation mode of the power switch in “ON” and put the select po-sition in “N” (NEUTRAL) position.WARNINGl If you are unable to safely assess the vehi-
cle due to vehicle damage, do not touch
the vehicle. Leave the vehicle and contact emergency services. Advise emergency
responders that this is a Plug-in Hybrid Electric vehicle.
If the ready indicator goes out
while driving
Vehicle operation and control are affected if
the ready indicator goes out while driving.
Before moving the vehicle to a safe area, be aware of the following:
l The brake booster may become inopera-
tive and the pedal effort will increase.
Press down the brake pedal harder than usual.
l The power steering system may not op-
erate, the steering wheel feels heavy when turning it.Emergency starting
E00800503920
If the Plug-in Hybrid EV system cannot be
started because the auxiliary battery is weak or dead, the battery from another vehicle can
be used with jumper cables to start the Plugin
Hybrid EV system.
WARNINGl To start the Plug-in Hybrid EV system us-
ing jumper cables from another vehicle
and perform the correct procedures ac-
cording to the instruction below. Incor- rect procedures could result in a fire, ex-
plosion, electric shock or damage to the
vehicles.
l Keep sparks, cigarettes and flames away
from the battery because the battery may
produce an explosion.CAUTIONl The Plug-in Hybrid EV system cannot be
started by pulling or pushing the vehicle.CAUTIONl Check the other vehicle. It must have a 12-
volt battery. If the other system isn’t 12-volt,shorting can damage both vehicles.
l Use the proper cables suitable for the battery
size to prevent overheating of the cables.
l Check the jumper cables for damage and
corrosion before use.
l Always wear protective eye goggles when
working near the battery.
l Keep the battery out of the reach of children.
l Do not attempt jump starting the auxiliary
battery while the drive battery is being charged. Doing so could damage the charg-
ing equipment or the vehicle.NOTEl If the auxiliary battery is disconnected, the
operation mode of the power switch is mem-
orized. When a booster battery is connected
by jumper cables, the operation mode re- turns to the state before the auxiliary battery
ran down.
Pay due attention if you do not know the op-
eration mode before the auxiliary battery
was fully discharged.
l If the auxiliary battery is fully discharged
with the select position in the “P” (PARK)
position, the select position cannot be changed to other position from the “P”
(PARK) position in some cases. In such a case, the front wheels have been locked.
Therefore, the vehicle cannot be moved.
If the vehicle breaks down
9-02OGGE14E5For emergencies9
Page 363 of 442
CAUTIONlDo not mix one type of tyre with another or
use a different size from the one listed. This
would cause early wear and poor handling.To store the tools and jack
E00803800037
Reverse the removing procedure when stor-
ing the jack, jack bar and wheel nut wrench.
Refer to “Tools and jack” on page 9-06.
Wheel covers*
E00801300735
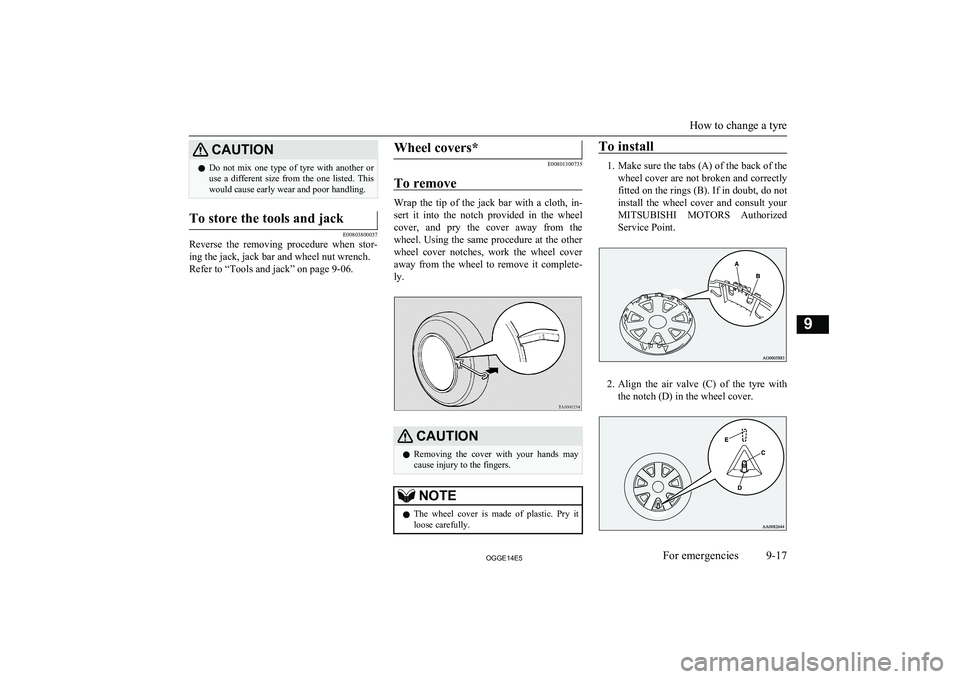
To remove
Wrap the tip of the jack bar with a cloth, in- sert it into the notch provided in the wheel
cover, and pry the cover away from the wheel. Using the same procedure at the other
wheel cover notches, work the wheel cover away from the wheel to remove it complete-
ly.
CAUTIONl Removing the cover with your hands may
cause injury to the fingers.NOTEl The wheel cover is made of plastic. Pry it
loose carefully.To install
1. Make sure the tabs (A) of the back of the
wheel cover are not broken and correctly fitted on the rings (B). If in doubt, do not install the wheel cover and consult your
MITSUBISHI MOTORS Authorized
Service Point.
2. Align the air valve (C) of the tyre with
the notch (D) in the wheel cover.
How to change a tyre
9-17OGGE14E5For emergencies9
Page 387 of 442

Wheel condition
E01001801970
1- Location of the tread wear indicator
2- Tread wear indicator
Check the tyres for cuts, cracks and other damage. Replace the tyres if there are deep
cuts or cracks. Also check each tyre for pieces of metal or pebbles.
The use of worn tyres can be very dangerous
because of the greater chance of skidding or
hydroplaning. The tread depth of the tyres
must exceed 1.6 mm in order for the tyres to meet the minimum requirement for use.
Tread wear indicators will appear on the sur-
face of the tyre as the tyre wears, thereby in-
dicating that the tyre no longer meets the
minimum requirement for use. When these wear indicators appear, the tyres must be re-
placed with new ones.
When replacement of any of the tyres is nec-
essary, replace all of them.CAUTIONl Always use tyres of the same size, same
type, and same brand, and which have no wear differences. Using tyres of differentsize, type, brands or degree of wear, will in-
crease the differential oil temperature, result-
ing in possible damage to the driving sys-
tem. Further, the drive train will be subjec- ted to excessive loading, possibly leading tooil leakage, component seizure, or other seri-
ous faults.Replacing tyres and wheels
E01007201569
CAUTIONl Avoid using different size tyres from the one
listed and the combined use of different
types of tyres, as this can affect driving safe- ty.
Refer to “Tyres and wheels” on page
12-08.
l Even if a wheel has the same rim size and
offset as the specified type of wheel, its
shape may prevent it from being fitted cor- rectly. We recommend you to consult a spe-
cialist before using wheels that you have.CAUTIONl As your vehicle is equipped with a tyre pres-
sure monitoring system, only MITSUBISHI
Motors genuine wheels should be used. Use
of another type of wheel risks air leaks and
sensor damage, as it will not be possible to install the tyre pressure sensor properly.
Refer to “Tyre pressure monitoring system
(TPMS)” on page 7-64.Tyre rotation
E01001902516
Tyre wear varies with vehicle conditions,
road surface conditions and individual driv- er’s driving habits. To equalize the wear andhelp extend tyre life, it is recommended to ro-
tate the tyres immediately after discovery of
abnormal wear, or whenever the wear differ- ence between the front and rear tyres is rec-
ognizable.
Tyres
11-11OGGE14E5Maintenance11
Page 388 of 442

When rotating tyres, check for uneven wear
and damage. Abnormal wear is usually caused by incorrect tyre pressure, improper wheel alignment, out of balance wheel, or se-
vere braking. We recommend you to have it checked to determine the cause of irregular
tread wear.CAUTIONl If the tyres have arrows (A) indicating the
correct direction of rotation, swap the front
and rear tyres on the left-hand side of the ve- hicle and the front and rear tyres on the right-hand side of the vehicle separately.
Keep each tyre on its original side of the ve- hicle. When fitting the tyres, make sure the
arrows point in the direction in which the wheels will turn when the vehicle moves
forward. Any tyre whose arrow points in the wrong direction will not perform to its fullpotential.Front
CAUTIONl Avoid the combined use of different types of
tyres.
Using different types of tyres can affect ve-
hicle performance and safety.Snow tyres
E01002001979
The use of snow tyres is recommended for
driving on snow and ice. To preserve driving stability, mount snow tyres of the same size and tread pattern on all 4 wheels.
A snow tyre that is worn down more than
50% is no longer appropriate to use.
Snow tyres which do not meet specifications must not be used.
CAUTIONl Observe permissible maximum speed for
your snow tyres and the legal speed limit.
l As your vehicle is equipped with a tyre pres-
sure monitoring system, only MITSUBISHI
Motors genuine wheels should be used. Use
of another type of wheel risks air leaks and
sensor damage, as it will not be possible to install the tyre pressure sensor properly.
Refer to “Tyre pressure monitoring system
(TPMS)” on page 7-64.NOTEl The laws and regulations concerning snow
tyres (driving speed, required use, type, etc.)
vary. Find out and follow the laws and regu- lations in the area you intend to drive.
l If flange nuts are used on your vehicle,
change to tapered nuts when steel wheels are used.
Tyres
11-12OGGE14E5Maintenance11Tyres that do not have arrows showing rotation direction Front
Tyres that have arrows showing rotation direc- tion Front
Page 389 of 442

Snow traction device (tyrechains)
E01002103020
If snow traction device (tyre chains) have to
be used, ensure that they are fitted only on
the drive wheels (front) in accordance with
the manufacturer’s instructions.
On 4WD vehicles in which the driving power is distributed preferentially to the front wheels, ensure that the snow traction device
(tyre chains) are fitted on the front.
Use only snow traction device (tyre chains) which are designed for use with the tyresmounted on the vehicle: use of the incorrect
size or type of snow traction device (tyre
chains) could result in damage to the vehicle body.
Contact a MITSUBISHI MOTORS Author-
ized Service Point before putting on snow traction device (tyre chains). The max. snowtraction device (tyre chains) height is as fol- lows.
Tyre sizeWheel sizeMax. snow
traction de- vice (tyrechains)
height [mm]215/70R16 100H16 x 6 1/2 J
16 x 6 1/2 JJ9 mmTyre sizeWheel sizeMax. snow
traction de- vice (tyrechains)
height [mm]225/55R18 98H18x7 J
When driving with a snow traction device
(tyre chains) on the tyres, do not drive faster than 50 km/h (30 mph). When you reach
roads that are not covered in snow, immedi- ately remove the snow traction device (tyre
chains).
CAUTIONl Choose a clear straight stretch of road where
you can pull off and still be seen while you
are fitting the snow traction device (tyre
chains).
l Do not fit snow traction device (tyre chains)
before you need them. This will wear out
your tyres and the road surface.
l After driving around for 100-300 meters,
stop and retighten the snow traction device (tyre chains).
l Drive carefully and do not exceed 50 km/h
(30 mph). Remember that preventing acci-
dents is not the purpose of snow traction de- vice (tyre chains).
l When snow traction device (tyre chains) are
installed, take care that they do not damage the disc wheel or body.CAUTIONl An aluminium wheel can be damaged by a
snow traction device (tyre chains) whiledriving. When fitting a snow traction device
(tyre chains) on an aluminium wheel, take care that any part of the snow traction device
(tyre chains) and fitting cannot be brought into contact with the wheel.
l Remove the wheel covers before installing a
snow traction device (tyre chains), otherwise
they may be damaged by the snow traction
device (tyre chains). (See page 9-17.)
l When installing or removing a snow traction
device (tyre chains), take care that hands and
other parts of your body and not injured by the sharp edges of the vehicle body.NOTEl The laws and regulations concerning the use
of snow traction device (tyre chains) vary.
Always follow local laws and regulations.
In most countries, it is prohibited by the law to use of snow traction device (tyre chains) on roads without snow.Wiper blade rubber
replacement E01002600532
Windscreen wiper blades
1. Lift the wiper arm off the windscreen.
Wiper blade rubber replacement
11-13OGGE14E5Maintenance11
Page 416 of 442

Electric motor specificationsE01100603963ItemFront MotorRear MotorElectric motor modelS61Y61Maximum output (ECE net)60 kWMaximum torque137 Nm195 NmMaximum 30 minutes power25 kW
Low voltage electrical systemE01100803750Voltage12 VAuxiliary batteryType (JIS)S46B24L(S)Capacity (5HR)36 AhSpark plug typeNGKDIFR5C11
Tyres and wheelsE01100904354Tyre215/70R16 100H225/55R18 98HWheelSize16x6 1/2J, 16x6 1/2JJ18x7JOffset38 mm
Electric motor specifications
12-08OGGE14E5Specifications12
Page 424 of 442

Child restraint................................................5-15
Force limiter.................................................. 5-15
Inspection...................................................... 5-25
Pregnant women restraint............................. 5-14
Pretensioner...................................................5-14
Seat belt reminder..............................................5-11
Seat belts........................................................... 5-09
Seat
Adjustment.................................................... 5-02
Front seats..................................................... 5-03
Head restraints.............................................. 5-05
Heated seats.................................................. 5-04
Making a flat seat.......................................... 5-08
Making a luggage area.................................. 5-07
Rear seat........................................................ 5-05
Security alarm system....................................... 4-27
Select Position indicator.................................... 7-14
Selector Lever (Joystick Type)......................... 7-12
Service precaution........................................... 11-02
Side turn-signal lamps Bulb capacity.............................................. 11-23
Snow traction device (Tyre chains).................11-13
Snow tyres....................................................... 11-12
Spark plug....................................................... 12-08
Specifications.................................................. 12-02
Speed Limiter.................................................... 7-38
Starting and stopping the Plug-in Hy- brid EV System................................................ 7-11
Steering Steering wheel height adjustment................. 7-05
Stop lamps
Bulb capacity.............................................. 11-23
Replacement................................................ 11-28
Stopping the Plug-in Hybrid EV System.......... 7-11Storage spaces................................................... 8-73
Sun visors.......................................................... 8-69
Sunroof.............................................................. 4-35
Supplemental restraint system...........................5-26 Servicing....................................................... 5-36
System check screen..........................................6-14
T
Tail lampsBulb capacity.............................................. 11-23
Replacement................................................ 11-28
Tailgate.............................................................. 4-18
Tank capacity.................................................... 2-13
Time Setting...................................................... 8-42
Tools.................................................................. 9-06 Storage.......................................................... 9-06
Towing.............................................................. 9-18
Trailer towing.................................................... 7-76
Transfer oil...................................................... 12-10
Turn-signal indication lamps.............................6-41
Turn/Lane-change signals................................. 6-50
Tyre repair kit.................................................... 9-07
Tyres................................................................ 11-10
How to change a tyre.................................... 9-13Inflation pressures....................................... 11-10
Rotation....................................................... 11-11
Size (tyre and wheel).................................. 12-08
Snow traction device (Tyre chains)............ 11-13
Snow tyres................................................... 11-12
Tread wear indicators.................................. 11-11
Tyre repair kit............................................... 9-07
U
USB input terminal............................................8-66
How to connect a USB memory device........ 8-66
How to connect an iPod................................ 8-67
Used engine oils safety instructions and disposal information..................................2-15
V
Vanity mirror lampBulb capacity.............................................. 11-24
Vehicle care precautions................................. 10-02
Vehicle dimensions......................................... 12-04
Vehicle identification number......................... 12-02
Vehicle identification number plate................ 12-03 Vehicle information code plate....................... 12-02
Vehicle labeling...............................................12-02
Vehicle performance....................................... 12-05
Vehicle weight.................................................12-05 Ventilators......................................................... 8-02
W
Warning lamps.................................................. 6-42
Washer Fluid.................................................. 11-08,12-10
Switch........................................... 6-53,6-57,6-58
Washing...........................................................10-03
Waxing............................................................ 10-04
Weight............................................................. 12-05
Wheel Covers........................................................... 9-17
Alphabetical index
13- 4 OGGE14E5Alphabetical index