2014 MITSUBISHI OUTLANDER lock
[x] Cancel search: lockPage 32 of 451
Front seats
Seat and restraint systems 4-5
4
N00401901326
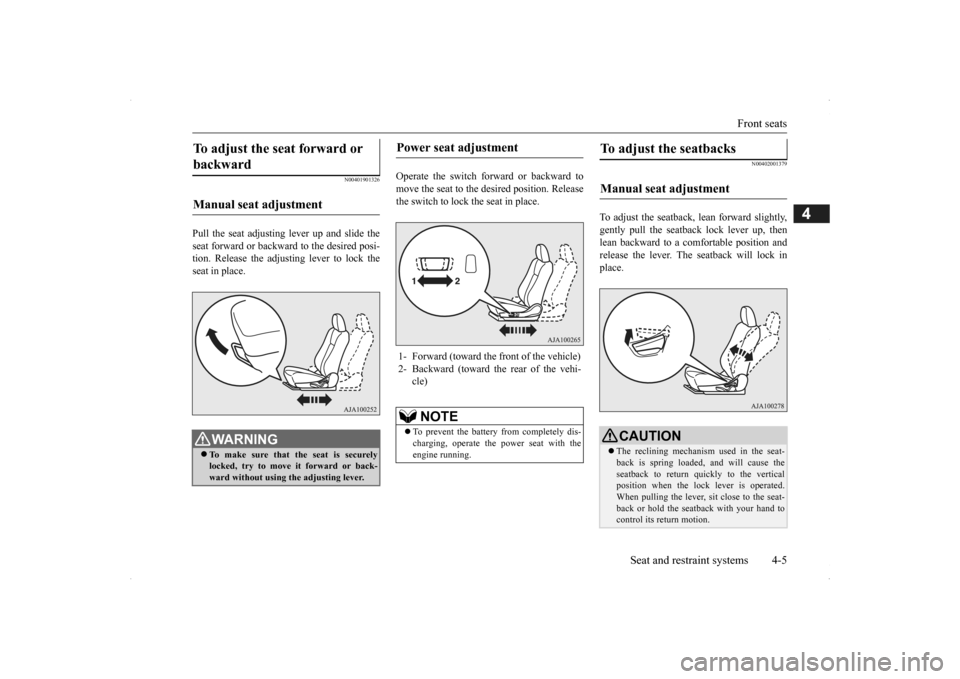
Pull the seat adjusting lever up and slide the seat forward or backwa
rd to the desired posi-
tion. Release the adjusting lever to lock the seat in place.
Operate the switch forward or backward to move the seat to the
desired position. Release
the switch to lock the seat in place.
N00402001379
To adjust the seatback,
lean forward slightly,
gently pull the seatback lock lever up, then lean backward to a comfortable position andrelease the lever. The seatback will lock in place.
To adjust the seat forward or backward Manual seat adjustment
WA R N I N G To make sure that the seat is securely locked, try to move
it forward or back-
ward without using
the adjusting lever.
Power seat adjustment 1- Forward (toward the front of the vehicle) 2- Backward (toward the rear of the vehi-
cle)NOTE
To prevent the battery
from completely dis-
charging, operate the power seat with the engine running.
To adjust the seatbacks Manual seat adjustment
CAUTION The reclining mechanism used in the seat- back is spring loaded, and will cause theseatback to return quickly to the vertical position when the lock lever is operated. When pulling the lever, sit close to the seat-back or hold the seatback with your hand to control its return motion.
BK0200500US.book 5 ページ 2013年2月12日 火曜日 午前9時46分
Page 35 of 451
Second row seats 4-8 Seat and restraint systems
4
N00402501231
When sitting in the mi
ddle seating position of
the second row seat, adjust the head restraints
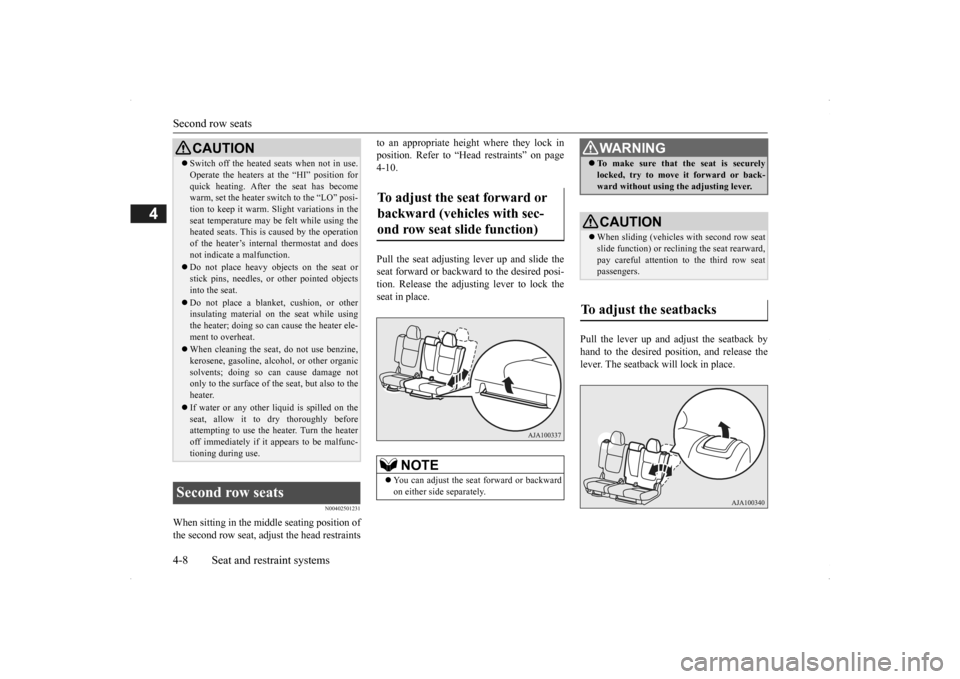
to an appropriate height where they lock in position. Refer to “Head restraints” on page4-10. Pull the seat adjusting lever up and slide the seat forward or backwa
rd to the desired posi-
tion. Release the adjusting lever to lock the seat in place.
Pull the lever up and adjust the seatback by hand to the desired position, and release thelever. The seatback will lock in place.
CAUTION Switch off the heated seats when not in use. Operate the heaters at the “HI” position forquick heating. After the seat has becomewarm, set the heater switch to the “LO” posi- tion to keep it warm. S
light variations in the
seat temperature may be
felt while using the
heated seats. This is
caused by the operation
of the heater’s internal thermostat and does not indicate a malfunction. Do not place heavy obj
ects on the seat or
stick pins, needles, or
other pointed objects
into the seat. Do not place a blanket,
cushion, or other
insulating material on the seat while using the heater; doing so can
cause the heater ele-
ment to overheat. When cleaning the seat, do not use benzine, kerosene, gasoline, alc
ohol, or other organic
solvents; doing so can cause damage not only to the surface of the seat, but also to the heater. If water or any other li
quid is spilled on the
seat, allow it to dry thoroughly beforeattempting to use the heater. Turn the heater off immediately if it
appears to be malfunc-
tioning during use.
Second row seats
To adjust the seat forward or backward (vehicles with sec- ond row seat slide function)
NOTE
You can adjust the seat forward or backward on either side separately.
WA R N I N G To make sure that the seat is securely locked, try to move it forward or back-ward without using
the adjusting lever.
CAUTIONWhen sliding (vehicles with second row seat slide function) or reclining the seat rearward, pay careful attention to the third row seat passengers.
To adjust the seatbacks
BK0200500US.book 8 ページ 2013年2月12日 火曜日 午前9時46分
Page 36 of 451
Second row seats
Seat and restraint systems 4-9
4
N00403001318
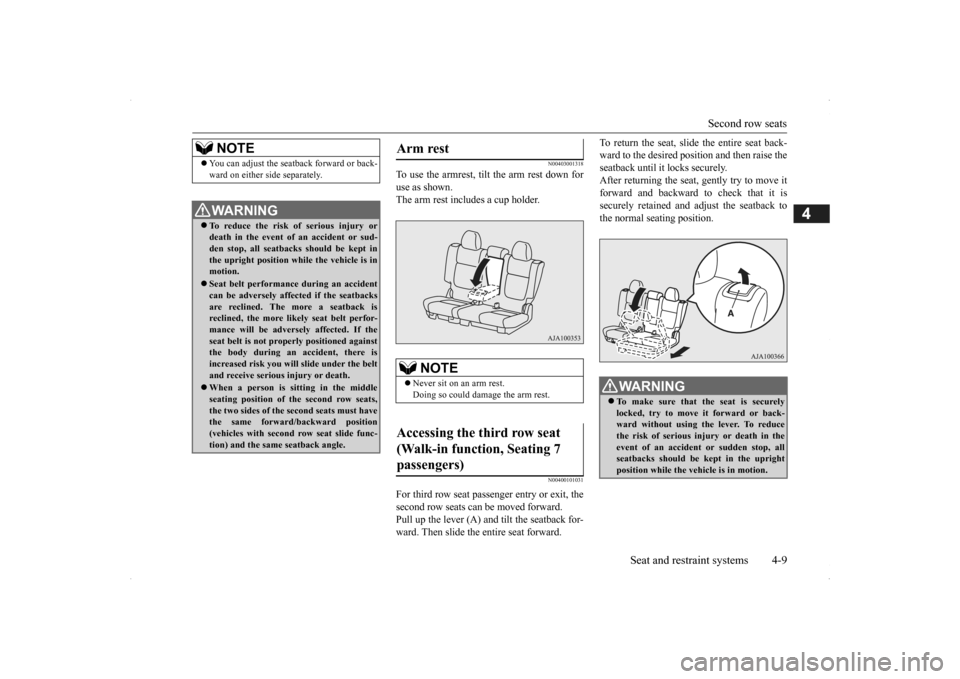
To use the armrest, tilt the arm rest down for use as shown. The arm rest includes a cup holder.
N00400101031
For third row seat passenger entry or exit, thesecond row seats can be moved forward.Pull up the lever (A) and tilt the seatback for- ward. Then slide the entire seat forward.
To return the seat, slide the entire seat back- ward to the desired position and then raise theseatback until it locks securely. After returning the seat, gently try to move it forward and backward to check that it issecurely retained and adjust the seatback to the normal seating position.
NOTE
You can adjust the seatback forward or back- ward on either side separately.WA R N I N G To reduce the risk of serious injury or death in the event of
an accident or sud-
den stop, all seatbacks should be kept in the upright position wh
ile the vehicle is in
motion. Seat belt performance during an accident can be adversely affect
ed if the seatbacks
are reclined. The more a seatback is reclined, the more likely seat belt perfor- mance will be advers
ely affected. If the
seat belt is not prop
erly positioned against
the body during an accident, there is increased risk you will slide under the beltand receive serious
injury or death.
When a person is sitting in the middle seating position of the second row seats, the two sides of the second seats must have the same forward/backward position(vehicles with second row seat slide func- tion) and the same seatback angle.
Arm rest
NOTE
Never sit on an arm rest. Doing so could damage the arm rest.
Accessing the third row seat (Walk-in function, Seating 7 passengers)
WA R N I N G To make sure that the seat is securely locked, try to move
it forward or back-
ward without using the lever. To reduce the risk of serious in
jury or death in the
event of an accident
or sudden stop, all
seatbacks should be kept in the upright position while the ve
hicle is in motion.
BK0200500US.book 9 ページ 2013年2月12日 火曜日 午前9時46分
Page 38 of 451
Head restraints
Seat and restraint systems 4-11
4
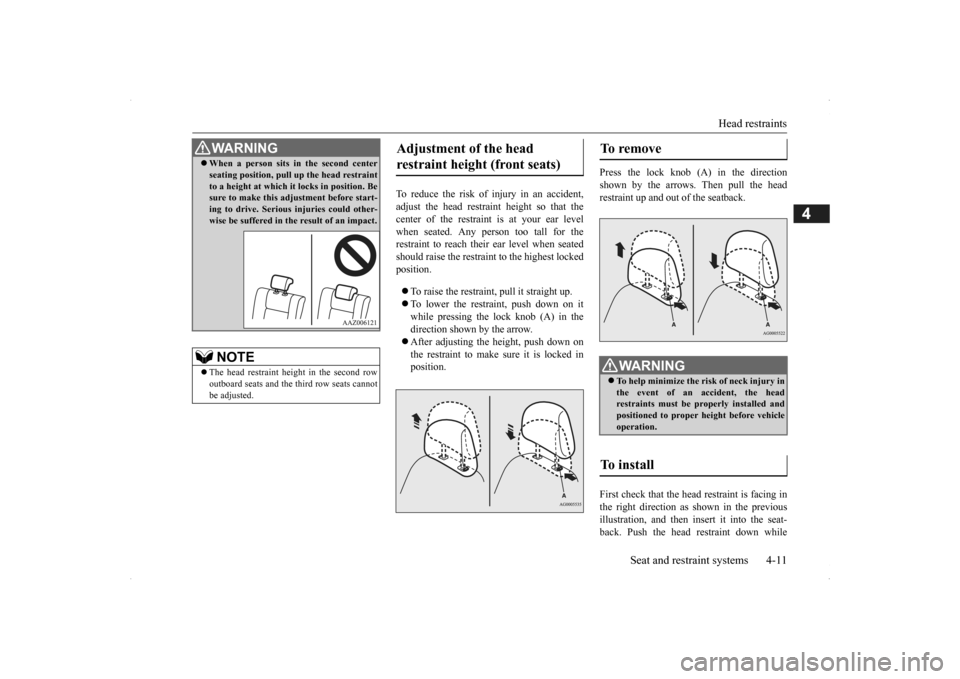
To reduce the risk of injury in an accident, adjust the head restraint height so that thecenter of the restraint is at your ear level when seated. Any person too tall for the restraint to reach their ear level when seatedshould raise the restraint to the highest locked position. To raise the restraint, pull it straight up. To lower the restraint, push down on it while pressing the lock knob (A) in the direction shown by the arrow. After adjusting the height, push down on the restraint to make sure it is locked in position.
Press the lock knob (A) in the direction shown by the arrows. Then pull the head restraint up and out of the seatback. First check that the head restraint is facing in the right direction as shown in the previousillustration, and then insert it into the seat- back. Push the head
restraint down while
When a person sits in the second center seating position, pull up
the head restraint
to a height at which it locks in position. Besure to make this adjustment before start- ing to drive. Serious injuries could other- wise be suffered in the result of an impact.NOTE
The head restraint height in the second row outboard seats and the third row seats cannot be adjusted.WA R N I N G
Adjustment of the head restraint height (front seats)
To remove
WA R N I N G To help minimize the risk of neck injury in the event of an accident, the headrestraints must be properly installed and positioned to proper height before vehicle operation.
To install
BK0200500US.book 11 ページ 2013年2月12日 火曜日 午前9時46分
Page 39 of 451
Making a cargo area 4-12 Seat and restraint systems
4
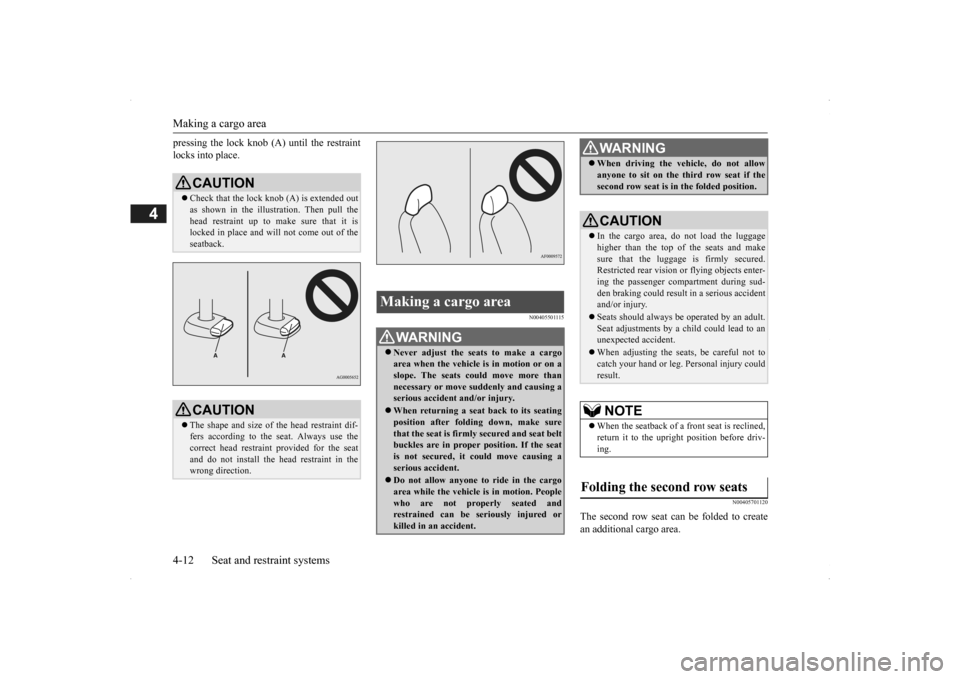
pressing the lock knob (A) until the restraint locks into place.
N00405501115
N00405701120
The second row seat can be folded to create an additional cargo area.
CAUTION Check that the lock knob (A) is extended out as shown in the illustration. Then pull the head restraint up to make sure that it is locked in place and will
not come out of the
seatback.CAUTION The shape and size of the head restraint dif- fers according to the seat. Always use the correct head restraint provided for the seatand do not install the he
ad restraint in the
wrong direction.
Making a cargo area
WA R N I N G Never adjust the seats to make a cargo area when the vehicle is in motion or on a slope. The seats co
uld move more than
necessary or move su
ddenly and causing a
serious accident
and/or injury.
When returning a seat back to its seating position after fold
ing down, make sure
that the seat is firmly secured and seat beltbuckles are in proper
position. If the seat
is not secured, it could move causing a serious accident. Do not allow anyone to ride in the cargo area while the vehicle
is in motion. People
who are not properly seated and restrained can be seriously injured or killed in an accident.
When driving the vehicle, do not allow anyone to sit on the third row seat if thesecond row seat is in the folded position.CAUTION In the cargo area, do not load the luggage higher than the top of the seats and makesure that the luggage is firmly secured. Restricted rear vision or
flying objects enter-
ing the passenger compartment during sud-den braking could result
in a serious accident
and/or injury. Seats should always be
operated by an adult.
Seat adjustments by a child could lead to an unexpected accident. When adjusting the seats, be careful not to catch your hand or leg.
Personal injury could
result.NOTE
When the seatback of a front seat is reclined, return it to the upright
position before driv-
ing.
Folding the second row seats
WA R N I N G
BK0200500US.book 12 ページ 2013年2月12日 火曜日 午前9時46分
Page 41 of 451
Making a cargo area 4-14 Seat and restraint systems
4
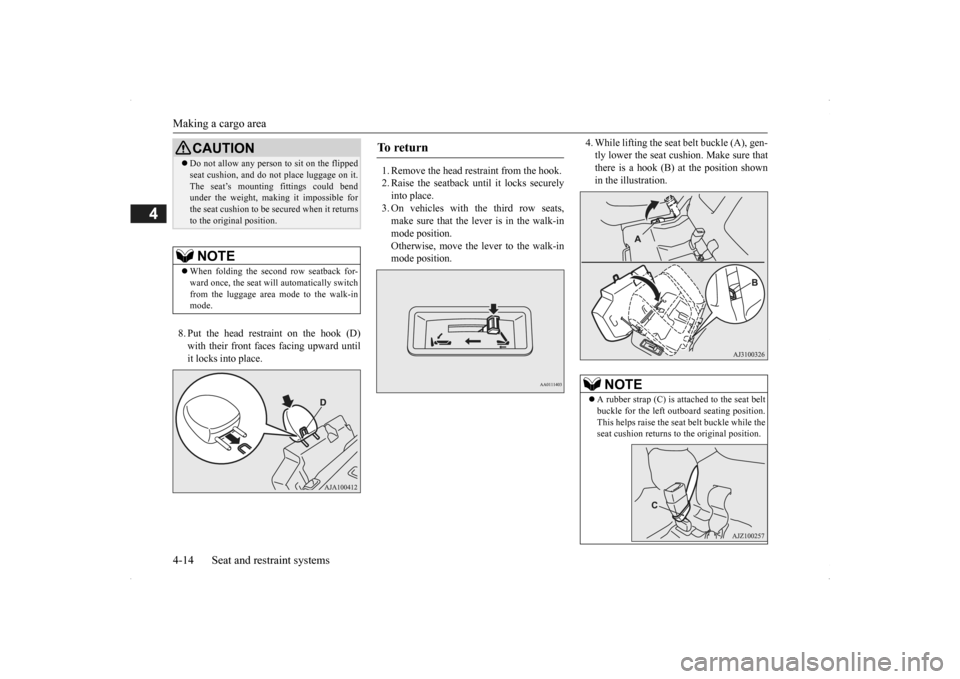
8. Put the head restraint on the hook (D) with their front fa
ces facing upward until
it locks into place.
1. Remove the head restraint from the hook. 2. Raise the seatback until it locks securely into place. 3. On vehicles with the third row seats,make sure that the lever is in the walk-in mode position. Otherwise, move the lever to the walk-inmode position.
4. While lifting the seat
belt buckle (A), gen-
tly lower the seat cushion. Make sure thatthere is a hook (B) at the position shown in the illustration.
CAUTION Do not allow any person to sit on the flipped seat cushion, and do
not place luggage on it.
The seat’s mounting
fittings could bend
under the weight, making it impossible for the seat cushion to be secured when it returns to the original position.NOTE
When folding the second row seatback for- ward once, the seat will automatically switch from the luggage area
mode to the walk-in
mode.
To r e t u r n
NOTE
A rubber strap (C) is atta
ched to the seat belt
buckle for the left out
board seating position.
This helps raise the seat
belt buckle while the
seat cushion returns to the original position.
BK0200500US.book 14 ページ 2013年2月12日 火曜日 午前9時46分
Page 42 of 451
Making a cargo area
Seat and restraint systems 4-15
4
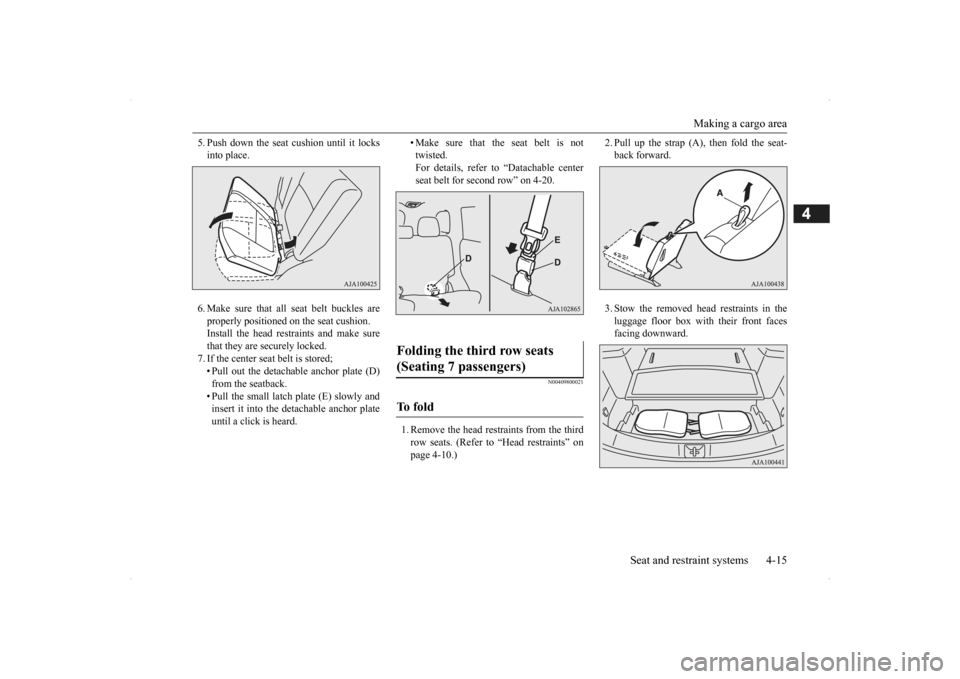
5. Push down the seat cushion until it locks into place. 6. Make sure that all
seat belt buckles are
properly positioned on the seat cushion. Install the head restraints and make surethat they are securely locked. 7. If the center seat
belt is stored;
• Pull out the detachable anchor plate (D)from the seatback. • Pull the small latch plate (E) slowly and insert it into the detachable anchor plateuntil a click is heard.
• Make sure that the seat belt is not twisted.For details, refer to “Datachable center seat belt for second row” on 4-20.
N00409800021
1. Remove the head restraints from the thirdrow seats. (Refer to
“Head restraints” on
page 4-10.)
2. Pull up the strap (A), then fold the seat- back forward. 3. Stow the removed head restraints in the luggage floor box with their front faces facing downward.
Folding the third row seats (Seating 7 passengers) To f o l d
BK0200500US.book 15 ページ 2013年2月12日 火曜日 午前9時46分
Page 43 of 451
Making a flat seat 4-16 Seat and restraint systems
4
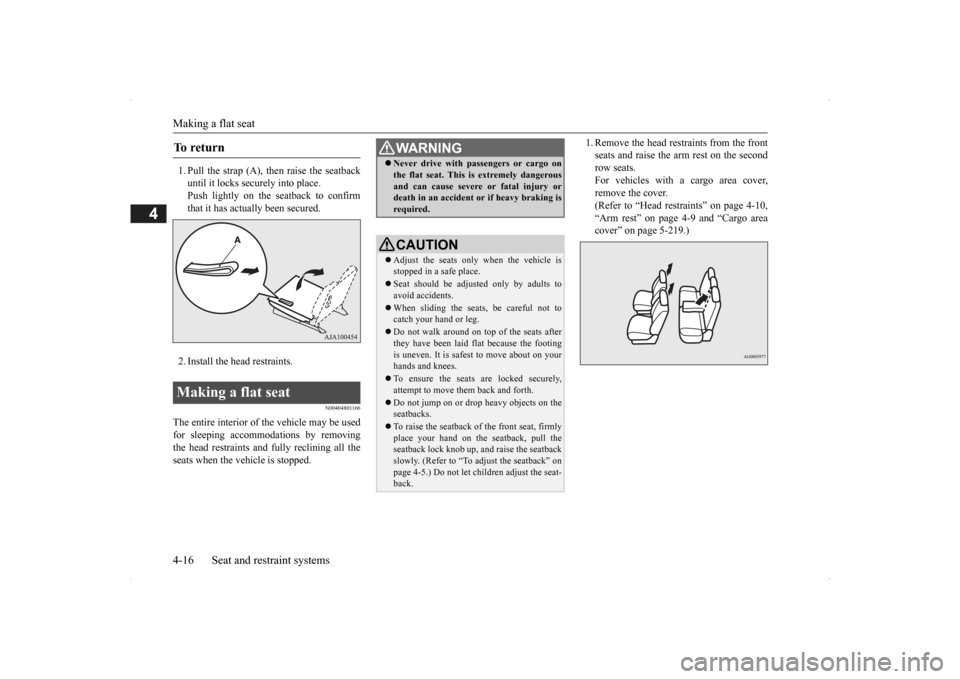
1. Pull the strap (A), then raise the seatback until it locks securely into place. Push lightly on the seatback to confirm that it has actually been secured. 2. Install the head restraints.
N00404801166
The entire interior of the vehicle may be used for sleeping accomm
odations by removing
the head restraints and fully reclining all the seats when the vehicle is stopped.
1. Remove the head re
straints from the front
seats and raise the arm rest on the secondrow seats. For vehicles with a cargo area cover, remove the cover.(Refer to “Head restraints” on page 4-10, “Arm rest” on page 4-9 and “Cargo area cover” on page 5-219.)
To r e t u r n Making a flat seat
WA R N I N G Never drive with passengers or cargo on the flat seat. This is extremely dangerousand can cause severe or fatal injury ordeath in an accident
or if heavy braking is
required.CAUTION Adjust the seats only
when the vehicle is
stopped in a safe place. Seat should be adjusted only by adults to avoid accidents. When sliding the seat
s, be careful not to
catch your hand or leg. Do not walk around on t
op of the seats after
they have been laid fl
at because the footing
is uneven. It is safe
st to move about on your
hands and knees. To ensure the seats are locked securely, attempt to move them back and forth. Do not jump on or drop heavy objects on the seatbacks. To raise the seatback of the front seat, firmly place your hand on the
seatback, pull the
seatback lock knob up,
and raise the seatback
slowly. (Refer to “To adjust the seatback” onpage 4-5.) Do not let children adjust the seat- back.
BK0200500US.book 16 ページ 2013年2月12日 火曜日 午前9時46分