Page 119 of 460

Features and controls
3-31
3
Keyless entry system
N00515500213
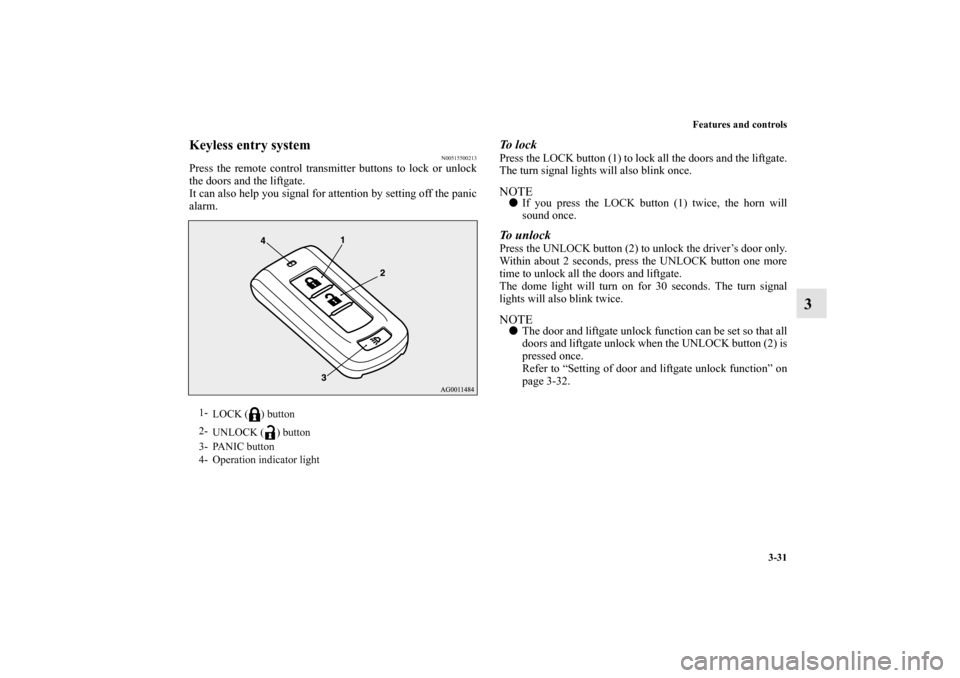
Press the remote control transmitter buttons to lock or unlock
the doors and the liftgate.
It can also help you signal for attention by setting off the panic
alarm.
To l o c kPress the LOCK button (1) to lock all the doors and the liftgate.
The turn signal lights will also blink once.NOTE�If you press the LOCK button (1) twice, the horn will
sound once.To unlockPress the UNLOCK button (2) to unlock the driver’s door only.
Within about 2 seconds, press the UNLOCK button one more
time to unlock all the doors and liftgate.
The dome light will turn on for 30 seconds. The turn signal
lights will also blink twice.NOTE�The door and liftgate unlock function can be set so that all
doors and liftgate unlock when the UNLOCK button (2) is
pressed once.
Refer to “Setting of door and liftgate unlock function” on
page 3-32.
1-
LOCK ( ) button
2-
UNLOCK ( ) button
3- PANIC button
4- Operation indicator light
BK0162600US.book 31 ページ 2013年3月22日 金曜日 午後2時41分
Page 120 of 460

3-32 Features and controls
3
Answerback functionThe horn of the keyless entry system answerback function can
be changed as required. This is done with the key removed
from the ignition switch.
Horn deactivation/reactivation
The answerback function can be set in the following three
ways.
1. Put the operation mode in OFF.
2. Open the driver’s door and turn the combination head-
lights and dimmer switch to the “OFF” position.
3. Press the LOCK button (1) for 4 to 10 seconds and press
the UNLOCK button (2) during this time.
4. Release in sequence the UNLOCK and LOCK buttons
within 10 seconds of pressing the UNLOCK button in step
3.Turn signal light deactivation/reactivation
The turn signal lights answerback function can be changes.
If you want to change the answerback function, please contact
an authorized Mitsubishi Motors dealer.
Buzzer deactivation/reactivation
The buzzer answerback function can be turned ON or OFF as
required.
Setting of door and liftgate unlock function
N00544600098
The door and liftgate unlock function can be set to the follow-
ing two conditions.
Each time the door and liftgate unlock function is set, a chime
will sound to tell you the condition of the door and liftgate
unlock function.
1. Put the operation mode in OFF.
2. Open the driver’s door and turn the combination head-
lights and dimmer switch to the “OFF” position.
3. Press the LOCK button (1) for 4 to 10 seconds and press
the UNLOCK button (2) during this time.
4. Release in sequence the LOCK and UNLOCK buttons
within 10 seconds of pressing the LOCK button in step 3.
One chime: The horn will not sound.
Two chimes: The horn will sound.
Four chimes: The horn will sound if the LOCK button is
pressed twice within 1 second.
Number of
chimes
Condition
One chime All doors and the liftgate unlock
Two chimes Driver’s door unlock only
BK0162600US.book 32 ページ 2013年3月22日 金曜日 午後2時41分
Page 121 of 460

Features and controls
3-33
3
Using the panic alarm
N00544700060
If you are near your vehicle and feel threatened, you can acti-
vate the alarm to call attention as follows:
1. Press the PANIC button (3) for more than 1 second.
2. The headlights will blink on and off and the horn will
sound intermittently for about 3 minutes.
3. To turn off the alarm, press any button on the remote con-
trol transmitter.NOTE�The indicator light (4) comes on each time a button is
pressed.
�The F.A.S.T.-key can be used from about 40 feet (12 m)
away. However, this distance may change if your vehicle
is near a TV transmitting tower, a power station, or a radio
station.
�If the following conditions are observed after pressing the
LOCK (1) or UNLOCK (2) button on the remote control
transmitter, the buttery in the F.A.S.T.-key may need to be
replaced.
• The doors and the liftgate cannot be locked or unlocked.
• The panic alarm cannot be operated.
• The indicator light (4) is dim or does not come on.
�If you lose your F.A.S.T.-key, please contact an authorized
Mitsubishi Motors dealer for a replacement.
�If you wish to obtain an additional F.A.S.T.-key, please
contact an authorized Mitsubishi Motors dealer. A maxi-
mum of four F.A.S.T.-key can be programmed for your
vehicle.�To use the new remote control transmitters, it is necessary
to register the key with the electronic immobilizer and
keyless entry system.
Refer to “Electronic immobilizer (Anti-theft starting sys-
tem): Customer F.A.S.T.-key programming” on page 3-
29.
General information
N00562000065
Your F.A.S.T.-key operates on a radio frequency subject to
Federal Communications Commission (FCC) Rules (For vehi-
cles sold in U.S.A.) and Industry Canada Rules (For vehicles
sold in Canada). This device complies with Part 15 of FCC
Rules and Industry Canada licence-exempt RSS standard(s).
Operation is subject to the following two conditions.
�This device may not cause harmful interference.
�This device must accept any interference received, includ-
ing interference that may cause undesired operation of this
device.Procedure for replacing the remote control trans-
mitter battery
N00562100066
1. Before replacing the battery, remove static electricity from
your body by touching a metal grounded object.
WA R N I N G
!�Changes or modifications not expressly approved by
the party responsible for compliance could void the
user’s authority to operate the equipment.
BK0162600US.book 33 ページ 2013年3月22日 金曜日 午後2時41分
Page 132 of 460
3-44 Features and controls
3
Main switch
N00548700130
The main switch located on the driver’s door can be used to
operate all the windows.
A window can be opened or closed by operating the corre-
sponding switch.
Press the switch down to open the window, and pull up the
switch to close it.
If the driver’s door window switch is fully pressed down/pulled
up, the driver’s door window automatically opens/closes com-
pletely. (Type 1)
If the driver’s door window switch is fully pressed down, the
driver’s door window automatically opens completely. (Type
2)
If you want to stop the window movement, operate the switch
lightly in the reverse direction.
WA R N I N G
!�Before operating the power windows, make sure
that nothing can be trapped (head, hands, fingers,
etc.) in the window.�Never leave the vehicle without carrying the key.�Never leave children or unreliable adults unat-
tended inside the vehicle.
Ty p e 1
BK0162600US.book 44 ページ 2013年3月22日 金曜日 午後2時41分
Page 136 of 460

3-48 Features and controls
3Parking brake
N00511400399
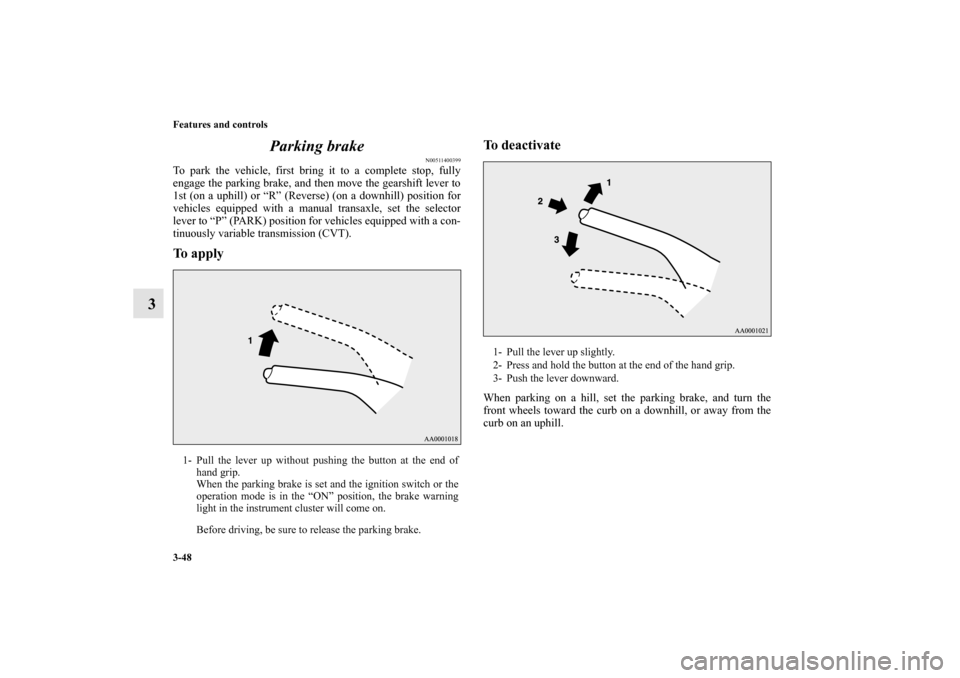
To park the vehicle, first bring it to a complete stop, fully
engage the parking brake, and then move the gearshift lever to
1st (on a uphill) or “R” (Reverse) (on a downhill) position for
vehicles equipped with a manual transaxle, set the selector
lever to “P” (PARK) position for vehicles equipped with a con-
tinuously variable transmission (CVT).To applyTo deactivate
When parking on a hill, set the parking brake, and turn the
front wheels toward the curb on a downhill, or away from the
curb on an uphill.
1- Pull the lever up without pushing the button at the end of
hand grip.
When the parking brake is set and the ignition switch or the
operation mode is in the “ON” position, the brake warning
light in the instrument cluster will come on.
Before driving, be sure to release the parking brake.
1- Pull the lever up slightly.
2- Press and hold the button at the end of the hand grip.
3- Push the lever downward.
BK0162600US.book 48 ページ 2013年3月22日 金曜日 午後2時41分
Page 137 of 460
Features and controls
3-49
3 Steering wheel height adjustment
N00511500231
To adjust the steering wheel to the desired position, move the
lever upward or downward while moving the steering wheel to
the desired level.
CAUTION
!�Before driving, be sure that the parking brake is
fully released and brake warning light is off.
If you drive without the parking brake fully
released, the warning lamp will illuminate and a
buzzer sounds when the vehicle speed exceeds 5 mph
(8 km/h).
If a vehicle is driven without releasing the parking
brake, the brakes will be overheated, resulting in
ineffective braking and possible brake failure.
A- Wheel lock
B- Release
BK0162600US.book 49 ページ 2013年3月22日 金曜日 午後2時41分
Page 139 of 460
Features and controls
3-51
3
To adjust the mirror positionIt is possible to move the mirror up/down and left/right to
adjust its position.
To reduce the glareThe day/night knob (A) at the bottom of the mirror can be used
to adjust the mirror to reduce the glare from the headlights of
vehicles behind you during night driving.1- Daytime position
2- Night position
BK0162600US.book 51 ページ 2013年3月22日 金曜日 午後2時41分
Page 141 of 460
Features and controls
3-53
3
To fold the mirror
N00549200099
The outside mirror can be manually folded in towards the side
window to prevent damage when parking in tight locations.
Door mirror heater
(if so equipped)
N00549300218
When the rear window defogger switch is pressed with the
engine running, the outside rearview mirrors are defogged or
defrosted. Current will flow through the heater element inside
the mirrors, thus clearing away frost or condensation.
The indicator light (A) will illuminate while the defogger is on.
The heater will be turned off automatically in about 20 min-
utes.Ty p e 1
BK0162600US.book 53 ページ 2013年3月22日 金曜日 午後2時41分