Page 9 of 460

Quick index
1
If this warning light comes on or flashes while you’re driving...
N00200701136
NOTE�These warning lights will come on for a few seconds for a bulb check when the ignition switch is first turned to “ON” or the
operation mode is put in ON.
Warning lights
Do this
Ref. Page
Charging system warning light�Park your vehicle in a safe place and stop the engine.
Contact your Mitsubishi Motors dealer or a repair facility of your choice for
assistance.P. 3 - 1 1 3
(Illuminates and intermittent sounds)�Park your vehicle in a safe place and stop the engine.
Contact your Mitsubishi Motors dealer or a repair facility of your choice for
assistance.P. 3 - 2 1
Oil pressure warning light�Park your vehicle in a safe place and stop the engine, then check the engine
oil level.
If the light comes on while the engine oil level is normal, have the system
checked at an authorized Mitsubishi Motors dealer or a repair facility of your
choice as soon as possible.P. 3 - 1 1 3
BK0162600US.book 1 ページ 2013年3月22日 金曜日 午後2時41分
Page 198 of 460

3-110 Features and controls
3Indicators
N00519900127
Turn signal indicators/Hazard warning lights
N00520000216
The arrows will flash in time with the corresponding exterior
turn signals when the turn signal lever is used.
Both arrows will flash when the hazard warning flasher switch
is pressed.NOTE�If the indicator flashes faster than usual or if the indicator
stays on without flashing, check for a malfunctioning turn
signal light bulb or turn signal connection.High beam indicator
N00520100086
A blue light comes on when the headlights are on high beam.Front fog light indicator
(if so equipped)
N00520200175
This indicator comes on while the front fog lights are on.Low coolant temperature indicator - green
N00575600010
This indicator comes on in green while the coolant temperature
is low.NOTE�When the indicator goes out, this should be used as a
rough indication of when the heating starts working.
ECO indicator
N00568800036
This indicator comes on while fuel-efficient driving is
achieved.
BK0162600US.book 110 ページ 2013年3月22日 金曜日 午後2時41分
Page 207 of 460

Features and controls
3-119
3
NOTE�A light in the instrument panel flashes to show when the
turn signal lights are working properly.
If this light flashes faster than usual, check for a burned
out turn signal light bulb or malfunctioning connection in
the signal.
If the panel light does not come on when the lever is
moved, check for a blown fuse or a burned out bulb in the
panel.
Have the system inspected by your authorized Mitsubishi
Motors dealer or a repair facility of your choice.
�It is possible to modify functions as follows:
• Deactivate the turn signal light 3-flash function for lane
changes.
• Adjust the time required to operate the lever for the 3-
flash function.
• Changing of the tone of a sounding buzzer as the turn
signal lights flash.
See your authorized Mitsubishi Motors dealer for details.
Hazard warning flasher switch
N00522700318
If you press the flasher switch, the turn signals will flash inter-
mittently, and so will the hazard warning lights. This is an
emergency warning system and should not be used when the
vehicle is in motion, except for emergencies.
If you need to leave your vehicle, the flashers will keep work-
ing after the ignition switch is removed or the operation mode
is put in OFF.NOTE�If the flashers are used for several hours, the battery will
run down. This could make it difficult or impossible to
restart your vehicle.
BK0162600US.book 119 ページ 2013年3月22日 金曜日 午後2時41分
Page 375 of 460

7
Vehicle care and maintenance
Service precautions . . . . . . . . . . . . . . . . . . . . . . . .7- 2
Catalytic converter . . . . . . . . . . . . . . . . . . . . . . . . .7- 4
Engine hood . . . . . . . . . . . . . . . . . . . . . . . . . . . . . .7- 5
View of the engine compartment . . . . . . . . . . . . . .7- 7
Engine oil and oil filter . . . . . . . . . . . . . . . . . . . . .7- 8
Engine coolant . . . . . . . . . . . . . . . . . . . . . . . . . . . .7- 11
Air cleaner filter . . . . . . . . . . . . . . . . . . . . . . . . . . .7- 13
Manual transaxle oil (if so equipped) . . . . . . . . . .7- 14
Continuously variable transmission (CVT)
fluid (if so equipped) . . . . . . . . . . . . . . . . . . . . .7- 15
Washer fluid . . . . . . . . . . . . . . . . . . . . . . . . . . . . . .7- 15
Brake fluid . . . . . . . . . . . . . . . . . . . . . . . . . . . . . . .7- 16
Battery . . . . . . . . . . . . . . . . . . . . . . . . . . . . . . . . . .7- 17
Tires . . . . . . . . . . . . . . . . . . . . . . . . . . . . . . . . . . . .7- 19
Clutch pedal free play (if so equipped) . . . . . . . . .7- 28
Brake pedal free play . . . . . . . . . . . . . . . . . . . . . . .7- 29
Parking brake . . . . . . . . . . . . . . . . . . . . . . . . . . . . .7- 29
Wiper blades . . . . . . . . . . . . . . . . . . . . . . . . . . . . .7- 30
Emission-control system maintenance. . . . . . . . . .7- 31
General maintenance . . . . . . . . . . . . . . . . . . . . . . .7- 33
For cold and snowy weather . . . . . . . . . . . . . . . . .7- 35Fusible links . . . . . . . . . . . . . . . . . . . . . . . . . . . . . 7- 35
Fuses . . . . . . . . . . . . . . . . . . . . . . . . . . . . . . . . . . . 7- 36
Replacement of light bulbs . . . . . . . . . . . . . . . . . . 7- 43
Vehicle care precautions . . . . . . . . . . . . . . . . . . . . 7- 55
Cleaning the inside of your vehicle . . . . . . . . . . . . 7- 56
Cleaning the outside of your vehicle . . . . . . . . . . . 7- 58
BK0162600US.book 1 ページ 2013年3月22日 金曜日 午後2時41分
Page 417 of 460

Vehicle care and maintenance
7-43
7 Replacement of light bulbs
N00942900349
Before replacing the bulb, be sure the light is off. Do not touch
the glass part of the new bulb with your bare fingers; the oil
from your skin will stay on the glass and dim or destroy the
bulb when it gets hot.
NOTE�If you are unsure of how to carry out the work as required,
it is recommended that these procedures be carried out by
an authorized Mitsubishi Motors dealer or a repair facility
of your choice.
�Be careful not to scratch the vehicle body when removing
a light and lens.
�When it rains, or when the vehicle has been washed, the
inside of the lens sometimes becomes temporarily foggy.
This is the same phenomenon as when window glass mists
up on a humid day, and does not indicate a functional
problem.
When the light is switched on, the heat will remove the
fog. However, if water gathers inside the light, please
have it checked by an authorized Mitsubishi Motors
dealer or a repair facility of your choice.
CAUTION
!�Bulbs are extremely hot immediately after being
turned off.
When replacing the bulb, wait for it to cool suffi-
ciently before touching it. You could otherwise be
burned.�Handle halogen light bulb with care. The gas inside
halogen light bulb is highly pressurized, so drop-
ping, knocking, or scratching a halogen light bulb
can cause it to shatter.�Never hold the halogen light bulb with a bare hand,
dirty glove, etc.
The oil from your hand could cause the bulb to
break the next time the headlights are used.
If the glass surface is dirty, clean it with alcohol and
let it dry completely before installing the bulb.
BK0162600US.book 43 ページ 2013年3月22日 金曜日 午後2時41分
Page 418 of 460
7-44 Vehicle care and maintenance
7
Bulb capacity
N00943000132
The bulb should only be replaced with a new bulb with the
same rating and type. The type and rating are listed on the base
of the bulb.Outside
N00950300876
NOTE�It is not possible to repair or replace only the bulb for the
side turn signal light.
Check with an authorized Mitsubishi Motors dealer or a
repair facility of your choice when the light needs to be
repaired or replaced.
Front
Description
Wattage
ANSI Trade
No. or Bulb
type
1 Front turn signal light 27 W #1156NA
2 Headlight/Daytime running light
(if so equipped)60/55 W HB2
3 Parking light 5 W W5W
4 Front fog light (if so equipped) 55 W H11
5 Front side-marker light 5 W W5W
6 Side turn signal light 5 W —
BK0162600US.book 44 ページ 2013年3月22日 金曜日 午後2時41分
Page 419 of 460
Vehicle care and maintenance
7-45
7
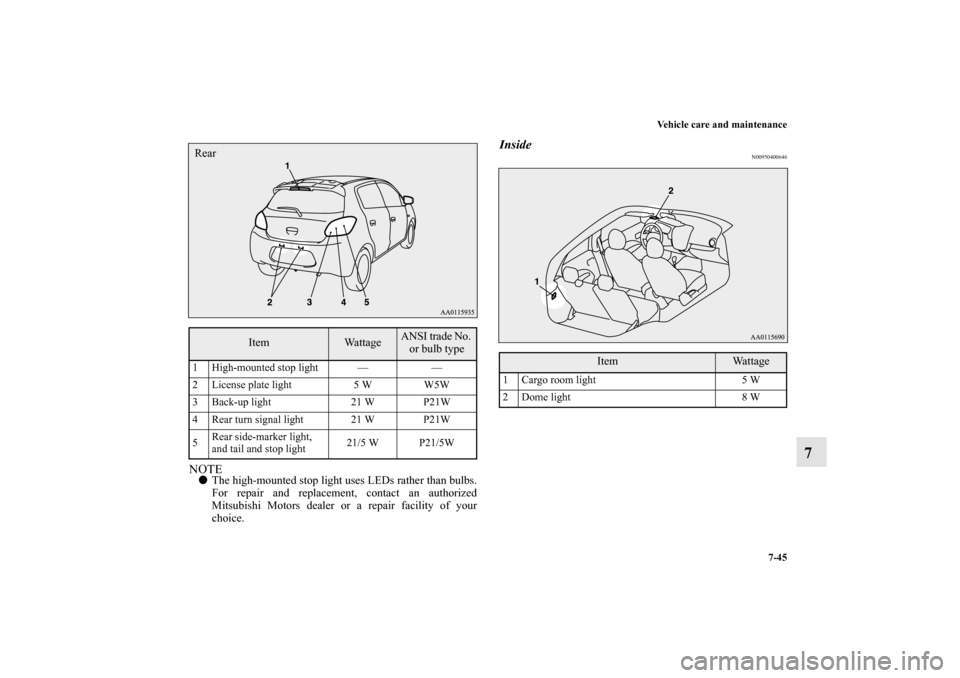
NOTE�The high-mounted stop light uses LEDs rather than bulbs.
For repair and replacement, contact an authorized
Mitsubishi Motors dealer or a repair facility of your
choice.
Inside
N00950400646
Item
Wattage
ANSI trade No.
or bulb type
1 High-mounted stop light — —
2 License plate light 5 W W5W
3 Back-up light 21 W P21W
4 Rear turn signal light 21 W P21W
5Rear side-marker light,
and tail and stop light21/5 W P21/5WRear
Item
Wa t t a g e
1 Cargo room light 5 W
2 Dome light 8 W
BK0162600US.book 45 ページ 2013年3月22日 金曜日 午後2時41分
Page 420 of 460
7-46 Vehicle care and maintenance
7
Headlights/Daytime running lights
(if so equipped)
N00901800121
1. Pull out the connector (A), and then remove the sealing
cover (B).2. Unhook the spring (C), which secures the bulb, and then
remove the bulb (D).
3. To install the bulb, perform the removal steps in reverse.
Headlight aim adjustment
N00943200352
The alignment of the headlights should be checked by an
authorized Mitsubishi Motors dealer or a repair facility of your
choice.
*- Front of the vehicle
BK0162600US.book 46 ページ 2013年3月22日 金曜日 午後2時41分


N00901800121
1. Pull out the connector (A), and then remove the sealing
cover (B).2. Unhook the spring (C), whic")