Page 285 of 460

Comfort controls
5-13
5
Air selection lever
N00736800413
Normally, use the outside air position to keep the windshield
and side windows clear and to quickly remove fog or frost
from the windshield.
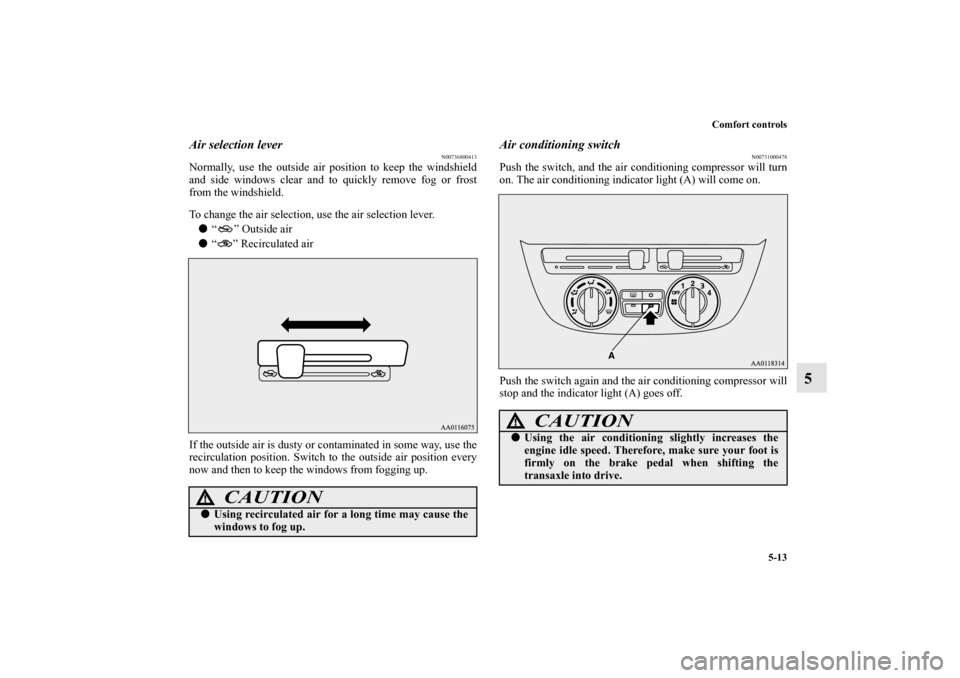
To change the air selection, use the air selection lever.
�“ ” Outside air
�“ ” Recirculated air
If the outside air is dusty or contaminated in some way, use the
recirculation position. Switch to the outside air position every
now and then to keep the windows from fogging up.
Air conditioning switch
N00731000478
Push the switch, and the air conditioning compressor will turn
on. The air conditioning indicator light (A) will come on.
Push the switch again and the air conditioning compressor will
stop and the indicator light (A) goes off.
CAUTION
!�Using recirculated air for a long time may cause the
windows to fog up.
CAUTION
!�Using the air conditioning slightly increases the
engine idle speed. Therefore, make sure your foot is
firmly on the brake pedal when shifting the
transaxle into drive.
BK0162600US.book 13 ページ 2013年3月22日 金曜日 午後2時41分
Page 289 of 460
Comfort controls
5-17
5 Automatic air conditioning
(if so equipped)
N00731500301
The air conditioning can only be used while the engine is running. Control panel
N00711800542
Type 2 Type 1
1- Temperature control switch
2- Air conditioning switch
3- MODE switch
4- Air selection switch
5- Blower speed selection switch
6- Defogger switch
7- AUTO switch
8- Electric rear window defogger switch → P.3-125
9- OFF switch
10- Temperature display
11- Mode selection display12- Air selection indicator
13- Air conditioning indicator
14- AUTO indicator
15- Blower speed display
BK0162600US.book 17 ページ 2013年3月22日 金曜日 午後2時41分
Page 291 of 460

Comfort controls
5-19
5
Temperature control switch
N00737000324
Press or of the temperature control switch to the
desired temperature.
The selected temperature will be shown in the display (A).
NOTE�While the engine coolant temperature is low, the tempera-
ture of the air from the heater will be cool/cold until the
engine warms up, even if you have selected warm air with
the switch.
To prevent the windshield and windows from fogging up,
the vent mode will be changed to “ ” and the blower
speed will be reduced.
�When the temperature is set to the highest or the lowest
setting under the AUTO operation, the air selection and
the air conditioning will be automatically changed as fol-
lows.
• Quick Heating (When the temperature is set to the high-
est setting)
Outside air will be introduced and the air conditioning
will stop.
If the air selection and the air conditioning are operated
manually after an automatic changeover, manual opera-
tion will be selected.
• Quick Cooling (When the temperature is set to the low-
est setting)
Inside air will be recirculated and the air conditioning
will operate.
The above indicates the factory settings. You can personalize
the air selection switch and air conditioning switch to match
your personal preferences.
Contact your Mitsubishi Motors dealer or a repair facility of
your choice for assistance.
Refer to “Personalizing the air conditioning switch (Changing
the function setting)” on page5-24.
BK0162600US.book 19 ページ 2013年3月22日 金曜日 午後2時41分
Page 295 of 460
Comfort controls
5-23
5
NOTE�The factory setting is “Enable automatic air control”.
�When the defogger switch is pressed, the air selection will
automatically change to the outside air position, even if
the system is set to “Disable automatic air control”, in
order to prevent windows from fogging up.
Air conditioning switch
N00737300343
Push the switch, and the air conditioning compressor will turn
on. The “ ” indicator will be shown in the display (A).
Push the switch again and the air conditioning compressor will
stop and the indicator goes off.
CAUTION
!�Using the air conditioning slightly increases the
engine idle speed. Therefore, make sure your foot is
firmly on the brake pedal when shifting the
transaxle into drive.
BK0162600US.book 23 ページ 2013年3月22日 金曜日 午後2時41分
Page 302 of 460

5-30 Comfort controls
5AM/FM electronically tuned radio with CD
player
(if so equipped)
N00734301075
The audio system can only be used when the ignition switch or
the operation mode is in ON or ACC.NOTE�To listen to the audio system while the engine is not run-
ning, turn the ignition switch to the “ACC” position or put
the operation mode in ACC.
�If a cellular phone is used inside the vehicle, it may create
noise in the audio equipment. This does not mean that
anything is wrong with your audio equipment. In such a
case, use the cellular phone at a place as far away as possi-
ble from the audio equipment.
�If foreign objects or water get into the audio equipment, or
if smoke or a strange odor comes from it, immediately
turn off the audio system and have it checked at an autho-
rized Mitsubishi Motors dealer or a repair facility of your
choice. Never try to repair it yourself. Avoid using the
audio system until it is inspected by a qualified person.
�If the audio system is damaged by foreign objects, water,
or fire, have the system checked by a qualified Mitsubishi
Motors technician.
Volume and tone control panel
N00711900729
To adjust the volume
N00712000411
Turn the VOL knob clockwise to increase the volume; counter-
clockwise to decrease the volume.
The status will be displayed in the display.1- PWR (On-Off) switch
2- VOL (Volume control) knob
3- Display
4-
/MENU (Mode change) button
5- Sound control button
BK0162600US.book 30 ページ 2013年3月22日 金曜日 午後2時41分
Page 341 of 460
6
For emergencies
If the vehicle breaks down . . . . . . . . . . . . . . . . . . .6- 2
Jump-starting the engine . . . . . . . . . . . . . . . . . . . .6- 2
Engine overheating . . . . . . . . . . . . . . . . . . . . . . . .6- 5
Jack and tools . . . . . . . . . . . . . . . . . . . . . . . . . . . . .6- 7
Tire repair kit (if so equipped) . . . . . . . . . . . . . . . .6- 9
How to change a tire
(Vehicles equipped with spare tire) . . . . . . . . . .6- 18
Towing . . . . . . . . . . . . . . . . . . . . . . . . . . . . . . . . . .6- 29
Operation under adverse driving conditions . . . . .6- 32
BK0162600US.book 1 ページ 2013年3月22日 金曜日 午後2時41分
Page 342 of 460

6-2 For emergencies
6If the vehicle breaks down
N00836300233
If your vehicle breaks down on the road, move to the shoulder
and turn on the hazard warning flashers. If there is no shoulder,
or the shoulder is not safe, drive in the right lane slowly with
the hazard lights flashing until you come to a safe stopping
place. Keep the flashers flashing.If the engine stops/failsIf the engine stops, there will be no power assist to the steering
and brakes, making these difficult to use.
�The brake booster will not work, so the brakes will not
grip well. The brake pedal will be harder to press than
usual.
�Since there is no power steering assist, the steering wheel
will be hard to turn.When the engine fails at the intersectionGet help from your passengers, bystanders, etc. to push the
vehicle and move it to a safe area.
Jump-starting the engine
N00836400768
If the engine cannot be started because the battery is weak or
dead, you can start it with the battery from another vehicle
using jumper cables.NOTE�Do not use jumper cables if they have damage or corro-
sion.
1. Take off any metal jewelry such as watch bands or brace-
lets that might create an accidental electrical contact.
2. Position the vehicles close enough together so that the
jumper cables can reach, but be sure the vehicles aren’t
touching each other.
WA R N I N G
!�To reduce the risk of igniting flammable gas that
may be emitted from the battery, carefully read this
section before jump-starting the vehicle.�Do not try to start your vehicle by pushing or tow-
ing. This can cause an accident resulting in serious
injury or death and can damage the vehicle.
CAUTION
!�Check the other vehicle. It must have a 12-volt bat-
tery. If the other system isn’t 12-volt, both systems
can be damaged.
BK0162600US.book 2 ページ 2013年3月22日 金曜日 午後2時41分
Page 344 of 460

6-4 For emergencies
6
NOTE�Open the terminal cover before connecting the jumper
cable to the positive terminal of the battery.
(Refer to “Battery” on page 7-17.)
�Use the proper cables suitable for the battery size.
Otherwise heat damage to the cables could result.
7. Connect one end of the other jumper cable to the nega-
tive (-) terminal of the booster battery (B), and then con-
nect the other end to the designated ground location of
the vehicle with the discharged battery (A) at the point
farthest from the battery.
8. Start the engine in the vehicle providing the boost. Let the
engine idle a few minutes, then start the engine in the
vehicle with the discharged battery.
9. After the engine is started, disconnect the cables in the
reverse order from the way you connected them.
Charging the battery by using an external bat-
tery charger
WA R N I N G
!�Be sure to follow the proper order when connecting
the batteries, of: →→→�Make sure that the connection is made to the cor-
rect designated location (as shown in the illustra-
tion) properly. If the connection is directly made to
the negative (-) terminal of the battery, the flamma-
ble gases from inside the battery might catch fire
and explode, causing personal injury.�When connecting the jumper cable, do not connect
the positive (+) cable to the negative (-) terminal.
Sparks can make the battery explode.
WA R N I N G
!�Always remove the battery from your vehicle when
the battery is charged by an external battery
charger.�Keep sparks, cigarettes, and flames away from the
battery because the battery could explode.�Keep your work area well vented when charging or
using the battery in an enclosed space.�Remove all the caps before charging the battery.�Electrolyte (battery acid) is made of corrosive
diluted sulfuric acid. If electrolyte comes in contact
with your hands, eyes, clothes, or the painted sur-
face of your vehicle, thoroughly flush with water. If
electrolyte gets in your eyes, flush them immediately
and thoroughly with water, and get prompt medical
attention.�Always wear protective clothing and goggles when
working near the battery.�Keep the battery out of the reach of children.
BK0162600US.book 4 ページ 2013年3月22日 金曜日 午後2時41分