2014 MITSUBISHI LANCER SPORTBACK wheel
[x] Cancel search: wheelPage 217 of 422
Headlight leveling switch (if so equipped) 5-150 Features and controls
5
4. The headlights will come on in the low beam setting for about 30 seconds. After the headlights go off, the headlights can be turned on again in the low beam settingfor about 30 seconds by pulling the turn signal lever toward you within 60 seconds of turning the ignition switch to the“LOCK” position. To turn on the head- lights again after 60 seconds of turning the ignition switch to the “LOCK” posi-tion, repeat the process from step 1.
N00537100062
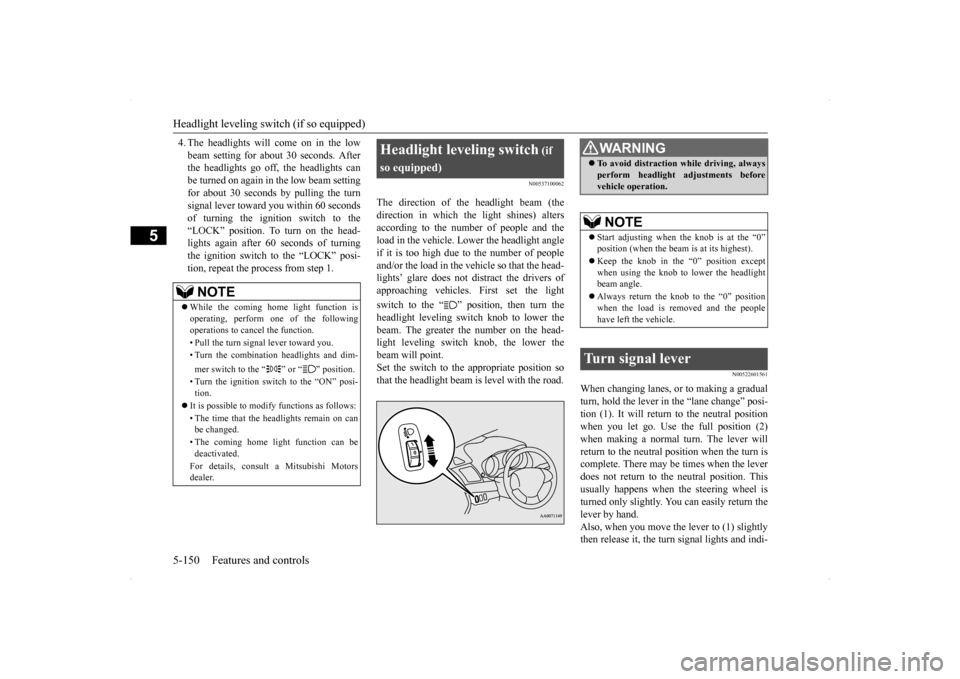
The direction of the headlight beam (thedirection in which the light shines) alters according to the number of people and the load in the vehicle. Lower the headlight angleif it is too high due to the number of people and/or the load in the vehicle so that the head- lights’ glare does not distract the drivers ofapproaching vehicles. First set the light switch to the “ ” position, then turn the headlight leveling switch knob to lower the beam. The greater the number on the head-light leveling switch knob, the lower the beam will point. Set the switch to the appropriate position sothat the headlight beam is level with the road.
N00522601561
When changing lanes, or to making a gradual turn, hold the lever in the “lane change” posi- tion (1). It will return to the neutral positionwhen you let go. Use the full position (2) when making a normal turn. The lever will return to the neutral position when the turn iscomplete. There may be times when the lever does not return to the neutral position. This usually happens when the steering wheel isturned only slightly. You can easily return the lever by hand. Also, when you move the lever to (1) slightlythen release it, the turn signal lights and indi-
NOTE
While the coming home light function is operating, perform one of the followingoperations to cancel the function. • Pull the turn signal lever toward you.• Turn the combination headlights and dim- mer switch to the “ ” or “ ” position. • Turn the ignition switch to the “ON” posi- tion.
It is possible to modify functions as follows: • The time that the headlights remain on can be changed. • The coming home light function can be deactivated. For details, consult a Mitsubishi Motors dealer.
Headlight leveling switch
(if
so equipped)
WA R N I N G To avoid distraction while driving, always perform headlight adjustments before vehicle operation.NOTE
Start adjusting when the knob is at the “0” position (when the beam is at its highest). Keep the knob in the “0” position except when using the knob to lower the headlightbeam angle. Always return the knob to the “0” position when the load is removed and the people have left the vehicle.
Turn signal lever
BK0200700US.book
150 ページ 2013年2月15日 金曜日 午後12時17分
Page 224 of 422
Electric rear window defogger switch
Features and controls 5-157
5
N00523700315
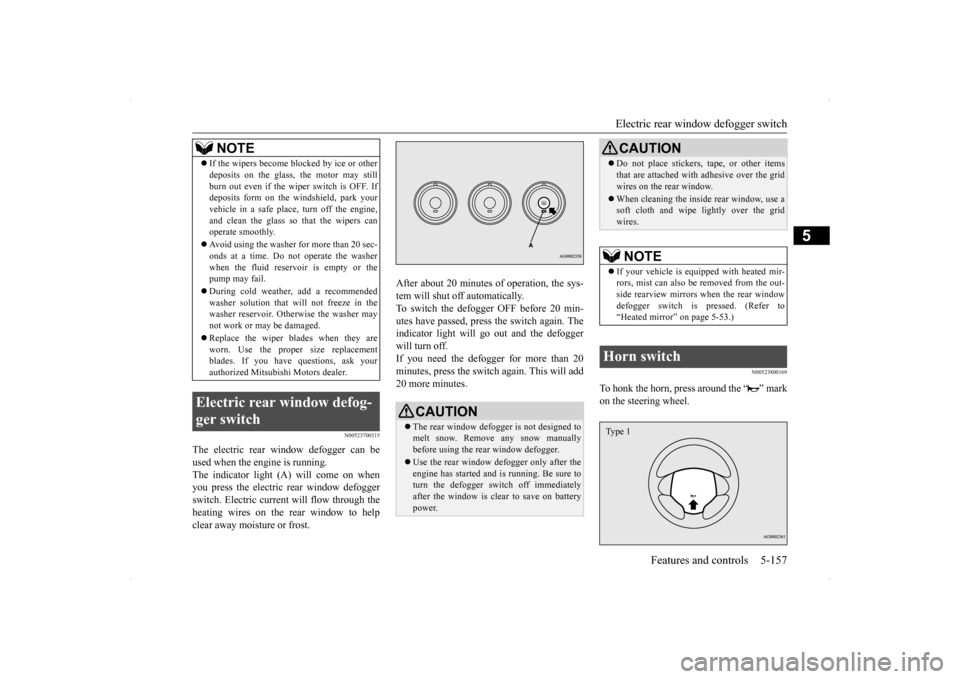
The electric rear window defogger can be used when the engine is running. The indicator light (A) will come on when you press the electric rear window defoggerswitch. Electric current will flow through the heating wires on the rear window to help clear away moisture or frost.
After about 20 minutes of operation, the sys- tem will shut off automatically. To switch the defogger OFF before 20 min-utes have passed, press the switch again. The indicator light will go out and the defogger will turn off. If you need the defogger for more than 20minutes, press the switch
again. This will add
20 more minutes.
N00523800169
To honk the horn, press around the “ ” mark on the steering wheel.
If the wipers become blocked by ice or other deposits on the glass, the motor may still burn out even if the wiper switch is OFF. If deposits form on the windshield, park your vehicle in a safe place, turn off the engine,and clean the glass so that the wipers can operate smoothly. Avoid using the washer for more than 20 sec- onds at a time. Do not operate the washer when the fluid reser
voir is empty or the
pump may fail. During cold weather, add a recommended washer solution that will not freeze in the washer reservoir. Otherwise the washer may not work or may be damaged. Replace the wiper blades when they are worn. Use the proper size replacementblades. If you have questions, ask your authorized Mitsubishi Motors dealer.
Electric rear window defog- ger switch
NOTE
CAUTION The rear window defogger is not designed to melt snow. Remove any snow manuallybefore using the rear window defogger. Use the rear window defogger only after the engine has started and is running. Be sure to turn the defogger switch off immediately after the window is clear to save on batterypower.
Do not place stickers, tape, or other items that are attached with adhesive over the grid wires on the rear window. When cleaning the inside rear window, use a soft cloth and wipe lightly over the grid wires.NOTE
If your vehicle is equipped with heated mir- rors, mist can also be removed from the out-side rearview mirrors when the rear window defogger switch is pressed. (Refer to “Heated mirror” on page 5-53.)
Horn switch
CAUTION
Type 1
BK0200700US.book
157 ページ 2013年2月15日 金曜日 午後12時17分
Page 239 of 422

Bluetooth® 2.0 interface (if so equipped) 5-172 Features and controls
5
6. The voice guide will say “Calling
You can redial the last number called, based on the history of dialed calls in the paired cel- lular phone. Use the following procedure to redial. 1. Press the SPEECH button (except for vehicles with Mitsubishi Multi-Commu- nication System) or PICK-UP button (for vehicles with Mitsubishi Multi-Commu-nication System). 2. Say “Redial.”
N00565700018
During a call, press the SPEECH button toenter voice recognition mode, then say
“
N00565800019
If an incoming phone call is received whilethe ignition switch is in the “ACC” or “ON”position, the audio system will be automati- cally turned on and switched to the incoming call, even when the audio system was origi-nally off. The voice guide announcement for the incoming call will be output from the frontpassenger’s seat speaker. If the CD player or radio was playing when the incoming call was received, the audio sys-tem will mute the sound from the CD player or radio and output only the incoming call. To receive the call, press the PICK-UP buttonon the steering wheel control switch. When the call is over,
the audio system will
return to its previous state.
N00565900010
At any time during a call, you can mute thevehicle microphone. Pressing the SPEECH button and then saying “Mute” during a call will turn ON the mute function and mute the microphone.Saying “Mute off” in the same way will turn off the mute function and cancel the mute on the microphone.
N00566600014
The Bluetooth
® 2.0 interface can switch
between hands-free mode (hands-free calls) and private mode (calls using cellular phone). If you press the SPEECH button and say“Transfer call” during a hands-free call, you can stop the hands-free mode and talk in pri- vate mode. To return to hands-free mode, press the SPEECH button again and say “Transfer call.”
N00566000018
The Bluetooth
® 2.0 interface has 2 types of
unique phonebooks that are different from thephonebook stored in the cellular phone. They
NOTE
When the confirmation function is on, the system will check if the name and location of the receiver are correct. If the name is cor-rect, answer “Yes.” To change the name or location to call, answer “No.” The system will return to Step3.
RedialingSend function
Receiving calls
Mute function
Switching between hands-free mode and private mode
Phonebook function
BK0200700US.book
172 ページ 2013年2月15日 金曜日 午後12時17分
Page 262 of 422
Vehicle preparation before driving
Driving safety 6-3
6
N00629000685
For a safer and more enjoyable trip, always observe the following: Before starting the vehicle, make certain that you and all passengers are seated and wearing their seat belts properly (with children in the rear seat, in appropriaterestraints), and that all the doors and the rear hatch are locked.
Move the driver’s seat as far backward as possible, while still keeping good visibil- ity, and good control of the steering wheel, brakes, accelerator, and controls.Check the instrument panel indicators and multi-information display for any possible problem. Move the front passenger seat as far back as possible. Make sure that infants and small children are properly restrained in accordance withall laws and regulations.
Check these by selecting the defroster mode, and set the blower switch on high. You should be able to feel the air blowing against the windshield.(Refer to “Defrosting or defogging (wind- shield, door windows)” on page 7-9, 7-14, 7-19, 7-24.) Check all the tires for heavy tread wear or uneven wear patterns. Look for stones, nails,glass, or other objects stuck in the tread. Look for any tread cuts or sidewall cracks. Check the wheel nuts for tightness, and the tires(including spare tire) for proper pressures.
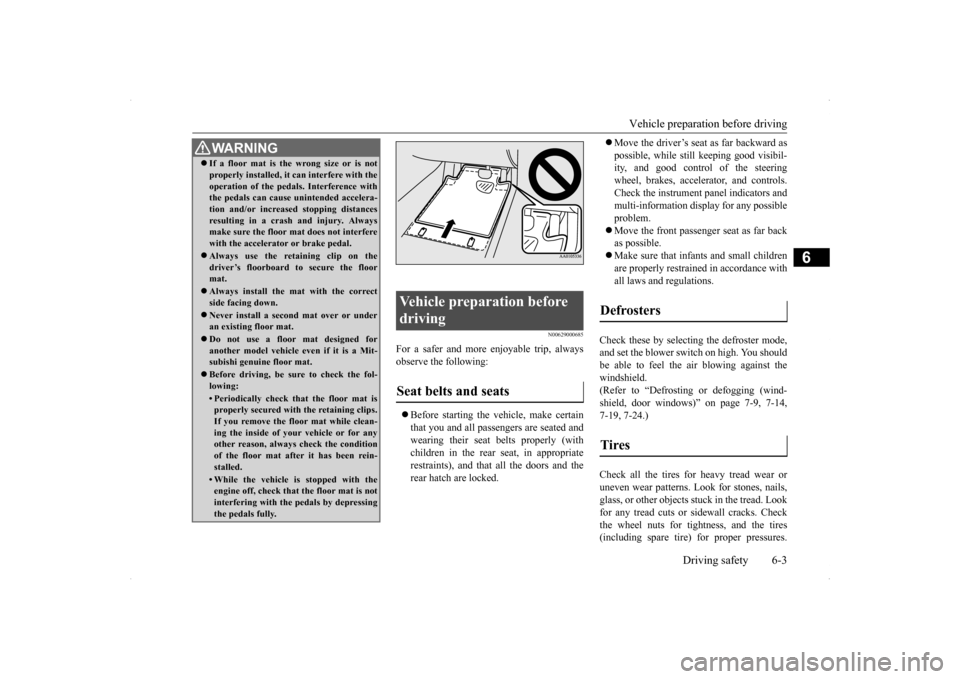
WA R N I N G If a floor mat is the wrong size or is not properly installed, it can interfere with the operation of the pedals. Interference with the pedals can cause unintended accelera- tion and/or increased stopping distancesresulting in a crash and injury. Always make sure the floor mat does not interfere with the accelerator or brake pedal. Always use the retaining clip on the driver’s floorboard to secure the floormat. Always install the mat with the correct side facing down. Never install a second mat over or under an existing floor mat. Do not use a floor mat designed for another model vehicle ev
en if it is a Mit-
subishi genuine floor mat. Before driving, be sure to check the fol- lowing:• Periodically check that the floor mat isproperly secured with the retaining clips. If you remove the floor mat while clean-ing the inside of your vehicle or for any other reason, always check the condition of the floor mat after it has been rein-stalled.• While the vehicle is stopped with the engine off, check that the floor mat is not interfering with the pedals by depressingthe pedals fully.
Vehicle preparation before driving Seat belts and seats
Defrosters Tires
BK0200700US.bo
ok 3 ページ 2013年2月15日 金曜日 午後12時17分
Page 265 of 422
Parking 6-6 Driving safety
6
N00629600261
When parking on a hill, set the parking brake, and turn the front wheels toward the curb on adownhill, or away from the curb on an uphill. If necessary, apply chocks to wheels. Place the gearshift lever into the “R” (Reverse) position when parking on a down-hill slope, into the 1s
t position when parking
on an uphill slope. Be sure that the parking brake is firmly set when parked and that the selector lever(CVT) or gearshift lever (Twin Clutch SST) is in the “P” (PARK) position. When parking on a hill, it is important to setthe parking brake before moving the selector lever (CVT) or gearshift lever (Twin Clutch
SST) to the “P” (PARK) position. This pre- vents loading the parking brake against the transaxle. When this happens, it is difficult to move the selector lever (CVT) or gearshiftlever (Twin Clutch SST) out of the “P” (PARK) position. Never leave the engi
ne running while you
take a short sleep/rest. Also, never leave the engine running in a closed or poorly venti-lated place. Your front bumper can be damaged if you scrape it over curbs or parking stop blocks. Be careful when traveling up or down steepslopes where your bumper can scrape the road.
When leaving the vehicle unattended, always carry the key and lock all doors and the rear hatch.Always try to park your vehicle in a well lit area.
N00629900323
It is very important to know how muchweight your vehicle can carry. This weight is called the vehicle capacity weight andincludes the weight of all occupants, cargo and non-factory-installed options. The tire and loading information placard located onthe driver’s door sill of your vehicle will show how much weight it may properly carry.
Parking Parking on a hill For vehicles equipped with man- ual transaxle For vehicles equipped with contin- uously variable transmission (CVT) or Twin Clutch SST
Parking with the engine run- ning
WA R N I N G Leaving the engine running risks injury or death from accidentally moving the gear- shift lever (manual transaxle or Twin Clutch SST) or the selector lever (CVT) orfrom the accumulation of toxic exhaust fumes in the passenger compartment.
Where you park
WA R N I N G Do not park your vehicle in areas where combustible materials such as dry grass or leaves can come in contact with a hot exhaust, since a fire could occur.
When leaving the vehicle Loading information
BK0200700US.bo
ok 6 ページ 2013年2月15日 金曜日 午後12時17分
Page 309 of 422
Operation Keys 7-38 Comfort controls
7
N00716800055
13-
5 key Play/Pause Bluetooth Audio
*2, and use
as preset key 5 for radio.
14-
6 key Return during audio track search, and stop Bluetooth Audio
*2.
For radio, use as preset key 6.
15-
key/ key
For audio, select audio track/file; forradio, perform automatic station selec- tion. Select channels in the satellite radio*
1.
16- MENU key
Switch to Menu mode.
17-
/SEL key
Adjust audio quality and select items.For radio, manually select stations. Select channels in the satellite radio*
1.
*1: Requires a satellite tuner connection.*2: Requires a separately-purchased Blue- tooth-capable audio device in equip- ment by type (vehicles with a Bluetooth
® 2.0 interface).
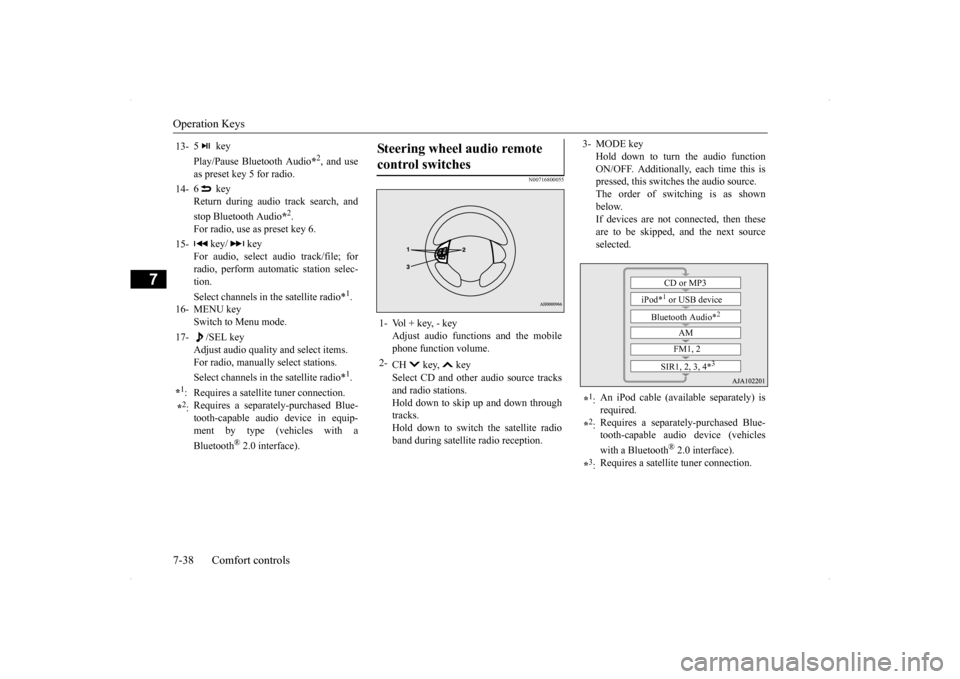
Steering wheel audio remote control switches 1- Vol + key, - key
Adjust audio functions and the mobilephone function volume.
2-
CH key, key Select CD and other audio source tracks and radio stations.Hold down to skip up and down through tracks. Hold down to switch the satellite radioband during satellite radio reception.
3- MODE key
Hold down to turn the audio functionON/OFF. Additionally, each time this is pressed, this switches the audio source. The order of switching is as shownbelow. If devices are not connected, then these are to be skipped, and the next sourceselected.
*1: An iPod cable (available separately) is required.
*2: Requires a separately-purchased Blue- tooth-capable audio device (vehicles with a Bluetooth
® 2.0 interface).
*3: Requires a satellite tuner connection.
CD or MP3
iPod*
1 or USB device
Bluetooth Audio*
2
AM FM1, 2
SIR1, 2, 3, 4*
3
BK0200700US.bo
ok 38 ページ 2013年2月15日 金曜日 午後12時17分
Page 335 of 422
If the vehicle breaks down 8-2 For emergencies
8
N00836300204
If your vehicle breaks down on the road, move to the shoulder and turn on the hazardwarning flashers. If there is no shoulder, or the shoulder is not safe, drive in the right lane slowly, with the hazard lights flashing, untilyou come to a safe stopping place. Keep the flashers flashing. If the engine stops, there will be no power assist to the steering and brakes, making these difficult to use. The brake booster will not work, so the brakes will not grip well. The brake pedalwill be harder to press than usual. Since there is no power steering assist, the steering wheel will be hard to turn.
Get help from your passengers, bystanders, etc. to push the vehicl
e and move it to a safe
zone.
N00836400654
If the engine cannot be started because the battery is weak or dead, you can start it withthe battery from another vehicle using jumper cables. 1. Take off any metal jewelry such as watch bands or bracelets that might make an accidental electrical contact.
2. Position the vehicles close enough together so that the jumper cables can reach, but be sure the vehicles aren’t touching each other. 3. You could be injured if the vehicles move. Set the parking brake firmly on each vehi- cle. Put an automatic transaxle, CVT or Twin Clutch SST in “P” (PARK) or amanual transaxle in “N” (Neutral). Turn the ignition switch to the “LOCK” posi- tion.
If the vehicle breaks down If the engine stops/fails When the engine fails at the intersection
Jump-starting the engine
WA R N I N G When using jumper cables to start a vehi- cle, follow the procedures and be very cau- tious. CAUTION Do not try to start your vehicle by pushing or towing. Vehicles equipped with continuously variable transmission (CVT) or Twin Clutch SST cannot be started this way. Pushing ortowing a vehicle that has a manual transaxle may overheat and damage the catalytic con- verter. Also, there is more risk of an accidentwhen a vehicle is being pushed or towed.
CAUTION Check the other vehicle. It must have a 12- volt battery. If the other system isn’t 12-volt, both systems can be damaged.WA R N I N G Turn the ignition switch to the “LOCK” position on both vehicles. Make sure thatthe cables or your clothes cannot be caught by the fan or drive belt. Personal injury could result. NOTE
Turn off all lights, heater, and other electrical loads. This will avoid sparks and help saveboth batteries.
BK0200700US.bo
ok 2 ページ 2013年2月15日 金曜日 午後12時17分
Page 339 of 422
How to change a tire 8-6 For emergencies
8
N00832600124 N00832700242
Before removing the jack, lift up the board.
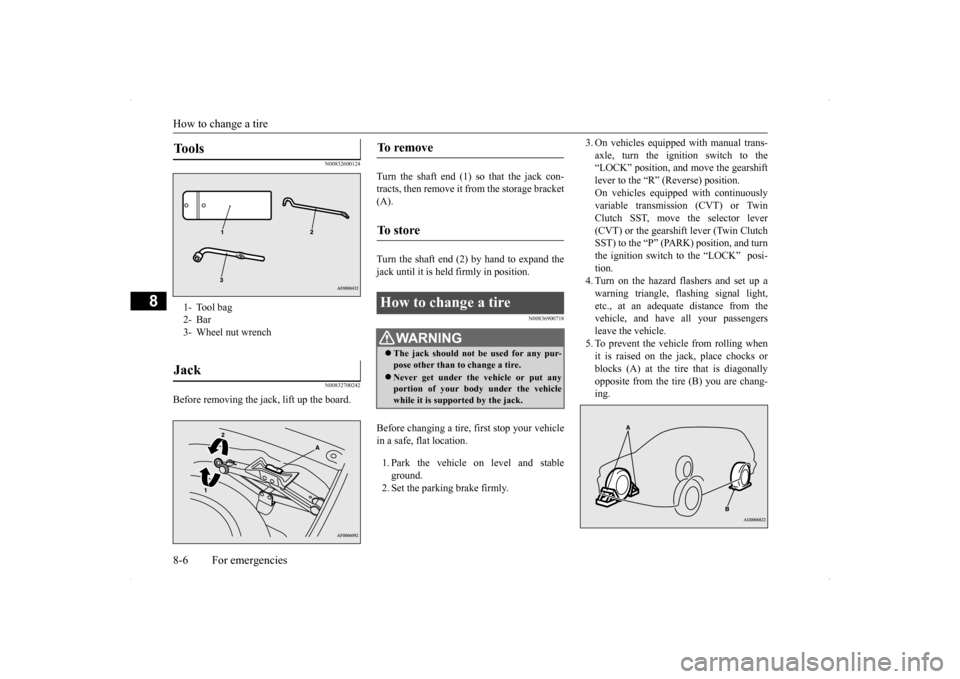
Turn the shaft end (1) so that the jack con- tracts, then remove it from the storage bracket(A). Turn the shaft end (2) by hand to expand the jack until it is held firmly in position.
N00836900718
Before changing a tire, first stop your vehicle in a safe, flat location. 1. Park the vehicle on level and stable ground.2. Set the parking brake firmly.
3. On vehicles equipped with manual trans- axle, turn the ignition switch to the “LOCK” position, and move the gearshift lever to the “R” (Reverse) position.On vehicles equipped with continuously variable transmission (CVT) or Twin Clutch SST, move the selector lever(CVT) or the gearshift lever (Twin Clutch SST) to the “P” (PARK) position, and turn the ignition switch to the “LOCK” posi-tion.4. Turn on the hazard flashers and set up a warning triangle, flashing signal light, etc., at an adequate distance from thevehicle, and have all your passengers leave the vehicle. 5. To prevent the vehicle from rolling whenit is raised on the jack, place chocks or blocks (A) at the tire that is diagonally opposite from the tire (B) you are chang-ing.
Tools 1- Tool bag2- Bar3- Wheel nut wrenchJack
To remove To s t o r e How to change a tire
WA R N I N G The jack should not be used for any pur- pose other than to change a tire. Never get under the vehicle or put any portion of your body under the vehiclewhile it is supported by the jack.
BK0200700US.bo
ok 6 ページ 2013年2月15日 金曜日 午後12時17分