2014 MITSUBISHI LANCER SPORTBACK audio
[x] Cancel search: audioPage 320 of 422
Listen to Bluetooth Audio (if so equipped)
Comfort controls 7-49
7
N00717500020
This product can play back tracks on com- mercially-available Bluetooth-capable audio devices.
Regarding how to connect your Bluetooth device, refer to “Connecting the Bluetooth
®
2.0 interface and Bluetooth device” on page 5-165. Operation methods below describe situations once connection has been completed. 1. Press the MEDIA key to set Bluetooth Audio as the source. The selected source is indicated on the display. 2. Press the 5 key. Bluetooth Audio play- back starts.
While the file is selected, press the 6 key to return to the previous operation. While the file is selected, hold down the 6 key to cancel track search mode. If there is no operation for five seconds after selecting the file, that file is played back. Operations such as selecting a track will can- cel track search mode.
Listen to Bluetooth Audio
(if
so equipped)
CAUTION Never hold these devices in your hand to operate while driving, as this is dangerous. Do not leave the Bluetooth audio device unattended in the vehicle. Depending on how the devices are handled, audio files being damaged or lost, therefore it is recommended that data be backed up.NOTE
NOTE
Depending on the type of Bluetooth-capable audio devices, usage may not be possible, or functions that can be used may be restricted. Confirm together with the user manuals for the commercially-available Bluetooth-capa- ble audio devices. Depending on the type of Bluetooth-capable audio devices, volume levels may differ. There is the danger of loud volumes, so priorto use, it is recommended that you turn the volume down. “Adjust Volume” (P.7-36)
Depending on the status of the Bluetooth audio device, it may take some time until thedevice is recognized, or playback starts. Bluetooth audio device specifications and settings may mean that connection is not possible, or result in differences in operation or display. Depending on audio data in the Bluetooth audio device, track information may not bedisplayed correctly. Depending on the status of the vehicle and device, the iPod/iPhone may not play back after starting the engine.
Connect a Bluetooth-capable Audio Device
NOTE
If the iPod/iPhone is connected via Bluetooth as a Bluetooth-capable audio device, then donot connect the iPod/iPhone using an iPod cable. Connection using both methods will result in erroneous operation.
Play Bluetooth Audio
NOTE
Hold down the 5 key to pause. Press the 6 key to stop.
BK0200700US.bo
ok 49 ページ 2013年2月15日 金曜日 午後12時17分
Page 321 of 422
Use AUX (if so equipped) 7-50 Comfort controls
7
Press the key or key to select the track. This enables selection of the next or previous track. Hold down the 3 key or the 4 key. Fast forward/rewind is possible. Repeat playback, random playback, and scan playback are possible. Press the 1RPT key. Repeat playback of th
e track currently being
played.
Press the 2RDM key. Play the tracks in the Bluetooth Audio device in a random order. Press the SCAN key. Play the first 10 seconds of each of the tracks on the whole Bluetooth Audio device inorder.
N00717600034
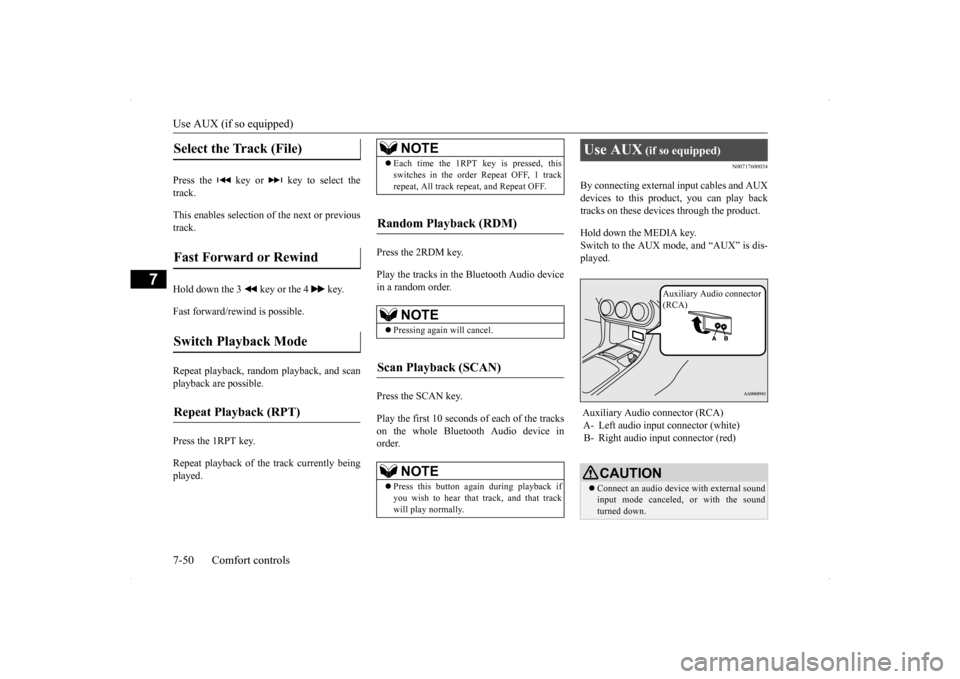
By connecting external input cables and AUXdevices to this product, you can play back tracks on these devices through the product. Hold down the MEDIA key. Switch to the AUX mode, and “AUX” is dis-played.
Select the Track (File)
Fast Forward or Rewind
Switch Playback Mode
Repeat Playback (RPT)
NOTE
Each time the 1RPT key is pressed, this switches in the order Repeat OFF, 1 track repeat, All track repeat, and Repeat OFF.
Random Playback (RDM)
NOTE
Pressing again will cancel.
Scan Playback (SCAN)
NOTE
Press this button again during playback if you wish to hear that track, and that track will play normally.
Use AUX
(if so equipped)
Auxiliary Audio connector (RCA) A- Left audio input connector (white) B- Right audio input connector (red)
CAUTION Connect an audio device with external sound input mode canceled, or with the sound turned down.
Auxiliary Audio connector (RCA)
BK0200700US.bo
ok 50 ページ 2013年2月15日 金曜日 午後12時17分
Page 322 of 422
Use AUX (if so equipped) Comfort controls 7-51
7
Even if not inserted, the product will switch to AUX, therefore take care with volume levels when not inserted.NOTE
Depending on the audio device to be con- nected, noise may be emitted. For power, use the battery power source included in the audio device to be connected. Using the connected audio device whilecharging through the cigarette lighter socket in the vehicle may lead to noise being emit- ted through the speakers. If no audio devices are connected, then do not select the external sound input mode. Ifexternal sound input mode is selected while no audio devices are connected, then sound may be emitted through the speakers.CAUTION
BK0200700US.bo
ok 51 ページ 2013年2月15日 金曜日 午後12時17分
Page 324 of 422
Audio Quality and Volume Balance Adjustment
Comfort controls 7-53
7
This switches in the order “Channel name”, “Category name”, “Artist name”, “Trackname”, and “Composer name”. This switches in the order “Disc title”, “Track title”, and “Operating status”. This switches in the order “Folder title”, “File title”, and “Operating status”.
Hold down the DISP key. This switches the ID3tag display. [DISP] Each time the key is pressed, this switches in the order “Album name”, “Track name”, “Artist name”, “Genre name”*, and“Operating status”.
N00718200024
This switches in the order “Albums”, “Trackname”, “Artist name”, “Genre name”, and “Operating status”.
N00718300025
Operating details are the same as in “DuringiPod Playback” (P.7-53).
N00718400026
Change audio quality settings. 1. Press the /SEL key to select settings items. Each time the /SEL key is pressed, this switches in the order BASS, TREBLE, FADER, BALANCE, SCV, and Cancel. 2. Turn the /SEL key to adjust.
During Satellite Radio Reception
(if so equipped)
NOTE
The channel and category have a maximum display of 8 characters. The other items have a maximum display of 36 characters.
During CD-DA playback
NOTE
If there is no text information to display, then “NO TITLE” is displayed.
During MP3/WMA/AAC Play- back
NOTE
If there is no text information to display, then “NO TITLE” is displayed.
Display the ID3tag
*:Displayed when playing back audio files on a USB device (vehicles with a Bluetooth
® 2.0 interface).
NOTE
During display of the ID3tag, hold down the DISP key to switch to the folder title display. The genre name display may not be possible.
During iPod Playback
NOTE
If there is no text information to display, then “NO TITLE” is displayed. Displayed genre name in equipment by type (vehicles with a Bluetooth
® 2.0 interface).
The genre name display may not be possible.
During Bluetooth
® 2.0 Audio Play-
back
(if so equipped)
Audio Quality and Volume Balance Adjustment Adjust Audio Quality and Vol- ume Balance
BK0200700US.bo
ok 53 ページ 2013年2月15日 金曜日 午後12時17分
Page 325 of 422
System Settings 7-54 Comfort controls
7
N00718500030
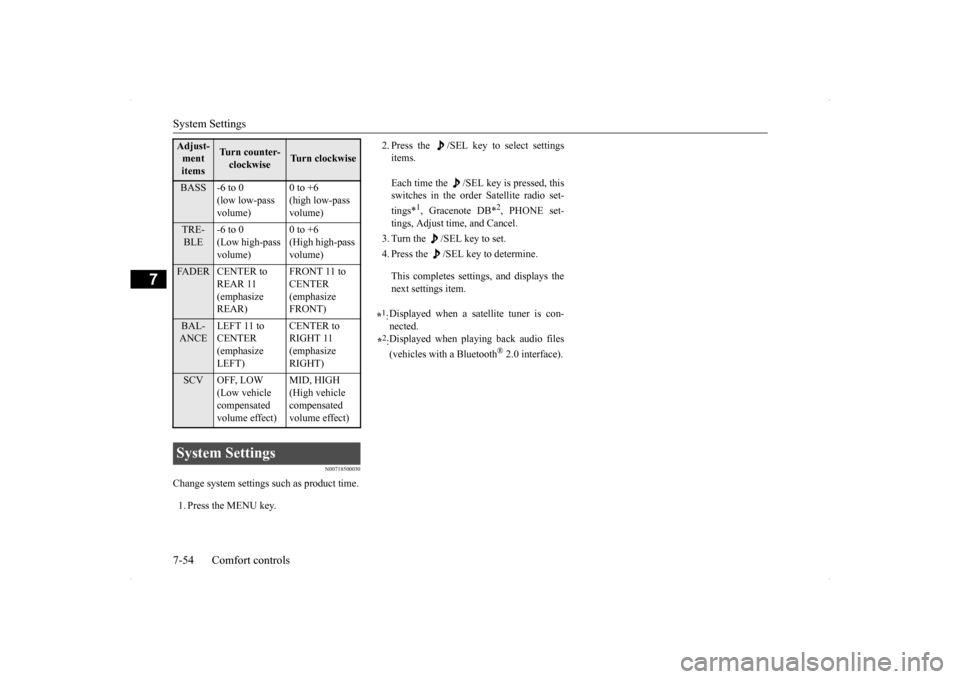
Change system settings such as product time. 1. Press the MENU key.
2. Press the /SEL key to select settings items. Each time the /SEL key is pressed, this switches in the order Satellite radio set- tings*
1, Gracenote DB*
2, PHONE set-
tings, Adjust time, and Cancel. 3. Turn the /SEL key to set.4. Press the /SEL key to determine. This completes settings, and displays the next settings item.
Adjust- ment items
Turn counter-clockwise
Turn clockwise
BASS -6 to 0
(low low-pass volume)
0 to +6 (high low-pass volume)
TRE- BLE
-6 to 0 (Low high-pass volume)
0 to +6 (High high-pass volume)
FADER CENTER to
REAR 11 (emphasize REAR)
FRONT 11 to CENTER (emphasize FRONT)
BAL- ANCE
LEFT 11 to CENTER (emphasize LEFT)
CENTER to RIGHT 11 (emphasize RIGHT)
SCV OFF, LOW
(Low vehicle compensated volume effect)
MID, HIGH (High vehicle compensated volume effect)
System Settings
*1: Displayed when a satellite tuner is con- nected.
*2: Displayed when playing back audio files (vehicles with a Bluetooth
® 2.0 interface).
BK0200700US.bo
ok 54 ページ 2013年2月15日 金曜日 午後12時17分
Page 327 of 422
System Settings 7-56 Comfort controls
7
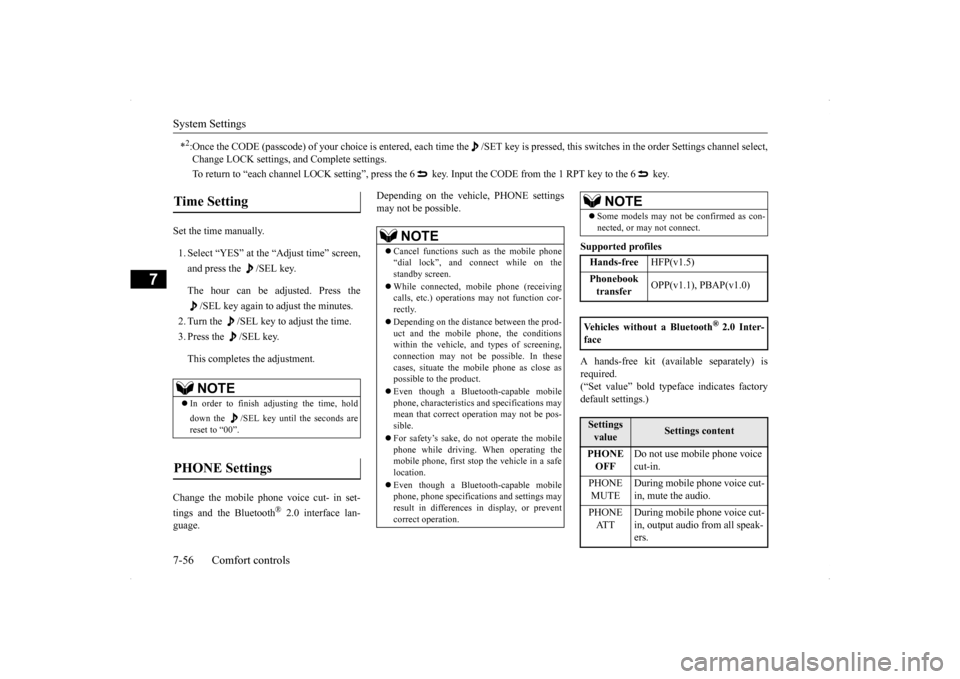
Set the time manually. 1. Select “YES” at the “Adjust time” screen, and press the /SEL key. The hour can be adjusted. Press the
/SEL key again to adjust the minutes.
2. Turn the /SEL key to adjust the time.3. Press the /SEL key. This completes the adjustment.
Change the mobile phone voice cut- in set- tings and the Bluetooth
® 2.0 interface lan-
guage.
Depending on the vehicle, PHONE settings may not be possible.
Supported profiles A hands-free kit (available separately) is required.(“Set value” bold typeface indicates factory default settings.)
*2:Once the CODE (passcode) of your choice is
entered, each time the /SET key is pressed,
this switches in the order Settings chan
nel select,
Change LOCK settings, and Complete settings. To return to “each channel LOCK setting”, press the 6 ke
y. Input the CODE from the 1 RPT key to the 6 key.
Time Setting
NOTE
In order to finish adjusting the time, hold down the /SEL key until the seconds are reset to “00”.
PHONE Settings
NOTE
Cancel functions such as the mobile phone “dial lock”, and connect while on the standby screen. While connected, mobile phone (receiving calls, etc.) operations may not function cor- rectly. Depending on the distance between the prod- uct and the mobile phone, the conditions within the vehicle, and types of screening, connection may not be possible. In thesecases, situate the mobile phone as close as possible to the product. Even though a Bluetooth-capable mobile phone, characteristics and specifications may mean that correct operation may not be pos-sible. For safety’s sake, do not operate the mobile phone while driving. When operating the mobile phone, first stop the vehicle in a safe location. Even though a Bluetooth-capable mobile phone, phone specifications and settings mayresult in differences in display, or prevent correct operation.
Some models may not be confirmed as con- nected, or may not connect.Hands-free
HFP(v1.5)
Phonebook transfer
OPP(v1.1), PBAP(v1.0)
Vehicles without a Bluetooth
® 2.0 Inter-
faceSettings value
Settings content
PHONE OFF
Do not use mobile phone voice cut-in.
PHONE MUTE
During mobile phone voice cut- in, mute the audio.
PHONE AT T
During mobile phone voice cut- in, output audio from all speak- ers.
NOTE
BK0200700US.bo
ok 56 ページ 2013年2月15日 金曜日 午後12時17分
Page 329 of 422

Troubleshooting 7-58 Comfort controls
7
Mode
Message
Cause
Response
CD CHECK DISC The disc is inserted upsi
de down. Insert with the label side up.
The disc has condensation on it. Wait a while before inserting again.
DISC ERROR The disc is damaged. Clean the read surface of the disc.
The disc is dirty.
INTERNAL E The drive has malfunctioned for some reason. Check that there is no problem with the disc, and
insert the disc again. If the problem persists, con-sult an authorized Mitsubishi Motors dealer or a repair facility of your choice.
HEAT ERROR The temperature inside the product is high.
Remove the disc, and wait for the internal tempera- ture to return to normal.
USB FILE ERROR Files that cannot be played are
selected. Select files that can be played.
“Audio Files (MP3/WMA/AAC)” (P.7-31)
USB BUS PWR There is high or low electrical current or
voltage. Turn the power OFF and wait a short while. If the
problem persists, consult an authorized Mitsubishi Motors dealer or a repair facility of your choice.
LSI ERROR There is an internal malfunction for some reason. UNSUPPORTED Unsupported audio files have been pl
ayed. Confirm audio files that can be played.
“Audio Files (MP3/WMA/AAC)” (P.7-31)
FORMAT
UNSUPPORTED An unsupported USB device has been co
nnected. Please connect a USB memory device.
DEVICE
iPod NO SONG An iPod/iPhone not containing any tracks has been
connected.
Connect an iPod/iPhone containing tracks.
VER ERROR This iPod/iPhone software version is not su
pported. Please change to a supported software version.
Other ERROR DC An abnormal direct voltage has been sent to the
speakers.
Turn the power OFF and wait a short while. If the problem persists, consult an authorized Mitsubishi Motors dealer or a repair facility of your choice.
BK0200700US.bo
ok 58 ページ 2013年2月15日 金曜日 午後12時17分
Page 330 of 422
Antenna
Comfort controls 7-59
7
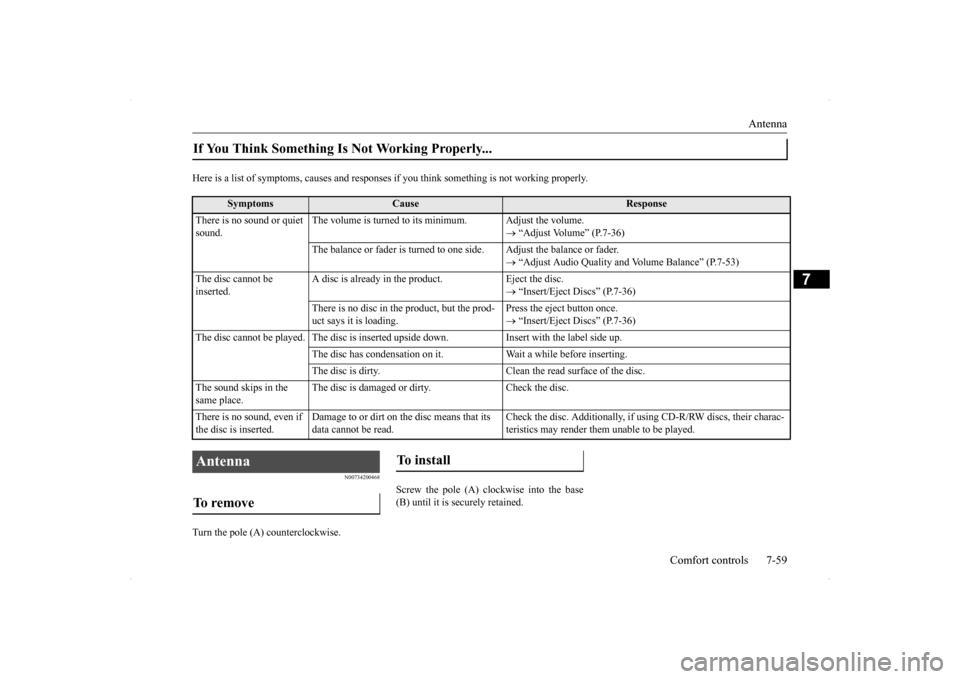
Here is a list of symptoms, causes and responses
if you think something is not working properly.
N00734200468
Turn the pole (A) counterclockwise.
Screw the pole (A) clockwise into the base (B) until it is securely retained.
If You Think Something Is Not Working Properly...
Symptoms
Cause
Response
There is no sound or quiet sound.
The volume is turned to its minimum. Adjust the volume.
“Adjust Volume” (P.7-36)
The balance or fader is turned to one side. Adjust the balance or fader.
“Adjust Audio Quality and Volume Balance” (P.7-53)
The disc cannot be inserted.
A disc is already in the product. Eject the disc.
“Insert/Eject Discs” (P.7-36)
There is no disc in the product, but the prod- uct says it is loading.
Press the eject button once. “Insert/Eject Discs” (P.7-36)
The disc cannot be played. The disc is inserted upside down. Insert with the label side up.
The disc has condensation on it. Wait a while before inserting.The disc is dirty. Clean the read surface of the disc.
The sound skips in the same place.
The disc is damaged or dirty. Check the disc.
There is no sound, even if the disc is inserted.
Damage to or dirt on the disc means that its data cannot be read.
Check the disc. Additionally, if using CD-R/RW discs, their charac- teristics may render them unable to be played.
Antenna To remove
To install
BK0200700US.bo
ok 59 ページ 2013年2月15日 金曜日 午後12時17分