2014 MITSUBISHI LANCER SPORTBACK reset
[x] Cancel search: resetPage 194 of 422
Multi-information display
Features and controls 5-127
5
4. Lightly press the multi-information meter switch to select the amount of time until the display appears. 5. Press and hold the multi-informationmeter switch (for about 2 seconds or more) to change the setting to the selected time.
N00563500070
It is possible to change the turn signal sound. 1. Press and hold the multi-information meter switch for about 2 seconds or more to switch from the setting mode screen tothe menu screen. Refer to “Changing the function settings (With ignition switch in the “ON” posi-tion)” on page 5-121.
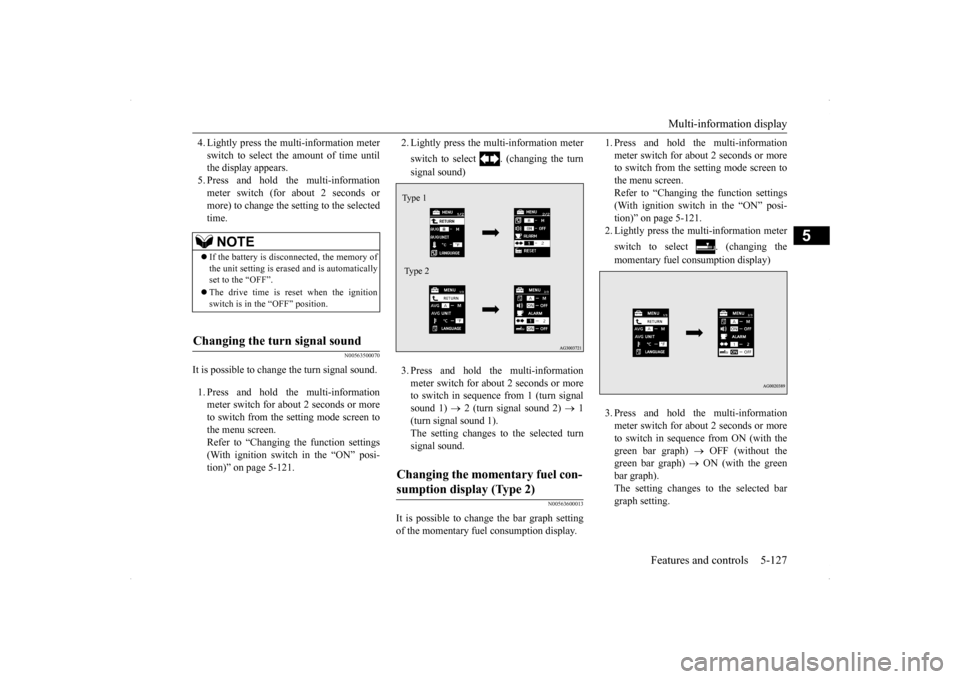
2. Lightly press the multi-information meter switch to select . (changing the turn signal sound) 3. Press and hold the multi-information meter switch for about 2 seconds or more to switch in sequence from 1 (turn signal sound 1)
2 (turn signal sound 2)
1
(turn signal sound 1). The setting changes to the selected turn signal sound.
N00563600013
It is possible to change the bar graph setting of the momentary fuel consumption display.
1. Press and hold the multi-information meter switch for about 2 seconds or more to switch from the setting mode screen to the menu screen.Refer to “Changing the function settings (With ignition switch in the “ON” posi- tion)” on page 5-121.2. Lightly press the multi-information meter switch to select . (changing the momentary fuel consumption display) 3. Press and hold the multi-information meter switch for about 2 seconds or more to switch in sequence from ON (with thegreen bar graph)
OFF (without the
green bar graph)
ON (with the green
bar graph).The setting changes to the selected bargraph setting.
NOTE
If the battery is disconnected, the memory of the unit setting is erased and is automatically set to the “OFF”. The drive time is reset when the ignition switch is in the “OFF” position.
Changing the turn signal sound
Changing the momentary fuel con- sumption display (Type 2) Ty p e 1 Type 2
BK0200700US.book
127 ページ 2013年2月15日 金曜日 午後12時17分
Page 195 of 422
Multi-information display 5-128 Features and controls
5
N00557600180
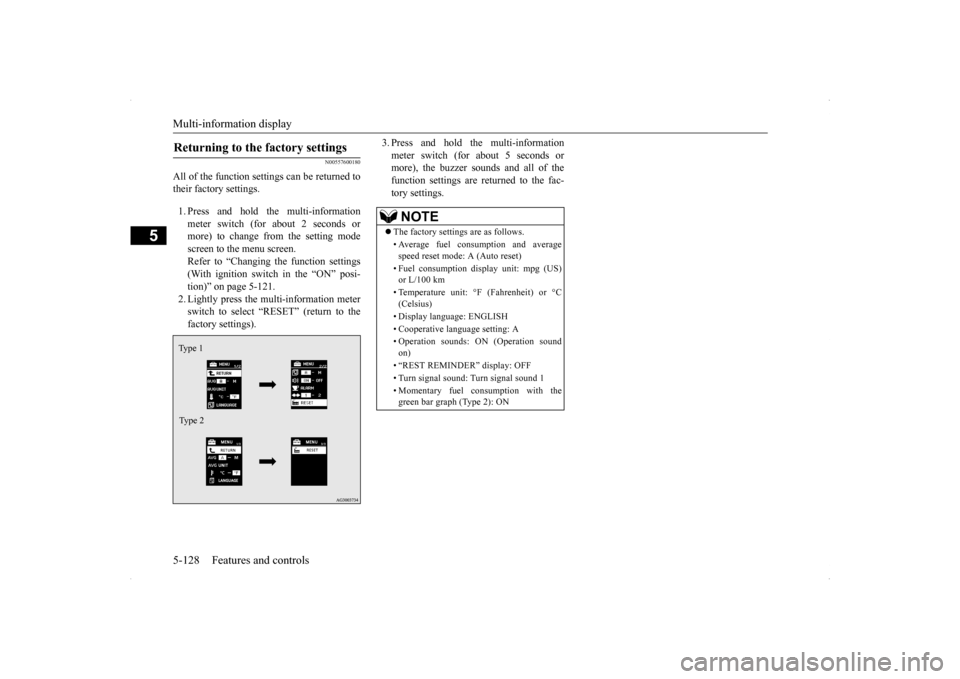
All of the function settings can be returned to their factory settings. 1. Press and hold the multi-information meter switch (for about 2 seconds or more) to change from the setting mode screen to the menu screen.Refer to “Changing the function settings (With ignition switch in the “ON” posi- tion)” on page 5-121.2. Lightly press the multi-information meterswitch to select “RESET” (return to the factory settings).
3. Press and hold the multi-information meter switch (for about 5 seconds or more), the buzzer sounds and all of the function settings are returned to the fac-tory settings.
Returning to the factory settings Ty p e 1 Type 2
NOTE
The factory settings are as follows. • Average fuel consumption and average speed reset mode: A (Auto reset) • Fuel consumption display unit: mpg (US) or L/100 km • Temperature unit: °F (Fahrenheit) or °C (Celsius) • Display language: ENGLISH • Cooperative language setting: A• Operation sounds: ON (Operation sound on) • “REST REMINDER” display: OFF • Turn signal sound: Turn signal sound 1 • Momentary fuel consumption with the green bar graph (Type 2): ON
BK0200700US.book
128 ページ 2013年2月15日 金曜日 午後12時17分
Page 308 of 422
Operation Keys
Comfort controls 7-37
7
N00716700025
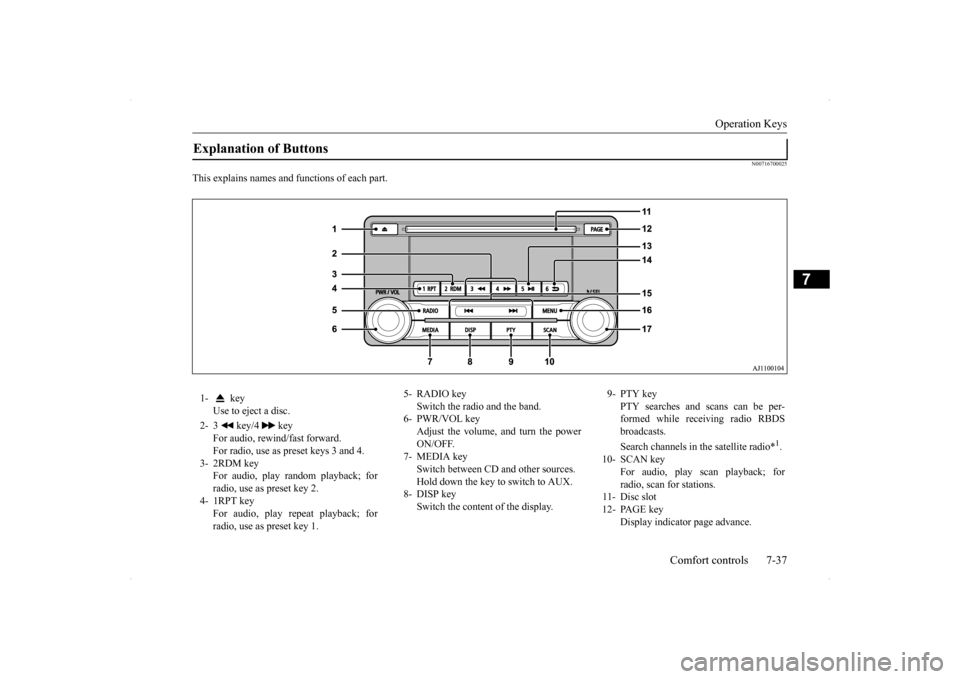
This explains names and functions of each part.Explanation of Buttons 1- key
Use to eject a disc.
2- 3 key/4 key
For audio, rewind/fast forward. For radio, use as preset keys 3 and 4.
3- 2RDM key
For audio, play random playback; for radio, use as preset key 2.
4- 1RPT key
For audio, play repeat playback; forradio, use as preset key 1.
5- RADIO key
Switch the radio and the band.
6- PWR/VOL key
Adjust the volume, and turn the power ON/OFF.
7- MEDIA key
Switch between CD and other sources. Hold down the key to switch to AUX.
8- DISP key
Switch the content of the display.
9- PTY key
PTY searches and scans can be per-formed while receiving radio RBDS broadcasts. Search channels in the satellite radio*
1.
10- SCAN key
For audio, play scan playback; for radio, scan for stations.
11- Disc slot 12- PAGE key
Display indicator page advance.
BK0200700US.bo
ok 37 ページ 2013年2月15日 金曜日 午後12時17分
Page 309 of 422
Operation Keys 7-38 Comfort controls
7
N00716800055
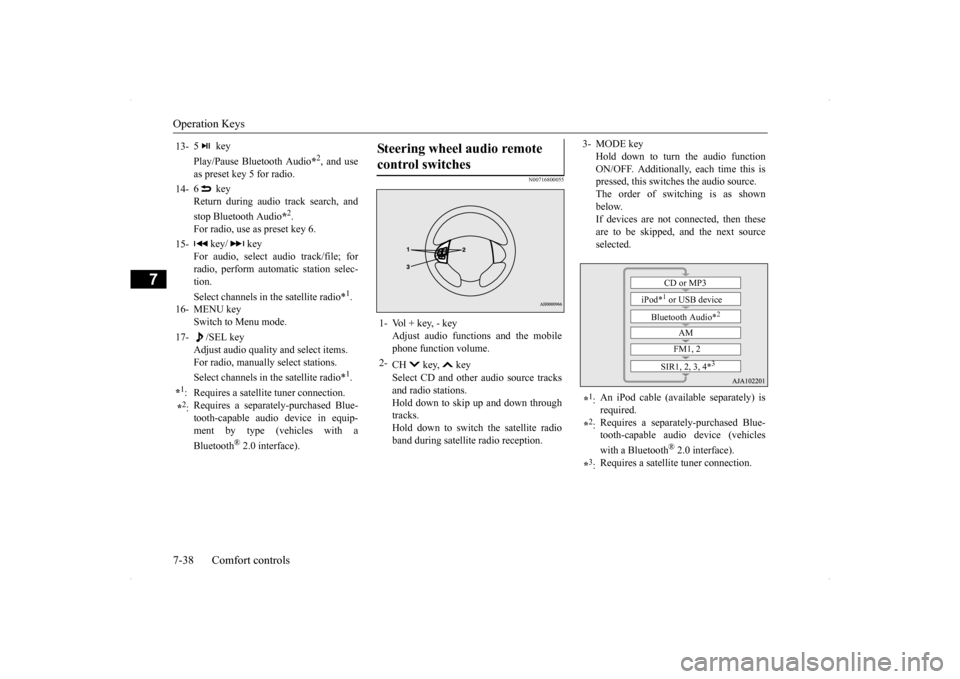
13-
5 key Play/Pause Bluetooth Audio
*2, and use
as preset key 5 for radio.
14-
6 key Return during audio track search, and stop Bluetooth Audio
*2.
For radio, use as preset key 6.
15-
key/ key
For audio, select audio track/file; forradio, perform automatic station selec- tion. Select channels in the satellite radio*
1.
16- MENU key
Switch to Menu mode.
17-
/SEL key
Adjust audio quality and select items.For radio, manually select stations. Select channels in the satellite radio*
1.
*1: Requires a satellite tuner connection.*2: Requires a separately-purchased Blue- tooth-capable audio device in equip- ment by type (vehicles with a Bluetooth
® 2.0 interface).
Steering wheel audio remote control switches 1- Vol + key, - key
Adjust audio functions and the mobilephone function volume.
2-
CH key, key Select CD and other audio source tracks and radio stations.Hold down to skip up and down through tracks. Hold down to switch the satellite radioband during satellite radio reception.
3- MODE key
Hold down to turn the audio functionON/OFF. Additionally, each time this is pressed, this switches the audio source. The order of switching is as shownbelow. If devices are not connected, then these are to be skipped, and the next sourceselected.
*1: An iPod cable (available separately) is required.
*2: Requires a separately-purchased Blue- tooth-capable audio device (vehicles with a Bluetooth
® 2.0 interface).
*3: Requires a satellite tuner connection.
CD or MP3
iPod*
1 or USB device
Bluetooth Audio*
2
AM FM1, 2
SIR1, 2, 3, 4*
3
BK0200700US.bo
ok 38 ページ 2013年2月15日 金曜日 午後12時17分
Page 310 of 422
Listen to Radio
Comfort controls 7-39
7
N00716900027
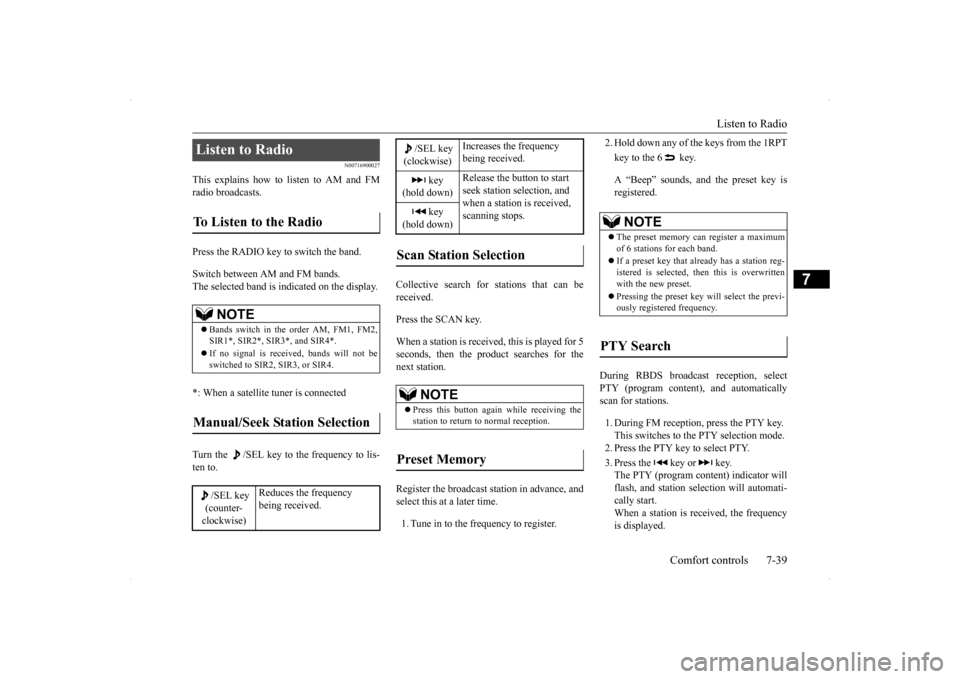
This explains how to listen to AM and FM radio broadcasts. Press the RADIO key to switch the band. Switch between AM and FM bands. The selected band is indicated on the display. *: When a satellite tuner is connected Turn the /SEL key to the frequency to lis- ten to.
Collective search for stations that can be received. Press the SCAN key.When a station is received, this is played for 5 seconds, then the product searches for the next station. Register the broadcast station in advance, and select this at a later time. 1. Tune in to the frequency to register.
2. Hold down any of the keys from the 1RPT key to the 6 key. A “Beep” sounds, and the preset key is registered.
During RBDS broadcast reception, select PTY (program content), and automatically scan for stations. 1. During FM reception, press the PTY key. This switches to the PTY selection mode.2. Press the PTY key to select PTY. 3. Press the key or key. The PTY (program content) indicator will flash, and station selection will automati-cally start. When a station is r
eceived, the frequency
is displayed.
Listen to Radio To Listen to the Radio
NOTE
Bands switch in the order AM, FM1, FM2, SIR1*, SIR2*, SIR3*, and SIR4*. If no signal is received, bands will not be switched to SIR2, SIR3, or SIR4.
Manual/Seek Station Selection
/SEL key (counter- clockwise)
Reduces the frequency being received.
/SEL key(clockwise)
Increases the frequency being received.
key
(hold down)
Release the button to start seek station selection, and when a station is received, scanning stops.
key
(hold down)Scan Station Selection
NOTE
Press this button again while receiving the station to return to normal reception.
Preset Memory
NOTE
The preset memory can register a maximum of 6 stations for each band. If a preset key that already has a station reg- istered is selected, then this is overwritten with the new preset. Pressing the preset key will select the previ- ously registered frequency.
PTY Search
BK0200700US.bo
ok 39 ページ 2013年2月15日 金曜日 午後12時17分
Page 312 of 422

Listen to Satellite Radio (if so equipped)
Comfort controls 7-41
7
Channels are received in order and take 10 seconds each. Press the SCAN key. All of the channels are scanned. 1. Press the PTY key. Switches to the category search mode,and the category name is indicated on the display. 2. Turn the /SEL key to select the cate- gory. 3. Press the SCAN key.The channels in the selected category are scanned.
Register the channel in advance, and select this at a later time. 1. Tune in to the channel to register. 2. Hold down any of the keys from the 1RPT key to the 6 key. A “Beep” sounds, and the preset key is registered.
Other channels can be selected while listen- ing to a channel. 1. Press the PTY key. Switches to the category search mode, and the category name is indicated on the display. 2. Turn the /SEL key to select the cate- gory. 3. Press the /SEL key. Switches to channel search mode. 4. Turn the /SEL key to select the chan- nel. 5. Press the /SEL key. A “Beep” sounds, and the selected chan- nel is received. (Channel preliminary set- ting mode)The channel name shown on the display flashes. Press the /SEL key again to cancel the search mode and return to normal recep- tion. 6. To continue the search, turn the /SEL key to select the channel.The selected channel is received. 7. Press the /SEL key. Cancels the search mode and returns to normal reception.
Scan Station Selection
Scan All Channels
NOTE
Press this key again while receiving the channel to return to normal reception. Selecting a channel will cancel this.
Scan Category Channels
NOTE
Press the SCAN key or PTY key again while receiving the channel to return to normal reception. Turning the /SET key will cancel.
Preset Memory
NOTE
The preset memory can register a maximum of 6 stations per band. If a preset key that already has a channel reg- istered is selected, then this is overwritten with the new preset. Pressing the preset key will select the previ- ously registered channel. The preset channels on the display are shownas “P1” though “P6”.
Channel Search
BK0200700US.bo
ok 41 ページ 2013年2月15日 金曜日 午後12時17分
Page 316 of 422

Listen to an iPod
Comfort controls 7-45
7
Press the MEDIA key to set the iPod as the source. The selected source is indicated on the dis- play. Press the key or key to select the track. This enables selection of the next or previous track.
Hold down the 3 key or the 4 key. Fast forward/rewind is possible. Repeat playback and shuffle playback are possible. Press the 1RPT key. Repeat playback of th
e track currently being
played. Press the 2RDM key. Play tracks in the category currently being played in a random order.
Regarding details such as types of iPod/iPhone that can be connected to equip- ment by type (vehicles with a Bluetooth
® 2.0
interface), and types of files that can be played back, refer to “Types of connectabledevices and supported file specifications” on page 5-182. Regarding how to connect the iPod/iPhone, refer to “How to connect an iPod” on page 5-181. When connecting the iPod/iPhone, use a commercially-available iPod connectioncable. Set up the device in order that no unsafe actions, such as plugging in the connection cable are taken while driving. When inserting and removing the iPod/iPhone, for safety’s sake first stop the vehicle. Depending on the status of the iPod/iPhone, it may take some time until the device is rec- ognized, or playback starts. Buttons on the product will not operate while iPod/iPhone is connected. iPod/iPhone specifications and settings may mean that connection is not possible, or result in differences in operation or display. Depending on audio data in the iPod/iPhone, track information may not be displayed cor-rectly. Depending on the status of the vehicle and device, the iPod/iPhone may not play back after starting the engine.NOTE
Data containing copyright information may not play back. It is recommended that the iPod/iPhone equalizer settings be set to flat. Operate the iPod/iPhone while connected to this product. If the iPod/iPhone is connected via Bluetooth as a Bluetooth-capable audio device, then donot connect the iPod/iPhone using an iPod cable. Connection using both methods will result in erroneous operation. If an iPod/iPhone does not operate correctly, then remove the iPod/iPhone from the prod-uct, reset, then reconnect.
Play iPod Select the Track (File)
NOTE
Fast Forward or Rewind Switch Playback Mode Repeat Playback (RPT)
NOTE
Pressing again will cancel.
Shuffle Playback (RDM)
BK0200700US.bo
ok 45 ページ 2013年2月15日 金曜日 午後12時17分
Page 326 of 422
System Settings
Comfort controls 7-55
7
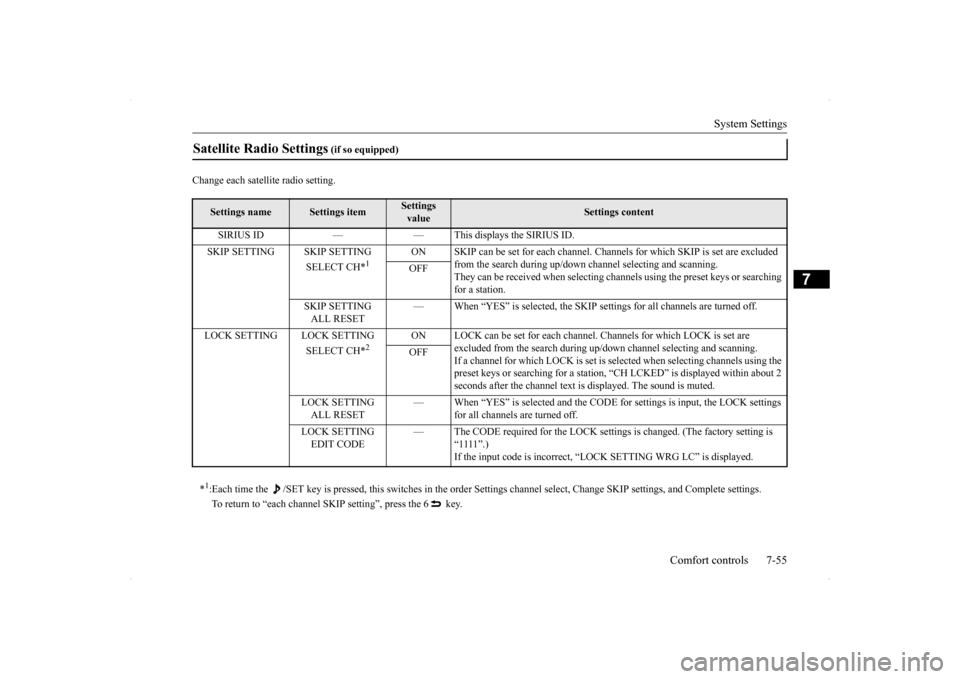
Change each satellite radio setting.Satellite Radio Settings
(if so equipped)
Settings name
Settings item
Settings value
Settings content
SIRIUS ID — — This displays the SIRIUS ID. SKIP SETTING SKIP SETTING
SELECT CH*
1
ON SKIP can be set for each channel. Channe
ls for which SKIP is set are excluded
from the search during up/down ch
annel selecting and scanning.
They can be received when selecting channe
ls using the preset keys or searching
for a station.
OFF
SKIP SETTING ALL RESET
— When “YES” is selected, the SKIP set
tings for all channels are turned off.
LOCK SETTING LOCK SETTING
SELECT CH*
2
ON LOCK can be set for each channel. Channels for which LOCK is set are
excluded from the search during up/do
wn channel selecting and scanning.
If a channel for which LOCK is set is sel
ected when selecting channels using the
preset keys or searching for a station,
“CH LCKED” is displayed within about 2
seconds after the channel text is displayed. The sound is muted.
OFF
LOCK SETTING ALL RESET
— When “YES” is selected and the CODE for settings is input, the LOCK settings
for all channels are turned off.
LOCK SETTING EDIT CODE
— The CODE required for the LOCK settings is changed. (The factory setting is
“1111”.)If the input code is incorrect, “L
OCK SETTING WRG LC” is displayed.
*1: Each time the /SET key is pressed, this switches in the order Sett
ings channel select, Change SKIP settings, and Complete setti
ngs.
To return to “each channel SKIP setting”, press the 6 key.
BK0200700US.bo
ok 55 ページ 2013年2月15日 金曜日 午後12時17分