Page 149 of 226
Mobile Phone 149
INFO/SETTINGS INFO
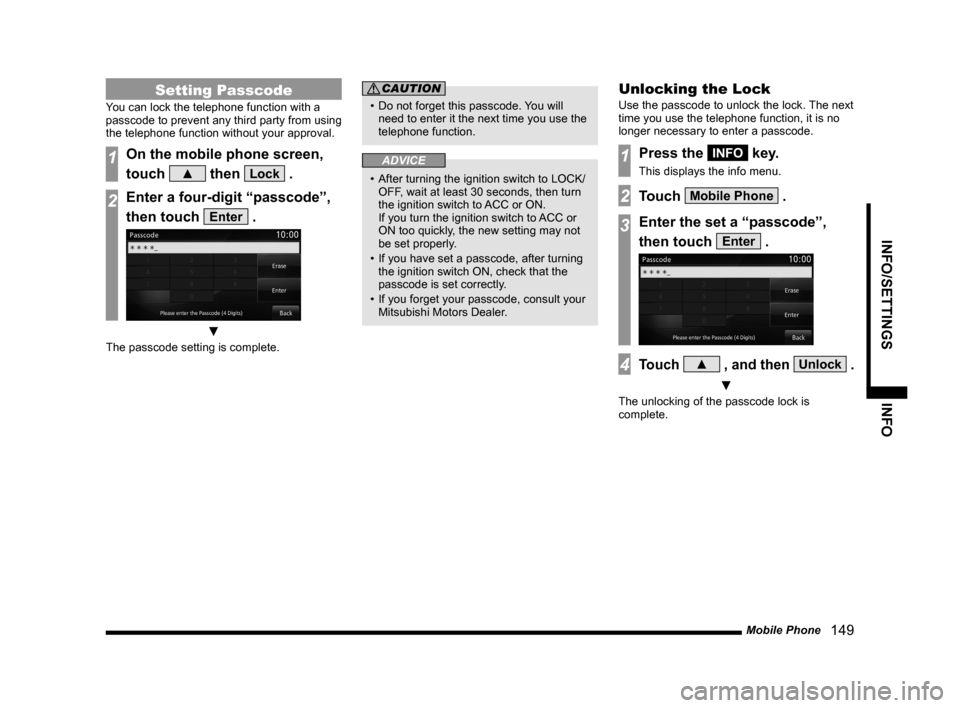
Setting Passcode
You can lock the telephone function with a
passcode to prevent any third party from using
the telephone function without your approval.
1On the mobile phone screen,
touch
▲ then Lock .
2Enter a four-digit “passcode”,
then touch
Enter .
▼
The passcode setting is complete.
CAUTION
• Do not forget this passcode. You will
need to enter it the next time you use the
telephone function.
ADVICE
• After turning the ignition switch to LOCK/
OFF, wait at least 30 seconds, then turn
the ignition switch to ACC or ON.
If you turn the ignition switch to ACC or
ON too quickly, the new setting may not
be set properly.
• If you have set a passcode, after turning
the ignition switch ON, check that the
passcode is set correctly.
• If you forget your passcode, consult your
Mitsubishi Motors Dealer.
Unlocking the Lock
Use the passcode to unlock the lock. The next
time you use the telephone function, it is no
longer necessary to enter a passcode.
1Press the INFO key.
This displays the info menu.
2Touch Mobile Phone .
3Enter the set a “passcode”,
then touch
Enter .
4Touch ▲ , and then Unlock .
▼
The unlocking of the passcode lock is
complete.
Page 151 of 226
Environment 151
INFO/SETTINGS INFO
Equipment by type
Environment
You can check the altitude, air pressure,
and outside temperature.
Displaying
1Press the INFO key.
This displays the info menu.
2Touch Environment .
▼
This displays the environment screen. 1) Altimeter
2) Barometer
3) Outside
4)
Freezing mark
Displayed when the outside temperature
is 3
°C or less. 5)
Outside temperature graph
6) Altitude graph
7)
Back
Touching this returns the display to the
info menu
(P24).
NOTE
• The display graphs display the latest
information in units of 5 minutes.
• You can change the display unit.
→“Units”(P209)
Display Contents
2)
3)4) 1)
6)
7)
5)
Page 152 of 226
152 Maintenance
Equipment by type
Maintenance
You can manage parts replacement timing
for your car.
Displaying
You can check the engine oil, oil filter, etc.
replacement timing.
NOTE
• The distance traveled used in the
maintenance information is calculated
by this product and does not necessarily
match the distance calculated by the car.
• During map updating, program updating,
etc., the distance traveled cannot be
calculated and the distance traveled
during this time is not reflected in the
maintenance information.
1Press the INFO key.
This displays the info menu.
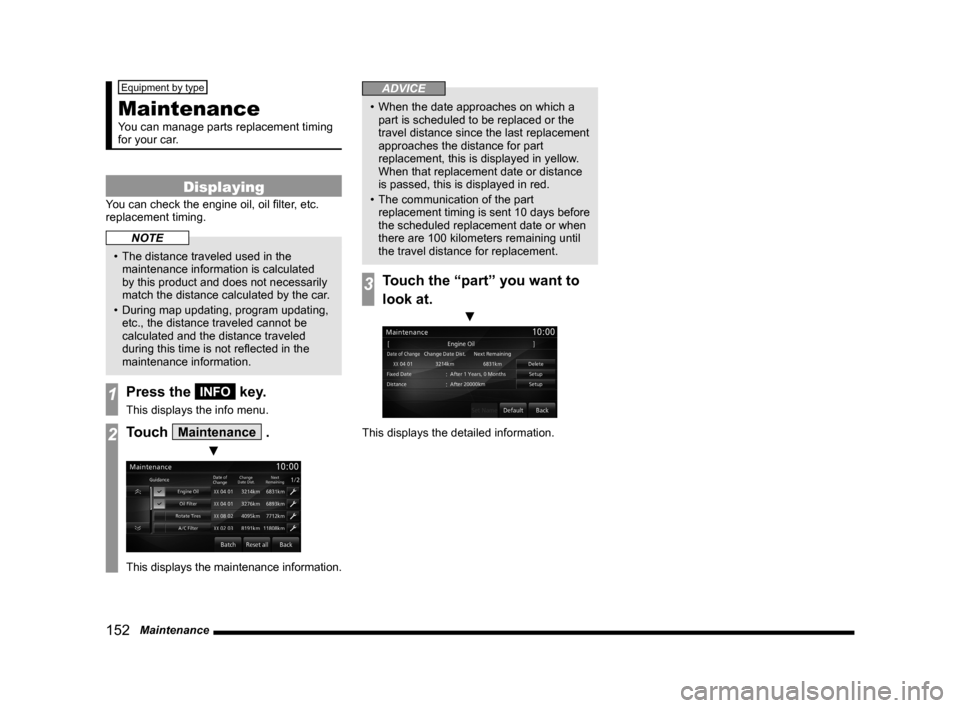
2Touch Maintenance .
▼
This displays the maintenance information.
ADVICE
• When the date approaches on which a
part is scheduled to be replaced or the
travel distance since the last replacement
approaches the distance for part
replacement, this is displayed in yellow.
When that replacement date or distance
is passed, this is displayed in red.
• The communication of the part
replacement timing is sent 10 days before
the scheduled replacement date or when
there are 100 kilometers remaining until
the travel distance for replacement.
3Touch the “part” you want to
look at.
▼
This displays the detailed information.
Page 153 of 226
Maintenance 153
INFO/SETTINGS INFO
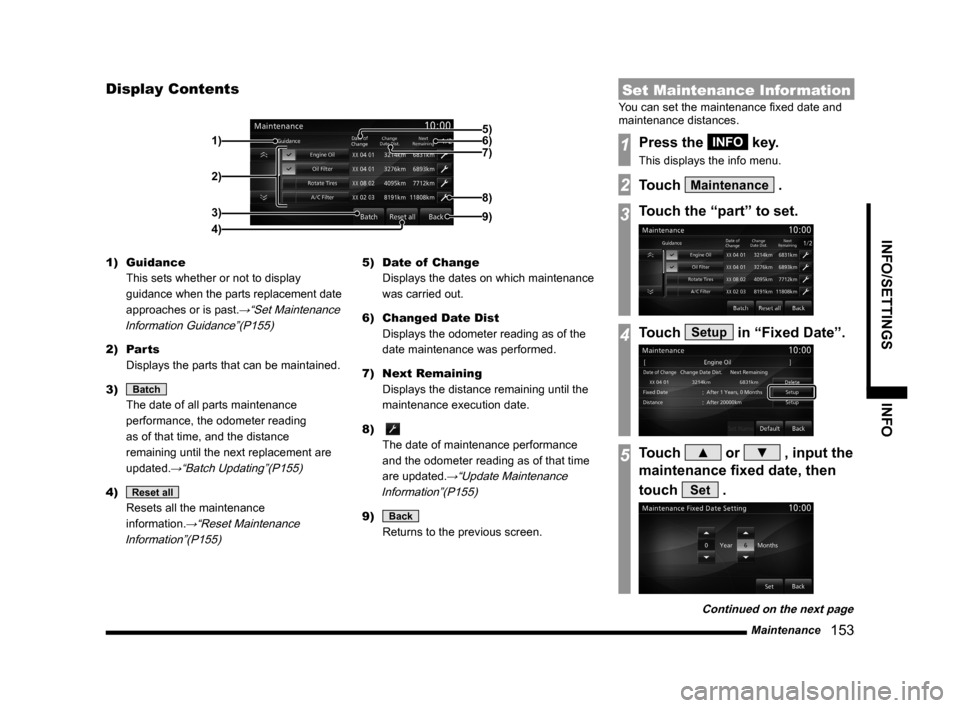
Display Contents
2)
3)
4) 1)
9)
8)
7) 6) 5)
1) Guidance
This sets whether or not to display
guidance when the parts replacement date
approaches or is past.
→“Set Maintenance
Information Guidance”(P155)
2) Parts
Displays the parts that can be maintained.
3)
Batch
The date of all parts maintenance
performance, the odometer reading
as of that time, and the distance
remaining until the next replacement are
updated.
→“Batch Updating”(P155)
4) Reset all
Resets all the maintenance
information.
→“Reset Maintenance
Information”(P155)
5) Date of Change
Displays the dates on which maintenance
was carried out.
6) Changed Date Dist
Displays the odometer reading as of the
date maintenance was performed.
7) Next Remaining
Displays the distance remaining until the
maintenance execution date.
8)
The date of maintenance performance
and the odometer reading as of that time
are updated.
→“Update Maintenance
Information”(P155)
9) Back
Returns to the previous screen.
Set Maintenance Information
You can set the maintenance fixed date and
maintenance distances.
1Press the INFO key.
This displays the info menu.
2Touch Maintenance .
3Touch the “part” to set.
4Touch Setup in “Fixed Date”.
5Touch ▲ or ▼ , input the
maintenance fixed date, then
touch
Set .
Continued on the next page
Page 154 of 226
154 Maintenance
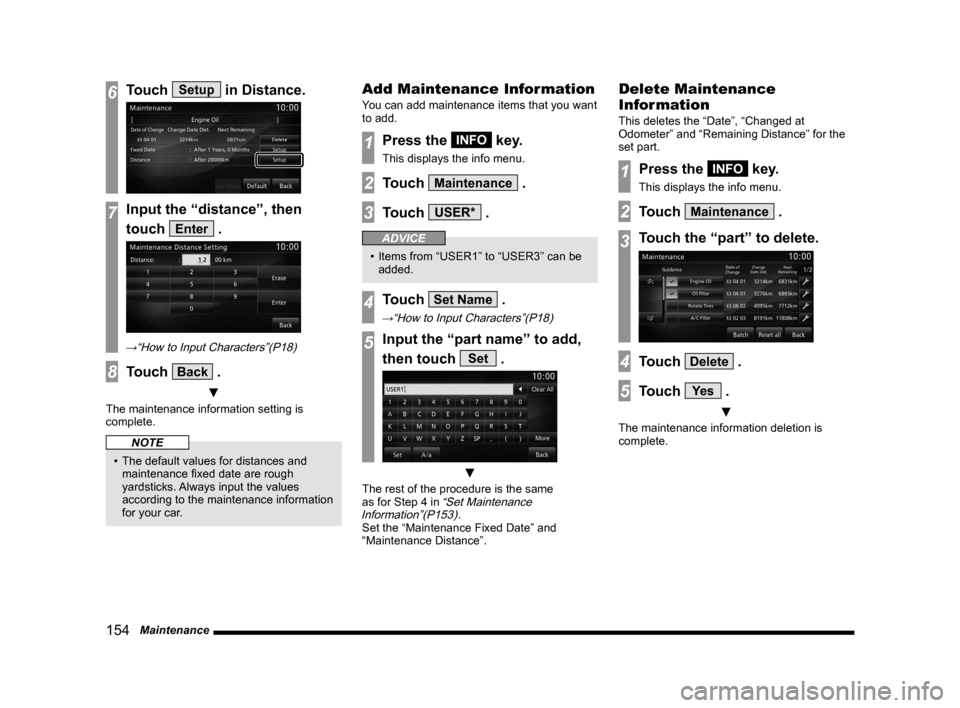
6Touch Setup in Distance.
7Input the “distance”, then
touch
Enter .
→“How to Input Characters”(P18)
8Touch Back .
▼
The maintenance information setting is
complete.
NOTE
• The default values for distances and
maintenance fixed date are rough
yardsticks. Always input the values
according to the maintenance information
for your car.
Add Maintenance Information
You can add maintenance items that you want
to add.
1Press the INFO key.
This displays the info menu.
2Touch Maintenance .
3Touch USER* .
ADVICE
• Items from “USER1” to “USER3” can be
added.
4Touch Set Name .
→“How to Input Characters”(P18)
5Input the “part name” to add,
then touch
Set .
▼
The rest of the procedure is the same
as for Step 4 in “Set Maintenance
Information”(P153).
Set the “Maintenance Fixed Date” and
“Maintenance Distance”.
Delete Maintenance
Information
This deletes the “Date”, “Changed at
Odometer” and “Remaining Distance” for the
set part.
1Press the INFO key.
This displays the info menu.
2Touch Maintenance .
3Touch the “part” to delete.
4Touch Delete .
5Touch Ye s .
▼
The maintenance information deletion is
complete.
Page 155 of 226
Maintenance 155
INFO/SETTINGS INFO
Update Maintenance
Information
When parts are replaced, the maintenance
information is updated.
1Press the INFO key.
This displays the info menu.
2Touch Maintenance .
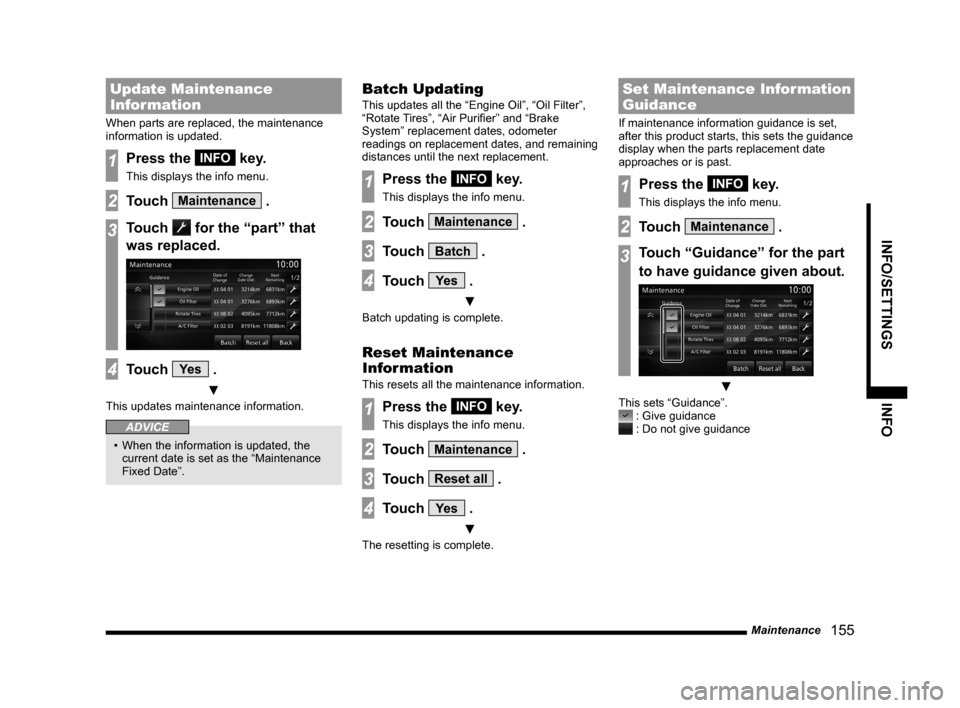
3Touch for the “part” that
was replaced.
4Touch Ye s .
▼
This updates maintenance information.
ADVICE
• When the information is updated, the
current date is set as the “Maintenance
Fixed Date”.
Batch Updating
This updates all the “Engine Oil”, “Oil Filter”,
“Rotate Tires”, “Air Purifier” and “Brake
System” replacement dates, odometer
readings on replacement dates, and remaining
distances until the next replacement.
1Press the INFO key.
This displays the info menu.
2Touch Maintenance .
3Touch Batch .
4Touch Ye s .
▼
Batch updating is complete.
Reset Maintenance
Information
This resets all the maintenance information.
1Press the INFO key.
This displays the info menu.
2Touch Maintenance .
3Touch Reset all .
4Touch Ye s .
▼
The resetting is complete.
Set Maintenance Information
Guidance
If maintenance information guidance is set,
after this product starts, this sets the guidance
display when the parts replacement date
approaches or is past.
1Press the INFO key.
This displays the info menu.
2Touch Maintenance .
3Touch “Guidance” for the part
to have guidance given about.
▼
This sets “Guidance”. : Give guidance : Do not give guidance
Page 157 of 226
HD Radio Data Information 157
INFO/SETTINGSINFO
HD Radio Data
Information
You can check Fuel price and weather
information.
NOTE
• Depending on the region, it may not be
possible to acquire information.
Displaying
1Press the INFO key.
This displays the info menu.
2Touch HD Information .
▼
This displays the HD Radio Data
Information screen.
Fuel price Information Screen
You can check Fuel prices. → “Fuel price Information Screen” (P158)
Weather Information Screen
You can check the weather by city. → “Weather Information Screen” (P160)
Page 163 of 226
Version Info 163
INFO/SETTINGS INFO
Version Info
You can check the map database,
navigation program version, and map
request code. This section also explains
methods for updating to a newer version of
the map database.
Displaying
Map Database Version
1Press the INFO key.
This displays the info menu.
2Touch Version Info .
▼
This displays the version info screen.
Checking the map request
code
1Press the INFO key.
This displays the info menu.
2Touch Map Reg. Code .
▼
This displays the map registration code
screen.
Version Updating Method
A map database or system can be updated
to a newer version by replacing the main unit
map card with a higher version map card,
available separately.
CAUTION
• When updating, first ensure that your
car is stopped in a safe area in which
stopping is permitted
1Press the OPEN key.
2Touch Monitor OPEN .
▼
The monitor panel opens.
Continued on the next page