Page 31 of 226
Navigation Screen 31
NAVIBasic Operation
Individual Icons
This section explains the icons displayed on
the current location screen (P29).
Displayed when connected to
Bluetooth.
→“Bluetooth Setting”(P209)
Displays the signal strength
and whether or not the phone is
roaming.
Displayed when the phone is
used.
Redisplays the phone operation
panel
(P148).
AV icon Displays the status of the audio
source currently being used.
Touching this switches to the
audio screen.
For details, see
“AV Icons”(P81).
Whether or not to display can
be selected with [Screen] “Other
Indicator Icons”.
→“Navi Settings”(P195)
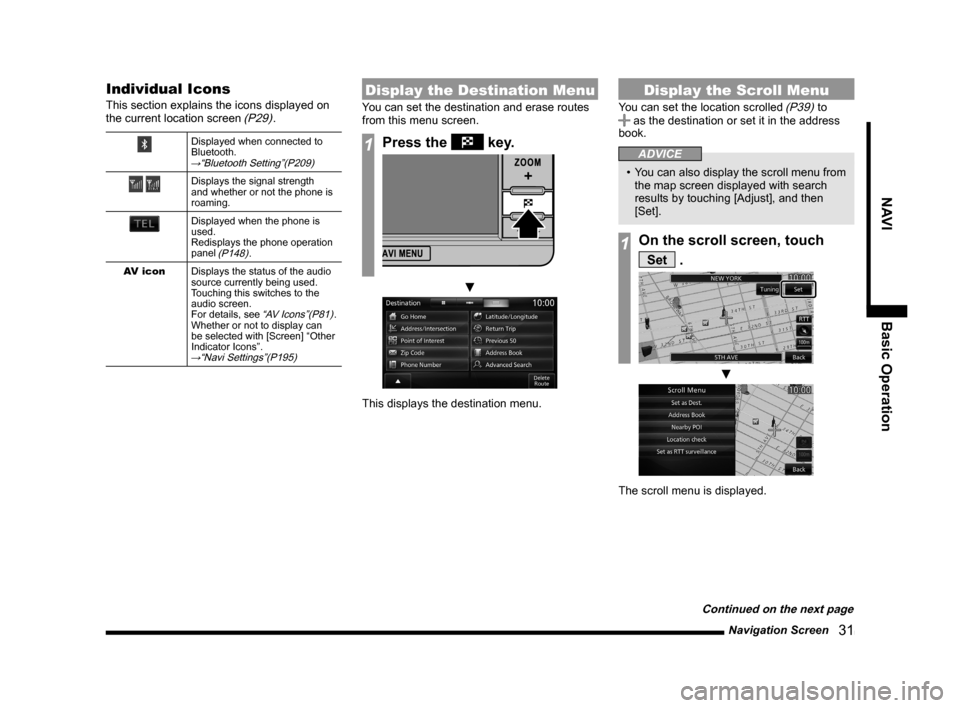
Display the Destination Menu
You can set the destination and erase routes
from this menu screen.
1Press the key.
▼
This displays the destination menu.
Display the Scroll Menu
You can set the location scrolled (P39) to as the destination or set it in the address
book.
ADVICE
• You can also display the scroll menu from
the map screen displayed with search
results by touching [Adjust], and then
[Set].
1On the scroll screen, touch
Set .
▼
The scroll menu is displayed.
Continued on the next page
Page 32 of 226
32 Navigation Screen
Set as Dest.
The location can be set as the
destination.
→“Set as the Destination”(P41)
Address Book The location can be
registered.→“Set in the Address
Book”(P42)
POI nearby Establishments around the
location can be searched for.
→“Search for Nearby
Establishments”(P42)
Location check The position of location
relative to the current location can
be checked.
→“Check the Location of Your
Car.”(P43)
Set as RTT
sur veillance Areas (around the location)
can be registered to check traffic
messages.
→“Registering the
RTT Surveillance Map”(P78)
Back Returns to the previous screen.
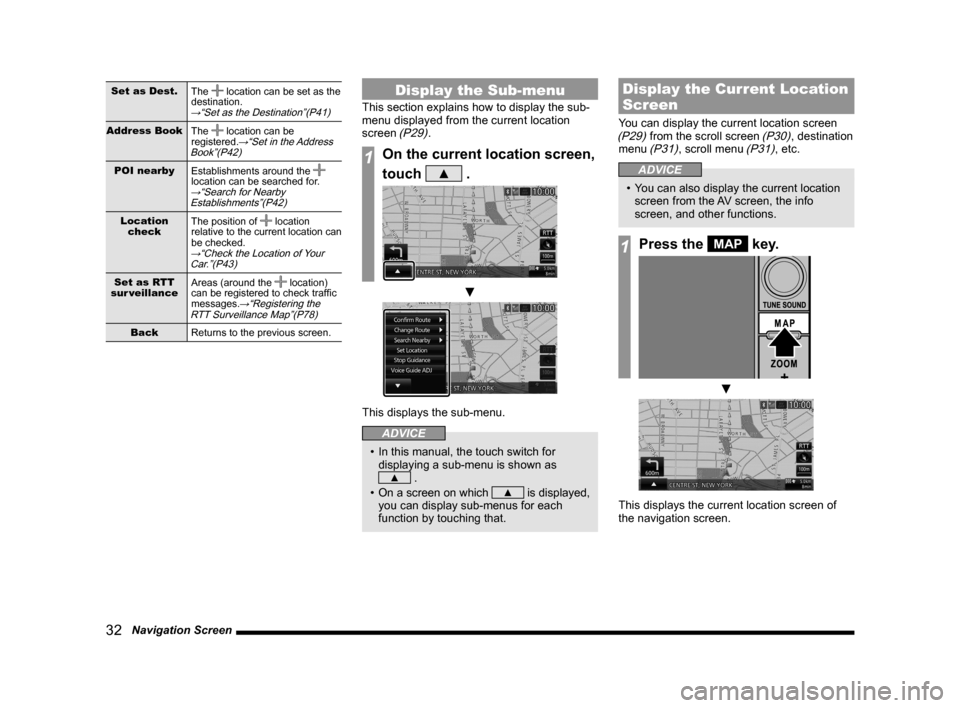
Display the Sub-menu
This section explains how to display the sub-
menu displayed from the current location
screen
(P29).
1On the current location screen,
touch
▲ .
▼
This displays the sub-menu.
ADVICE
• In this manual, the touch switch for
displaying a sub-menu is shown as
▲ .
• On a screen on which
▲ is displayed,
you can display sub-menus for each
function by touching that.
Display the Current Location
Screen
You can display the current location screen (P29) from the scroll screen (P30), destination
menu (P31), scroll menu (P31), etc.
ADVICE
• You can also display the current location
screen from the AV screen, the info
screen, and other functions.
1Press the MAP key.
▼
This displays the current location screen of
the navigation screen.
Page 46 of 226
46 Set Your Home as the Destination
Destination Settings
Set Your Home as
the Destination
You can set your pre-registered home (P67)
as the destination.
1Press the key.
This displays the destination menu.
2Touch Go Home .
▼
This displays the guidance start screen (P56).
ADVICE
• If you have not registered your home,
this displays a screen asking if you
want to register it, then the setting
screen is displayed.
→“Register a Home
Location”(P67)
3Touch Start .
▼
The search for the route with your home as
the destination is complete and route guidance
starts.
NOTE
• If a route using the HOV lane is in the
search result with set conditions, a telop
that confirms the use of the HOV lane is
displayed.
[Yes]: Search for a HOV lane route.
[No]: Search for a non-HOV lane route.
Page 47 of 226
Set the Searched for Location as the Destination 47
NAVIDestination Settings
Set the Searched
for Location as the
Destination
This section explains the series of
operations for setting the location searched
for with
“Search for a Location”(P48) as the
destination.
1Press the key.
This displays the destination menu.
2Touch any “search method”
and search for the location.
→“Search for a Location”(P48~P55)
3When the location you
searched for is displayed,
touch
Start .
▼
The search for the route that has the searched
for location as its destination is complete and
route guidance starts.
ADVICE
• Depending on the search method, the
establishment name and telephone
number may not be displayed.
NOTE
• If a route using the HOV lane is in the
search result with set conditions, a telop
that confirms the use of the HOV lane is
displayed.
[Yes]: Search for a HOV lane route.
[No]: Search for a non-HOV lane route.
Page 48 of 226
48 Search for a Location
Search for a
Location
With this product, you can use various
methods to search for locations.
The location searched for here is used when
setting the destination
(P46), a waypoint (P60), or an address in the address book (P67).
This section explains the method for
searching from the destination menu
(P21).
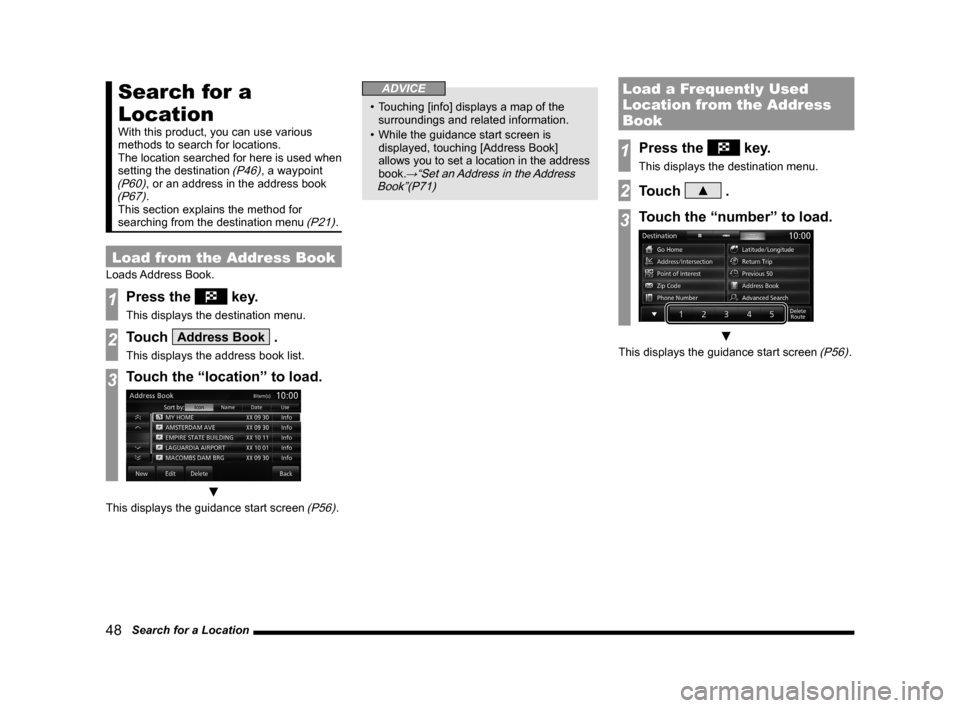
Load from the Address Book
Loads Address Book.
1Press the key.
This displays the destination menu.
2Touch Address Book .
This displays the address book list.
3Touch the “location” to load.
▼
This displays the guidance start screen (P56).
ADVICE
• Touching [info] displays a map of the
surroundings and related information.
• While the guidance start screen is
displayed, touching [Address Book]
allows you to set a location in the address
book.
→“Set an Address in the Address
Book”(P71)
Load a Frequently Used
Location from the Address
Book
1Press the key.
This displays the destination menu.
2Touch ▲ .
3Touch the “number” to load.
▼
This displays the guidance start screen (P56).
Page 49 of 226
Search for a Location 49
NAVIDestination Settings
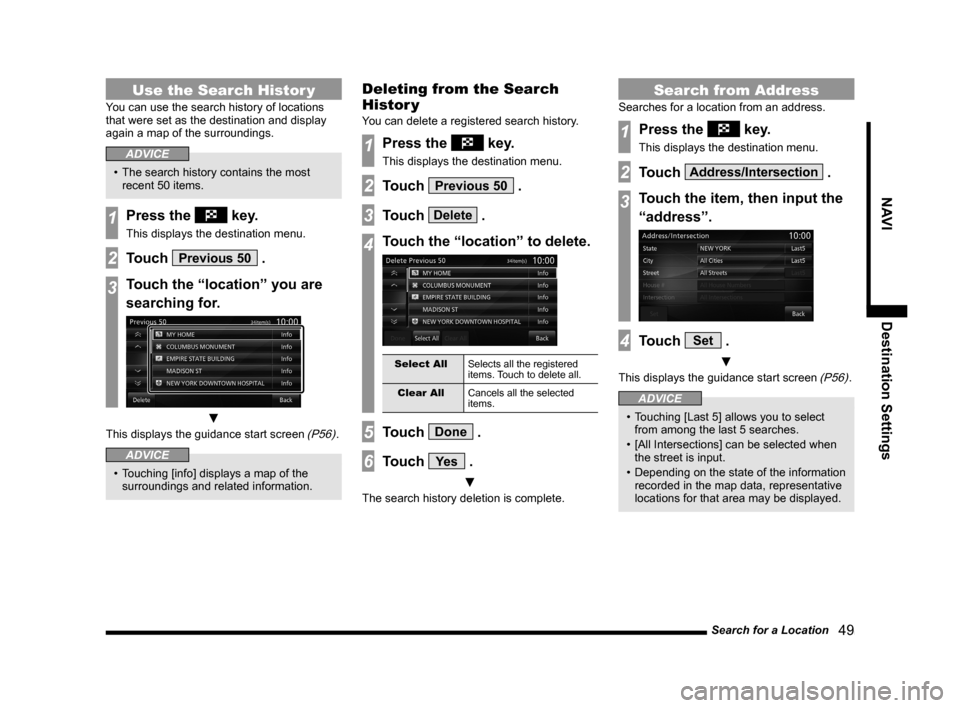
Use the Search Histor y
You can use the search history of locations
that were set as the destination and display
again a map of the surroundings.
ADVICE
• The search history contains the most
recent 50 items.
1Press the key.
This displays the destination menu.
2Touch Previous 50 .
3Touch the “location” you are
searching for.
▼
This displays the guidance start screen (P56).
ADVICE
• Touching [info] displays a map of the
surroundings and related information.
Deleting from the Search
Histor y
You can delete a registered search history.
1Press the key.
This displays the destination menu.
2Touch Previous 50 .
3Touch Delete .
4Touch the “location” to delete.
Select All Selects all the registered
items. Touch to delete all.
Clear All Cancels all the selected
items.
5Touch Done .
6Touch Ye s .
▼
The search history deletion is complete.
Search from Address
Searches for a location from an address.
1Press the key.
This displays the destination menu.
2Touch Address/Intersection .
3Touch the item, then input the
“address”.
4Touch Set .
▼
This displays the guidance start screen (P56).
ADVICE
• Touching [Last 5] allows you to select
from among the last 5 searches.
• [All Intersections] can be selected when
the street is input.
• Depending on the state of the information
recorded in the map data, representative
locations for that area may be displayed.
Page 50 of 226
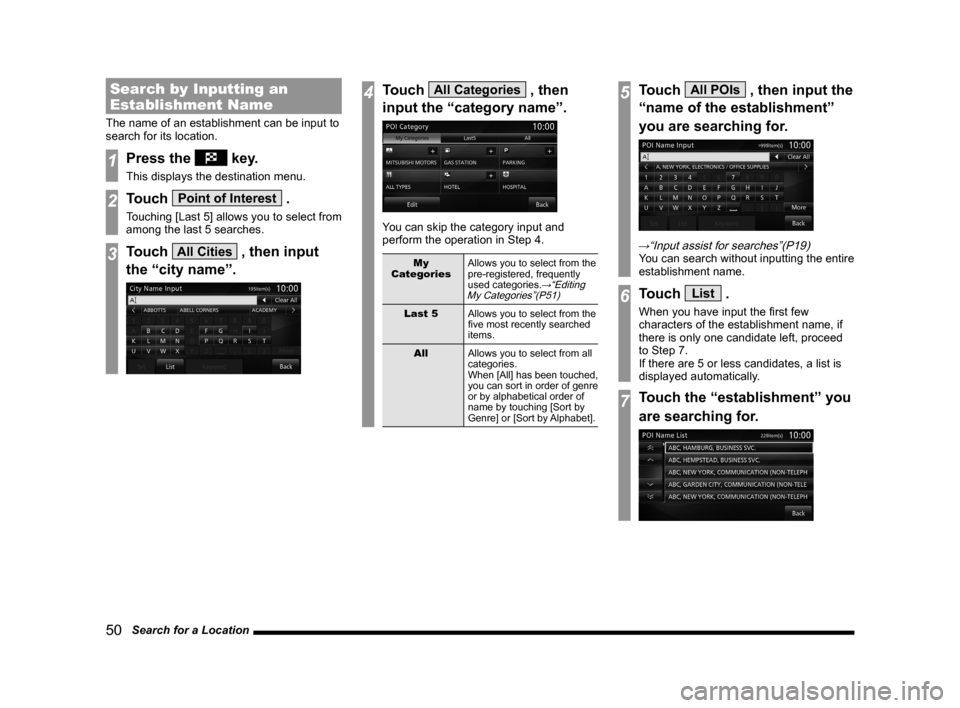
50 Search for a Location
Search by Inputting an
Establishment Name
The name of an establishment can be input to
search for its location.
1Press the key.
This displays the destination menu.
2Touch Point of Interest .
Touching [Last 5] allows you to select from
among the last 5 searches.
3Touch All Cities , then input
the “city name”.
4Touch All Categories , then
input the “category name”.
You can skip the category input and
perform the operation in Step 4.
My
Categories Allows you to select from the
pre-registered, frequently
used categories.
→“Editing
My Categories”(P51)
Last 5 Allows you to select from the
five most recently searched
items.
All Allows you to select from all
categories.
When [All] has been touched,
you can sort in order of genre
or by alphabetical order of
name by touching [Sort by
Genre] or [Sort by Alphabet].
5Touch All POIs , then input the
“name of the establishment”
you are searching for.
→“Input assist for searches”(P19)You can search without inputting the entire
establishment name.
6Touch List .
When you have input the first few
characters of the establishment name, if
there is only one candidate left, proceed
to Step 7.
If there are 5 or less candidates, a list is
displayed automatically.
7Touch the “establishment” you
are searching for.
Page 51 of 226
Search for a Location 51
NAVIDestination Settings
ADVICE
• If the list has the “+” mark, touch [Sub
POI], select the detailed establishment
name.
A list is displayed and you can select the
detailed establishment.
8Touch Set .
▼
This displays the guidance start screen (P56).
Editing My Categories
Registers a frequently used establishment
category in “My Categories”.
Up to 6 entries can be registered in “My
Categories”.
1Press the key.
This displays the destination menu.
2Touch Point of Interest .
3Touch All Categories .
4Touch Edit .
5Touch the “category”
to register.
The registered category is displayed
inverted.
Default Restores the factory settings.
Clear All Cancels all the registered
categories.
Sort by
Alphabet or
Sort by Genre Sorts by genre or in
alphabetical order by name.
6Touch Back .
Returns to the previous screen.
ADVICE
•
You can also edit by touching [NAVI
MENU] key, [Personal], and [My
Categories] in “Edit”.
→“Personal”(P204)