Page 19 of 226
How to Input Characters 19
IntroductionBasic Operation
Types of Characters That Can
Be Input
The input keyboard is capable of inputting
various characters.
Character input is displayed when it becomes
necessary during the operation of functions.
However, some functions limit the characters
that can be input.
Letters/numbers
Symbols
Keyboard for Number Input
The input keyboard makes it possible to input
house numbers and latitude/longitude.
Input assist for searches
4)5)
1)
3)
2)
1)
Displays the previous candidate list.
2) Search candidate list
Displays characters and candidates that
follow the input characters.
Touching this completes the input.
3)
Displays the next candidate list.
4)
List
Displays the search results for the input
characters.
5)
Keyword
Keywords can be input.
Page 20 of 226
20 Top Menu
Top Menu
By pressing the corresponding key, you can
use various functions from the top menus.
Display Types
The top menus have a number of display
methods. You can use the one you like best.
You can switch by touching the display switch
menu at the top of each top menu.
Touch
switch Display contents
NOTE
•
The types that can be displayed depend
on the top menu. There are also menus
that do not allow you to switch the display
type.
Page 21 of 226

Top Menu 21
Introduction Basic Operation
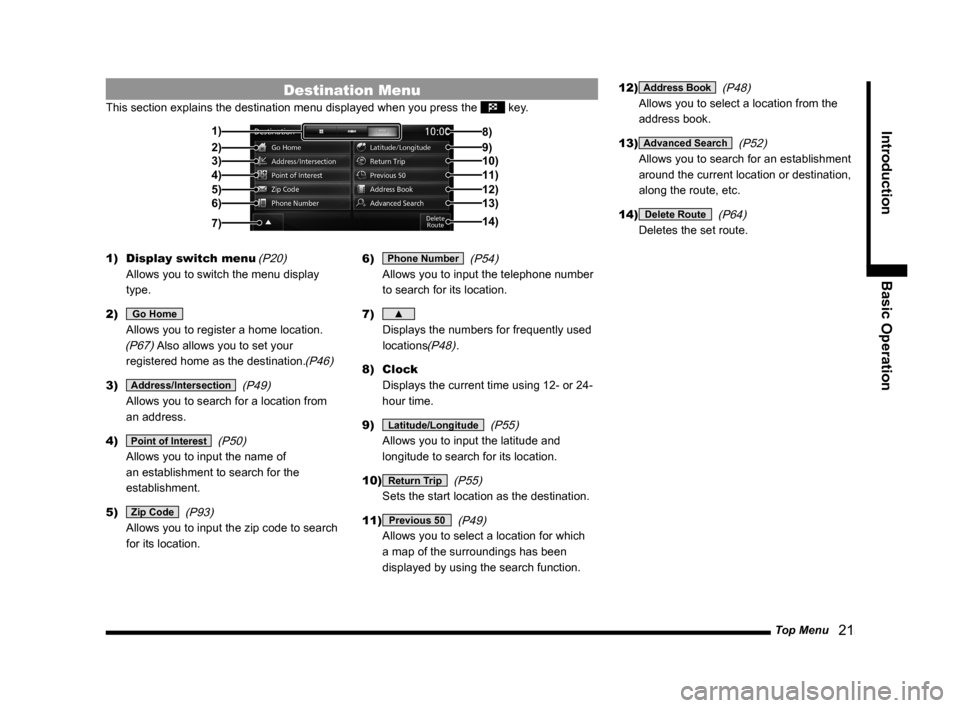
Destination Menu
This section explains the destination menu displayed when you press the \
key.
2)3)
4)
5)6) 1)
14) 8)
9)10)11)
12)13)
7)
1) Display switch menu (P20)
Allows you to switch the menu display
type.
2)
Go Home
Allows you to register a home location.
(P67) Also allows you to set your
registered home as the destination.
(P46)
3) Address/Intersection (P49)
Allows you to search for a location from
an address.
4)
Point of Interest (P50)
Allows you to input the name of
an establishment to search for the
establishment.
5)
Zip Code (P93)
Allows you to input the zip code to search
for its location. 6)
Phone Number
(P54)
Allows you to input the telephone number
to search for its location.
7)
▲
Displays the numbers for frequently used
locations
(P48).
8) Clock
Displays the current time using 12- or 24-
hour time.
9)
Latitude/Longitude (P55)
Allows you to input the latitude and
longitude to search for its location.
10)
Return Trip (P55)
Sets the start location as the destination.
11)
Previous 50 (P49)
Allows you to select a location for which
a map of the surroundings has been
displayed by using the search function. 12)
Address Book
(P48)
Allows you to select a location from the
address book.
13)
Advanced Search (P52)
Allows you to search for an establishment
around the current location or destination,
along the route, etc.
14)
Delete Route (P64)
Deletes the set route.
Page 22 of 226
22 Top Menu
Navi Menu
This section explains the navigation menu displayed when you press the NAVI MENU key.
2)3)
4) 1)
5)6)7)8)
1) Route Menu (P57)
Allows you to check and edit the set route.
2)
Guidance (P196)
Allows you to set up the guidance display.
3)
Screen (P197)
Allows you to set up the navigation
display.
4)
RTT (P75)
Allows you to set up the RTT.
5)
Route Options (P201)
Allows you to set up the default values for
route search conditions. 6)
Navi Voice/Others
(P202)
Allows you to set up the navigation audio
guidance. Also allows you to check vehicle
signals.
(P203)
7) Personal (P204)
Allows you to manage address book,
home location, and other information.
8)
Start Demo (P59)
Starts a demo trip.
Page 23 of 226

Top Menu 23
Introduction Basic Operation
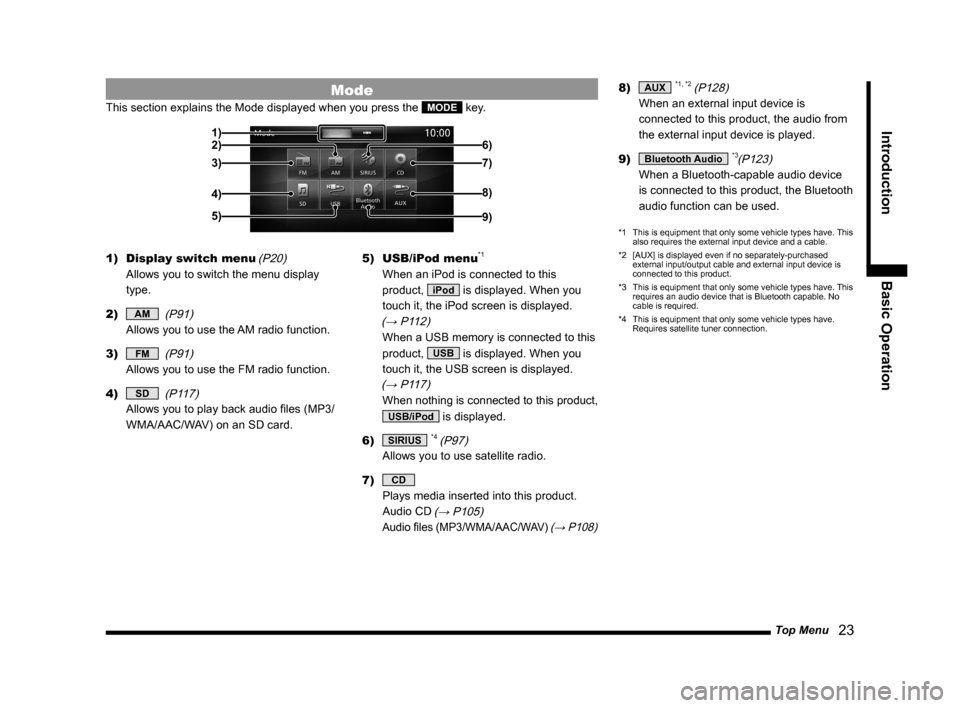
Mode
This section explains the Mode displayed when you press the MODE key.
2)
3)
4)
5) 1)
6)
7)
8)
9)
1) Display switch menu (P20)
Allows you to switch the menu display
type.
2)
AM (P91)
Allows you to use the AM radio function.
3)
FM (P91)
Allows you to use the FM radio function.
4)
SD (P117)
Allows you to play back audio files (MP3/
WMA/AAC/WAV) on an SD card. 5)
USB/iPod menu
*1
When an iPod is connected to this
product,
iPod is displayed. When you
touch it, the iPod screen is displayed.
(→ P112)
When a USB memory is connected to this
product,
USB is displayed. When you
touch it, the USB screen is displayed.
(→ P117)
When nothing is connected to this product,
USB/iPod is displayed.
6)
SIRIUS *4 (P97)
Allows you to use satellite radio.
7)
CD
Plays media inserted into this product.
Audio CD
(→ P105)
Audio files (MP3/WMA/AAC/WAV) (→ P108)
8) AUX *1, *2 (P128)
When an external input device is
connected to this product, the audio from
the external input device is played.
9)
Bluetooth Audio *3(P123)
When a Bluetooth-capable audio device
is connected to this product, the Bluetooth
audio function can be used.
*1 This is equipment that only some vehicle types have. This
also requires the external input device and a cable.
*2 [AUX] is displayed even if no separately-purchased
external input/output cable and external input device is
connected to this product.
*3 This is equipment that only some vehicle types have. This
requires an audio device that is Bluetooth capable. No
cable is required.
*4 This is equipment that only some vehicle types have.
Requires satellite tuner connection.
Page 24 of 226

24 Top Menu
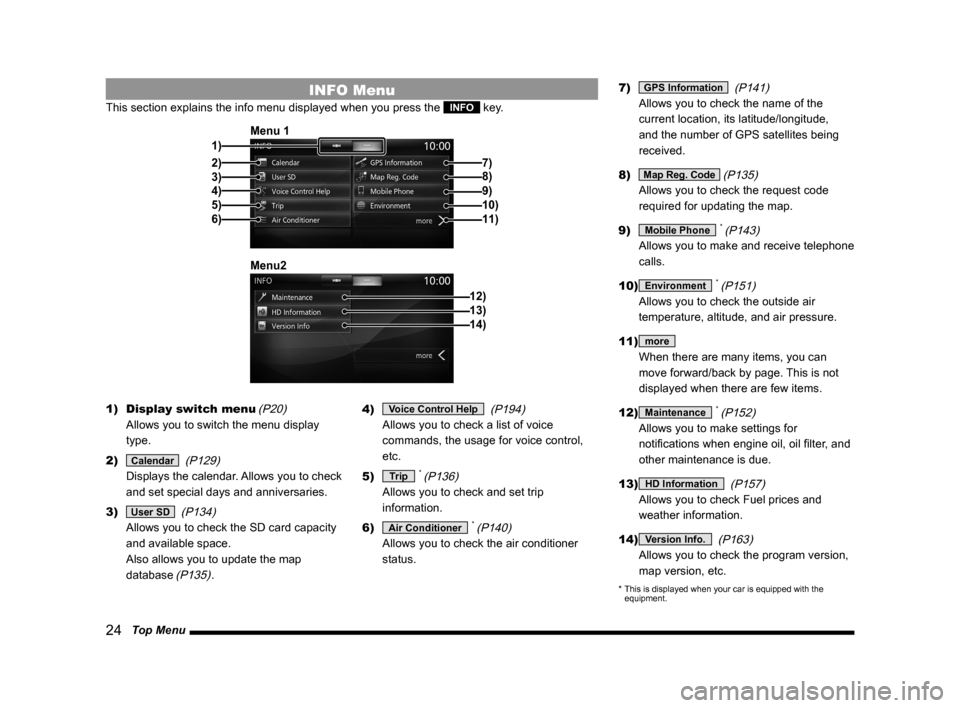
INFO Menu
This section explains the info menu displayed when you press the INFO key.
2)3)
4)
5)
6) 1) Menu 1
7)
8)
9)10)11)
12)
Menu213)14)
1)
Display switch menu (P20)
Allows you to switch the menu display
type.
2)
Calendar (P129)
Displays the calendar. Allows you to check
and set special days and anniversaries.
3)
User SD (P134)
Allows you to check the SD card capacity
and available space.
Also allows you to update the map
database
(P135). 4)
Voice Control Help
(P194)
Allows you to check a list of voice
commands, the usage for voice control,
etc.
5)
Trip * (P136)
Allows you to check and set trip
information.
6)
Air Conditioner * (P140)
Allows you to check the air conditioner
status. 7)
GPS Information
(P141)
Allows you to check the name of the
current location, its latitude/longitude,
and the number of GPS satellites being
received.
8)
Map Reg. Code (P135)
Allows you to check the request code
required for updating the map.
9)
Mobile Phone * (P143)
Allows you to make and receive telephone
calls.
10)
Environment * (P151)
Allows you to check the outside air
temperature, altitude, and air pressure.
11)
more
When there are many items, you can
move forward/back by page. This is not
displayed when there are few items.
12)
Maintenance * (P152)
Allows you to make settings for
notifications when engine oil, oil filter, and
other maintenance is due.
13)
HD Information (P157)
Allows you to check Fuel prices and
weather information.
14)
Version Info. (P163)
Allows you to check the program version,
map version, etc.
* This is displayed when your car is equipped with the
equipment.
Page 25 of 226
Top Menu 25
Introduction Basic Operation
SETTINGS Menu
This section explains the settings menu displayed when you press the SETTINGS key.
2)1)
3) 5)
4)
1) Display Off
(P213)
Allows you to switch OFF the screen
display.
2)
Picture Control (P213)
Allows you to adjust the picture quality.
3)
Vehicle Settings *1 (P213)
Allows you to make settings for vehicle
equipment. 4)
System *2
Allows you to make settings for the Time
(P208), Language (P208), Camera (P150),
A/C Cut-in
(P209), Units (P209), Pairing
(P209), Keyboard Layout (P212), etc.
5)
Clock Screen (P218)
Displays the clock.
*1 This is displayed when your car is equipped with the
equipment.
*2 Depending on the equipment, some of the items in
[System] may not be displayed.
Page 29 of 226

Navigation Screen 29
NAVIBasic Operation
Navigation Screen
This section explains the navigation map screen and the display contents\
for the menu
screens.
Map Display Contents
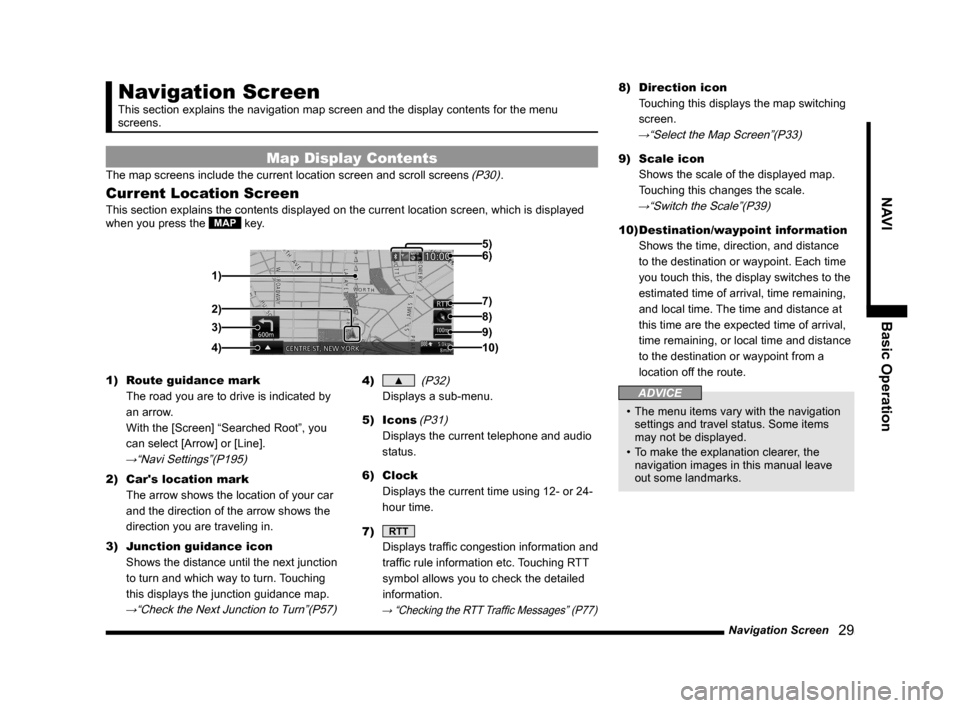
The map screens include the current location screen and scroll screens (P30).
Current Location Screen
This section explains the contents displayed on the current location scr\
een, which is displayed
when you press the MAP key.
3)
4) 1) 6) 5)
8)
7)
2)
9)
10)
1) Route guidance mark
The road you are to drive is indicated by
an arrow.
With the [Screen] “Searched Root”, you
can select [Arrow] or [Line].
→“Navi Settings”(P195)
2) Car's location mark
The arrow shows the location of your car
and the direction of the arrow shows the
direction you are traveling in.
3) Junction guidance icon
Shows the distance until the next junction
to turn and which way to turn. Touching
this displays the junction guidance map.
→“Check the Next Junction to Turn”(P57)
4) ▲ (P32)
Displays a sub-menu.
5) Icons
(P31)
Displays the current telephone and audio
status.
6) Clock
Displays the current time using 12- or 24-
hour time.
7)
RTT
Displays traffic congestion information and
traffic rule information etc. Touching RTT
symbol allows you to check the detailed
information.
→ “Checking the RTT Traffic Messages” (P77)
8) Direction icon
Touching this displays the map switching
screen.
→“Select the Map Screen”(P33)
9) Scale icon
Shows the scale of the displayed map.
Touching this changes the scale.
→“Switch the Scale”(P39)
10) Destination/waypoint information
Shows the time, direction, and distance
to the destination or waypoint. Each time
you touch this, the display switches to the
estimated time of arrival, time remaining,
and local time. The time and distance at
this time are the expected time of arrival,
time remaining, or local time and distance
to the destination or waypoint from a
location off the route.
ADVICE
• The menu items vary with the navigation
settings and travel status. Some items
may not be displayed.
• To make the explanation clearer, the
navigation images in this manual leave
out some landmarks.