Page 229 of 418

NOTElBecause the rear-view camera has a special
lens, the lines on the ground between park-
ing spaces may not look parallel on the screen.
l In the following situations, the screen indi-
cation may be difficult to see. There is no abnormality.
• Low light (nighttime)
• When the light of the sun or the light from
a vehicle’s headlamps shines directly into the lens
l If the camera is hot and is then cooled by
rain or a car wash, the lens can mist up. This phenomenon does not indicate a malfunc-
tion.
l It is not possible to fully see obstacles when
the lens is dirty. If the lens becomes conta-
minated by water droplets, snow, mud or oil, wipe off the contamination, taking care not
to scratch the lens.
l Please observe the following cautions. Ig-
noring them could lead to a camera malfunc-tion.
• Do not subject the camera to physical
shock.
• Do not apply wax to the camera.
• Do not splash the camera with boiling wa-
ter.
• Do not disassemble the camera.
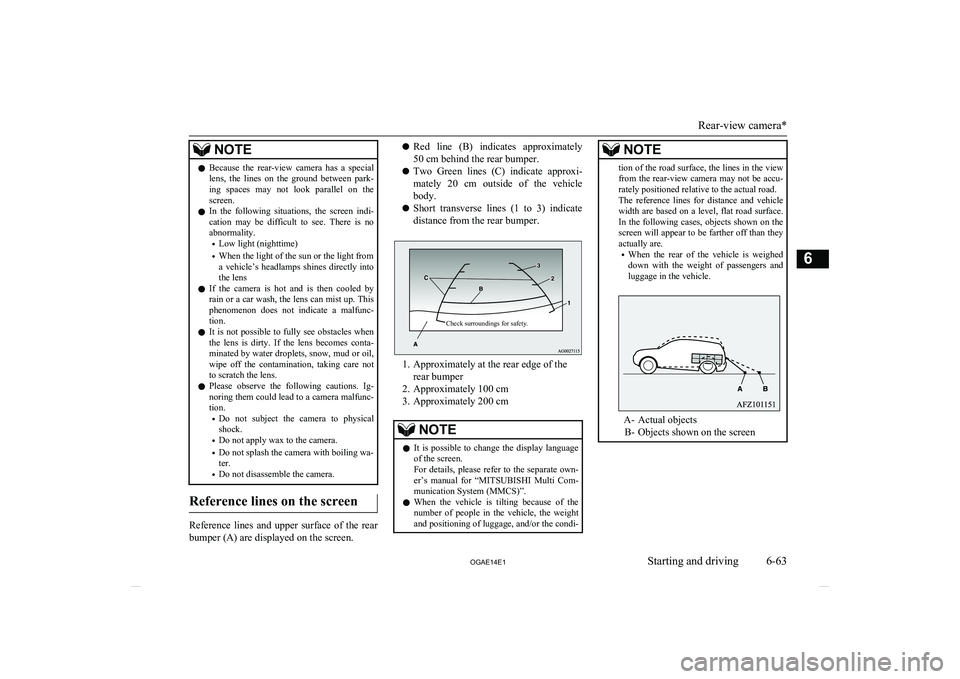
Reference lines on the screen
Reference lines and upper surface of the rear
bumper (A) are displayed on the screen.
l Red line (B) indicates approximately
50 cm behind the rear bumper.
l Two Green lines (C) indicate approxi-
mately 20 cm outside of the vehicle body.
l Short transverse lines (1 to 3) indicate
distance from the rear bumper.Check surroundings for safety.
1. Approximately at the rear edge of the rear bumper
2. Approximately 100 cm
3. Approximately 200 cm
NOTEl It is possible to change the display language
of the screen.
For details, please refer to the separate own- er’s manual for “ MITSUBISHI Multi Com-
munication System (MMCS)”.
l When the vehicle is tilting because of the
number of people in the vehicle, the weight
and positioning of luggage, and/or the condi-NOTEtion of the road surface, the lines in the view from the rear-view camera may not be accu-
rately positioned relative to the actual road.
The reference lines for distance and vehicle
width are based on a level, flat road surface. In the following cases, objects shown on the
screen will appear to be farther off than they actually are.
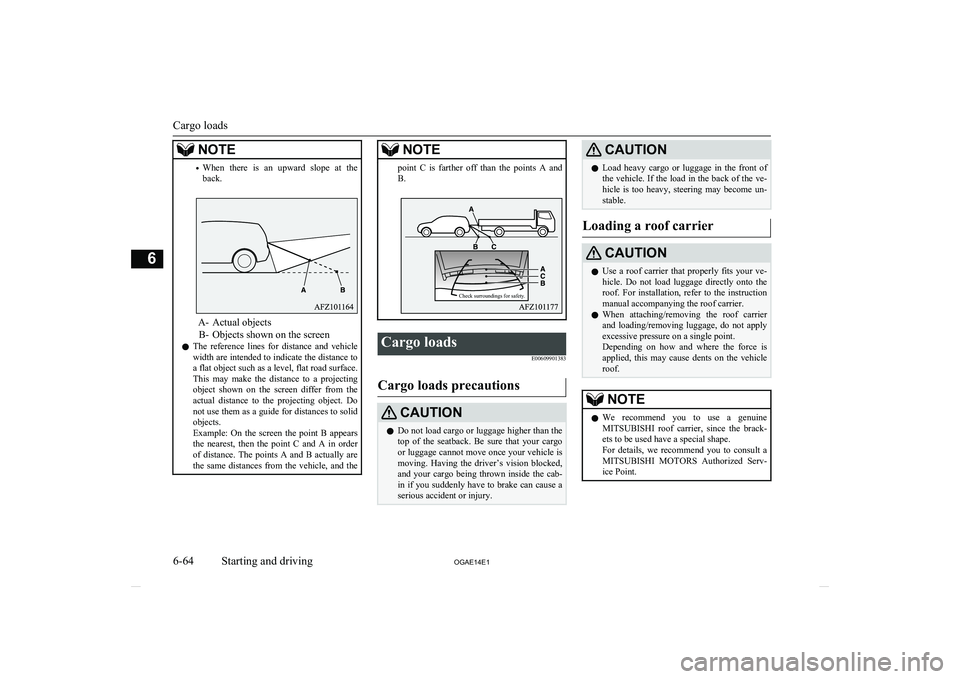
• When the rear of the vehicle is weighed
down with the weight of passengers and
luggage in the vehicle.
A- Actual objects
B- Objects shown on the screen
Rear-view camera*
6-63
OGAE14E1Starting and driving6
Page 230 of 418

NOTE•When there is an upward slope at the
back.
A- Actual objects
B- Objects shown on the screen
l The reference lines for distance and vehicle
width are intended to indicate the distance to
a flat object such as a level, flat road surface. This may make the distance to a projectingobject shown on the screen differ from the
actual distance to the projecting object. Do not use them as a guide for distances to solid
objects.
Example: On the screen the point B appears
the nearest, then the point C and A in order of distance. The points A and B actually are the same distances from the vehicle, and the
NOTEpoint C is farther off than the points A and
B.Cargo loads
E00609901383
Cargo loads precautions
CAUTIONlDo not load cargo or luggage higher than the
top of the seatback. Be sure that your cargo
or luggage cannot move once your vehicle is moving. Having the driver’s vision blocked,
and your cargo being thrown inside the cab- in if you suddenly have to brake can cause a
serious accident or injury.CAUTIONl Load heavy cargo or luggage in the front of
the vehicle. If the load in the back of the ve-
hicle is too heavy, steering may become un- stable.
Loading a roof carrier
CAUTIONl Use a roof carrier that properly fits your ve-
hicle. Do not load luggage directly onto the
roof. For installation, refer to the instruction manual accompanying the roof carrier.
l When attaching/removing the roof carrier
and loading/removing luggage, do not apply excessive pressure on a single point.
Depending on how and where the force is applied, this may cause dents on the vehicle
roof.NOTEl We recommend you to use a genuine
MITSUBISHI roof carrier, since the brack-
ets to be used have a special shape.
For details, we recommend you to consult a
MITSUBISHI MOTORS Authorized Serv-
ice Point.
Cargo loads
6-64 OGAE14E1Starting and driving6 Check surroundings for safety.
Page 324 of 418

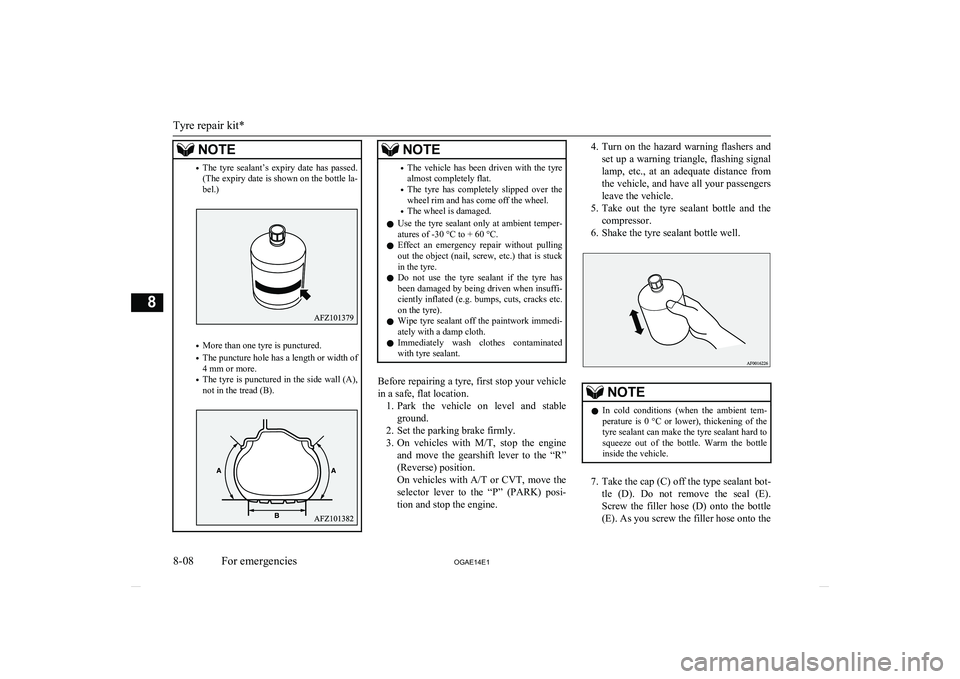
NOTE•The tyre sealant’s expiry date has passed.
(The expiry date is shown on the bottle la- bel.)
• More than one tyre is punctured.
• The puncture hole has a length or width of
4 mm or more.
• The tyre is punctured in the side wall (A),
not in the tread (B).
NOTE• The vehicle has been driven with the tyre
almost completely flat.
• The tyre has completely slipped over the
wheel rim and has come off the wheel.
• The wheel is damaged.
l Use the tyre sealant only at ambient temper-
atures of -30 °C to + 60 °C.
l Effect an emergency repair without pulling
out the object (nail, screw, etc.) that is stuck
in the tyre.
l Do not use the tyre sealant if the tyre has
been damaged by being driven when insuffi- ciently inflated (e.g. bumps, cuts, cracks etc.
on the tyre).
l Wipe tyre sealant off the paintwork immedi-
ately with a damp cloth.
l Immediately wash clothes contaminated
with tyre sealant.
Before repairing a tyre, first stop your vehicle
in a safe, flat location. 1. Park the vehicle on level and stable
ground.
2. Set the parking brake firmly.
3. On vehicles with M/T, stop the engine
and move the gearshift lever to the “R”
(Reverse) position.
On vehicles with A/T or CVT, move the
selector lever to the “P” (PARK) posi- tion and stop the engine.
4. Turn on the hazard warning flashers and
set up a warning triangle, flashing signal
lamp, etc., at an adequate distance from
the vehicle, and have all your passengers
leave the vehicle.
5. Take out the tyre sealant bottle and the
compressor.
6. Shake the tyre sealant bottle well.NOTEl In cold conditions (when the ambient tem-
perature is 0 °C or lower), thickening of the
tyre sealant can make the tyre sealant hard to squeeze out of the bottle. Warm the bottleinside the vehicle.
7. Take the cap (C) off the type sealant bot-
tle (D). Do not remove the seal (E). Screw the filler hose (D) onto the bottle
(E). As you screw the filler hose onto the
Tyre repair kit*
8-08 OGAE14E1For emergencies8
Page 389 of 418
Vehicle dimensionsE011002040381Front track1,525 mm2Overall width1,770 mm3Front overhang870 mm4Wheel base2,670 mm5Rear overhang755 mm6Overall length4,295 mm7Ground clearance (unladen)Petrol-powered vehicles180 mm, 195 mm*1Diesel-powered vehicles180 mm*1
: Vehicles for Russia, Kazakhstan and Ukraine
Vehicle dimensions
11-05
OGAE14E1Specifications11