Page 145 of 240

Settings are stored automatically after approxi‐
mately 10 seconds.
Sun visor
Glare shield
Fold the sun visor down or up.
Vanity mirror
A vanity mirror is located in the sun visor be‐
hind a cover. When the cover is opened, the
mirror lighting switches on.
Ashtray/cigarette
lighter
At a glance
The ashtray is located in one of the frontal cup
holders, the cigarette lighter above it in the
center console.
Ashtray In order to empty the ashtray, remove the ash‐
tray from the cupholder.
Lighter Danger of burns
Only hold the hot lighter by its knob; oth‐
erwise, there is a danger of getting burned.
Switch off the ignition and take the remote
control with you when leaving the vehicle so
that children cannot use the lighter and burn
themselves. ◀
Replace the cover after use
Reinsert the lighter or socket cover after
use, otherwise objects may get into the lighter
socket or fixture and cause a short circuit. ◀
Push in the lighter.
The lighter can be removed as
soon as it pops back out.
Connecting electrical de‐ vices
Hints Do not connect charging devices to the
12 volt socket in the vehicle
Do not connect battery chargers to the factory-
installed 12 volt sockets in the vehicle as this
may damage the vehicle battery due to an in‐
creased power consumption. ◀
Replace the cover after use
Reinsert the lighter or socket cover after
use, otherwise objects may get into the lighter
socket or fixture and cause a short circuit. ◀
Keep the airbag unfolding area clear
Make sure that the devices and cable are
located outside of the airbag's unfolding area;
otherwise, its unfolding can be hampered or
objects can be hurled through the interior
when the airbag unfolds. ◀
Sockets Sockets can be used for the running electrical
devices with the engine running or with the ig‐Seite 141Interior equipmentCONTROLS141
Online Edition for Part no. 01 40 2 957 280 - X/14
Page 146 of 240

nition switched on. The total load of all sockets
must not exceed 140 watts at 12 volts.
Do not damage the socket by using unsuitable
connectors.
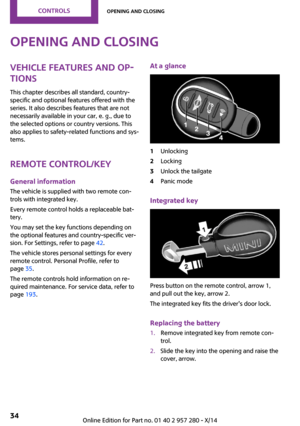
In the center console
Remove the cover or cigarette lighter.
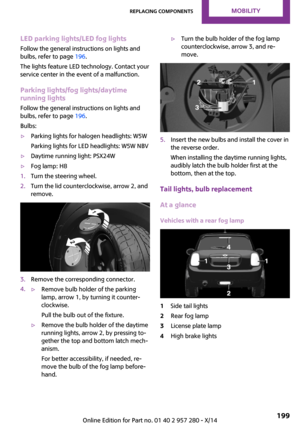
In the cargo area
The socket is located on the right side in the
cargo area.
USB interface The concept
Connection for USB devices with music files and
for importing data, such as for Personal Profile
settings.
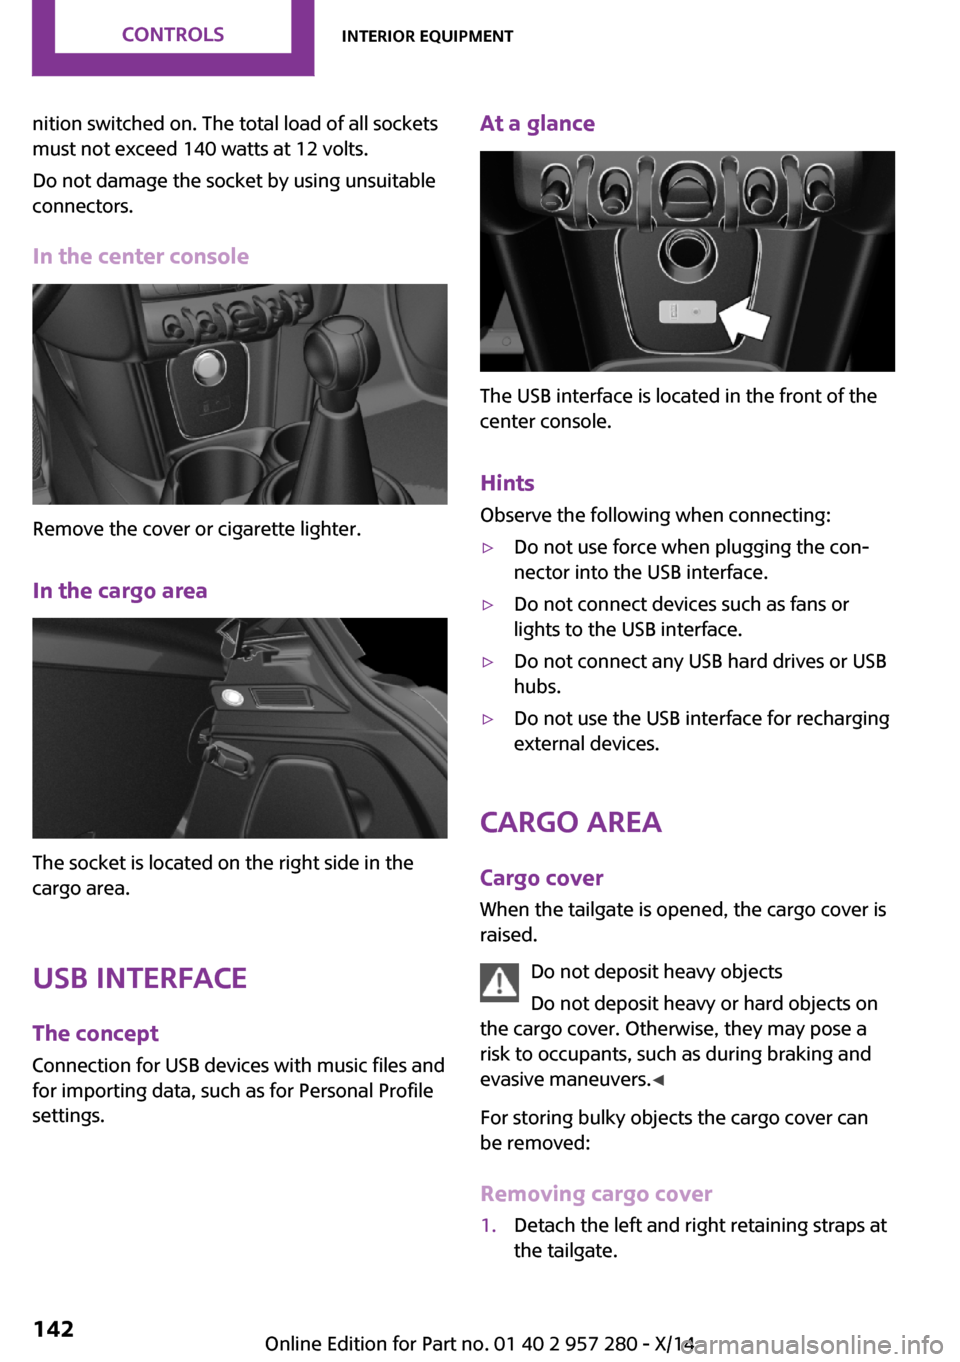
At a glance
The USB interface is located in the front of the
center console.
Hints Observe the following when connecting:
▷Do not use force when plugging the con‐
nector into the USB interface.▷Do not connect devices such as fans or
lights to the USB interface.▷Do not connect any USB hard drives or USB
hubs.▷Do not use the USB interface for recharging
external devices.
Cargo area
Cargo cover
When the tailgate is opened, the cargo cover is
raised.
Do not deposit heavy objects
Do not deposit heavy or hard objects on
the cargo cover. Otherwise, they may pose a
risk to occupants, such as during braking and
evasive maneuvers. ◀
For storing bulky objects the cargo cover can
be removed:
Removing cargo cover
1.Detach the left and right retaining straps at
the tailgate.Seite 142CONTROLSInterior equipment142
Online Edition for Part no. 01 40 2 957 280 - X/14
Page 147 of 240

2.Pull the cargo cover out of the brackets on
the left and right.
Installing cargo cover
1.Slide the cover forward horizontally into the
two side brackets until it audibly latches.2.Attach the left and right retaining straps at
the tailgate.
Enlarging the cargo area
General information
The cargo area can be enlarged by folding
down the rear seat backrest.
The rear seat backrest is divided into two parts
at a ratio of 60 to 40. The backrest of the right
seat is connected to the backrest center sec‐
tion.
Hints Danger of jamming
Before folding down the rear seat back‐
rests, ensure that the area of movement of the
backrests is clear. Ensure that no one is located
in or reaches into the area of movement of the
rear seat backrests. Otherwise, injury or dam‐
age may result. ◀
Push the headrests down, before the
backrests are folded down
Before folding down the rear seat backrests,
make sure that the corresponding headrest is
pushed all the way down; otherwise, damage
may result. ◀
Folding down rear seat backrest
The rear seat backrests can be folded down
from the front or from the cargo area.
Before the backrest is folded down, hook the
corresponding safety belt into the safety belt
on the side.
Pull the release upward and fold the backrest
toward the front.
Folding back the backrest Ensure that the lock is securely engaged
When you fold back the backrest make
sure that it locks in place. When this happens
the red warning field on the seat disappears.
Otherwise transported cargo could shoot into
the car's interior during braking or evasive ma‐
neuvers and endanger occupants. ◀
Fold up the backrest and press it into the latch.
Make sure that the safety belt is not pinched.
Adjusting the backrest tilt To transport bulky items, the cargo area can be
expanded by setting the backrests at a steeper
angle.
1.Released the back rest, and tilt it forward.Seite 143Interior equipmentCONTROLS143
Online Edition for Part no. 01 40 2 957 280 - X/14
Page 148 of 240
2.Fold the frame, arrow, up until it latches.3.Fold back and latch the backrest.
Do not install any child restraint systems
When the backrests are set at steeper po‐
sition, do not install any child restraint systems
on the backrest; otherwise, their protective ef‐
fect may be impaired. ◀
Seite 144CONTROLSInterior equipment144
Online Edition for Part no. 01 40 2 957 280 - X/14
Page 149 of 240

Storage compartmentsVehicle features and op‐
tions
This chapter describes all standard, country-
specific and optional features offered with the
series. It also describes features that are not necessarily available in your car, e. g., due to
the selected options or country versions. This
also applies to safety-related functions and sys‐
tems.
At a glance The following storage compartments are avail‐
able in the vehicle interior:▷Storage compartment in front of the cu‐
pholders.▷Storage tray in the center console.▷Glove compartment on the front passenger
side.▷Storage compartment above the glove
compartment.▷Storage compartment in the center arm‐
rest.▷Compartments in the doors.▷Pockets on the backrests of the front seats.▷Net underneath the center console in the
footwell of the front seat passenger.
Safety information
No loose objects in the car's interior
Do not stow any objects in the car's inte‐
rior without securing them; otherwise, they
may present a danger to occupants e.g., during
braking and evasive maneuvers. ◀
Do not place anti-slip mats on the dash‐
board
Do not place anti-slip mats on the dashboard.
The mat materials could damage the dash‐
board. ◀
Glove compartment
Opening
Pull the handle.
The light in the glove compartment switches
on.
Close the glove compartment again im‐
mediately
Close the glove compartment immediately after
use while driving; otherwise, injury may occur
during accidents. ◀
Closing Fold up the cover.
Seite 145Storage compartmentsCONTROLS145
Online Edition for Part no. 01 40 2 957 280 - X/14
Page 150 of 240

Storage compartment
above the glove com‐
partment
Opening
Press the lower edge of the cover. Immediately close the storage compart‐
ment
Close the storage compartment immediately
after use while driving; otherwise, injury may
occur during accidents. ◀
Closing
Push the cover back into the original position.
Compartments in the
doors
Do not stow any breakable objects
Do not store any breakable objects, e. g.
glass bottles, in the compartments, or there is
an increased risk of injury in the event of an ac‐
cident. ◀
Center armrest The center armrest contains a storage compart‐
ment.
Opening
Press button, arrow 1, and open center arm
rest upward, arrow 2.
Adjusting the height
Press button, arrow 1, and swing center arm
rest upward or downward into the desired
height, arrow 2.
Cupholders
Hints Shatter-proof containers and no hot
drinks
Use light and shatter-proof containers and do
not transport hot drinks. Otherwise, there is the
increased danger of injury in an accident. ◀
Unsuitable containers
Do not forcefully push unsuitable contain‐
ers into the cupholders. This may result in dam‐
age. ◀
Seite 146CONTROLSStorage compartments146
Online Edition for Part no. 01 40 2 957 280 - X/14
Page 151 of 240

Front
In the center console.Rear
On 3-door models: in front of the rear seats and
in the and in the side armrests.
On 5-door models: in front of the rear seats.
Clothes hooks The clothes hooks are located above the side
windows in the rear.
Do not obstruct view
When suspending clothing from the
hooks, ensure that it will not obstruct the driv‐
er's view. ◀
No heavy objects
Do not hang heavy objects from the
hooks; otherwise, they may present a danger
to passengers during braking and evasive ma‐
neuvers. ◀
Storage space under
cargo floor panel
Located under the cargo floor panel on the
right side is a trough for the onboard vehicle
tool kit.
To remove the onboard vehicle tool kit, fold the
right side of the cargo floor panel upward.
Variable cargo areafloor
With the variable cargo area floor, the cargo
area can be configured corresponding to trans‐
port requirements. To do this, remove the
cargo area floor, and insert it in the desired po‐
sition.
Follow instructions on securing the load, refer
to page 155.
Seite 147Storage compartmentsCONTROLS147
Online Edition for Part no. 01 40 2 957 280 - X/14
Page 152 of 240

Removing the cargo floor panel
On 5-door models: To change the position of
the cargo floor panel, first fold up the rear part
of the cargo floor panel.
Grasp the cargo floor panel in the rear and fold
slightly upward. Next, pull it backward from the
supports.
The cargo floor panel can be removed from the
cargo area above the tail lamps.
Lower position
▷Larger objects can be transported.▷Space for smaller objects remains between
the fixed and variable cargo area floor.Folded up position
The variable cargo floor panel may not be
used as a partition net to separate the
cargo area and the vehicle interior.▷Only use the variable cargo floor in the
folded-up position when the backrests are
folded up and locked.▷Always secure cargo against shifting, using
straps, belts and lashing eyes, e.g.
If you don't follow these precautions you can
endanger vehicle's occupants and damage the
cargo floor during braking. ◀
Fold up the cargo floor panel in the lower posi‐
tion and push it behind the locks on the left
and right, arrow.
▷You've reached the maximum cargo
height.▷The cargo net can be loaded with light‐
weight and flat objects.
Upper position
▷With the backrests folded down, a long, flat
loading surface is produced.Seite 148CONTROLSStorage compartments148
Online Edition for Part no. 01 40 2 957 280 - X/14