2014 MERCEDES-BENZ SLS AMG ROADSTER transmission
[x] Cancel search: transmissionPage 189 of 292
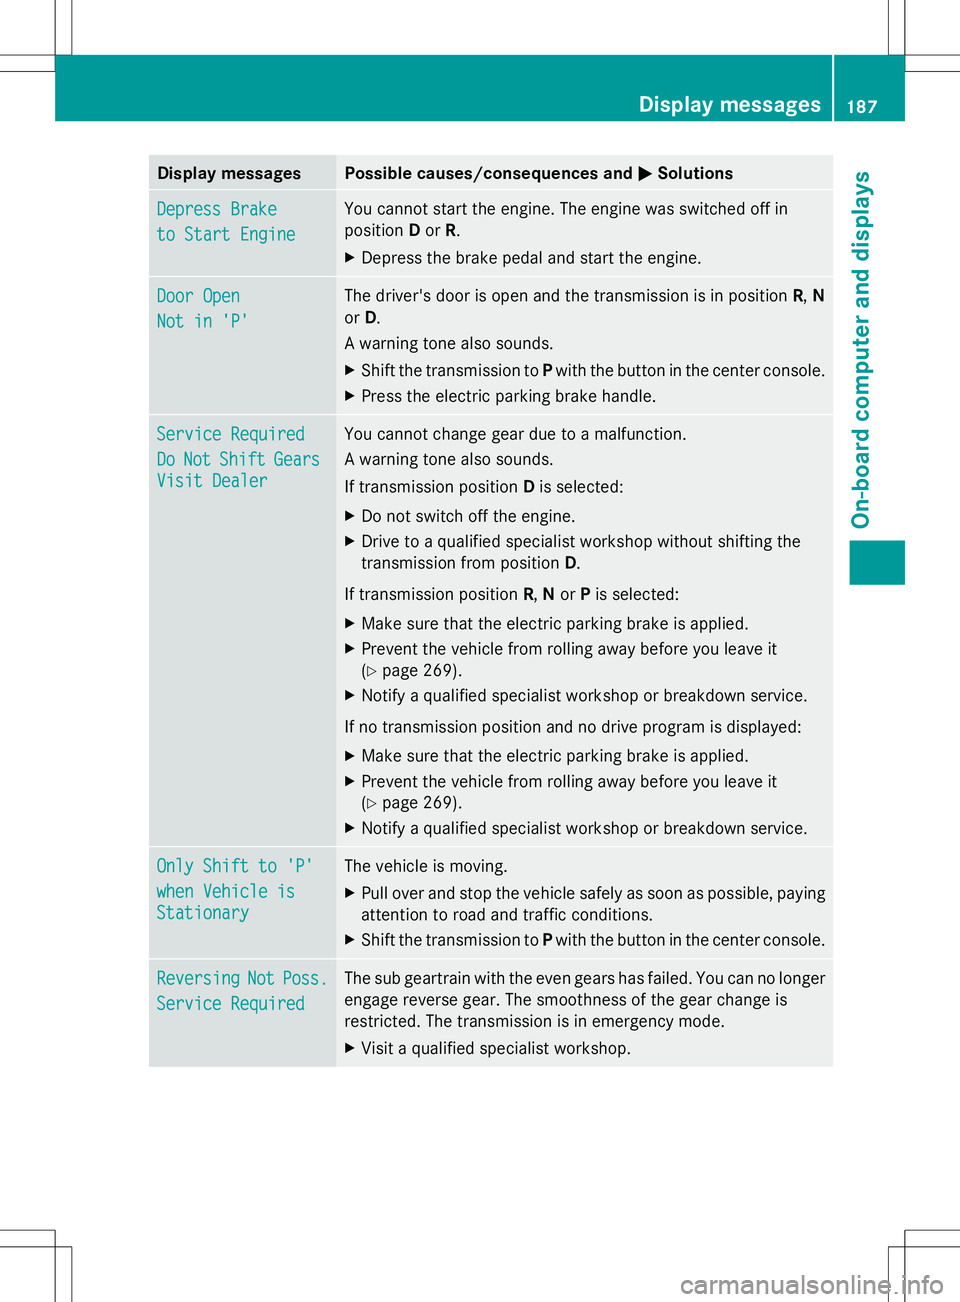
Display messages Possible causes/consequences and
M
MSolutions Depress Brake
Depress Brake
to Start Engine to Start Engine You cannot start the engine. The engine was switched off in
position
Dor R.
X Depress the brake pedal and start the engine. Door Open Door Open
Not in 'P' Not in 'P' The driver's door is open and the transmission is in position
R,N
or D.
A warning tone also sounds.
X Shift the transmission to Pwith the button in the center console.
X Press the electric parking brake handle. Service Required Service Required
Do Do
Not
Not Shift
Shift Gears
Gears
Visit Dealer
Visit Dealer You cannot change gear due to a malfunction.
A warning tone also sounds.
If transmission position
Dis selected:
X Do not switch off the engine.
X Drive to a qualified specialist workshop without shifting the
transmission from position D.
If transmission position R,Nor Pis selected:
X Make sure that the electric parking brake is applied.
X Prevent the vehicle from rolling away before you leave it
(Y page 269).
X Notify a qualified specialist workshop or breakdown service.
If no transmission position and no drive program is displayed:
X Make sure that the electric parking brake is applied.
X Prevent the vehicle from rolling away before you leave it
(Y page 269).
X Notify a qualified specialist workshop or breakdown service. Only Shift to 'P' Only Shift to 'P'
when Vehicle is when Vehicle is
Stationary Stationary The vehicle is moving.
X
Pull over and stop the vehicle safely as soon as possible, paying
attention to road and traffic conditions.
X Shift the transmission to Pwith the button in the center console. Reversing Reversing
Not
NotPoss.
Poss.
Service Required
Service Required The sub geartrain with the even gears has failed. You can no longer
engage reverse gear. The smoothness of the gear change is
restricted. The transmission is in emergency mode.
X
Visit a qualified specialist workshop. Display
messages
187On-board computer and displays Z
Page 190 of 292
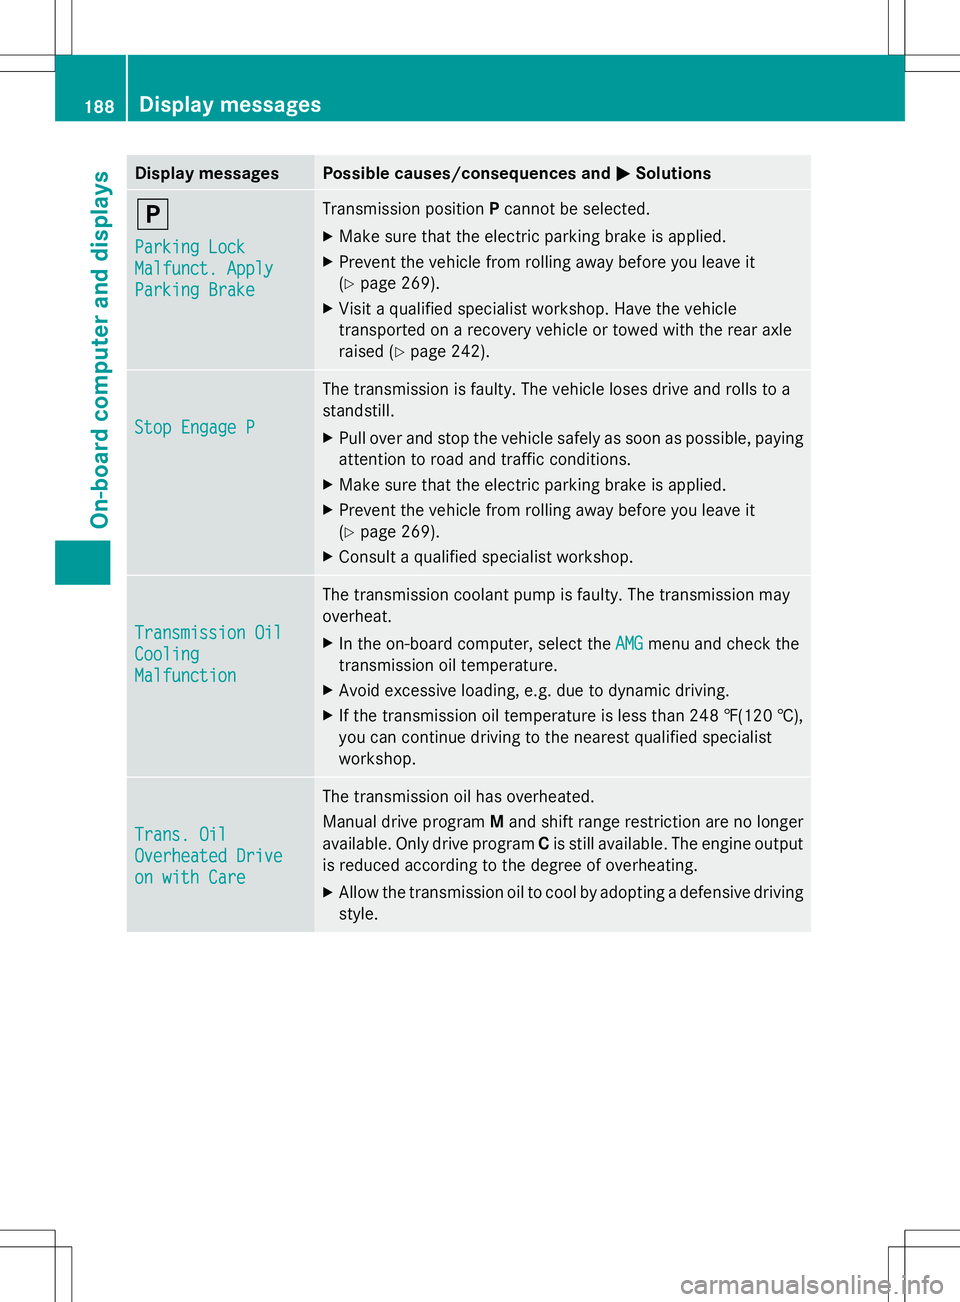
Display messages Possible causes/consequences and
M
MSolutions j
Parking Lock Parking Lock
Malfunct. Apply Malfunct. Apply
Parking Brake Parking Brake Transmission position
Pcannot be selected.
X Make sure that the electric parking brake is applied.
X Prevent the vehicle from rolling away before you leave it
(Y page 269).
X Visit a qualified specialist workshop. Have the vehicle
transported on a recovery vehicle or towed with the rear axle
raised ( Ypage 242). d
Stop Engage P Stop Engage P The transmission is faulty. The vehicle loses drive and rolls to a
standstill.
X
Pull over and stop the vehicle safely as soon as possible, paying
attention to road and traffic conditions.
X Make sure that the electric parking brake is applied.
X Prevent the vehicle from rolling away before you leave it
(Y page 269).
X Consult a qualified specialist workshop. d
Transmission Oil Transmission Oil
Cooling Cooling
Malfunction Malfunction The transmission coolant pump is faulty. The transmission may
overheat.
X
In the on-board computer, select the AMG AMGmenu and check the
transmission oil temperature.
X Avoid excessive loading, e.g. due to dynamic driving.
X If the transmission oil temperature is less than 248 ‡(120 †),
you can continue driving to the nearest qualified specialist
workshop. d
Trans. Oil Trans. Oil
Overheated Drive Overheated Drive
on with Care on with Care The transmission oil has overheated.
Manual drive program
Mand shift range restriction are no longer
available. Only drive program Cis still available. The engine output
is reduced according to the degree of overheating.
X Allow the transmission oil to cool by adopting a defensive driving
style. 188
Display
messagesOn-board computer and displays
Page 194 of 292
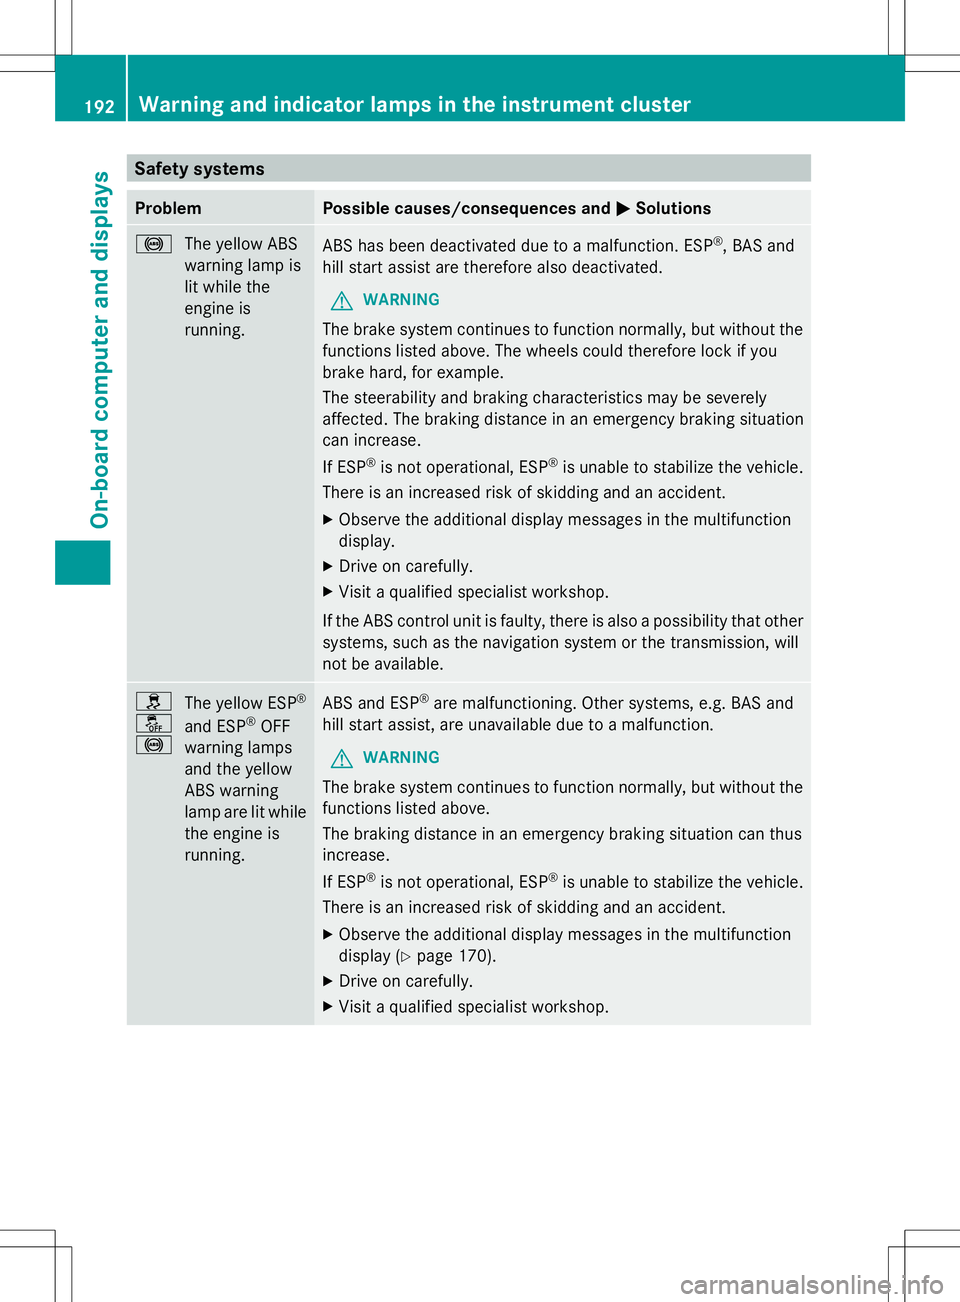
Safety systems
Problem Possible causes/consequences and
M
MSolutions !
The yellow ABS
warning lamp is
lit while the
engine is
running. ABS has been deactivated due to a malfunction. ESP
®
, BAS and
hill start assist are therefore also deactivated.
G WARNING
The brake system continues to function normally, but without the
functions listed above. The wheels could therefore lock if you
brake hard, for example.
The steerability and braking characteristics may be severely
affected. The braking distance in an emergency braking situation
can increase.
If ESP ®
is not operational, ESP ®
is unable to stabilize the vehicle.
There is an increased risk of skidding and an accident.
X Observe the additional display messages in the multifunction
display.
X Drive on carefully.
X Visit a qualified specialist workshop.
If the ABS control unit is faulty, there is also a possibility that other
systems, such as the navigation system or the transmission, will
not be available. h
å
!
The yellow ESP
®
and ESP ®
OFF
warning lamps
and the yellow
ABS warning
lamp are lit while
the engine is
running. ABS and ESP
®
are malfunctioning. Other systems, e.g. BAS and
hill start assist, are unavailable due to a malfunction.
G WARNING
The brake system continues to function normally, but without the
functions listed above.
The braking distance in an emergency braking situation can thus
increase.
If ESP ®
is not operational, ESP ®
is unable to stabilize the vehicle.
There is an increased risk of skidding and an accident.
X Observe the additional display messages in the multifunction
display (Y page 170).
X Drive on carefully.
X Visit a qualified specialist workshop. 192
Warning and indicator lamps in the instrument clusterOn-board computer and displays
Page 197 of 292
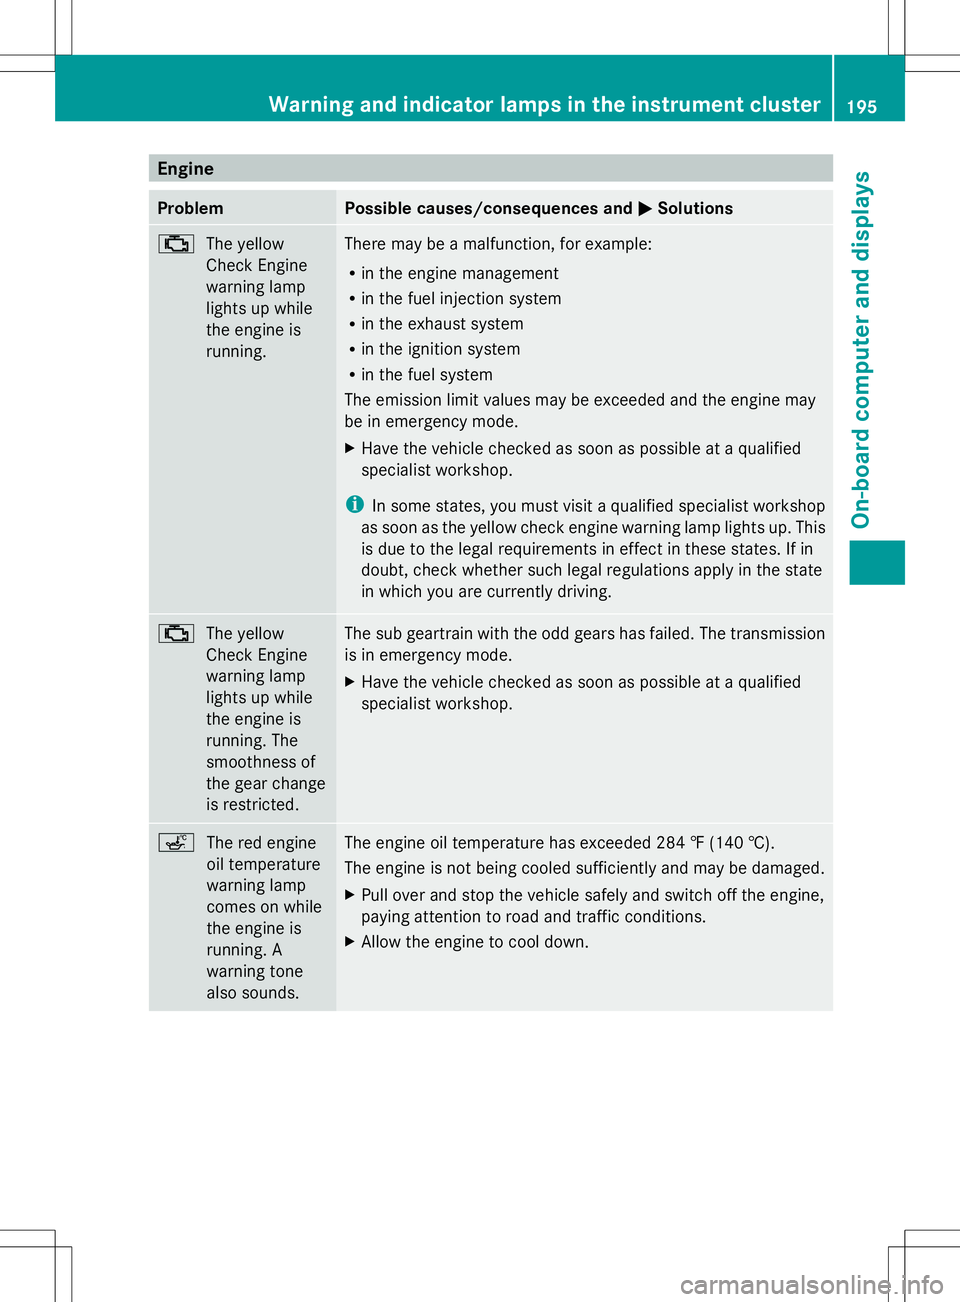
Engine
Problem Possible causes/consequences and
M
MSolutions ;
The yellow
Check Engine
warning lamp
lights up while
the engine is
running. There may be a malfunction, for example:
R
in the engine management
R in the fuel injection system
R in the exhaust system
R in the ignition system
R in the fuel system
The emission limit values may be exceeded and the engine may
be in emergency mode.
X Have the vehicle checked as soon as possible at a qualified
specialist workshop.
i In some states, you must visit a qualified specialist workshop
as soon as the yellow check engine warning lamp lights up. This
is due to the legal requirements in effect in these states. If in
doubt, check whether such legal regulations apply in the state
in which you are currently driving. ;
The yellow
Check Engine
warning lamp
lights up while
the engine is
running. The
smoothness of
the gear change
is restricted. The sub geartrain with the odd gears has failed. The transmission
is in emergency mode.
X
Have the vehicle checked as soon as possible at a qualified
specialist workshop. ç
The red engine
oil temperature
warning lamp
comes on while
the engine is
running. A
warning tone
also sounds. The engine oil temperature has exceeded 284 ‡ (140 †).
The engine is not being cooled sufficiently and may be damaged.
X
Pull over and stop the vehicle safely and switch off the engine,
paying attention to road and traffic conditions.
X Allow the engine to cool down. Warning and indicator lamps in the instrument cluster
195On-board computer and displays Z
Page 215 of 292
X
Select key position 2with the Start/Stop
button (Y page 119).
X Press the programing button of the door or
gate drive (see the door or gate drive
operating instructions, e.g. under
"Programing additional remote controls").
i Usually, you now have 30 seconds to
initiate the next step.
X Press previously programed button ;,=
or ? of the integrated garage door opener
until the door closes.
The rolling code synchronization is then
complete.
Notes on programing the remote control
Canadian radio frequency laws require a
"break" (or interruption) of the transmission
signals after broadcasting for a few seconds.
Therefore, these signals may not last long
enough for the integrated garage door
opener. The signal is not recognized during
programing. Comparable with Canadian law,
some U.S. garage door openers also feature
a "break".
Proceed as follows:
R if you live in Canada
R if you have difficulties programing the
garage door opener (regardless of where
you live) when using the programing steps
X Press and hold one of buttons ;to? on
the integrated garage door opener.
After a short time, indicator lamp :lights
up yellow.
X Release the button.
Indicator lamp :flashes yellow.
X Press button Bof garage door remote
control Afor two seconds, then release it
for two seconds.
X Press button Bagain for two seconds. X
Repeat this sequence on button Bof
remote control Auntil indicator lamp :
lights up green.
If indicator lamp :turns red, repeat the
process.
X Continue with the other programing steps
(see above).
Problems when programing
If you are experiencing problems programing
the integrated garage door opener on the
rear-view mirror, take note of the following
instructions:
R Check the transmitter frequency of garage
door drive remote control A. This can
usually be found on the back of the remote
control.
The integrated garage door opener is
compatible with devices that have units
which operate in the frequency range of
280 to 433 MHz .
R Replace the batteries in garage door
remote control A. This increases the
likelihood that garage door remote control
A will transmit a strong and precise signal
to the integrated garage door opener in the
rear-view mirror.
R When programing, hold remote control A
at varying distances and angles from the
button that you are programing. Try various
angles at a distance between 2and
12 inches (5to 30 cm) or at the same angle
but at varying distances.
R If another remote control for the same
garage door drive is available, repeat the
same programing steps with this remote
control. Before performing these steps,
make sure that new batteries have been
installed in garage door drive remote
control A.
R Note that some remote controls only
transmit for a limited amount of time (the
indicator lamp on the remote control goes Features
213Stowage and features Z
Page 216 of 292
out). Press button
Bon remote control
A again before transmission ends.
R Align the antenna cable of the garage door
opener unit. This can improve signal
reception/transmission.
Opening/closing the garage door Once programed, the integrated garage door
opener Awill assume the function of the
garage door system's remote control. Please
also read the operating instructions for the
garage door system.
X Select key position 2with the Start/Stop
button.
X Press button ;,=or? which you have
programed to operate the garage door.
Garage door system with a fixed code:
indicator lamp :lights up green.
Garage door system with a rolling code:
indicator lamp :flashes green.
i The transmitter will transmit a signal as
long as the button is pressed. The
transmission is halted after a maximum of
ten seconds and indicator lamp :lights
up yellow. Press button ;,=or? again
if necessary.
Clearing the memory X
Select key position 2with the Start/Stop
button.
X Press buttons ;and ?.
The indicator lamp lights up yellow.
X Press and hold buttons ;and ?until the
indicator lamp turns green.
i Make sure that you clear the memory of
the integrated garage door opener before
selling the vehicle. Charge maintenance socket
The battery may drain if the vehicle is left
stationary for long periods. In this case,
Mercedes-Benz recommends attaching the trickle charger to the charge maintenance
socket.
The charge maintenance socket is designed
solely for connecting a trickle charger. A
trickle charger can be obtained from an
authorized Mercedes-Benz Center, for
example.
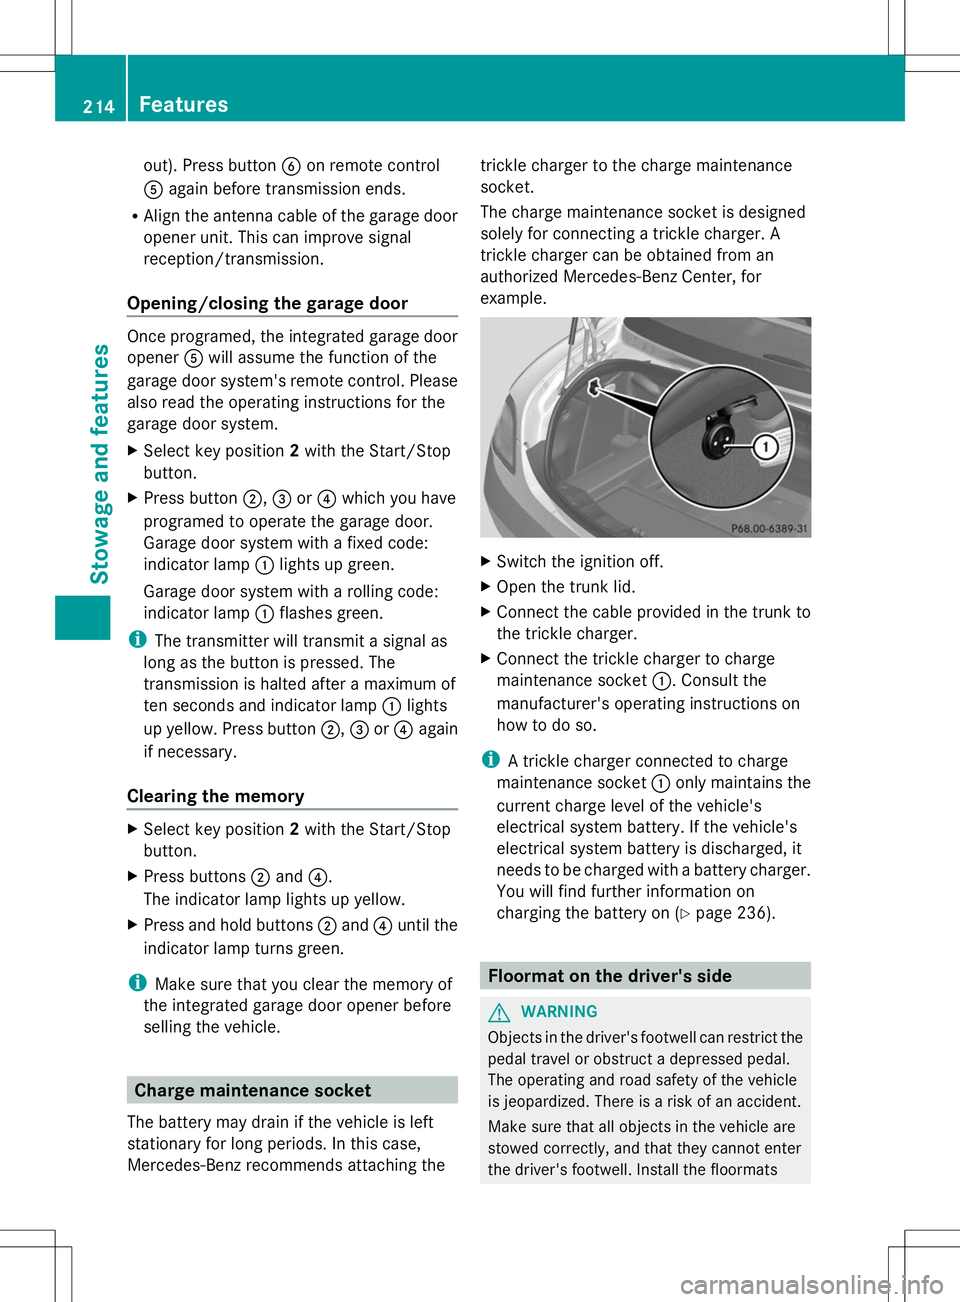
X
Switch the ignition off.
X Open the trunk lid.
X Connect the cable provided in the trunk to
the trickle charger.
X Connect the trickle charger to charge
maintenance socket :. Consult the
manufacturer's operating instructions on
how to do so.
i A trickle charger connected to charge
maintenance socket :only maintains the
current charge level of the vehicle's
electrical system battery. If the vehicle's
electrical system battery is discharged, it
needs to be charged with a battery charger.
You will find further information on
charging the battery on (Y page 236). Floormat on the driver's side
G
WARNING
Objects in the driver's footwell can restrict the
pedal travel or obstruct a depressed pedal.
The operating and road safety of the vehicle
is jeopardized. There is a risk of an accident.
Make sure that all objects in the vehicle are
stowed correctly, and that they cannot enter
the driver's footwell. Install the floormats 214
FeaturesStowage and features
Page 226 of 292
Start the engine using the SmartKey.. Move
the transmission to Nwith the E-SELECT
lever. Use the SmartKey to switch the
engine off again and then turn the
SmartKey to position 2. Make sure that you
then leave the SmartKey in position 2. You
may otherwise damage the vehicle, the
transmission or the car wash.
Check the transmission position in the
instrument cluster.
! Use the E-SELECT lever to shift the
transmission to Nbefore switching the
engine off. If you open the driver's or front-
passenger door, the transmission remains
in this position for up to 30 minutes if the
SmartKey is in the ignition, even if the
engine is switched off. If you do not shift
the transmission to Nusing the E-SELECT
lever beforehand, it shifts automatically to
parking position Pand locks the wheels if
the driver's or front-passenger door is
opened and the engine is switched off. This
may damage the vehicle, the transmission
or the car wash.
Observe the information on maneuvering
(Y page 131).
! Before driving into an automatic car wash,
make sure that it is suitable for the
dimensions of the vehicle. In particular,
make sure that:
R there is enough ground clearance
between the vehicle underbody and the
guide rails of the automatic car wash.
R the clearance width of the automatic car
wash is sufficient, particularly the width
of the guide rails.
R you enter the automatic car wash
straight and in the center of the guide
rails in order to avoid damaging the tires
or wheel rims.
Fold in the exterior mirrors before the
vehicle is washed. The exterior mirrors
could otherwise be damaged. !
Make sure that:
R the side windows and the roof are
completely closed
R the climate control blower is switched off
R the windshield wiper switch is at position
0
The vehicle could otherwise be damaged.
! In portal car washes, the windshield
wipers may be moved up the windshield by
the cleaning brushes when the ignition is
switched off.
Set the Start/Stop button to key position
2 to reset the windshield wipers to their
original position.
! Preferably use automatic car washes with
adjustable high-pressure pre-cleaning. This
corresponds with the specification for the
Cabriolet program. In car washes that use
high water pressures, there is a risk that a
small amount of water may leak into the
vehicle.
! Cabriolet: do not treat the vehicle with
hot wax under any circumstances.
After using an automatic car wash, wipe off
wax and drying agents from the windshield
and the wiper blades. This will prevent smears
and reduce wiping noises caused by residue
on the windshield.
Washing by hand In some countries, washing by hand is only
allowed at specially equipped washing bays.
Observe the legal requirements in each
country.
X
Do not use hot water and do not wash the
vehicle in direct sunlight.
X Use a soft sponge to clean.
X Use a mild cleaning agent, such as a car
shampoo approved by Mercedes-Benz.
X Thoroughly hose down the vehicle with a
gentle jet of water.
X Do not point the water jet directly towards
the air inlet. 224
CareMaintenance and care
Page 235 of 292
X
Remove the jack from the left-hand
stowage space in the trunk to allow the
stowage compartment to be opened.
X Turn fastener ;in the direction of the
arrow.
X Open stowage compartment :.
X Remove the TIREFIT kit, wheel chock,
alignment bolt and gloves. Flat tire
Preparing the vehicle
Your vehicle is equipped with a TIREFIT kit.
X Stop the vehicle on solid, non-slippery and
level ground, as far away as possible from
traffic.
X Switch on the hazard warning lamps.
X Apply the electric parking brake manually
(Y page 133).
X Bring the front wheels into the straight-
ahead position.
X Shift the transmission to Pwith the button
in the center console.
X Switch off the engine.
X Remove the SmartKey from the ignition
lock.
X All occupants must get out of the vehicle.
Make sure that they are not endangered as
they do so.
X Make sure that no one is near the danger
area while a wheel is being changed.
Anyone who is not directly assisting in the
wheel change should, for example, stand
behind the barrier.
X Get out of the vehicle. Pay attention to
traffic conditions when doing so.
X Close the driver's door. TIREFIT kit
Using the TIREFIT kit TIREFIT is a tire sealant.
You can use TIREFIT to seal punctures of up
to 0.16 in (4 mm), particularly those in the tire
tread. You can use TIREFIT at outside
temperatures down to
Ò4 ‡ (Ò20 †). G
WARNING
In the following situations, the tire sealant is
unable to provide sufficient breakdown
assistance, as it is unable to seal the tire
properly:
R there are cuts or punctures in the tire larger
than those mentioned above.
R the wheel rim is damaged.
R you have driven at very low tire pressures
or on a flat tire.
There is a risk of an accident.
Do not drive the vehicle. Contact a qualified
specialist workshop. G
WARNING
The tire sealant is harmful and causes
irritation. It must not come into contact with
your skin, eyes or clothing or be swallowed.
Do not inhale TIREFIT fumes. Keep tire sealant
away from children. There is a risk of injury.
If you come into contact with the tire sealant,
observe the following:
R Rinse off the tire sealant from your skin
immediately with water.
R If the tire sealant comes into contact with
your eyes, immediately rinse them
thoroughly with clean water.
R If tire sealant is swallowed, immediately
rinse your mouth out thoroughly and drink
plenty of water. Do not induce vomiting,
and seek medical attention immediately.
R Immediately change out of clothing which
has come into contact with tire sealant.
R If an allergic reaction occurs, seek medical
attention immediately. Flat ti
re
233Breakdo wn assis tance Z