2014 MERCEDES-BENZ SLS AMG GT COUPE lights
[x] Cancel search: lightsPage 145 of 290

Warning display for the front area
0043
Left-hand side of the vehicle
0044 Right-hand side of the vehicle
0087 Segments showing operational readiness
The warning display for each side of the
vehicle is divided into five yellow and two red
segments. PARKTRONIC is operational if
yellow segments showing operational
readiness 0087light up.
The selector lever position determines which
warning display is active while the engine is
running: Transmission
position Warning display
D
Front area activated
R
or N Rear and front areas
activated
P
No areas activated
One or more segments light up as the vehicle
approaches an obstacle, depending on the
vehicle's distance from the obstacle.
From the:
R sixth segment onwards, you will hear an
intermittent warning tone for
approximately two seconds.
R seventh segment onwards, you will hear a
warning tone for approximately two
seconds. This indicates that you have now
reached the minimum distance. Deactivating/activating PARKTRONIC
0043
Indicator lamp
0044 To deactivate/activate PARKTRONIC
If indicator lamp 0043lights up, PARKTRONIC is
deactivated.
i PARKTRONIC is automatically activated
when you switch on the ignition and release
the electric parking brake. Driving systems
143Driving and parking Z
Page 146 of 290
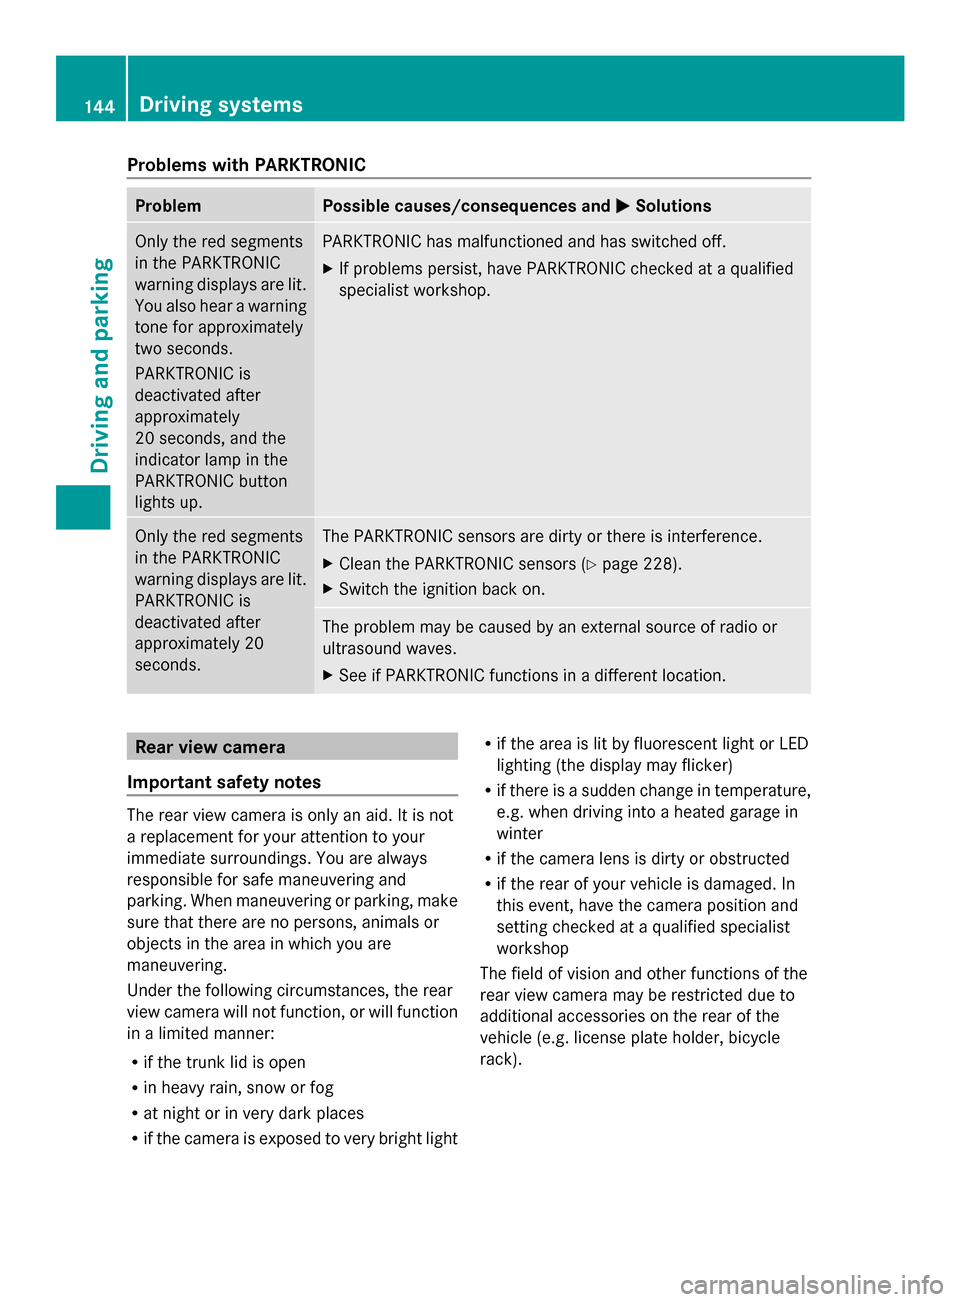
Problems with PARKTRONIC
Problem Possible causes/consequences and
0050
0050Solutions Only the red segments
in the PARKTRONIC
warning displays are lit.
You also hear a warning
tone for approximately
two seconds.
PARKTRONIC is
deactivated after
approximately
20 seconds, and the
indicator lamp in the
PARKTRONIC button
lights up. PARKTRONIC has malfunctioned and has switched off.
X
If problems persist, have PARKTRONIC checked at a qualified
specialist workshop. Only the red segments
in the PARKTRONIC
warning displays are lit.
PARKTRONIC is
deactivated after
approximately 20
seconds. The PARKTRONIC sensors are dirty or there is interference.
X
Clean the PARKTRONIC sensors (Y page 228).
X Switch the ignition back on. The problem may be caused by an external source of radio or
ultrasound waves.
X
See if PARKTRONIC functions in a different location. Rear view camera
Important safety notes The rear view camera is only an aid. It is not
a replacement for your attention to your
immediate surroundings. You are always
responsible for safe maneuvering and
parking. When maneuvering or parking, make
sure that there are no persons, animals or
objects in the area in which you are
maneuvering.
Under the following circumstances, the rear
view camera will not function, or will function
in a limited manner:
R if the trunk lid is open
R in heavy rain, snow or fog
R at night or in very dark places
R if the camera is exposed to very bright light R
if the area is lit by fluorescent light or LED
lighting (the display may flicker)
R if there is a sudden change in temperature,
e.g. when driving into a heated garage in
winter
R if the camera lens is dirty or obstructed
R if the rear of your vehicle is damaged. In
this event, have the camera position and
setting checked at a qualified specialist
workshop
The field of vision and other functions of the
rear view camera may be restricted due to
additional accessories on the rear of the
vehicle (e.g. license plate holder, bicycle
rack). 144
Driving systemsDriving and parking
Page 148 of 290

with, or altering the device will void any
warranties, and is not permitted by the
FCC. Do not tamper with, alter, or use in
any non-approved way.
Any unauthorized modification to this
device could void the user’s authority to
operate the equipment.
Monitoring range of the sensors In particular, the detection of obstacles can
be impaired if:
R dirt on the sensors or anything else
covering the sensors
R there is poor visibility, e.g. due to fog, heavy
rain or snow
R a narrow vehicle traveling in front, e.g. a
motorbike or bicycle
R the road has very wide lanes
R the road has narrow lanes
R you are not driving in the middle of the lane
R there are barriers or similar lane borders
Vehicles in the monitoring range are then not
indicated. Example (Roadster)
Blind Spot Assist monitors the area up to
10 ft (3 m) behind your vehicle and directly
next to your vehicle, as shown in the diagram.
If the lanes are narrow, vehicles driving in the
lane beyond the lane next to your vehicle may be indicated, especially if the vehicles are not
driving in the middle of their lane. This may
be the case if the vehicles are driving on the
inner side of their lane.
Due to the nature of the system:
R
warnings may be issued in error when
driving close to crash barriers or similar
solid lane borders.
R warnings may be interrupted when driving
alongside particularly long vehicles, e.g.
trucks, for a prolonged time.
The two sensors for Blind Spot Assist are
integrated into the sides of the rear bumper.
Make sure that the bumper is free of dirt, ice
or slush in the vicinity of the sensors. The
radar sensors must not be covered, e.g. by
overhanging loads. Following a severe impact
or in the event of damage to the bumpers,
have the function of the radar sensors
checked at a qualified specialist workshop.
Blind Spot Assist may otherwise not work
properly.
Indicator and warning display 0043
Yellow indicator lamp/red warning lamp
When Blind Spot Assist is activated, indicator
lamp 0043in the exterior mirrors lights up
yellow up to a speed of 20 mph (30 km/h). At
speeds above 20 mph (30 km/h), the
indicator lamp goes out and Blind Spot Assist
is operational.
If a vehicle is detected within the blind spot
monitoring range at speeds above 20 mph
(30 km/h), warning lamp 0043on the
corresponding side lights up red. This warning 146
Driving systemsDriving and parking
Page 160 of 290
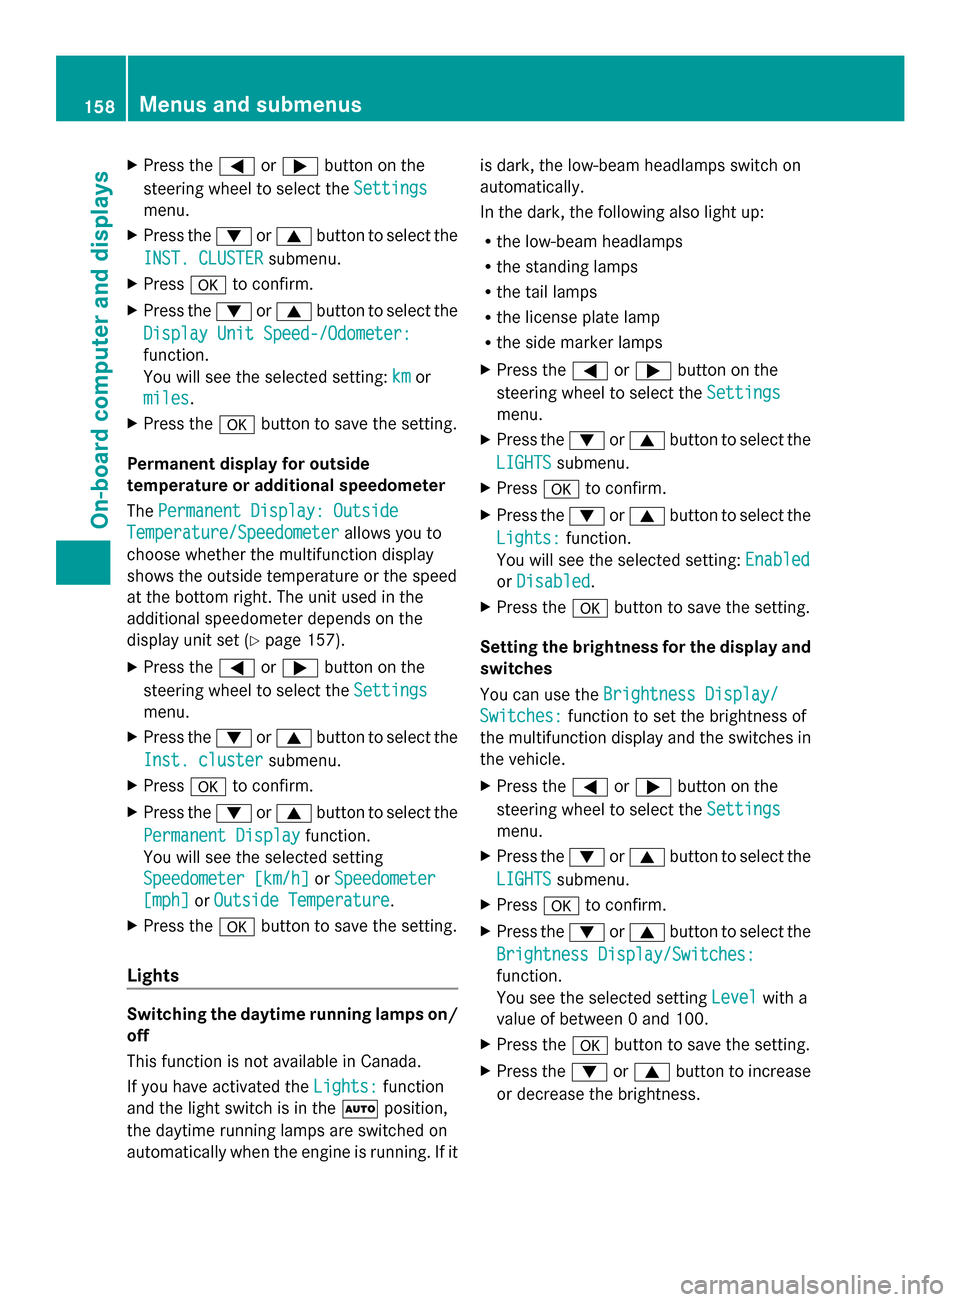
X
Press the 0059or0065 button on the
steering wheel to select the Settings
Settings
menu.
X Press the 0064or0063 button to select the
INST. CLUSTER
INST. CLUSTER submenu.
X Press 0076to confirm.
X Press the 0064or0063 button to select the
Display Unit Speed-/Odometer:
Display Unit Speed-/Odometer:
function.
You will see the selected setting: km kmor
miles
miles .
X Press the 0076button to save the setting.
Permanent display for outside
temperature or additional speedometer
The Permanent Display: Outside Permanent Display: Outside
Temperature/Speedometer
Temperature/Speedometer allows you to
choose whether the multifunction display
shows the outside temperature or the speed
at the bottom right. The unit used in the
additional speedometer depends on the
display unit set (Y page 157).
X Press the 0059or0065 button on the
steering wheel to select the Settings
Settings
menu.
X Press the 0064or0063 button to select the
Inst. cluster
Inst. cluster submenu.
X Press 0076to confirm.
X Press the 0064or0063 button to select the
Permanent Display
Permanent Display function.
You will see the selected setting
Speedometer [km/h] Speedometer [km/h] orSpeedometer
Speedometer
[mph]
[mph] orOutside Temperature
Outside Temperature.
X Press the 0076button to save the setting.
Lights Switching the daytime running lamps on/
off
This function is not available in Canada.
If you have activated the Lights:
Lights: function
and the light switch is in the 0058position,
the daytime running lamps are switched on
automatically when the engine is running. If it is dark, the low-beam headlamps switch on
automatically.
In the dark, the following also light up:
R
the low-beam headlamps
R the standing lamps
R the tail lamps
R the license plate lamp
R the side marker lamps
X Press the 0059or0065 button on the
steering wheel to select the Settings
Settings
menu.
X Press the 0064or0063 button to select the
LIGHTS LIGHTS submenu.
X Press 0076to confirm.
X Press the 0064or0063 button to select the
Lights:
Lights: function.
You will see the selected setting: Enabled
Enabled
or Disabled
Disabled .
X Press the 0076button to save the setting.
Setting the brightness for the display and
switches
You can use the Brightness Display/ Brightness Display/
Switches:
Switches: function to set the brightness of
the multifunction display and the switches in
the vehicle.
X Press the 0059or0065 button on the
steering wheel to select the Settings Settings
menu.
X Press the 0064or0063 button to select the
LIGHTS
LIGHTS submenu.
X Press 0076to confirm.
X Press the 0064or0063 button to select the
Brightness Display/Switches:
Brightness Display/Switches:
function.
You see the selected setting Level Levelwith a
value of between 0 and 100.
X Press the 0076button to save the setting.
X Press the 0064or0063 button to increase
or decrease the brightness. 158
Menus and submenusOn-board computer and displays
Page 161 of 290
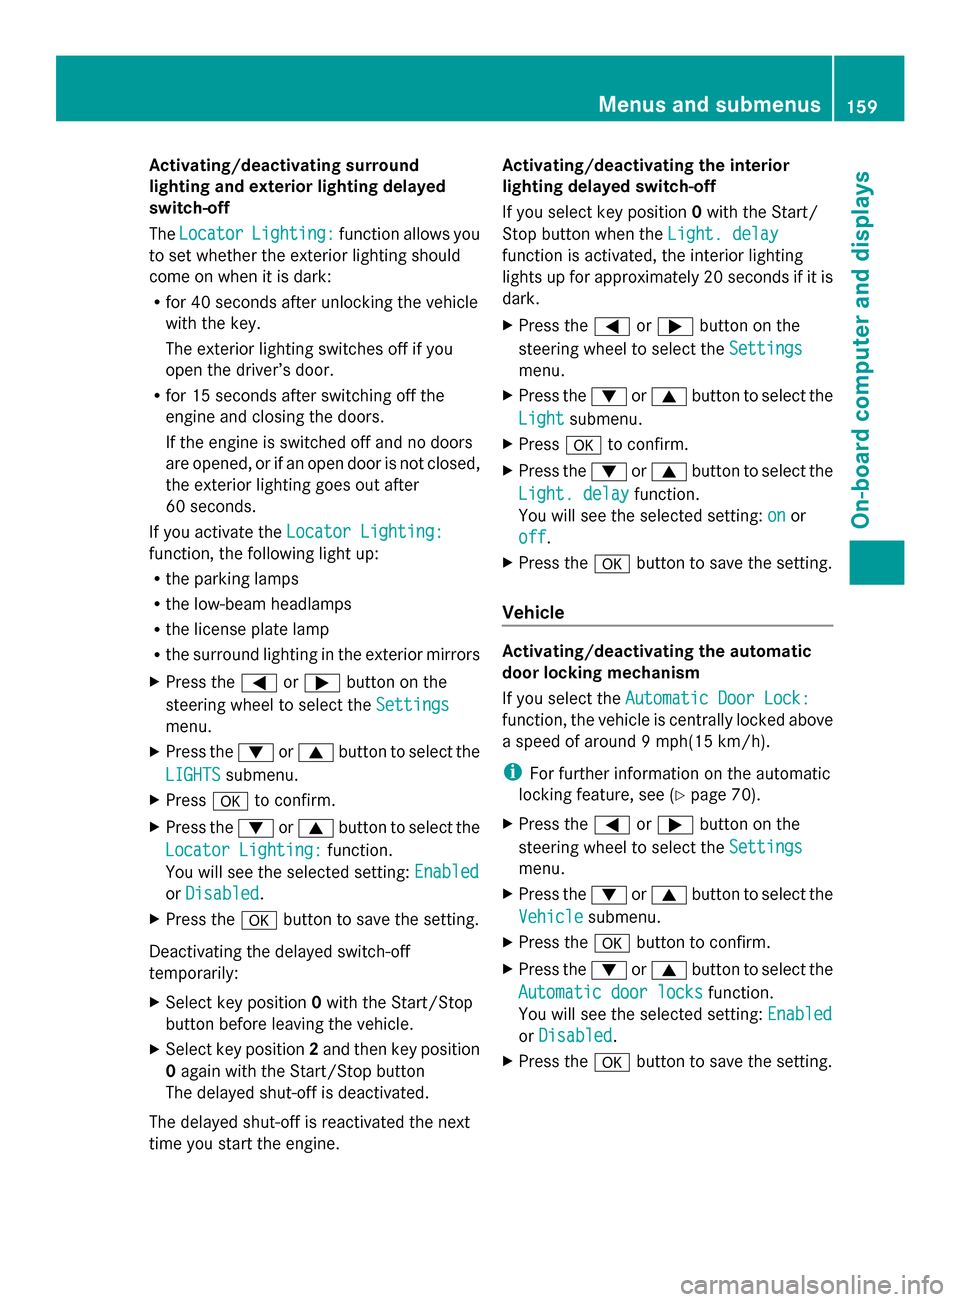
Activating/deactivating surround
lighting and exterior lighting delayed
switch-off
The Locator Locator Lighting:
Lighting: function allows you
to set whether the exterior lighting should
come on when it is dark:
R for 40 seconds after unlocking the vehicle
with the key.
The exterior lighting switches off if you
open the driver’s door.
R for 15 seconds after switching off the
engine and closing the doors.
If the engine is switched off and no doors
are opened, or if an open door is not closed,
the exterior lighting goes out after
60 seconds.
If you activate the Locator Lighting:
Locator Lighting:
function, the following light up:
R the parking lamps
R the low-beam headlamps
R the license plate lamp
R the surround lighting in the exterior mirrors
X Press the 0059or0065 button on the
steering wheel to select the Settings
Settings
menu.
X Press the 0064or0063 button to select the
LIGHTS
LIGHTS submenu.
X Press 0076to confirm.
X Press the 0064or0063 button to select the
Locator Lighting:
Locator Lighting: function.
You will see the selected setting: Enabled Enabled
or Disabled
Disabled .
X Press the 0076button to save the setting.
Deactivating the delayed switch-off
temporarily:
X Select key position 0with the Start/Stop
button before leaving the vehicle.
X Select key position 2and then key position
0 again with the Start/Stop button
The delayed shut-off is deactivated.
The delayed shut-off is reactivated the next
time you start the engine. Activating/deactivating the interior
lighting delayed switch-off
If you select key position
0with the Start/
Stop button when the Light. delay
Light. delay
function is activated, the interior lighting
lights up for approximately 20 seconds if it is
dark.
X Press the 0059or0065 button on the
steering wheel to select the Settings Settings
menu.
X Press the 0064or0063 button to select the
Light
Light submenu.
X Press 0076to confirm.
X Press the 0064or0063 button to select the
Light. delay
Light. delay function.
You will see the selected setting: on
onor
off
off .
X Press the 0076button to save the setting.
Vehicle Activating/deactivating the automatic
door locking mechanism
If you select the
Automatic Door Lock: Automatic Door Lock:
function, the vehicle is centrally locked above
a speed of around 9 mph(15 km/h).
i For further information on the automatic
locking feature, see (Y page 70).
X Press the 0059or0065 button on the
steering wheel to select the Settings Settings
menu.
X Press the 0064or0063 button to select the
Vehicle
Vehicle submenu.
X Press the 0076button to confirm.
X Press the 0064or0063 button to select the
Automatic door locks
Automatic door locks function.
You will see the selected setting: Enabled Enabled
or Disabled
Disabled .
X Press the 0076button to save the setting. Menus and submenus
159On-board computer and displays Z
Page 162 of 290
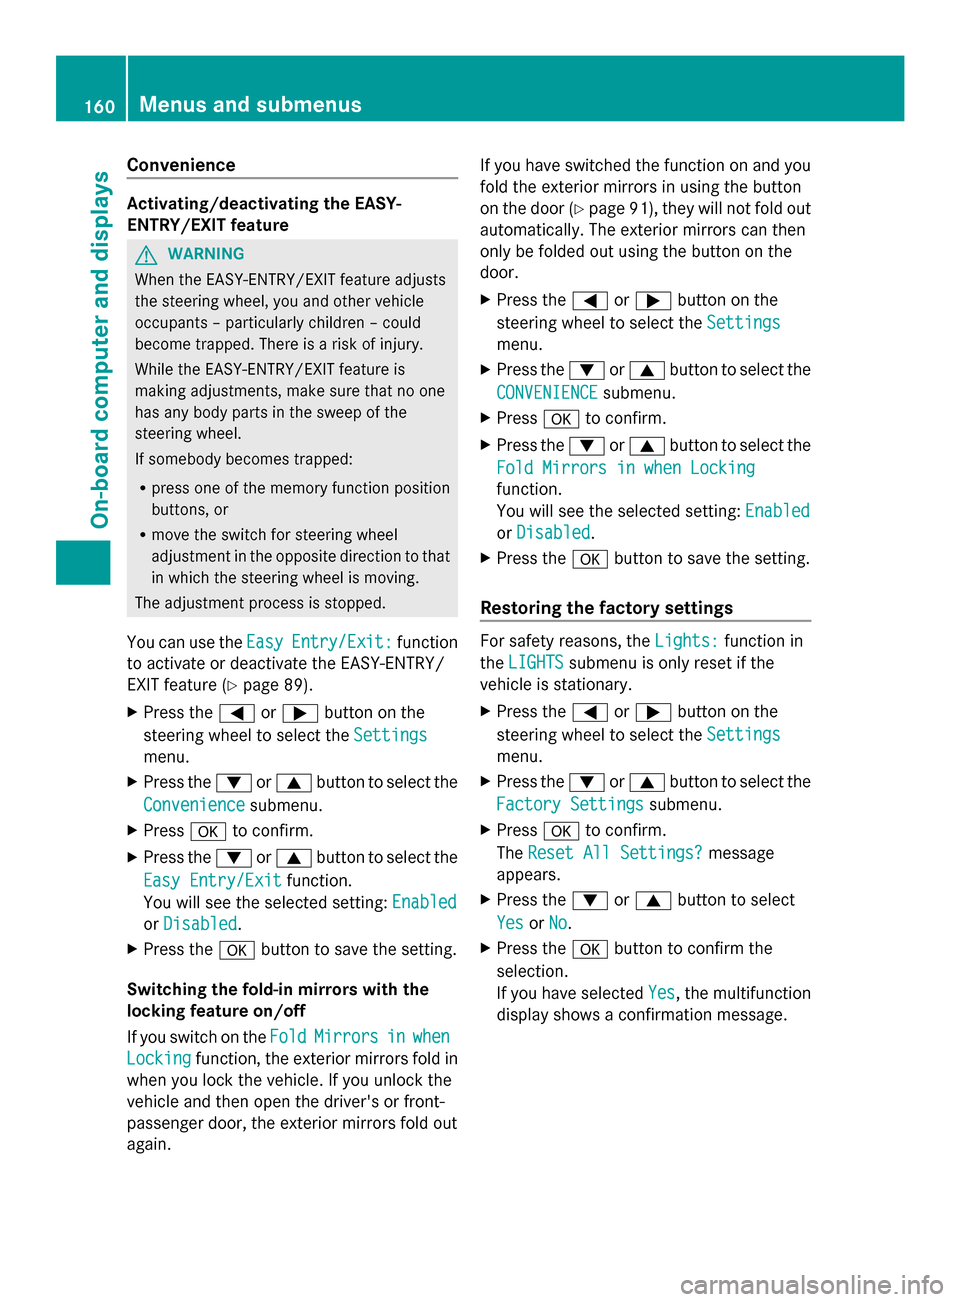
Convenience
Activating/deactivating the EASY-
ENTRY/EXIT feature
G
WARNING
When the EASY-ENTRY/EXIT feature adjusts
the steering wheel, you and other vehicle
occupants – particularly children – could
become trapped. There is a risk of injury.
While the EASY-ENTRY/EXIT feature is
making adjustments, make sure that no one
has any body parts in the sweep of the
steering wheel.
If somebody becomes trapped:
R press one of the memory function position
buttons, or
R move the switch for steering wheel
adjustment in the opposite direction to that
in which the steering wheel is moving.
The adjustment process is stopped.
You can use the Easy EasyEntry/Exit:
Entry/Exit: function
to activate or deactivate the EASY-ENTRY/
EXIT feature (Y page 89).
X Press the 0059or0065 button on the
steering wheel to select the Settings
Settings
menu.
X Press the 0064or0063 button to select the
Convenience Convenience submenu.
X Press 0076to confirm.
X Press the 0064or0063 button to select the
Easy Entry/Exit
Easy Entry/Exit function.
You will see the selected setting: Enabled
Enabled
or Disabled
Disabled .
X Press the 0076button to save the setting.
Switching the fold-in mirrors with the
locking feature on/off
If you switch on the Fold
Fold Mirrors
Mirrors in
inwhen
when
Locking
Locking function, the exterior mirrors fold in
when you lock the vehicle. If you unlock the
vehicle and then open the driver's or front-
passenger door, the exterior mirrors fold out
again. If you have switched the function on and you
fold the exterior mirrors in using the button
on the door (Y
page 91), they will not fold out
automatically. The exterior mirrors can then
only be folded out using the button on the
door.
X Press the 0059or0065 button on the
steering wheel to select the Settings Settings
menu.
X Press the 0064or0063 button to select the
CONVENIENCE
CONVENIENCE submenu.
X Press 0076to confirm.
X Press the 0064or0063 button to select the
Fold Mirrors in when Locking
Fold Mirrors in when Locking
function.
You will see the selected setting: Enabled Enabled
or Disabled
Disabled .
X Press the 0076button to save the setting.
Restoring the factory settings For safety reasons, the
Lights:
Lights:function in
the LIGHTS
LIGHTS submenu is only reset if the
vehicle is stationary.
X Press the 0059or0065 button on the
steering wheel to select the Settings Settings
menu.
X Press the 0064or0063 button to select the
Factory Settings
Factory Settings submenu.
X Press 0076to confirm.
The Reset All Settings?
Reset All Settings? message
appears.
X Press the 0064or0063 button to select
Yes
Yes orNo
No.
X Press the 0076button to confirm the
selection.
If you have selected Yes Yes, the multifunction
display shows a confirmation message. 160
Menus and submenusOn-board computer and displays
Page 168 of 290
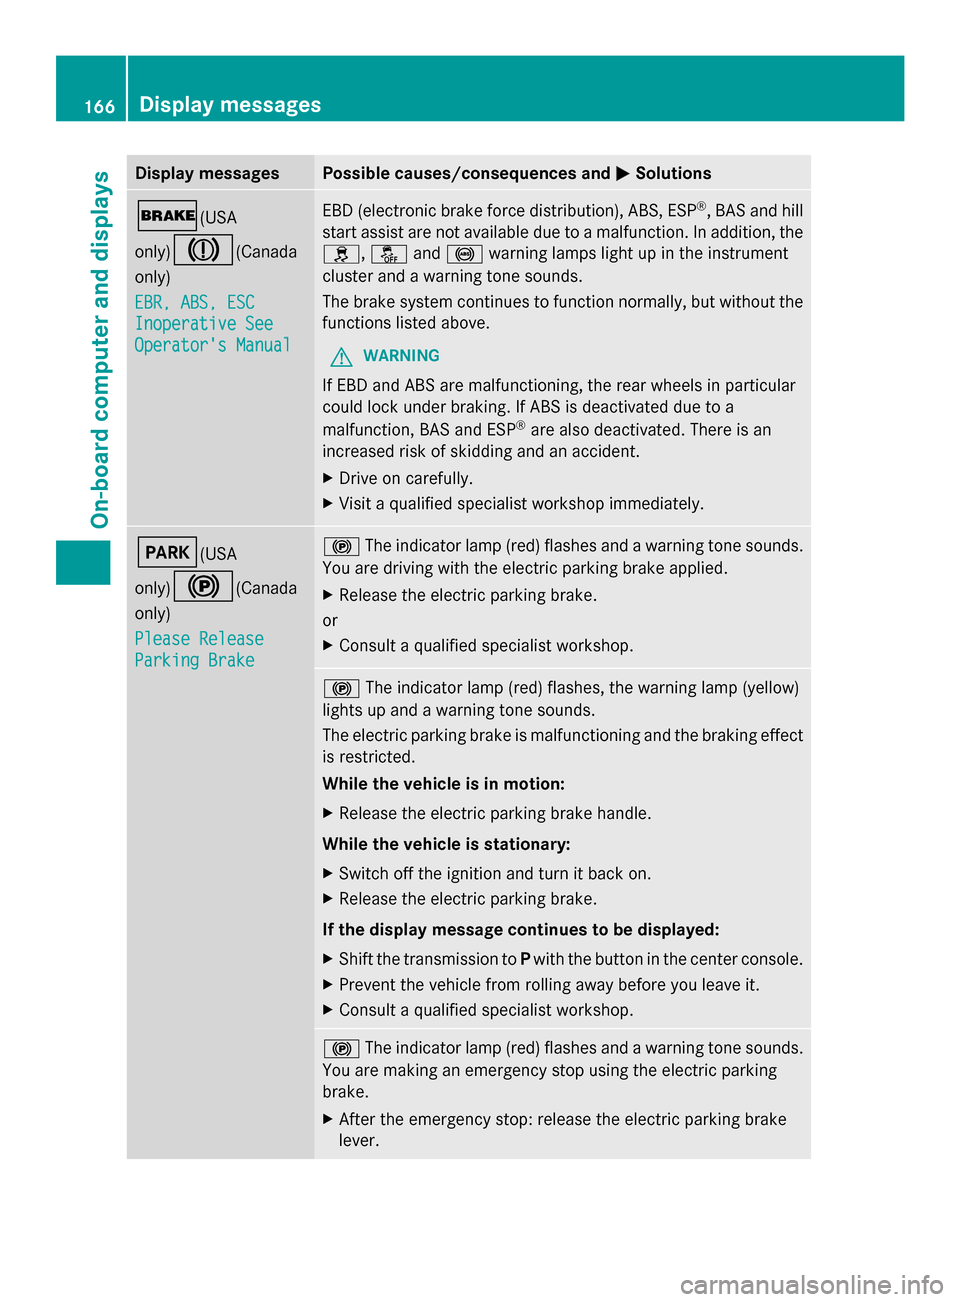
Display messages Possible causes/consequences and
0050
0050Solutions 0027(USA
only)
004D(Canada
only)
EBR, ABS, ESC EBR, ABS, ESC
Inoperative See Inoperative See
Operator's Manual Operator's Manual EBD (electronic brake force distribution), ABS, ESP
®
, BAS and hill
start assist are not available due to a malfunction. In addition, the
0089, 00BBand0025 warning lamps light up in the instrument
cluster and a warning tone sounds.
The brake system continues to function normally, but without the
functions listed above.
G WARNING
If EBD and ABS are malfunctioning, the rear wheels in particular
could lock under braking. If ABS is deactivated due to a
malfunction, BAS and ESP ®
are also deactivated. There is an
increased risk of skidding and an accident.
X Drive on carefully.
X Visit a qualified specialist workshop immediately. 0049(USA
only)
0024(Canada
only)
Please Release Please Release
Parking Brake Parking Brake 0024
The indicator lamp (red) flashes and a warning tone sounds.
You are driving with the electric parking brake applied.
X Release the electric parking brake.
or
X Consult a qualified specialist workshop. 0024
The indicator lamp (red) flashes, the warning lamp (yellow)
lights up and a warning tone sounds.
The electric parking brake is malfunctioning and the braking effect
is restricted.
While the vehicle is in motion:
X Release the electric parking brake handle.
While the vehicle is stationary:
X Switch off the ignition and turn it back on.
X Release the electric parking brake.
If the display message continues to be displayed:
X Shift the transmission to Pwith the button in the center console.
X Prevent the vehicle from rolling away before you leave it.
X Consult a qualified specialist workshop. 0024
The indicator lamp (red) flashes and a warning tone sounds.
You are making an emergency stop using the electric parking
brake.
X After the emergency stop: release the electric parking brake
lever. 166
Display
messagesOn-board computer and displays
Page 169 of 290
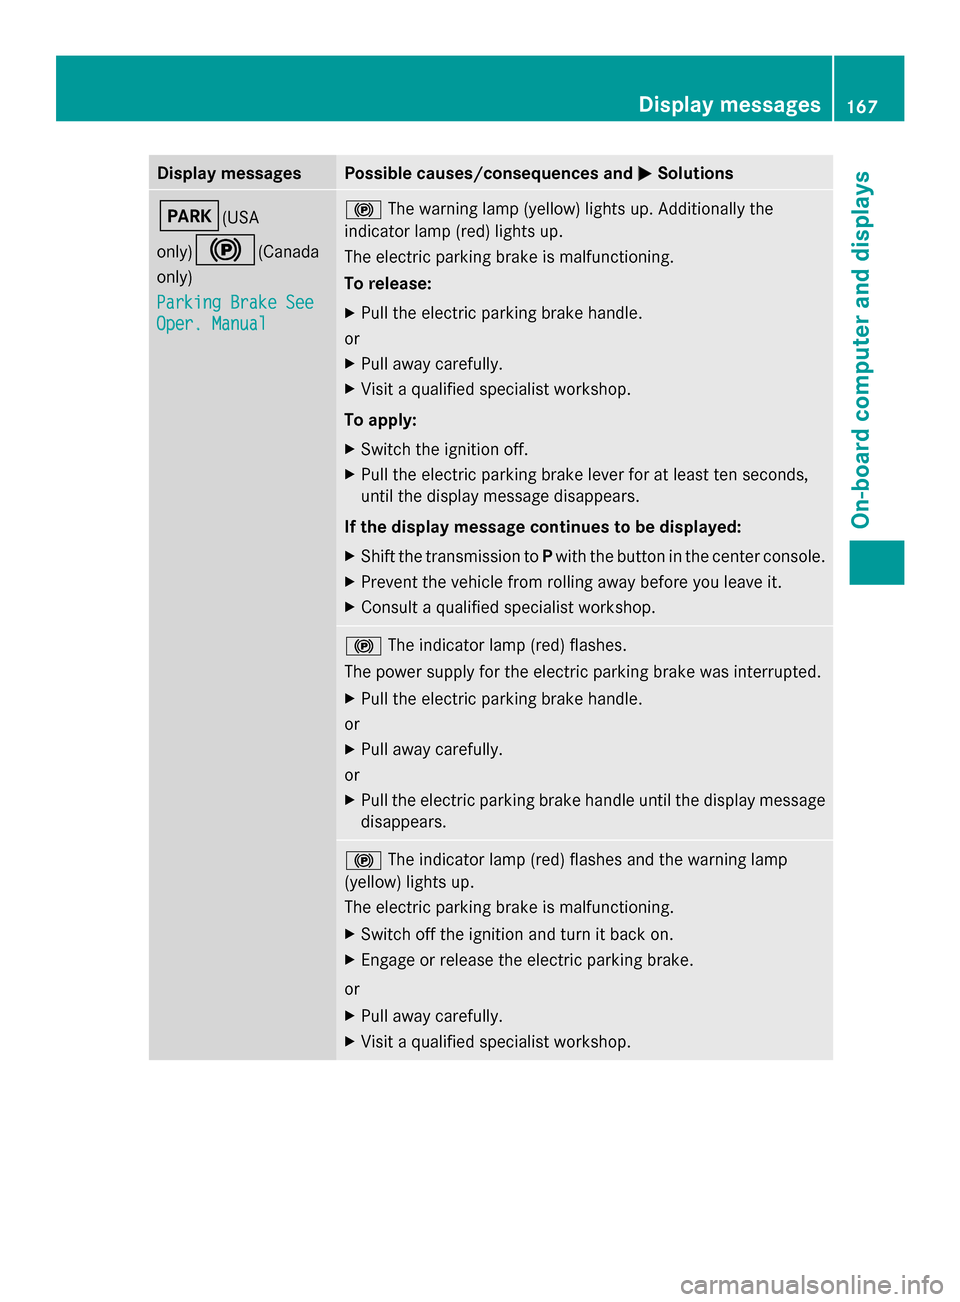
Display messages Possible causes/consequences and
0050
0050Solutions 0049(USA
only)
0024(Canada
only)
Parking Brake See Parking Brake See
Oper. Manual Oper. Manual 0024
The warning lamp (yellow) lights up. Additionally the
indicator lamp (red) lights up.
The electric parking brake is malfunctioning.
To release:
X Pull the electric parking brake handle.
or
X Pull away carefully.
X Visit a qualified specialist workshop.
To apply:
X Switch the ignition off.
X Pull the electric parking brake lever for at least ten seconds,
until the display message disappears.
If the display message continues to be displayed:
X Shift the transmission to Pwith the button in the center console.
X Prevent the vehicle from rolling away before you leave it.
X Consult a qualified specialist workshop. 0024
The indicator lamp (red) flashes.
The power supply for the electric parking brake was interrupted.
X Pull the electric parking brake handle.
or
X Pull away carefully.
or
X Pull the electric parking brake handle until the display message
disappears. 0024
The indicator lamp (red) flashes and the warning lamp
(yellow) lights up.
The electric parking brake is malfunctioning.
X Switch off the ignition and turn it back on.
X Engage or release the electric parking brake.
or
X Pull away carefully.
X Visit a qualified specialist workshop. Display
messages
167On-board computer and displays Z