2014 MERCEDES-BENZ SLS AMG GT COUPE low oil pressure
[x] Cancel search: low oil pressurePage 30 of 290

Warning and indicator lamps
Function Page
0043
ESP
® 193
0044
Seat belts 191
0087
Brakes (USA only)
004D
Brakes (Canada only) 0085
High-beam headlamps 98
0083
Low-beam headlamps 97
0084
Turn signal 98
006B
SRS 194
006C
Check Engine
006D
ABS
192 Function Page
006E
Engine oil temperature 150
006F
Tire pressure 197
0070
Electric parking brake (USA
only)
0024
Electric parking brake
(Canada only) 0071
Reserve fuel 196
0072
SPORT handling mode 56
0073
ESP
®
OFF 5528
Instrument clusterAt a glance
Page 181 of 290

Display messages Possible causes/consequences and
0050
0050Solutions 00B2
Check Engine Oil Check Engine Oil
Level Level
(Add 1
(Add 1 Liter)
Liter) The oil level is too low.
X
Check the oil level (Y page 219).
X If necessary, add engine oil.
X Have the engine checked for leaks if you need to add engine oil
more often than usual.
! Avoid long journeys with too little engine oil. The engine will
otherwise be damaged.
Information on approved engine oils can be obtained from any
qualified specialist workshop or on the Internet at http://
www.mbusa.com (USA only). 00B2
Engine Oil Level Engine Oil Level
Too High Too High You have added too much engine oil. The engine or catalytic
converter may be damaged.
X
Siphon off excess engine oil until it is at the specified level.
Observe the legal requirements. 00B2
Engine Oil Level Engine Oil Level
Cannot Be Measured Cannot Be Measured The measuring system is faulty.
X
Visit a qualified specialist workshop. 00B2
Engine Oil Engine Oil
Pressure Control Pressure Control
See Operator's See Operator's
Manual Manual The oil pressure sensor has reported a malfunction.
The oil pressure control is in emergency mode.
The engine lubrication is guaranteed.
X
Visit a qualified specialist workshop. 00B2
Engine Oil Engine Oil
Pressure Stop Pressure Stop
Vehicle Turn Vehicle Turn
Engine Off Engine Off
X
Pull over and stop the vehicle safely and switch off the engine,
paying attention to road and traffic conditions.
X Check the engine oil level (Y page 219) and top up if necessary.
X If there are visible signs of oil loss from the vehicle, consult a
qualified specialist workshop. 00A8 There is only a small amount of fuel in the fuel tank.
X
Refuel at the nearest gas station. 00B6
Fuel Level Low Fuel Level Low The fuel level has fallen below the reserve range.
X
Refuel at the nearest gas station. Display
messages
179On-board computer and displays Z
Page 198 of 290
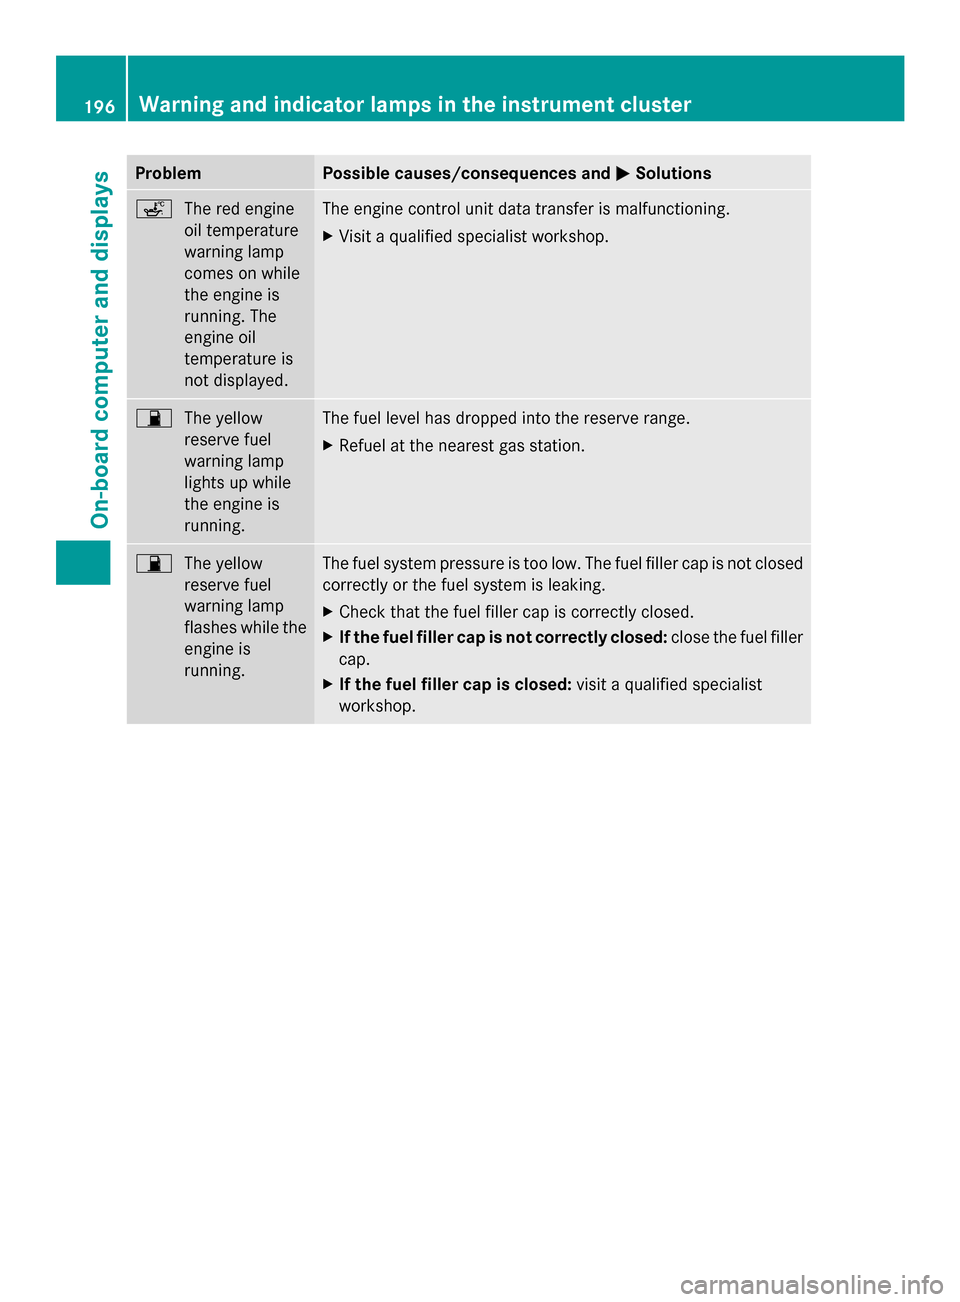
Problem Possible causes/consequences and
0050
0050Solutions 00E4
The red engine
oil temperature
warning lamp
comes on while
the engine is
running. The
engine oil
temperature is
not displayed. The engine control unit data transfer is malfunctioning.
X
Visit a qualified specialist workshop. 00B5
The yellow
reserve fuel
warning lamp
lights up while
the engine is
running. The fuel level has dropped into the reserve range.
X
Refuel at the nearest gas station. 00B5
The yellow
reserve fuel
warning lamp
flashes while the
engine is
running. The fuel system pressure is too low. The fuel filler cap is not closed
correctly or the fuel system is leaking.
X
Check that the fuel filler cap is correctly closed.
X If the fuel filler cap is not correctly closed: close the fuel filler
cap.
X If the fuel filler cap is closed: visit a qualified specialist
workshop. 196
Warning and indicator lamps in the instrument clusterOn-board computer and displays
Page 228 of 290
Benz. This is the case approximately every
three to five months, depending on the
climate conditions and the care product used.
If dirt has penetrated the paint surface or the
paint has become dull, the paint cleaner
recommended and approved by Mercedes-
Benz should be used.
Do not use these care products in the sun or
on the hood while the hood is hot.
X Use a suitable touch-up stick, e.g. MB
Touch-Up Stick, to correct smaller areas of
paint damage quickly and provisionally.
Matte finish care If your vehicle has a clear matte finish,
observe the following instructions in order to
avoid damage to the paintwork due to
incorrect care.
These notes also apply to light alloy wheels
with a clear matte finish.
! Never polish the vehicle or the light alloy
wheels. Polishing causes the finish to
shine.
! The following may cause the paint to
become shiny and thus reduce the matte
effect:
R Vigorous rubbing with unsuitable
materials.
R Frequent use of car washes.
R Washing the vehicle in direct sunlight.
! Never use paint cleaner, buffing or
polishing products such as gloss preserver
(wax). These products are only suitable for
high-gloss surfaces. Their use on vehicles
with matte finish leads to considerable
surface damage (shiny, spotted areas).
If wax comes into contact with the painted
surface by accident, remove it immediately
with commercially available petroleum
ether. Do so carefully and do not apply too
much pressure to the painted surface.
Ensure that no resinous, greasy or oily
substances come into contact with the paint, as these can leave a residue. If such
substances do come into contact with the
painted surface accidentally, remove these
immediately with commercially available
petroleum ether. Do so carefully and do not
apply too much pressure to the painted
surface.
Tar stains or marks on the painted surface
can be removed with a commercially
available tar remover. Do so carefully and
do not apply too much pressure to the
painted surface.
Always have paintwork repairs carried out
at a qualified specialist workshop, e.g. an
authorized Mercedes-Benz Center.
! Do not use wash programs with a hot wax
treatment under any circumstances.
i The vehicle should preferably be washed
by hand using a soft sponge, car shampoo
and plenty of water.
i Use only insect remover and car shampoo
from the range of recommended and
approved Mercedes-Benz care products.
Cleaning the Roadster soft top X
Light soiling: you can clean the soft top
while it is dry or rinse it with clear water.
X Normal to heavy soiling: clean the soft
top with a brush and clear water. Clean
stains and other dirt with a brush and soft
top cleaning agents that have been
recommended and approved by Mercedes-
Benz. Always brush from front to back,
following the grain of the fabric.
! Never use any of the following to clean the
soft top:
R gasoline
R thinner
R tar or stain remover
R other organic solvents
! Remove bird droppings immediately, as
they are corrosive and can therefore cause
the soft-top fabric to leak. Do not wash the 226
CareMaintenance and care
Page 231 of 290
Impurities combined with the effects of road
grit and corrosive environmental factors may
cause flash rust to form on the surface. You
can restore the original shine of the exhaust
pipe by cleaning it regularly, especially in
winter and after washing. Interior care
Cleaning the display !
For cleaning, do not use any of the
following:
R alcohol-based thinner or gasoline
R abrasive cleaning agents
R commercially-available household
cleaning agents
These may damage the display surface. Do
not put pressure on the display surface
when cleaning. This could lead to
irreparable damage to the display.
X Before cleaning the display, make sure that
it is switched off and has cooled down.
X Clean the display surface using a
commercially available microfiber cloth
and TFT/LCD display cleaner.
X Dry the display surface using a dry
microfiber cloth.
Cleaning the plastic trim G
WARNING
Care products and cleaning agents containing
solvents cause surfaces in the cockpit to
become porous. As a result, plastic parts may
come loose in the event of air bag
deployment. There is a risk of injury.
Do not use any care products and cleaning
agents to clean the cockpit.
! Do not affix the following to plastic
surfaces:
R stickers
R films
R scented oil bottles or similar items You can otherwise damage the plastic.
! Do not allow cosmetics, insect repellent
or sunscreen to come into contact with the
plastic trim. This maintains the high-quality
look of the surfaces.
X Wipe the plastic trim with a damp, lint-free
cloth, e.g. a microfiber cloth.
X Heavy soiling: use car care and cleaning
products recommended and approved by
Mercedes-Benz.
The surface may change color temporarily.
Wait until the surface is dry again.
Cleaning the steering wheel and
selector lever X
Thoroughly wipe with a damp cloth or use
leather care agents that have been
recommended and approved by Mercedes-
Benz.
Cleaning genuine wood and trim
elements !
Do not use solvent-based cleaning agents
such as tar remover, wheel cleaners,
polishes or waxes. There is otherwise a risk
of damaging the surface.
! Do not use chrome polish on trim pieces.
The trim pieces have a chrome look but are
mostly made of anodized aluminum and
can lose their shine if chrome polish is
used. Use a damp, lint-free cloth instead
when cleaning the trim pieces.
If the chrome-plated trim pieces are very
dirty, you can use a chrome polish. If you
are unsure as to whether the trim pieces
are chrome-plated or not, consult an
authorized Mercedes-Benz Center.
X Wipe the wooden trim and trim pieces with
a damp, lint-free cloth, e.g. a microfiber
cloth.
X Heavy soiling: use care and cleaning
products recommended and approved by
Mercedes-Benz. Care
229Maintenance and care Z
Page 271 of 290
If your vehicle's tire configuration allows, you
can change the wheels according to the
intervals in the tire manufacturer's warranty
book in your vehicle documents. If no
warranty book is available, the tires should be
rotated every 3,000 to 6,000 miles (5,000 to
10,000 km), or earlier if tire wear requires. Do
not change the direction of wheel rotation.
Clean the contact surfaces of the wheel and
the brake disc thoroughly every time a wheel
is rotated. Check the tire pressure and
reactivate the tire pressure monitor if
necessary. Direction of rotation
Tires with a specified direction of rotation
have additional benefits, e.g. if there is a risk
of hydroplaning. You will only gain these
benefits if the correct direction of rotation is
maintained.
An arrow on the sidewall of the tire indicates
its correct direction of rotation. Storing wheels
Store wheels that are not being used in a cool,
dry and preferably dark place. Protect the
tires from oil, grease, gasoline and diesel. Cleaning the wheels
G
WARNING
The water jet from a circular jet nozzle (dirt
blasters) can cause invisible exterior damage
to the tires or chassis components.
Components damaged in this way may fail
unexpectedly. There is a risk of an accident.
Do not use power washers with circular jet
nozzles to clean the vehicle. Have damaged
tires or chassis components replaced
immediately. Mounting a wheel
Preparing the vehicle X
Stop the vehicle on solid, non-slippery and
level ground.
X Apply the electric parking brake manually.
X Bring the front wheels into the straight-
ahead position.
X Shift the transmission to position P.
X Switch off the engine.
X Open the driver's door.
The on-board electronics now have status
0. This is the same as the SmartKey having
been removed.
X Remove Start/Stop button from ignition
lock (Y page 119).
X Take the following objects from the left-
hand stowage compartment and the left-
hand stowage space in the trunk:
R
lug wrench
R folding wheel chock
R jack
R alignment bolt
X Secure the vehicle to prevent it from rolling
away.
Securing the vehicle to prevent it from
rolling away If your vehicle is equipped with a wheel chock,
it can be found in the vehicle tool kit
(Y
page 232).
The folding wheel chock is an additional
safety measure to prevent the vehicle from
rolling away, for example when changing a
wheel. Changing a wheel
269Wheels and tires Z
Page 283 of 290
with premium-grade unleaded gasoline
as soon as possible.
R do not drive at the maximum speed.
R avoid sudden acceleration and engine
speeds above 3000 rpm.
R never refuel using fuel with an octane
number lower than 87. Otherwise,
engine failure could occur.
! Only use the fuel recommended.
Operating the vehicle with other fuels can
lead to engine failure.
Reformulated Gasoline (RFG) and/or
unleaded gasoline with additives can be used.
The concentration of additives in the fuel,
however, must not exceed 10%, e.g.:
R Ethanol
R TAME
R ETBE
R IPA
R TBA
For MTBE, the concentration should not
exceed 15%.
The concentration of methanol in gasoline,
including other additives, must not exceed
3%.
Using mixtures of methanol and ethanol is not
permitted. Gasohol, a mixture of 10 %ethanol
and 90% unleaded gasoline, may be used.
All of these blends must fulfill the fuel
requirements, e.g.:
R knock resistance
R boiling point
R vapor pressure
You will usually find information about the fuel
grade on the pump. If you cannot find the
label on the pump, ask the staff for
assistance.
i For further information, consult an
authorized Mercedes-Benz Center or on
the Internet at http://www.mbusa.com
(USA only).
Information on refueling ( Ypage 129). Additives
!
Operating the engine with fuel additives
added later can lead to engine failure. Do
not mix fuel additives with fuel. This does
not include additives for the removal and
prevention of residue buildup. gasoline
must only be mixed with additives
recommended by Mercedes-Benz. Comply
with the instructions for use on the product
label. More information about
recommended additives can be obtained
from any authorized Mercedes-Benz
Center.
Mercedes-Benz recommends that you use
fuel brands that have the additives.
The quality of the fuel available in some
countries may not be sufficient. Residue
could build up as a result. In such cases, and
in consultation with an authorized Mercedes-
Benz Center, the gasoline may be mixed with
the cleaning additive recommended by
Mercedes-Benz (part no. A000989254512).
You must observe the notes and mixing ratios
specified on the container. Engine oil
General notes !
Never use engine oil or an oil filter of a
specification other than is necessary to
fulfill the prescribed service intervals. Do
not change the engine oil or oil filter in
order to achieve longer replacement
intervals than those prescribed. You could
otherwise cause engine damage or damage
to the exhaust gas aftertreatment.
Follow the instructions in the service
interval display regarding the oil change.
Otherwise, you may damage the engine and
the exhaust gas aftertreatment.
When handling engine oil, observe the
important safety notes on service products
(Y page 279).
The engine oils are matched to the
performance of Mercedes-Benz engines and Service products and filling capacities
281Technical data Z