2014 MERCEDES-BENZ SL-CLASS ROADSTER roof rack
[x] Cancel search: roof rackPage 28 of 284

Protection of the environment
General notes
H
Environmental note
Daimler's declared policy is one of
comprehensive environmental protection.
The objectives are for the natural resources
that form the basis of our existence on this
planet to be used sparingly and in a manner
that takes the requirements of both nature
and humanity into account.
You too can help to protect the environment
by operating your vehicle in an
environmentally responsible manner.
Fuel consumption and the rate of engine,
transmission, brake and tire wear are affected
by these factors:
R operating conditions of your vehicle
R your personal driving style
You can influence both factors. You should
bear the following in mind:
Operating conditions:
R avoid short trips as these increase fuel
consumption.
R always make sure that the tire pressures
are correct.
R do not carry any unnecessary weight.
R remove roof racks once you no longer need
them.
R a regularly serviced vehicle will contribute
to environmental protection. You should
therefore adhere to the service intervals.
R always have service work carried out at a
qualified specialist workshop.
Personal driving style:
R do not depress the accelerator pedal when
starting the engine.
R do not warm up the engine when the vehicle
is stationary.
R drive carefully and maintain a safe distance
from the vehicle in front.
R avoid frequent, sudden acceleration and
braking. R
change gear in good time and use each gear
only up to Ôof its maximum engine speed.
R switch off the engine in stationary traffic.
R keep an eye on the vehicle's fuel
consumption. Environmental concerns and
recommendations
Wherever the operating instructions require
you to dispose of materials, first try to
regenerate or re-use them. Observe the
relevant environmental rules and regulations
when disposing of materials. In this way you
will help to protect the environment. Genuine Mercedes-Benz parts
H
Environmental note
Daimler AG also supplies reconditioned major
assemblies and parts which are of the same
quality as new parts. They are covered by the
same Limited Warranty entitlements as new
parts.
! Air bags and Emergency Tensioning
Devices, as well as control units and
sensors for these restraint systems, may be
installed in the following areas of your
vehicle:
R doors
R door pillars
R door sills
R seats
R cockpit
R instrument cluster
R center console
Do not install accessories such as audio
systems in these areas. Do not carry out
repairs or welding. You could impair the
operating efficiency of the restraint
systems. 26
Introduction
Page 97 of 284

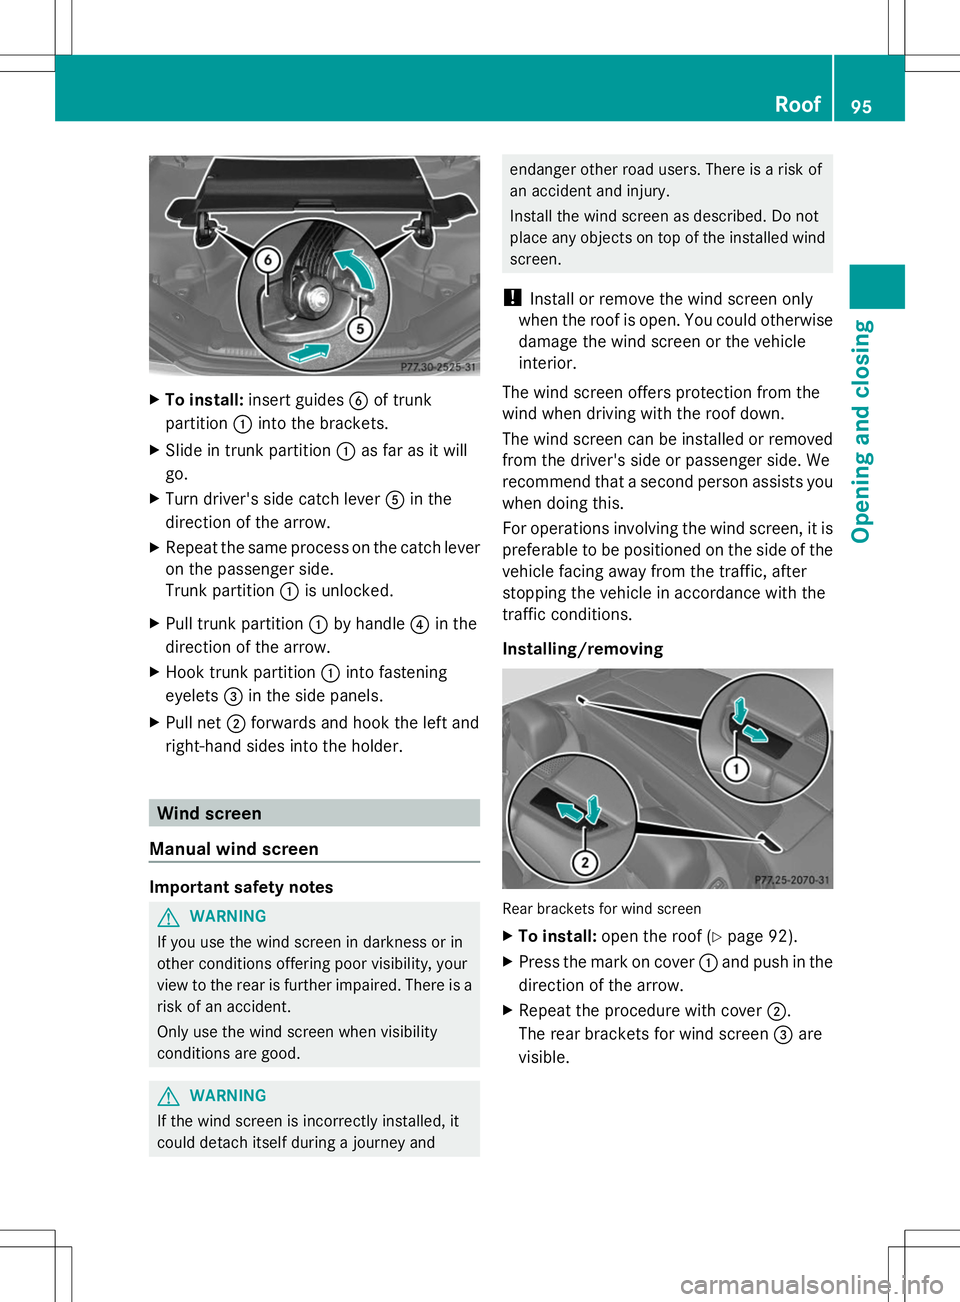
X
To install: insert guides Bof trunk
partition :into the brackets.
X Slide in trunk partition :as far as it will
go.
X Turn driver's side catch lever Ain the
direction of the arrow.
X Repeat the same process on the catch lever
on the passenger side.
Trunk partition :is unlocked.
X Pull trunk partition :by handle ?in the
direction of the arrow.
X Hook trunk partition :into fastening
eyelets =in the side panels.
X Pull net ;forwards and hook the left and
right-hand sides into the holder. Wind screen
Manual wind screen Important safety notes
G
WARNING
If you use the wind screen in darkness or in
other conditions offering poor visibility, your
view to the rear is further impaired. There is a
risk of an accident.
Only use the wind screen when visibility
conditions are good. G
WARNING
If the wind screen is incorrectly installed, it
could detach itself during a journey and endanger other road users. There is a risk of
an accident and injury.
Install the wind screen as described. Do not
place any objects on top of the installed wind
screen.
! Install or remove the wind screen only
when the roof is open. You could otherwise
damage the wind screen or the vehicle
interior.
The wind screen offers protection from the
wind when driving with the roof down.
The wind screen can be installed or removed
from the driver's side or passenger side. We
recommend that a second person assists you
when doing this.
For operations involving the wind screen, it is
preferable to be positioned on the side of the
vehicle facing away from the traffic, after
stopping the vehicle in accordance with the
traffic conditions.
Installing/removing Rear brackets for wind screen
X
To install: open the roof (Y page 92).
X Press the mark on cover :and push in the
direction of the arrow.
X Repeat the procedure with cover ;.
The rear brackets for wind screen =are
visible. Roof
95Opening and closing Z
Page 98 of 284

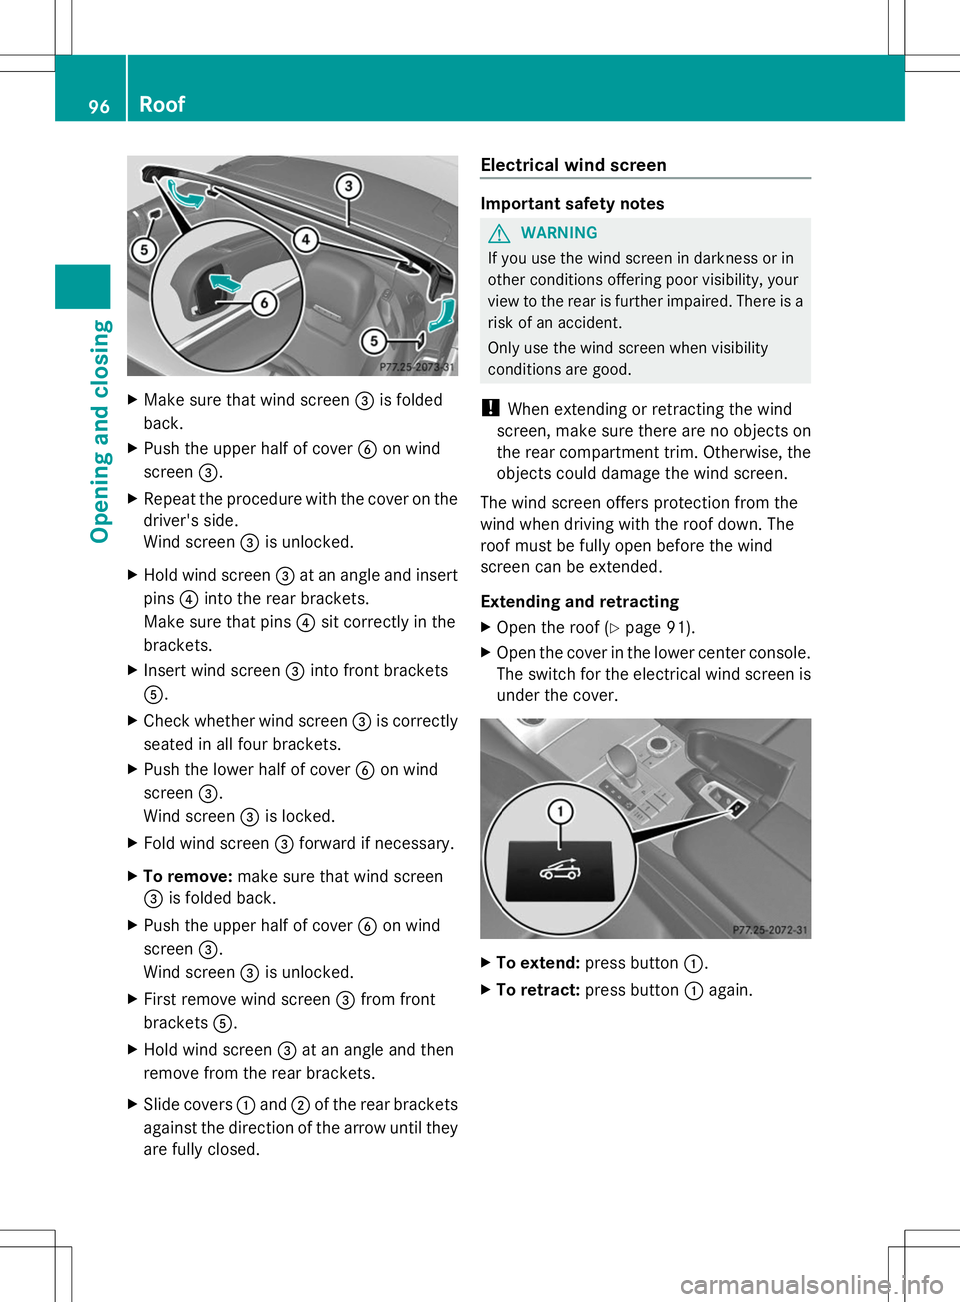
X
Make sure that wind screen =is folded
back.
X Push the upper half of cover Bon wind
screen =.
X Repeat the procedure with the cover on the
driver's side.
Wind screen =is unlocked.
X Hold wind screen =at an angle and insert
pins ?into the rear brackets.
Make sure that pins ?sit correctly in the
brackets.
X Insert wind screen =into front brackets
A.
X Check whether wind screen =is correctly
seated in all four brackets.
X Push the lower half of cover Bon wind
screen =.
Wind screen =is locked.
X Fold wind screen =forward if necessary.
X To remove: make sure that wind screen
= is folded back.
X Push the upper half of cover Bon wind
screen =.
Wind screen =is unlocked.
X First remove wind screen =from front
brackets A.
X Hold wind screen =at an angle and then
remove from the rear brackets.
X Slide covers :and ;of the rear brackets
against the direction of the arrow until they
are fully closed. Electrical wind screen Important safety notes
G
WARNING
If you use the wind screen in darkness or in
other conditions offering poor visibility, your
view to the rear is further impaired. There is a
risk of an accident.
Only use the wind screen when visibility
conditions are good.
! When extending or retracting the wind
screen, make sure there are no objects on
the rear compartment trim. Otherwise, the
objects could damage the wind screen.
The wind screen offers protection from the
wind when driving with the roof down. The
roof must be fully open before the wind
screen can be extended.
Extending and retracting
X Open the roof (Y page 91).
X Open the cover in the lower center console.
The switch for the electrical wind screen is
under the cover. X
To extend: press button :.
X To retract: press button :again. 96
RoofOpening and closing
Page 208 of 284

Problems with the loading aid
Problem Possible causes/consequences and
M
MSolutions It is no longer possible
to lower the stowed
roof in the trunk using
the loading aid. You cannot close the trunk any more.
X
Call a qualified specialist workshop. Stowage well under the trunk floor
X
To open: open trunk partition
= (Ypage 94).
X Swing trunk floor ?up by loop ;.
X Pull hook with Velcro attachment :off the
underside of trunk floor ?.
X Attach hook with Velcro attachment :to
trunk partition =by its handle.
The TIREFIT kit, tire-change tool kit, etc. are
located in the stowage compartment. Features
Information in the Digital Operator's
Manual
In the Digital Operator's Manual you will find
information on the following topics:
R Cup holder
R Bottle holder
R Ashtray
R Cigarette lighter
R 12 V sockets Sun visors
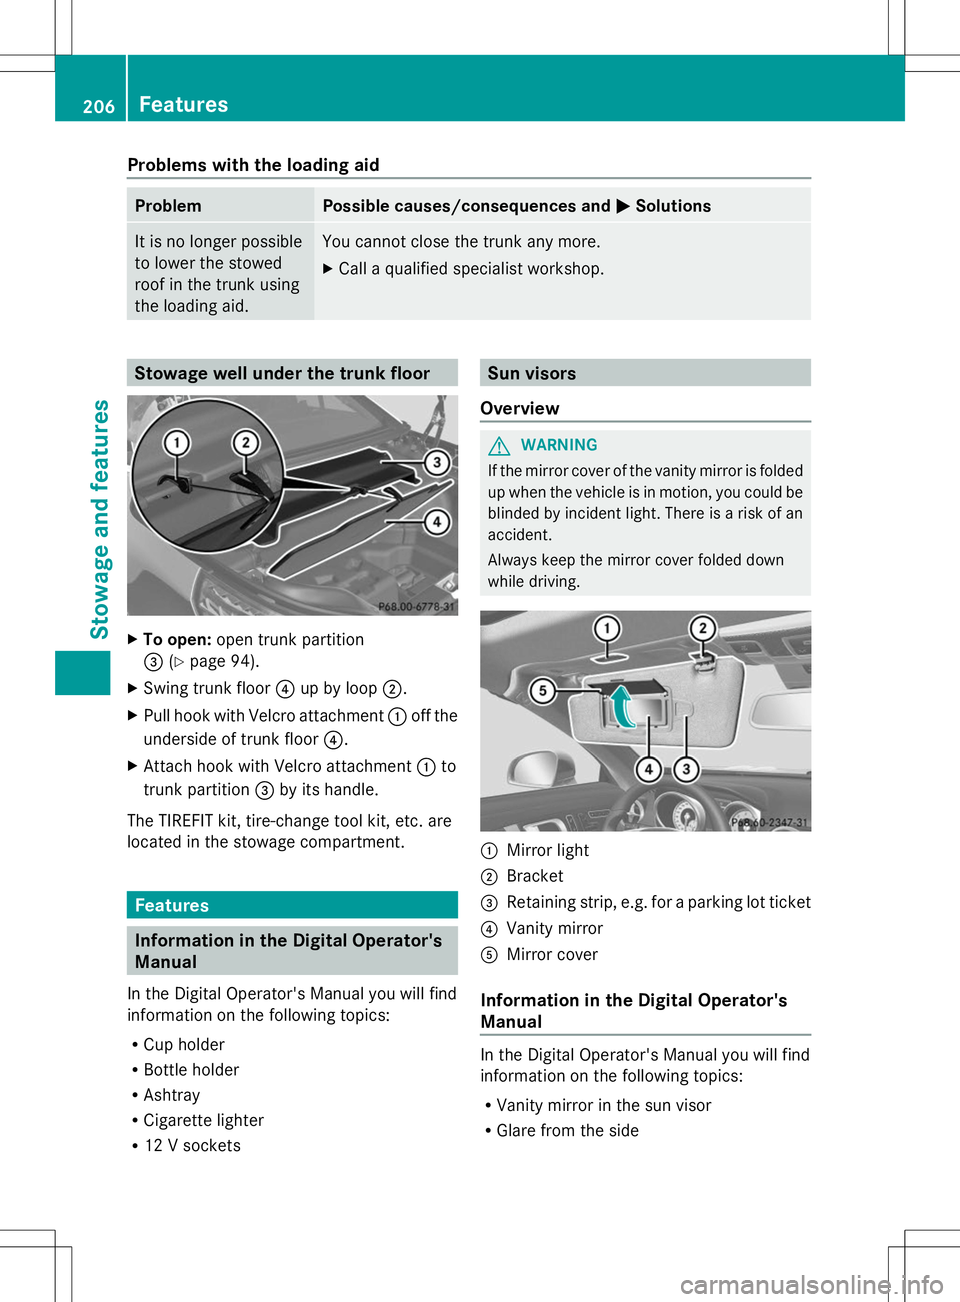
Overview G
WARNING
If the mirror cover of the vanity mirror is folded
up when the vehicle is in motion, you could be
blinded by incident light. There is a risk of an
accident.
Always keep the mirror cover folded down
while driving. :
Mirror light
; Bracket
= Retaining strip, e.g. for a parking lot ticket
? Vanity mirror
A Mirror cover
Information in the Digital Operator's
Manual In the Digital Operator's Manual you will find
information on the following topics:
R
Vanity mirror in the sun visor
R Glare from the side 206
FeaturesStowage and features
Page 264 of 284

Maximum loaded vehicle weight
The maximum weight is the sum of:
R
the curb weight of the vehicle
R the weight of the accessories
R the load limit
R the weight of the factory installed optional
equipment
Kilopascal (kPa)
Metric unit for tire pressure. 6.9 kPa
corresponds to 1 psi. Another unit for tire
pressure is bar. There are 100 kilopascals
(kPa) to 1 bar.
Load index
In addition to the load-bearing index, the load
index may also be imprinted on the sidewall
of the tire. This specifies the load-bearing
capacity more precisely.
Curb weight
The weight of a vehicle with standard
equipment including the maximum capacity
of fuel, oil and coolant. It also includes the air-
conditioning system and optional equipment
if these are installed in the vehicle, but does
not include passengers or luggage.
Maximum load rating
The maximum tire load is the maximum
permissible weight in kilograms or lbs for
which a tire is approved.
Maximum permissible tire pressure
Maximum permissible tire pressure for one
tire.
Maximum load on one tire
Maximum load on one tire. This is calculated
by dividing the maximum axle load of one axle
by two.
PSI (pounds per square inch)
A standard unit of measure for tire pressure. Aspect ratio
Relationship between tire height and tire
width in percent.
Tire pressure
This is pressure inside the tire applying an
outward force to each square inch of the tire's
surface. The tire pressure is specified in
pounds per square inch (psi), in kilopascal
(kPa) or in bar. The tire pressure should only
be corrected when the tires are cold.
Cold tire pressure
The tires are cold:
R if the vehicle has been parked without
direct sunlight on the tires for at least three
hours and
R if the vehicle has been driven for less than
1 mile (1.6 km).
Tread
The part of the tire that comes into contact
with the road.
Bead
The tire bead ensures that the tire sits
securely on the wheel. There are several steel
wires in the bead to prevent the tire from
coming loose from the wheel rim.
Sidewall
The part of the tire between the tread and the
bead.
Weight of optional extras
The combined weight of those optional extras
that weigh more than the replaced standard
parts and more than 2.3 kilograms (5 lbs).
These optional extras, such as high-
performance brakes, level control, a roof rack
or a high-performance battery, are not
included in the curb weight and the weight of
the accessories.
TIN (Tire Identification Number)
This is a unique identifier which can be used
by a tire manufacturer to identify tires, for
example for a product recall, and thus identify 262
All about wheels and tiresWheels and tires