2014 MERCEDES-BENZ SL-CLASS ROADSTER fuel cap
[x] Cancel search: fuel capPage 11 of 284

Driving on flooded roads
................131
Driving on wet roads ......................131
Exhaust check ............................... 131
Fuel ................................................ 131
General .......................................... 131
Hydroplaning ................................. 131
Icy road surfaces ........................... 131
Limited braking efficiency on
salted road s................................... 131
Symmetrical low bea m.................. 106
Wet road surface ........................... 131
DVD audio
Operating (on-board
computer) ...................................... 161
see also Digital Operator's Manual 188
DVD video
Operating (on-board
computer) ...................................... 161
see also Digital Operator's Manual 188 E
EASY-ENTRY feature Activating/deactivating .................161
Function/notes ............................. 102
EASY-EXIT feature
Function/notes ............................. 102
Switching on/off ........................... 161
EBD (electronic brake force
distribution)
Display message ............................ 166
Function/notes ................................ 72
ECO display
Function/notes ............................. 131
ECO start/stop function
Automatic engine start ..................125
Automatic engine switch-off ..........125
Deactivating/activating .................125
General information .......................125
Important safety notes ..................125
Introduction ................................... 125
Electronic Stability Program
see ESP ®
(Electronic Stability Program)
Emergency release
Driver's door .................................... 84
Trunk ............................................... 89
Vehicle ............................................. 84Emergency Tensioning Devices
Function .......................................... .62
Safety guideline s............................. 45
Emissions control
Service and warranty information ....27
Engine
Check Engine warning lamp ........... 175
Display message ............................ 172
ECO start/stop function ................125
Engine number ............................... 274
Irregular running ............................ 126
Jump-starting ................................. 235
Starting problems ..........................126
Starting the engine with the
SmartKey ....................................... 123
Starting with KEYLESS-GO .............123
Switching off .................................. 131
Tow-starting (vehicle) ..................... 240
Engine electronics
Problem (malfunction) ...................126
Engine oil
Adding ........................................... 218
Additives ........................................ 276
Checking the oil level ..................... 217
Checking the oil level using the
dipstick .......................................... 217
Display message ............................ 163
Filling capacity ............................... 276
Notes about oil grades ................... 276
Notes on oil level/consumption ....217
Temperature (on-board
computer) ...................................... 161
Viscosity ........................................ 276
Entering a city
see also Digital Operator's Manual 188
Entering an address
see also Digital Operator's Manual 188
ESP ®
(Electronic Stability
Program) AMG menu (on-board
computer) ...................................... 161
Deactivating/activating (AMG
vehicles) .......................................... 71
Deactivating/activating (notes;
except AMG vehicles) ......................70
Display message ............................ 164
ETS .................................................. 69
Function/notes ................................ 69 Index
9
Page 12 of 284

General notes
.................................. 69
Important safety information ...........69
Warning lamp ................................. 179
ETS (Electronic Traction System) ....... 69
Exhaust check ................................... 131
Exhaust tail pipe (cleaning
instructions) ...................................... 222
Exterior lighting Setting options .............................. 106
see Lights
Exterior mirrors
Adjusting ....................................... 102
Dipping (automatic) .......................102
Folding in when locking (on-board
computer) ...................................... 161
Storing settings (memory function) 103
Storing the parking position ..........102
Eyeglasses compartment .................204 F
Filler cap see Fuel filler flap
Filling capacities (Technical data) ...275
First-aid kit ......................................... 226
Flat tire MOExtended tires ..........................227
Preparing the vehicle .....................227
TIREFIT kit ...................................... 228
Floormats ........................................... 214
Front fog lamps Display message ............................ 163
Fuel
Consumption statistics ..................161
Displaying the current
consumption .................................. 161
Displaying the range ......................161
Driving tips .................................... 131
Fuel gauge ....................................... 35
Grade (gasoline) ............................ 276
Important safety notes ..................275
Premium-grade unleaded gasoline .276
Problem (malfunction) ...................130
Refueling ........................................ 127
Tank content/reserve fuel .............275
Fuel filler flap
Opening/closing ............................ 128Fuel level
Calling up the range (on-board
computer) ...................................... 161
Fuel tank
Capacity ........................................ 275
Problem (malfunction) ...................130
Fuse allocation chart (vehicle tool
kit) ...................................................... 226
Fuses Allocation chart ............................. 240
Before changing ............................. 240
Dashboard fuse box .......................241
Fuse box in the engine
compartment ................................. 241
Fuse box in the rear compartment .242
Important safety notes ..................240 G
Garage door opener Clearing the memory .....................214
Important safety notes ..................211
Opening/closing the garage door ..214
Programming (button in the rear-
view mirror) ................................... 212
Gasoline ............................................. 276
Gear indicator (on-board
computer) .......................................... 161
Gear or selector lever (cleaning
guidelines) ......................................... 223
Genuine parts ...................................... 26
Glass roof (sunblind) ...........................97
Glove box ........................................... 204
Google™ Local Search see also Digital Operator's Manual 188 H
HANDS-FREE ACCESS .......................... 86
Hazard warning lamps ......................106
Head bags Display message ............................ 168
Operation ........................................ .50
Headlamps
Cleaning system (notes) ................278
Fogging up ..................................... 106
see Automatic headlamp mode
Head level heating (AIRSCARF) ........101 10
Index
Page 19 of 284

Steering (display message)
..............175
Steering wheel Adjusting (electrically) ...................102
Button overview ............................... 37
Buttons (on-board computer) ......... 160
Important safety notes ..................102
Paddle shifters ............................... 126
Storing settings (memory function) 103
Steering wheel (cleaning
instructions) ...................................... 223
Steering wheel paddle shifters ........126
Stopwatch (RACETIMER) ................... 161
Stowage areas ................................... 204
Stowage compartments Armrest (under) ............................. 204
Center console .............................. 204
Cup holders ................................... 206
Display message) ........................... 163
Eyeglasses compartment ...............204
Glove box ...................................... .204
Important safety information .........204
Stowage net ................................... 204
Stowage net ....................................... 204
Stowage space Center console (rear) .....................204
Umbrella holder ............................. 204
Stowage well beneath the trunk
floor .................................................... 206
Sun visor ............................................ 206
Surround lighting (on-board
computer) .......................................... 161
Suspension tuning Active Body Control (AMG vehicles) 144
Active Body Control (except AMG
vehicles) ........................................ 142
SETUP (on-board computer) ..........161
Switching air-recirculation mode
on/off ................................................. 116
Switching off the alarm (ATA) ............75
Systems settings (COMAND) see also Digital Operator's Manual 188 T
Tachometer ........................................ 160
Tail lamps Display message ............................ 163
see Lights Tank content
Fuel gauge ....................................... 35
Technical data
Capacities ...................................... 275
Information .................................... 274
Tires/wheels ................................. 268
Vehicle data ................................... 279
TELEAID
Call priority .................................... 211
Downloading destinations
(COMAND) ..................................... 207
Downloading routes .......................207
Emergency call .............................. 208
Geo fencing ................................... 207
Locating a stolen vehicle ...............207
MB info call button ........................210
Remote vehicle locking ..................207
Roadside Assistance button ..........209
Search & Send ............................... 207
Self-test ......................................... 207
Speed alert .................................... 207
System .......................................... 207
Triggering the vehicle alarm ........... 207
Vehicle remote malfunction
diagnosis ....................................... 207
Vehicle remote unlocking ..............207
Tele Aid
General notes ................................ 207
Telephone
Accepting a call ............................. 161
Menu (on-board computer) ............161
Number from the phone book ....... .161
Redialing ........................................ 161
Rejecting/ending a call .................161
see also Digital Operator's Manual 188
Telephone compartment ................204
Temperature
Coolant .......................................... 160
Coolant (on-board computer) ......... 161
Engine oil (on-board computer) ...... 161
Outside temperature ..................... .160
Setting (climate control) ................116
Theft deterrent systems
ATA (Anti-Theft Alarm system) .........75
Immobilizer ...................................... 75
Timing (RACETIMER) .........................161
TIREFIT kit .......................................... 228 Index
17
Page 130 of 284

G
WARNING
Fuel is poisonous and hazardous to health.
There is a risk of injury.
You must make sure that fuel does not come
into contact with your skin, eyes or clothing
and that it is not swallowed. Do not inhale fuel
vapors. Keep fuel away from children.
If you or others come into contact with fuel,
observe the following:
R Wash away fuel from skin immediately
using soap and water.
R If fuel comes into contact with your eyes,
immediately rinse them thoroughly with
clean water. Seek medical assistance
without delay.
R If fuel is swallowed, seek medical
assistance without delay. Do not induce
vomiting.
R Immediately change out of clothing which
has come into contact with fuel. G
WARNING
Electrostatic buildup can create sparks and
ignite fuel vapors. There is a risk of fire and
explosion.
Always touch the vehicle body before opening
the fuel filler flap or touching the fuel pump
nozzle. Any existing electrostatic buildup is
thereby discharged.
! Do not use diesel to refuel vehicles with a
gasoline engine. Do not switch on the
ignition if you accidentally refuel with the
wrong fuel. Otherwise, the fuel will enter
the fuel system. Even small amounts of the
wrong fuel could result in damage to the
fuel system and the engine. Notify a
qualified specialist workshop and have the
fuel tank and fuel lines drained completely.
! Overfilling the fuel tank could damage the
fuel system.
! Take care not to spill any fuel on painted
surfaces. You could otherwise damage the
paintwork. !
Use a filter when refueling from a fuel can.
Otherwise, the fuel lines and/or injection
system could be blocked by particles from
the fuel can.
Do not get into the vehicle again during the
refueling process. Otherwise, electrostatic
charge could build up again.
If you overfill the fuel tank, fuel could spray
out when the fuel pump nozzle is removed.
For further information on fuel and fuel quality
(Y page 275). Refueling
Opening/closing the fuel filler flap :
To open the fuel filler flap
; To insert the fuel filler cap
= Tire pressure table
? Fuel type to be used
The fuel filler flap is unlocked or locked
automatically when you open or close the
vehicle with the SmartKey or with KEYLESS-
GO.
The position of the fuel filler cap is displayed
8 in the instrument cluster. The arrow
next to the filling pump indicates the side of
the vehicle.
Opening the fuel filler flap X
Switch the engine off.
X Remove the SmartKey from the ignition
lock. 128
RefuelingDriving and parking
Page 131 of 284

X
KEYLESS-GO: open the driver’s door.
This corresponds to key position 0: "key
removed".
The driver’s door can be closed again.
X Press the fuel filler flap in the direction of
arrow :.
Fuel filler flap :swings open.
X Turn the fuel filler flap counter-clockwise
and remove it.
X Insert the fuel filler cap into the holder
bracket on the inside of filler flap ;.
X Completely insert the filler neck of the fuel
pump nozzle into the tank and refuel.
X Only fill the tank until the pump nozzle
switches off.
i Do not add any more fuel after the pump
stops filling for the first time. Otherwise,
fuel could leak out.
Closing the fuel filler flap X
Place fuel filler cap on the fuel filler neck
and turn clockwise until it engages.
X Close the fuel filler flap.
i Close the fuel filler flap before locking the
vehicle.
i If you are driving with the fuel filler cap
open, the 8reserve fuel warning lamp
flashes. The ;Check Engine warning
lamp may also light up. A message appears
in the multifunction display (Y page 163).
For further information on warning and
indicator lamps in the instrument cluster,
see (Y page 175). Refueling
129Driving and parking Z
Page 221 of 284

X
Replace cap :on the filler neck and turn
clockwise.
Ensure that the cap locks into place
securely.
X Check the oil level again with the oil
dipstick (Y page 217).
Further information on engine oil
(Y page 276). Checking and adding other service
products
Checking coolant level G
WARNING
Certain components in the engine
compartment, such as the engine, radiator
and parts of the exhaust system, can become
very hot. Working in the engine compartment
poses a risk of injury.
Where possible, let the engine cool down and
touch only the components described in the
following. G
WARNING
The engine cooling system is pressurized,
particularly when the engine is warm. When
opening the cap, you could be scalded by hot
coolant spraying out. There is a risk of injury.
Let the engine cool down before opening the
cap. Wear eye and hand protection when
opening the cap. Open the cap slowly half a
turn to allow pressure to escape. Example X
Park the vehicle on a level surface.
Only check the coolant level when the
vehicle is on a level surface and the engine
has cooled down.
X Turn the SmartKey to position 2in the
ignition lock (Y page 121).
On vehicles with KEYLESS-GO, press the
Start/Stop button twice (Y page 121).
X Check the coolant temperature gauge in
the multifunction display.
The coolant temperature must be below
158 ‡ (70 †).
X Turn the SmartKey to position
0(Y page 121) in the ignition lock.
X Slowly turn cap ;half a turn counter-
clockwise to allow excess pressure to
escape.
X Turn cap ;further counter-clockwise and
remove it.
If the coolant is at the level of marker bar
= in the filler neck when cold, there is
enough coolant in coolant expansion
tank :.
If the coolant level is approximately 0.6 in
(1.5 cm) above marker bar =in the fuel
filler neck when warm, there is enough
coolant in expansion tank :.
X If necessary, add coolant that has been
tested and approved by Mercedes-Benz.
X Replace cap ;and turn it clockwise as far
as it will go.
For further information on coolant, see
(Y page 277).
Windshield washer system G
WARNING
Certain components in the engine
compartment, such as the engine, radiator
and parts of the exhaust system, can become
very hot. Working in the engine compartment
poses a risk of injury.
Where possible, let the engine cool down and
touch only the components described in the
following. Engine compartment
219Maintenance and care Z
Page 233 of 284
to the instrument cluster in the driver's
field of vision.
X Stop after driving for approximately ten
minutes and check the tire pressure with
the tire inflation compressor.
The tire pressure must now be at least
130 kPa (1.3 bar/19 psi). G
WARNING
If the required tire pressure is not reached
after driving for a short period, the tire is too
badly damaged. The tire sealant cannot repair
the tire in this instance. Damaged tires and a
tire pressure that is too low can significantly
impair the vehicle's braking and driving
characteristics. There is a risk of accident.
Do not continue driving. Contact a qualified
specialist workshop.
X Correct the tire pressure if it is still at least
130 kPa (1.3 bar/19 psi) (for the values,
see the Tire and Loading Information
placard on the driver's side B-pillar or tire
pressure table on the fuel filler flap).
X To increase the tire pressure: switch on
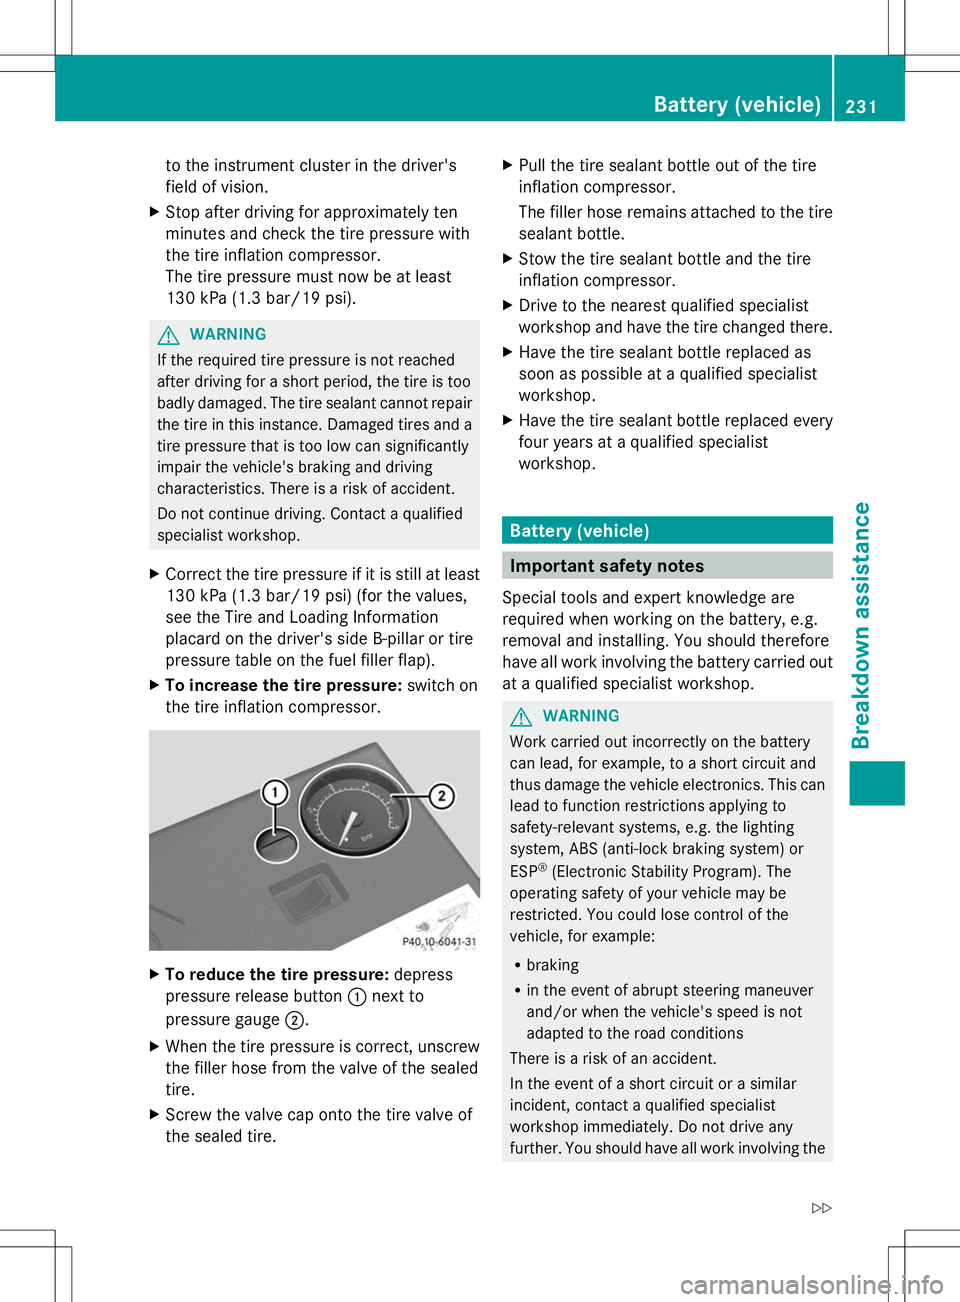
the tire inflation compressor. X
To reduce the tire pressure: depress
pressure release button :next to
pressure gauge ;.
X When the tire pressure is correct, unscrew
the filler hose from the valve of the sealed
tire.
X Screw the valve cap onto the tire valve of
the sealed tire. X
Pull the tire sealant bottle out of the tire
inflation compressor.
The filler hose remains attached to the tire
sealant bottle.
X Stow the tire sealant bottle and the tire
inflation compressor.
X Drive to the nearest qualified specialist
workshop and have the tire changed there.
X Have the tire sealant bottle replaced as
soon as possible at a qualified specialist
workshop.
X Have the tire sealant bottle replaced every
four years at a qualified specialist
workshop. Battery (vehicle)
Important safety notes
Special tools and expert knowledge are
required when working on the battery, e.g.
removal and installing. You should therefore
have all work involving the battery carried out
at a qualified specialist workshop. G
WARNING
Work carried out incorrectly on the battery
can lead, for example, to a short circuit and
thus damage the vehicle electronics. This can
lead to function restrictions applying to
safety-relevant systems, e.g. the lighting
system, ABS (anti-lock braking system) or
ESP ®
(Electronic Stability Program). The
operating safety of your vehicle may be
restricted. You could lose control of the
vehicle, for example:
R braking
R in the event of abrupt steering maneuver
and/or when the vehicle's speed is not
adapted to the road conditions
There is a risk of an accident.
In the event of a short circuit or a similar
incident, contact a qualified specialist
workshop immediately. Do not drive any
further. You should have all work involving the Battery (vehicle)
231Breakdown assistance
Z
Page 237 of 284

Jump-starting
For the jump-starting procedure, use only the jump-starting connection point, consisting of a
positive terminal and a ground point, in the engine compartment. G
WARNING
Battery acid is caustic. There is a risk of injury.
Avoid contact with the skin, eyes or clothing. Do not inhale any battery gases. Do not lean over
the battery. Keep children away from batteries. Wash battery acid immediately with water and
seek medical attention. G
WARNING
During charging and jump-starting, explosive gases can escape from the battery. There is a risk
of an explosion.
Particularly avoid fire, open flames, creating sparks and smoking. Ensure there is sufficient
ventilation while charging and jump-starting. Do not lean over a battery. G
WARNING
During the charging process, a battery produces hydrogen gas. If a short circuit occurs or sparks
are created, the hydrogen gas can ignite. There is a risk of an explosion.
R Make sure that the positive terminal of a connected battery does not come into contact with
vehicle parts.
R Never place metal objects or tools on a battery.
R It is important that you observe the described order of the battery terminals when connecting
and disconnecting a battery.
R When jump-starting, make sure that the battery poles with identical polarity are connected.
R It is particularly important to observe the described order when connecting and disconnecting
the jumper cables.
R Never connect or disconnect the battery terminals while the engine is running. G
WARNING
A discharged battery can freeze at temperatures below freezing point. When jump-starting the
vehicle or charging the battery, gases can escape from the battery. There is a risk of an explosion.
Allow the frozen battery to thaw out before charging it or jump-starting.
! Avoid repeated and lengthy starting attempts. Otherwise, the catalytic converter could be
damaged by the non-combusted fuel.
If, at low temperatures, the indicator lamps/warning lamps in the instrument cluster do not
light up, it is highly likely that the discharged battery has frozen. In this case, you may neither
charge the battery nor jump-start the vehicle. The service life of a thawed-out battery may be
shorter. The starting characteristics can be impaired, particularly at low temperatures. Have
the thawed-out battery checked at a qualified specialist workshop. Jump-starting
235Breakdown assistance Z