2014 MERCEDES-BENZ S-Class warning light
[x] Cancel search: warning lightPage 145 of 434

indicator lamp in the multifunction display
remains lit.
X To switch off: move the combination
switch back to its normal position or move
the light switch to another position.
The 00CE indicator lamp in the instrument
cluster goes out. Adaptive Highbeam Assist PLUS
General notes With Adaptive Highbeam Assist Plus, you can
automatically switch between low-beam,
partial high-beam and high-beam headlamps.
Partial high-beam is a form of illumination
whereby the high-beam is directed past other
road users. Other road users are kept out of
the high-beam. This prevents glare. When
there is a vehicle in front, for example, the
high-beam headlamps illuminate the areas to
its right and left, and the vehicle in front is
illuminated by the low-beam headlamps.
The system automatically adapts the low-
beam headlamp range depending on the
distance to the other vehicle. Once the
system no longer detects any other vehicles,
it reactivates the high-beam headlamps.
If the high-beam or partial high-beam are
causing too much reflection from traffic signs, the lights are automatically dimmed
and glare for the driver caused by the
reflections is thus avoided.
The system's optical sensor is located behind
the windshield near the overhead control
panel.
Important safety notes
G
WARNING
Adaptive Highbeam Assist Plus does not
recognize road users:
R who have no lights, e.g. pedestrians
R who have poor lighting, e.g. cyclists
R whose lighting is blocked, e.g. by a barrier
In very rare cases, Adaptive Highbeam Assist
Plus may not recognize road users who do
have lights, or may recognize them too late.
In this or similar situations, the automatic
high-beam headlamps will not be deactivated
or will be activated regardless. There is a risk
of an accident.
Always carefully observe the traffic conditions
and switch off the high-beam headlamps in
good time.
Adaptive Highbeam Assist Plus cannot take
into account road, weather or traffic
conditions. Adaptive Highbeam Assist Plus is
only an aid. You are responsible for adjusting
the vehicle's lighting to the prevailing light,
visibility and traffic conditions.
In particular, the detection of obstacles can
be restricted if there is:
R poor visibility, e.g. due to fog, heavy rain or
snow
R dirt on the sensors or the sensors are
obscured Exterior lighting
143Lights and windshield wipers Z
Page 147 of 434
0087
004A To switch the front interior lighting
on/off
0085 0042 To switch the rear interior lighting
on/off
0083 003D To switch the right-hand front
reading lamp on/off
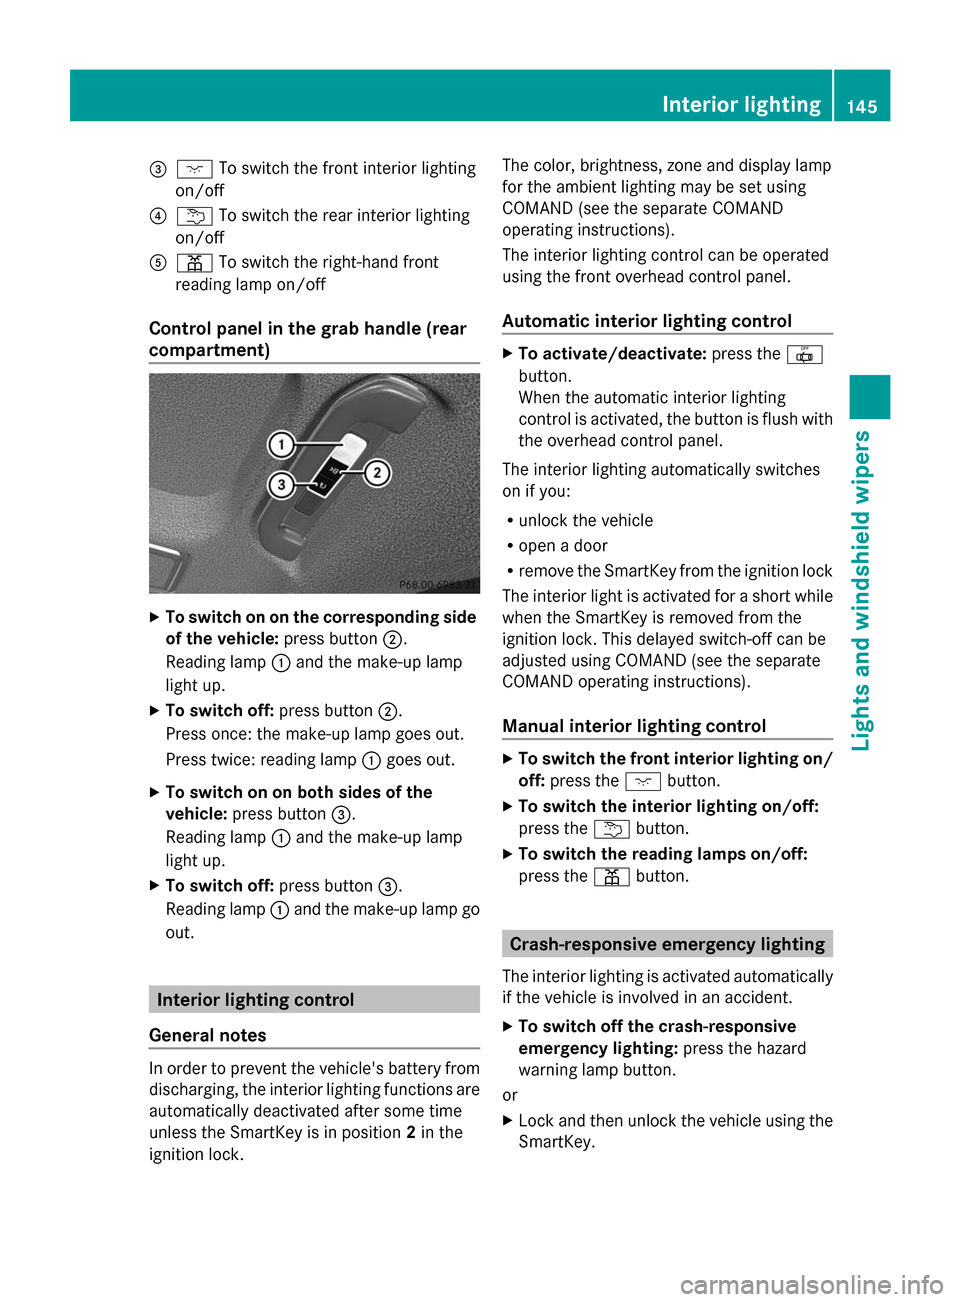
Control panel in the grab handle (rear
compartment) X
To switch on on the corresponding side
of the vehicle: press button0044.
Reading lamp 0043and the make-up lamp
light up.
X To switch off: press button0044.
Press once: the make-up lamp goes out.
Press twice: reading lamp 0043goes out.
X To switch on on both sides of the
vehicle: press button 0087.
Reading lamp 0043and the make-up lamp
light up.
X To switch off: press button0087.
Reading lamp 0043and the make-up lamp go
out. Interior lighting control
General notes In order to prevent the vehicle's battery from
discharging, the interior lighting functions are
automatically deactivated after some time
unless the SmartKey is in position 2in the
ignition lock. The color, brightness, zone and display lamp
for the ambient lighting may be set using
COMAND (see the separate COMAND
operating instructions).
The interior lighting control can be operated
using the front overhead control panel.
Automatic interior lighting control
X
To activate/deactivate: press the0033
button.
When the automatic interior lighting
control is activated, the button is flush with
the overhead control panel.
The interior lighting automatically switches
on if you:
R unlock the vehicle
R open a door
R remove the SmartKey from the ignition lock
The interior light is activated for a short while
when the SmartKey is removed from the
ignition lock. This delayed switch-off can be
adjusted using COMAND (see the separate
COMAND operating instructions).
Manual interior lighting control X
To switch the front interior lighting on/
off: press the 004Abutton.
X To switch the interior lighting on/off:
press the 0042button.
X To switch the reading lamps on/off:
press the 003Dbutton. Crash-responsive emergency lighting
The interior lighting is activated automatically
if the vehicle is involved in an accident.
X To switch off the crash-responsive
emergency lighting: press the hazard
warning lamp button.
or
X Lock and then unlock the vehicle using the
SmartKey. Interior lighting
145Lights and windshield wipers Z
Page 149 of 434
Replacing the wiper blades
Important safety notes G
WARNING
If the windshield wipers begin to move while
you are changing the wiper blades, you could
be trapped by the wiper arm. There is a risk
of injury.
Always switch off the windshield wipers and
ignition before changing the wiper blades.
! To avoid damaging the wiper blades,
make sure that you touch only the wiper
arm of the wiper.
! Never open the hood if a windshield wiper
arm has been folded away from the
windshield.
Never fold a windshield wiper arm without
a wiper blade back onto the windshield.
Hold the windshield wiper arm firmly when
you change the wiper blade. If you release
the windshield wiper arm without a wiper
blade and it falls onto the windshield, the
windshield may be damaged by the force of
the impact.
Mercedes-Benz recommends that you have
the wiper blades changed at a qualified
specialist workshop.
! Always position the windshield wiper
arms vertically before folding them away
from the windshield. By doing so, you will
avoid damage to the hood.
Replacing the wiper blades (standard
windshield wipers) Moving the wiper blades to a vertical
position
X
Turn the SmartKey to position 0in the
ignition lock (Y page 171).
X Set the windshield wiper to the 00AA
position.
X Turn the SmartKey to position 1in the
ignition lock (Y page 171). X
As soon as the wiper arms are vertical to
the hood, turn the SmartKey to position 0
in the ignition lock (Y page 171).
X Remove the SmartKey.
X Fold the wiper arms away from the
windshield until you feel them snap into
place.
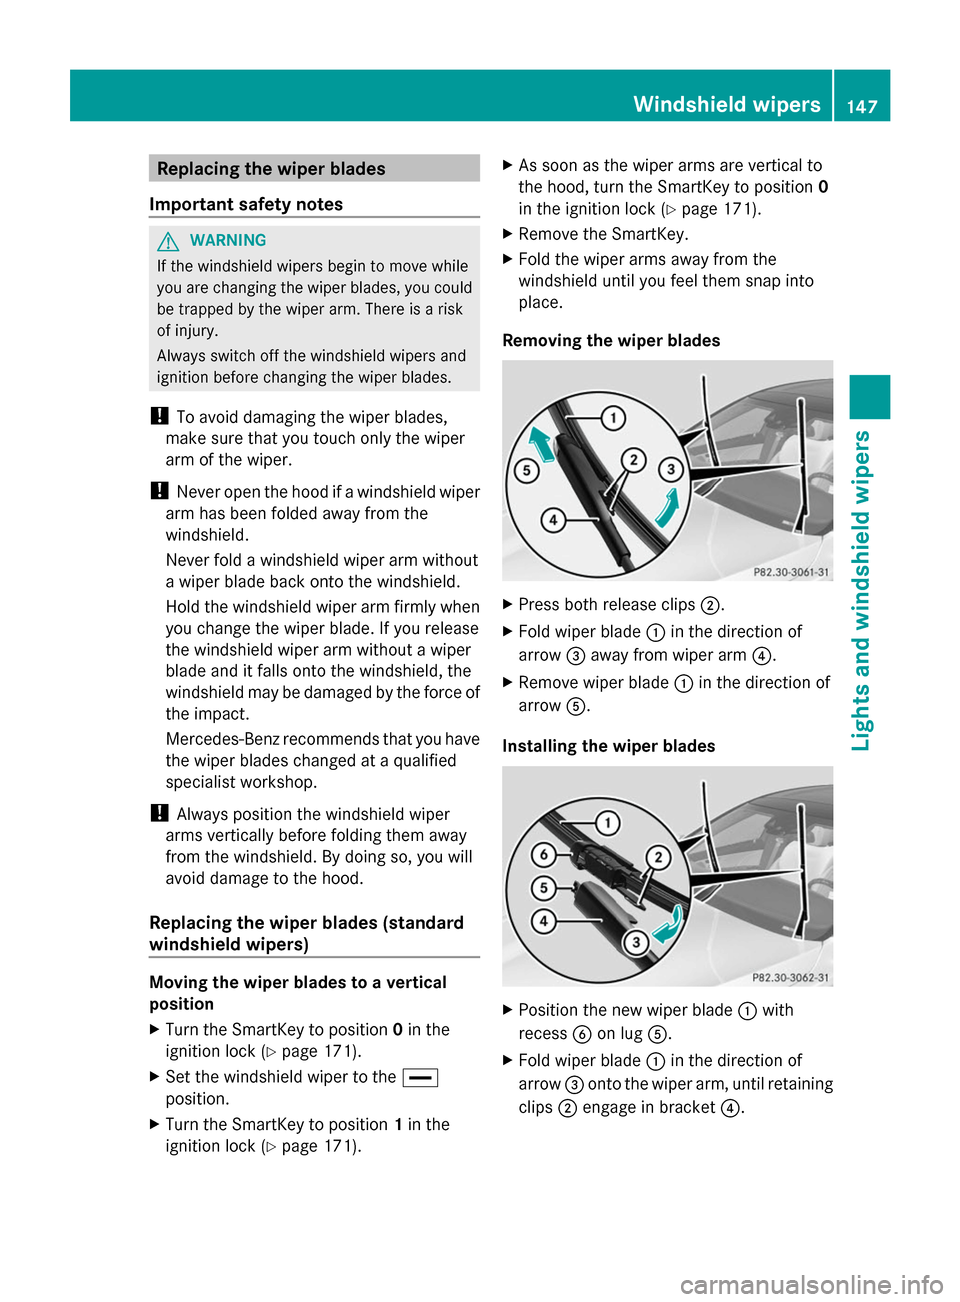
Removing the wiper blades X
Press both release clips 0044.
X Fold wiper blade 0043in the direction of
arrow 0087away from wiper arm 0085.
X Remove wiper blade 0043in the direction of
arrow 0083.
Installing the wiper blades X
Position the new wiper blade 0043with
recess 0084on lug 0083.
X Fold wiper blade 0043in the direction of
arrow 0087onto the wiper arm, until retaining
clips 0044engage in bracket 0085. Windshield wipers
147Lights and windshield wipers Z
Page 166 of 434
The heating or ventilation time depends on
the temperature that has been set.
Front control panel X
Turn the SmartKey to position 0in the
ignition lock or remove it (Y page 171).
X To activate: press the004Brocker switch
up or down.
The indicator lamp in the 004Brocker
switch lights up.
X To deactivate: press the004Brocker
switch up or down.
The indicator lamp in the 004Brocker
switch goes out.
i The blower will run at a low speed
regardless of the airflow setting.
i If you activate the residual heat function
at high temperatures, only the ventilation
will be activated. The blower runs at
medium speed.
Rear control panel X
Turn the SmartKey to position 0in the
ignition lock or remove it (Y page 171).
REST appears in the rear compartment
display.
X To activate: press rocker switch 0074up or
down (Y page 153).
The indicator lamp in rocker switch 0074
lights up.
X To deactivate: press rocker switch 0074up
or down (Y page 153).
The indicator lamp in rocker switch 0074goes
out. REST goes out on the rear
compartment display.
i If you do not activate the residual heat
function, REST goes out automatically after
five minutes on the rear compartment
display. Residual heat is deactivated automatically:
R
after approximately 30 minutes if the
residual heat function is activated in the
front or rear compartment
R after approximately 15 minutes if the
residual heat function is activated in the
front and rear compartments
R when the ignition is switched on
R if the battery voltage drops Perfume atomizer
Operating the perfume atomizer G
WARNING
If children open the perfume vial, they could
drink the perfume or it could come into
contact with their eyes. There is a risk of
injury. Do not leave children unsupervised in
the vehicle.
If the perfume liquid has been drunk, consult
a doctor. If perfume comes into contact with
your eyes or skin, rinse the eyes with clean
water. If you continue to experience
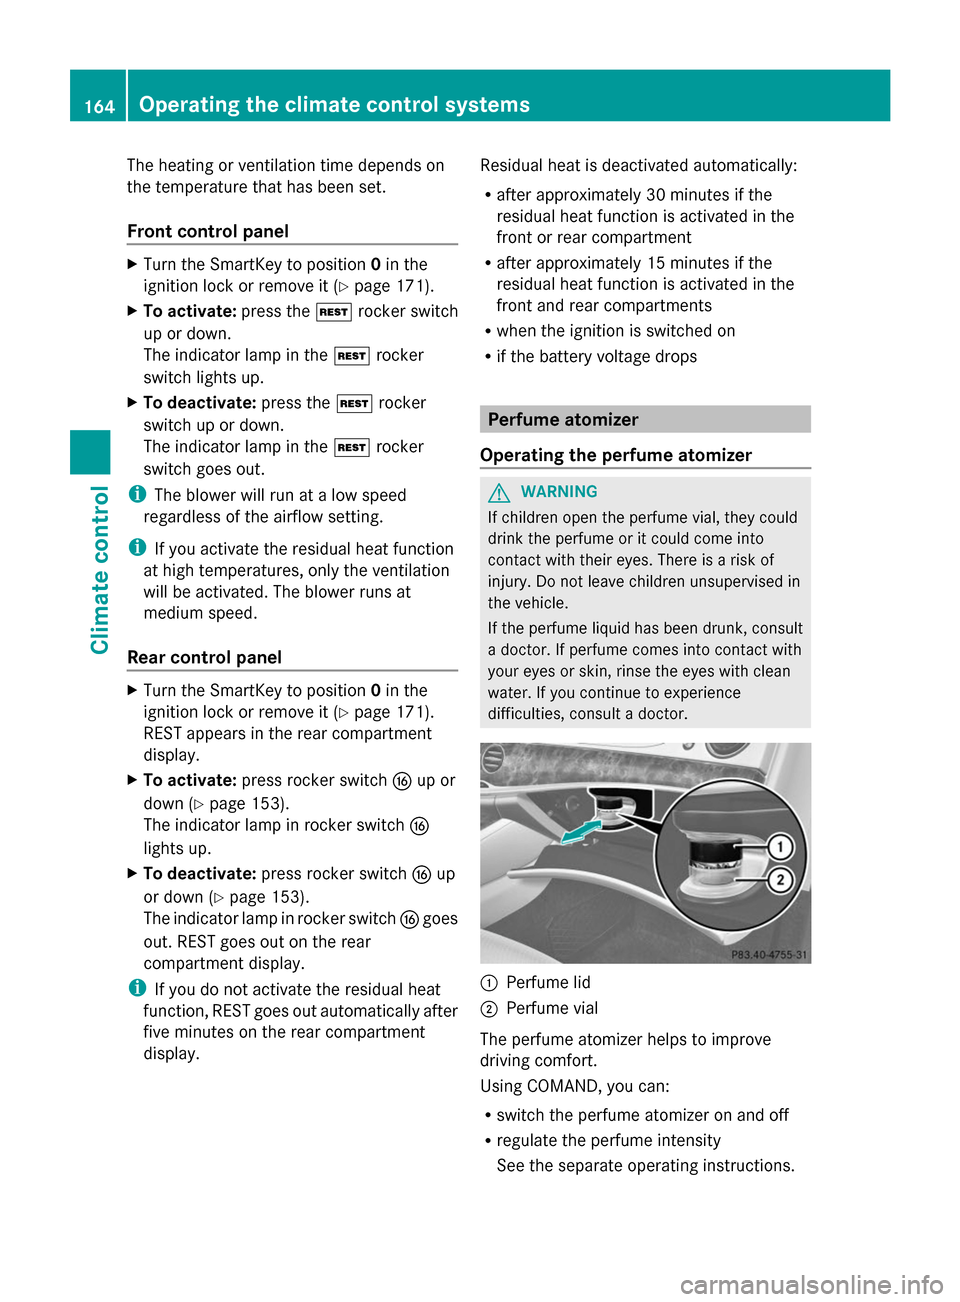
difficulties, consult a doctor. 0043
Perfume lid
0044 Perfume vial
The perfume atomizer helps to improve
driving comfort.
Using COMAND, you can:
R switch the perfume atomizer on and off
R regulate the perfume intensity
See the separate operating instructions. 164
Operating the climate control systemsClimate control
Page 180 of 434

Problems with the engine
Problem Possible causes/consequences and
0050
0050Solutions The engine does not
start. The starter motor
can be heard. R
There is a malfunction in the engine electronics.
R There is a malfunction in the fuel supply.
X Before attempting to start the engine again, turn the SmartKey
in the ignition back to position 0or press the Start/Stop button
repeatedly until all indicator lamps in the instrument cluster go
out.
X Try to start the engine again (Y page 173). Avoid excessively
long and frequent attempts to start the engine as these will drain
the battery.
If the engine does not start after several attempts:
X Consult a qualified specialist workshop. The engine does not
start. You cannot hear
the starter motor. The on-board voltage is too low because the battery is too weak
or discharged.
X
Jump-start the vehicle (Y page 373).
If the engine does not start despite attempts to jump-start it:
X Consult a qualified specialist workshop. The starter motor was exposed to a thermal load that was too high.
X
Try to start the engine again.
If the engine still does not start:
X Consult a qualified specialist workshop. The engine is not
running smoothly and
is misfiring. There is a malfunction in the engine electronics or in a mechanical
component of the engine management system.
X
Only depress the accelerator pedal slightly.
Otherwise, non-combusted fuel may get into the catalytic
converter and damage it.
X Have the cause rectified immediately at a qualified specialist
workshop. The coolant
temperature gauge
shows a value above
248 ‡ (120 †). The coolant level is too low. The coolant is too hot and the engine
is no longer being cooled sufficiently.
X Stop as soon as possible and allow the engine and the coolant
to cool down.
X Check the coolant level (Y page 351). Observe the warning
notes as you do so and add coolant if necessary. 178
DrivingDriving and parking
Page 191 of 434
X
Insert the fuel filler cap into the holder on
the inside of filler flap 0044.
X Completely insert the filler neck of the fuel
pump nozzle into the tank, hook in place
and refuel.
X Only fill the tank until the pump nozzle
switches off.
i Do not add any more fuel after the pump
stops filling for the first time. Otherwise,
fuel may leak out.
Closing the fuel filler flap X
Replace the cap on the filler neck and turn
clockwise until it engages audibly.
X Close the fuel filler flap.
i Close the fuel filler flap before locking the
vehicle.
i If you are driving with the fuel filler cap
open, the 00B6reserve fuel warning lamp
flashes. A message appears in the
multifunction display (Y page 286).
In addition, the 00B9Check Engine warning
lamp may light up (Y page 308).
For further information on warning and
indicator lamps in the instrument cluster,
see (Y page 308). Refueling
189Driving and parking Z
Page 194 of 434
Electric parking brake
General notes G
WARNING
If you leave children unsupervised in the
vehicle, they could set it in motion by, for
example:
R release the parking brake.
R shift the automatic transmission out of the
parking position P.
R start the engine.
In addition, they may operate vehicle
equipment and become trapped. There is a
risk of an accident and injury.
When leaving the vehicle, always take the
SmartKey with you and lock the vehicle. Never
leave children unsupervised in the vehicle.
The function of the electric parking brake is
dependent on the on-board voltage. If the on-
board voltage is low or there is a malfunction
in the system, it may not be possible to apply
the released parking brake.
X If this is the case, only park the vehicle on
level ground and secure it to prevent it
rolling away.
X Shift the automatic transmission to
position P.
It may not be possible to release an applied
parking brake, if the on-board voltage is low
or there is a malfunction in the system.
Contact a qualified specialist workshop.
i The electric parking brake performs a
function test at regular intervals while the
engine is switched off. The sounds that can
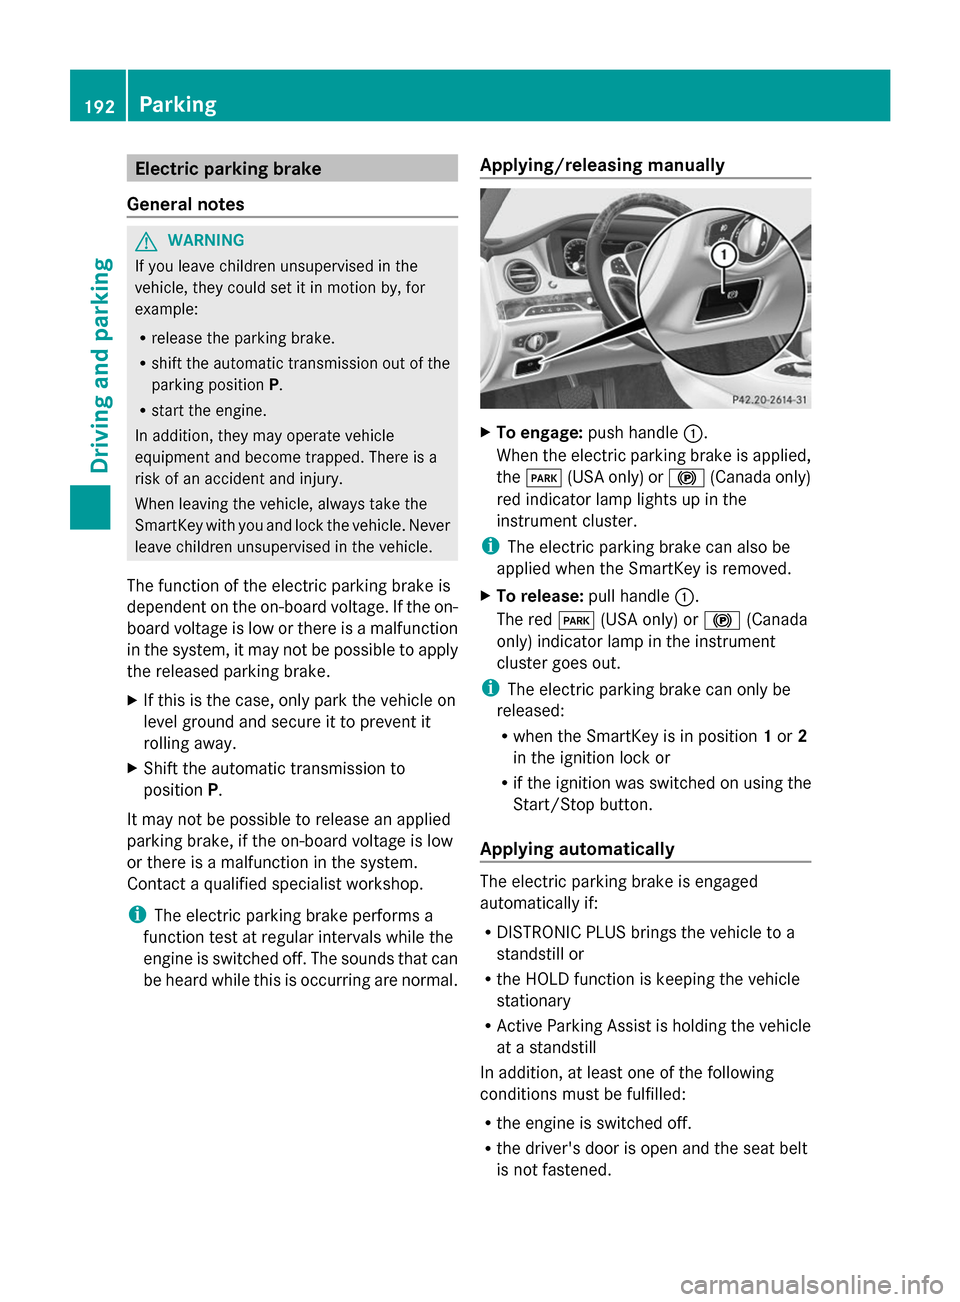
be heard while this is occurring are normal. Applying/releasing manually X
To engage: push handle 0043.
When the electric parking brake is applied,
the 0049 (USA only) or 0024(Canada only)
red indicator lamp lights up in the
instrument cluster.
i The electric parking brake can also be
applied when the SmartKey is removed.
X To release: pull handle0043.
The red 0049(USA only) or 0024(Canada
only) indicator lamp in the instrument
cluster goes out.
i The electric parking brake can only be
released:
R when the SmartKey is in position 1or 2
in the ignition lock or
R if the ignition was switched on using the
Start/Stop button.
Applying automatically The electric parking brake is engaged
automatically if:
R
DISTRONIC PLUS brings the vehicle to a
standstill or
R the HOLD function is keeping the vehicle
stationary
R Active Parking Assist is holding the vehicle
at a standstill
In addition, at least one of the following
conditions must be fulfilled:
R the engine is switched off.
R the driver's door is open and the seat belt
is not fastened. 192
ParkingDriving and parking
Page 195 of 434
R
there is a system malfunction.
R the power supply is insufficient.
R the vehicle is stationary for a lengthy
period.
The red 0049(USA only) or 0024(Canada
only) indicator lamp in the instrument cluster
lights up.
i The electric parking brake is not
automatically engaged if the engine is
switched off by the ECO start/stop
function.
Releasing automatically The electric parking brake is released
automatically when all of the following
conditions are fulfilled:
R the engine is running.
R the transmission is in position Dor R.
R the seat belt has been fastened.
R you depress the accelerator pedal.
If the automatic transmission is in position
R, the trunk lid must be closed.
If your seat belt is not fastened, the following
conditions must be fulfilled to automatically
release the electric parking brake:
R the driver's door is closed.
R you have shifted out of transmission
position Por you have previously driven
faster than 2 mph (3 km/h).
i Ensure that you do not depress the
accelerator pedal unintentionally.
Otherwise the parking brake will be
released and the vehicle will start to move.
Emergency braking The vehicle can also be braked during an
emergency by using the electric parking
brake.
X While driving, push handle 0043of the electric
parking brake (Y page 192).
i The vehicle is braked as long as you keep
handle 0043of the electric parking brake pressed. The longer electric parking brake
handle
0043is depressed, the greater the
braking force.
During braking:
R a warning tone sounds
R the Release Parking Brake
Release Parking Brake message
appears
R the red 0049(USA only) or 0024(Canada
only) indicator lamp in the instrument
cluster flashes
When the vehicle has been braked to a
standstill, the electric parking brake is
engaged. Parking the vehicle for a long period
If you leave the vehicle parked for longer than
four weeks, the battery may be damaged by
exhaustive discharging and further damaged
in the event of this occurring again.
X Connecting a trickle charger.
i You can obtain information about trickle
chargers from a qualified specialist
workshop.
If you leave the vehicle parked for longer than
six weeks, the vehicle may suffer damage as
a result of lack of use.
X Visit a qualified specialist workshop and
seek advice. Driving tips
General driving tips
Important safety notes G
WARNING
If you switch off the ignition while driving,
safety-relevant functions are only available
with limitations, or not at all. This could affect,
for example, the power steering and the brake
boosting effect. You will require considerably
more effort to steer and brake. There is a risk
of an accident. Driving
tips
193Driving an d parking
Z