2014 MERCEDES-BENZ S-Class service indicator
[x] Cancel search: service indicatorPage 337 of 434

Making an emergency call
X
To initiate an emergency call
manually: press cover 0043briefly to open.
X Press SOS button 0044briefly.
The indicator lamp in SOS button 0044
flashes until the emergency call is
concluded.
X Wait for a voice connection to the
Mercedes-Benz Customer Assistance
Center.
X After the emergency call, close cover 0043.
i If the mobile phone network is
unavailable, mbrace will not be able to
make the emergency call. If you leave the
vehicle immediately after pressing the SOS
button, you will not know whether mbrace
placed the emergency call. In this case,
always summon assistance by other
means.
Roadside Assistance button X
Press Roadside Assistance button 0043.
This initiates a call to the Mercedes-Benz
Customer Assistance Center.
The indicator lamp in Roadside Assistance
button 0043flashes while the call is active.
The multifunction display shows the
Connecting Call
Connecting Call message. The audio
system is muted.
If a connection can be made, the Call Call
Connected Connected message appears in the
multifunction display.
If a mobile phone network and GPS reception
are available, the system transfers data to the
Mercedes-Benz Customer Assistance Center,
for example:
R Current location of the vehicle
R Vehicle identification number
i The COMAND display indicates that a call
is active. During the call, you can change to
the navigation menu by pressing the NAVI
button on COMAND, for example.
Voice output is not available.
A voice connection is established between
the Mercedes-Benz Customer Assistance
Center and the vehicle occupants.
From the vehicle remote malfunction
diagnosis, the Mercedes-Benz Customer
Assistance Center can ascertain the nature of
the problem (Y page 339).
The Mercedes-Benz Customer Assistance
Center either sends a qualified Mercedes-
Benz technician or makes arrangements for
your vehicle to be transported to the nearest
authorized Mercedes-Benz Center.
You may be charged for services such as
repair work and/or towing.
Further details are available in your mbrace
manual. Features
335Stowage and features Z
Page 338 of 434
i
The system has not been able to initiate
a roadside assistance call, if:
R the indicator lamp for roadside
assistance call button 0052is flashing
continuously.
R no voice connection to the Mercedes-
Benz Customer Assistance Center was
established.
This can occur if the relevant mobile phone
network is not available, for example.
The Call Failed
Call Failed message appears in the
multifunction display.
X To end a call: press the0076button on the
multifunction steering wheel.
or
X Press the corresponding button for ending
a phone call on COMAND.
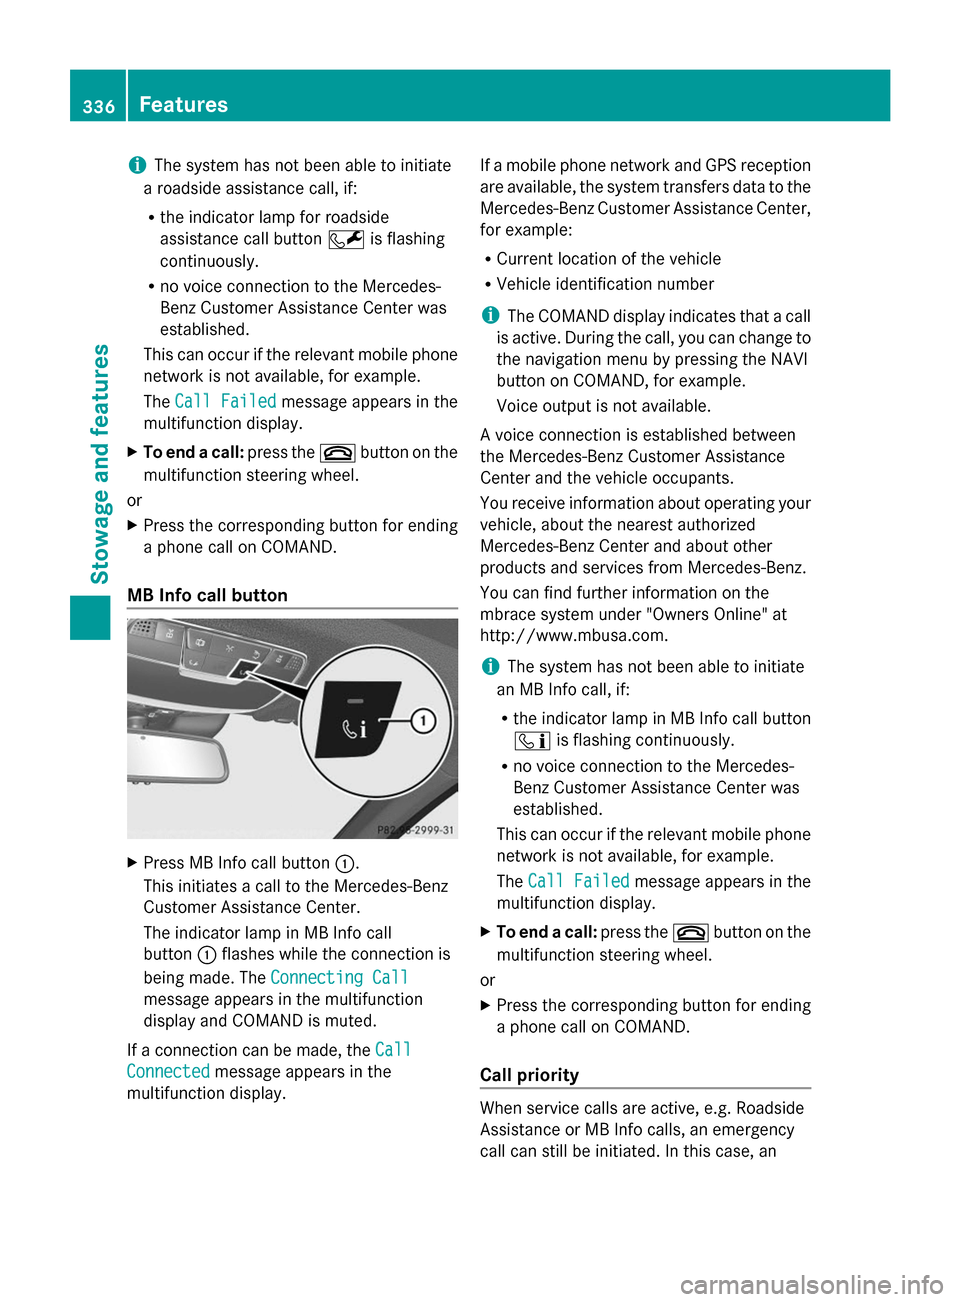
MB Info call button X
Press MB Info call button 0043.
This initiates a call to the Mercedes-Benz
Customer Assistance Center.
The indicator lamp in MB Info call
button 0043flashes while the connection is
being made. The Connecting Call Connecting Call
message appears in the multifunction
display and COMAND is muted.
If a connection can be made, the Call Call
Connected
Connected message appears in the
multifunction display. If a mobile phone network and GPS reception
are available, the system transfers data to the
Mercedes-Benz Customer Assistance Center,
for example:
R
Current location of the vehicle
R Vehicle identification number
i The COMAND display indicates that a call
is active. During the call, you can change to
the navigation menu by pressing the NAVI
button on COMAND, for example.
Voice output is not available.
A voice connection is established between
the Mercedes-Benz Customer Assistance
Center and the vehicle occupants.
You receive information about operating your
vehicle, about the nearest authorized
Mercedes-Benz Center and about other
products and services from Mercedes-Benz.
You can find further information on the
mbrace system under "Owners Online" at
http://www.mbusa.com.
i The system has not been able to initiate
an MB Info call, if:
R the indicator lamp in MB Info call button
00D9 is flashing continuously.
R no voice connection to the Mercedes-
Benz Customer Assistance Center was
established.
This can occur if the relevant mobile phone
network is not available, for example.
The Call Failed
Call Failed message appears in the
multifunction display.
X To end a call: press the0076button on the
multifunction steering wheel.
or
X Press the corresponding button for ending
a phone call on COMAND.
Call priority When service calls are active, e.g. Roadside
Assistance or MB Info calls, an emergency
call can still be initiated. In this case, an336
FeaturesStowage and features
Page 339 of 434
emergency call will take priority and override
all other active calls.
The indicator lamp of the respective button
flashes until the call is ended.
An emergency call can only be terminated by
the Mercedes-Benz Customer Assistance
Center.
All other calls can be ended by pressing:
R the 0076 button on the multifunction
steering wheel
R or the corresponding COMAND button for
ending a telephone call
i When a call is initiated, the audio system
is muted. The mobile phone is no longer
connected to COMAND. However, if you
want to use your mobile phone, do so only
when the vehicle is stationary and in a safe
location.
Downloading destinations in COMAND Downloading destinations
Destination Download gives you access to a
data bank with over 15 million Points of
Interest (POIs). These can be downloaded on
the navigation system in your vehicle. If you
know the destination, the address can be
downloaded. Alternatively, you can obtain the
location of Points of Interest (POIs)/
important destinations in the vicinity.
Furthermore, you can download routes with
up to four way points.
You are prompted to confirm route guidance
to the address entered.
X Select Yes
Yes by turning 00790052007Aor sliding
009500520096 the COMAND controller and press
0098 to confirm.
The system calculates the route and
subsequently starts the route guidance with
the address entered.
i If you select No
No, the address can be saved
in the address book.
i The destination download function is
available if the relevant mobile phone network is available and data transfer is
possible.
i The destination download function can
only be used if the vehicle is equipped with
a navigation system.
Route Assistance
This service is part of the mbrace PLUS
Package and cannot be purchased
separately.
i You can also use the Route Assistance
function if your vehicle is not equipped with
a navigation system.
Within the framework of this service, you
receive a professional and reliable form of
navigation support without having to leave
your vehicle.
The customer service representative finds a
suitable route depending on your vehicle's
current position and the desired destination.
You will then be guided live through the
current route section.
Search & Send General notes
i
To use "Search & Send", your vehicle
must be equipped with mbrace and a
navigation system. Additionally, an mbrace
service subscription must be completed.
"Search & Send" is a destination entry
service. A destination address which is found
on Google Maps ®
can be transferred via
mbrace directly to your vehicle's navigation
system.
Specifying and sending the destination
address
X Go to the website http://
maps.google.com and enter a destination
address into the entry field.
X To send the destination address to the
e-mail address of your mbrace
account: click on the corresponding
button on the website.
i Example: Features
337Stowage and features Z
Page 372 of 434

G
WARNING
Electrostatic build-up can lead to the creation
of sparks, which could ignite the highly
explosive gases of a battery. There is a risk of
an explosion.
Before handling the battery, touch the vehicle
body to remove any existing electrostatic
build-up.
The highly flammable gas mixture forms when
charging the battery as well as when jump-
starting.
Always make sure that neither you nor the
battery is electrostatically charged. A build-
up of electrostatic charge can be caused, for
example:
R by wearing clothing made from synthetic
fibers
R due to friction between clothing and seats
R if you push or pull the battery across the
carpet or other synthetic materials
R if you wipe the battery with a cloth G
WARNING
During the charging process, a battery
produces hydrogen gas. If a short circuit
occurs or sparks are created, the hydrogen
gas can ignite. There is a risk of an explosion.
R Make sure that the positive terminal of a
connected battery does not come into
contact with vehicle parts.
R Never place metal objects or tools on a
battery.
R It is important that you observe the
described order of the battery terminals
when connecting and disconnecting a
battery.
R When jump-starting, make sure that the
battery poles with identical polarity are
connected.
R It is particularly important to observe the
described order when connecting and
disconnecting the jumper cables.
R Never connect or disconnect the battery
terminals while the engine is running. G
WARNING
Battery acid is caustic. There is a risk of injury.
Avoid contact with the skin, eyes or clothing.
Do not inhale any battery gases. Do not lean
over the battery. Keep children away from
batteries. Wash battery acid immediately with
water and seek medical attention. H
Environmental note Batteries contain dangerous
substances. It is against the
law to dispose of them with
the household rubbish. They
must be collected separately
and recycled to protect the
environment.
Dispose of batteries in an
environmentally friendly
manner. Take discharged
batteries to a qualified
specialist workshop or a
special collection point for
used batteries.
! Have the battery checked regularly at a
qualified specialist workshop.
Observe the service intervals in the
Maintenance Booklet or contact a qualified
specialist workshop for more information.
! You should have all work involving the
battery carried out at a qualified specialist
workshop. In the exceptional case that it is
necessary for you to disconnect the battery
yourself, make sure that:
R secure the vehicle to prevent it from
rolling away.
R you switch off the engine and remove the
SmartKey. Make sure the ignition is
switched off. Check that all the indicator
lamps in the instrument cluster are off.
Otherwise, electronic components, such
as the alternator, may be damaged.
R you first remove the negative terminal
clamp and then the positive terminal
clamp. Never swap the terminal clamps. 370
Battery (vehicle)Breakdown assistance
Page 374 of 434
jump-starting the vehicle or charging the
battery, gases can escape from the battery.
There is a risk of an explosion.
Allow the frozen battery to thaw out before
charging it or jump-starting.
! Only use battery chargers with a
maximum charging voltage of 14.8 V.
! Only charge the battery using the jump-
starting connection point.
The jump-starting connection point is in the
engine compartment (Y page 373).
X Open the hood.
X Connect the battery charger to the positive
terminal and ground point in the same
order as when connecting the donor
battery in the jump-starting procedure
(Y page 373).
Never charge a battery still installed in the
vehicle unless a battery charger unit
approved by Mercedes-Benz is being used. An
accessory battery charge unit specially
adapted for Mercedes-Benz vehicles and
tested and approved by Mercedes-Benz is
available. It permits the charging of the
battery in its installed position. Contact an
authorized Mercedes-Benz Center for further
information and availability. Read the battery
charger's operating instructions before
charging the battery.
If, at low temperatures, the indicator lamps/
warning lamps in the instrument cluster do
not light up, it is highly likely that the
discharged battery has frozen. In this case
you may neither jump-start the vehicle nor
charge the battery. The service life of a
thawed-out battery may be shorter. The
starting characteristics can be impaired,
particularly at low temperatures. Have the
thawed-out battery checked at a qualified
specialist workshop. 372
Battery (vehicle)Breakdown assistance
Page 375 of 434
Jump-starting
For the jump-starting procedure, use only the jump-starting connection point, consisting of a
positive terminal and a ground point, in the engine compartment. G
WARNING
Battery acid is caustic. There is a risk of injury.
Avoid contact with the skin, eyes or clothing. Do not inhale any battery gases. Do not lean over
the battery. Keep children away from batteries. Wash battery acid immediately with water and
seek medical attention. G
WARNING
During charging and jump-starting, explosive gases can escape from the battery. There is a risk
of an explosion.
Particularly avoid fire, open flames, creating sparks and smoking. Ensure there is sufficient
ventilation while charging and jump-starting. Do not lean over a battery. G
WARNING
During the charging process, a battery produces hydrogen gas. If a short circuit occurs or sparks
are created, the hydrogen gas can ignite. There is a risk of an explosion.
R Make sure that the positive terminal of a connected battery does not come into contact with
vehicle parts.
R Never place metal objects or tools on a battery.
R It is important that you observe the described order of the battery terminals when connecting
and disconnecting a battery.
R When jump-starting, make sure that the battery poles with identical polarity are connected.
R It is particularly important to observe the described order when connecting and disconnecting
the jumper cables.
R Never connect or disconnect the battery terminals while the engine is running. G
WARNING
A discharged battery can freeze at temperatures below freezing point. When jump-starting the
vehicle or charging the battery, gases can escape from the battery. There is a risk of an explosion.
Allow the frozen battery to thaw out before charging it or jump-starting.
! Avoid repeated and lengthy starting attempts. Otherwise, the catalytic converter could be
damaged by the non-combusted fuel.
If, at low temperatures, the indicator lamps/warning lamps in the instrument cluster do not
light up, it is highly likely that the discharged battery has frozen. In this case, you may neither
charge the battery nor jump-start the vehicle. The service life of a thawed-out battery may be
shorter. The starting characteristics can be impaired, particularly at low temperatures. Have
the thawed-out battery checked at a qualified specialist workshop. Jump-starting
373Breakdown assistance Z
Page 387 of 434
and wheels checked at a qualified specialist
workshop.
When parking your vehicle, make sure that
the tires do not get deformed by the curb or
other obstacles. If it is necessary to drive over
curbs, speed humps or similar elevations, try
to do so slowly and at an obtuse angle.
Otherwise, the tires, particularly the
sidewalls, may be damaged. Regular checking of wheels and tires
G
WARNING
Damaged tires can cause tire inflation
pressure loss. As a result, you could lose
control of your vehicle. There is a risk of
accident.
Check the tires regularly for signs of damage
and replace any damaged tires immediately.
Regularly check the wheels and tires of your
vehicle for damage at least once a month, as
well as after driving off-road or on rough
roads. Damaged wheels can cause a loss of
tire pressure. Pay particular attention to
damage such as:
R cuts in the tires
R punctures
R tears in the tires
R bulges on tires
R deformation or severe corrosion on wheels
Regularly check the tire tread depth and the
condition of the tread across the whole width
of the tire (Y page 385). If necessary, turn
the front wheels to full lock in order to inspect
the inner side of the tire surface.
All wheels must have a valve cap to protect
the valve against dirt and moisture. Do not
mount anything onto the valve other than the
standard valve cap or other valve caps
approved by Mercedes-Benz for your vehicle.
Do not use any other valve caps or systems,
e.g. tire pressure monitoring systems. Regularly check the pressure of all the tires
particularly prior to long trips. Adjust the tire
pressure as necessary (Y
page 387).
The service life of tires depends, among other
things, on the following factors:
R driving style
R tire pressure
R distance covered Important safety notes on the tire
tread
G
WARNING
Insufficient tire tread will reduce tire traction.
The tire is no longer able to dissipate water.
This means that on wet road surfaces, the risk
of hydroplaning increases, in particular where
speed is not adapted to suit the driving
conditions. There is a risk of accident.
If the tire pressure is too high or too low, tires
may exhibit different levels of wear at
different locations on the tire tread. Thus, you
should regularly check the tread depth and
the condition of the tread across the entire
width of all tires.
Minimum tire tread depth for:
R Summer tires: 00CEin (3 mm)
R M+S tires: 00CFin (4 mm)
For safety reasons, replace the tires before
the legally prescribed limit for the minimum
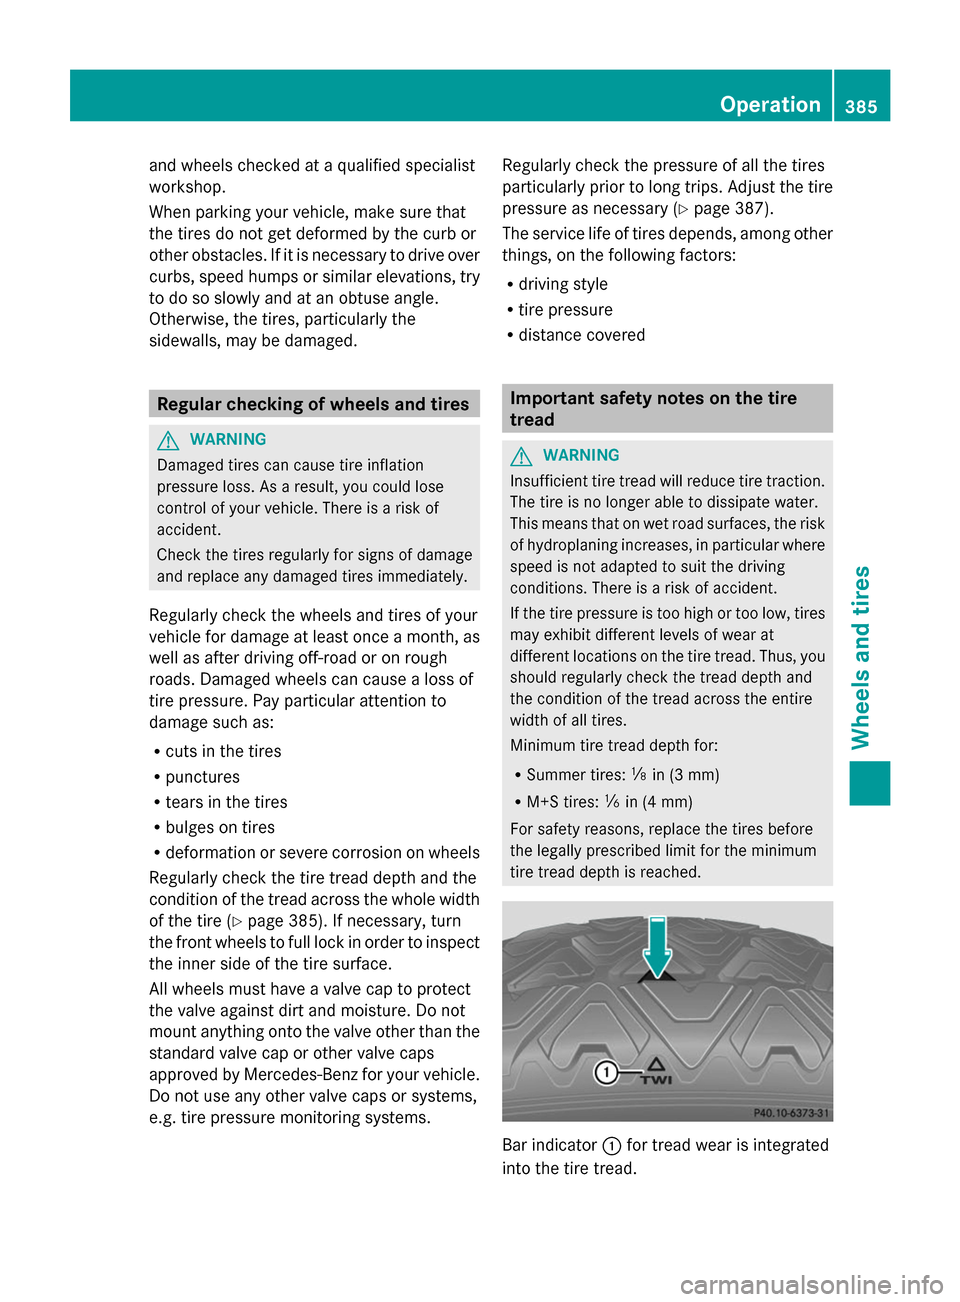
tire tread depth is reached. Bar indicator
0043for tread wear is integrated
into the tire tread. Operation
385Wheels and tires Z
Page 393 of 434

X
Read the tire pressure and compare it with
the recommended value on the Tire and
Loading Information placard ( Ypage 387).
X If the tire pressure is too low, increase it to
the recommended value.
X If the tire pressure is too high, release air
by pressing down the metal pin in the valve.
Use the tip of a pen, for example. Then,
check the tire pressure again using the tire
pressure gauge.
X Screw the valve cap onto the valve.
X Repeat these steps for the other tires. Tire pressure monitor
General notes If a tire pressure monitor is installed, the
vehicle's wheels have sensors that monitor
the tire pressures in all four tires. The tire
pressure monitor warns you if the pressure
drops in one or more of the tires. The tire
pressure monitor only functions if the correct
sensors are installed on all wheels.
Information on tire pressures is displayed in
the multifunction display. After a few minutes
of driving, the current tire pressure of each
tire is shown in the Service
Service menu of the
multifunction display; see illustration
(example). For information on the message display, refer
to the "Checking the tire pressure
electronically" section ( Ypage 392).
Important safety notes G
WARNING
Each tire, including the spare (if provided),
should be checked at least once every two weeks when cold and inflated to the pressure
recommended by the vehicle manufacturer
on the Tire and Loading Information placard
on the driver's door B-pillar or the tire
pressure label on the inside of the fuel filler
flap. If your vehicle has tires of a different size
than the size indicated on the Tire and Loading
Information placard or, if available, the tire
pressure label, you should determine the
proper tire pressure for those tires.
As an added safety feature, your vehicle has
been equipped with a tire pressure monitoring
system (TPMS) that illuminates a low tire
pressure telltale when one or more of your
tires are significantly underinflated.
Accordingly, when the low tire pressure
telltale lights up, you should stop and check
your tires as soon as possible, and inflate
them to the proper pressure. Driving on a
significantly underinflated tire causes the tire
to overheat and can lead to tire failure.
Underinflation also reduces fuel efficiency
and tire tread life, and may affect the vehicle's
handling and stopping ability. Please note that
the TPMS is not a substitute for proper tire
maintenance, and it is the driver's
responsibility to maintain correct tire
pressure, even if underinflation has not
reached the level to trigger illumination of the
TPMS low tire pressure telltale.
Your vehicle has also been equipped with a
TPMS malfunction indicator to indicate when
the system is not operating properly. The
TPMS malfunction indicator is combined with
the low tire pressure telltale. When the
system detects a malfunction, the warning
lamp will flash for approximately a minute and
then remain continuously illuminated. This
sequence will be repeated every time the
vehicle is started as long as the malfunction
exists. When the malfunction indicator is
illuminated, the system may not be able to
detect or signal low tire pressure as intended.
TPMS malfunctions may occur for a variety of
reasons, including the installation of
incompatible replacement or alternate tires
or wheels on the vehicle that prevent the Ti
re pressure
391Wheels and tires
Z