2014 MERCEDES-BENZ S-Class heated
[x] Cancel search: heatedPage 127 of 434

Adjusting the active multicontour
seat
The active multicontour seat can be adjusted
using COMAND (see the separate operating
instructions). Multicontour seat in the rear
You can use the Rear Seat Entertainment
System to adjust the multicontour seats for
the outer seats (see the separate operating
instructions). Adjusting the 4-way lumbar support
The 4-way lumbar support can be adjusted
with COMAND (see the separate operating
instructions). Switching the seat heating on/off
Activating/deactivating G
WARNING
Repeatedly switching on the seat heating can
cause the seat cushion and backrest pads to
become very hot. The health of persons with
limited temperature sensitivity or a limited
ability to react to excessively high
temperatures may be affected or they may
even suffer burn-like injuries. There is a risk
of injury.
Therefore, do not switch the seat heating on
repeatedly. For vehicles equipped with the Warmth
Comfort package: the armrest in the door and
the rear armrest or the rear-compartment
center console can also be heated when you
switch on the seat heating of one of the front
or rear seats. This can be set with COMAND
(see the separate operating instructions).
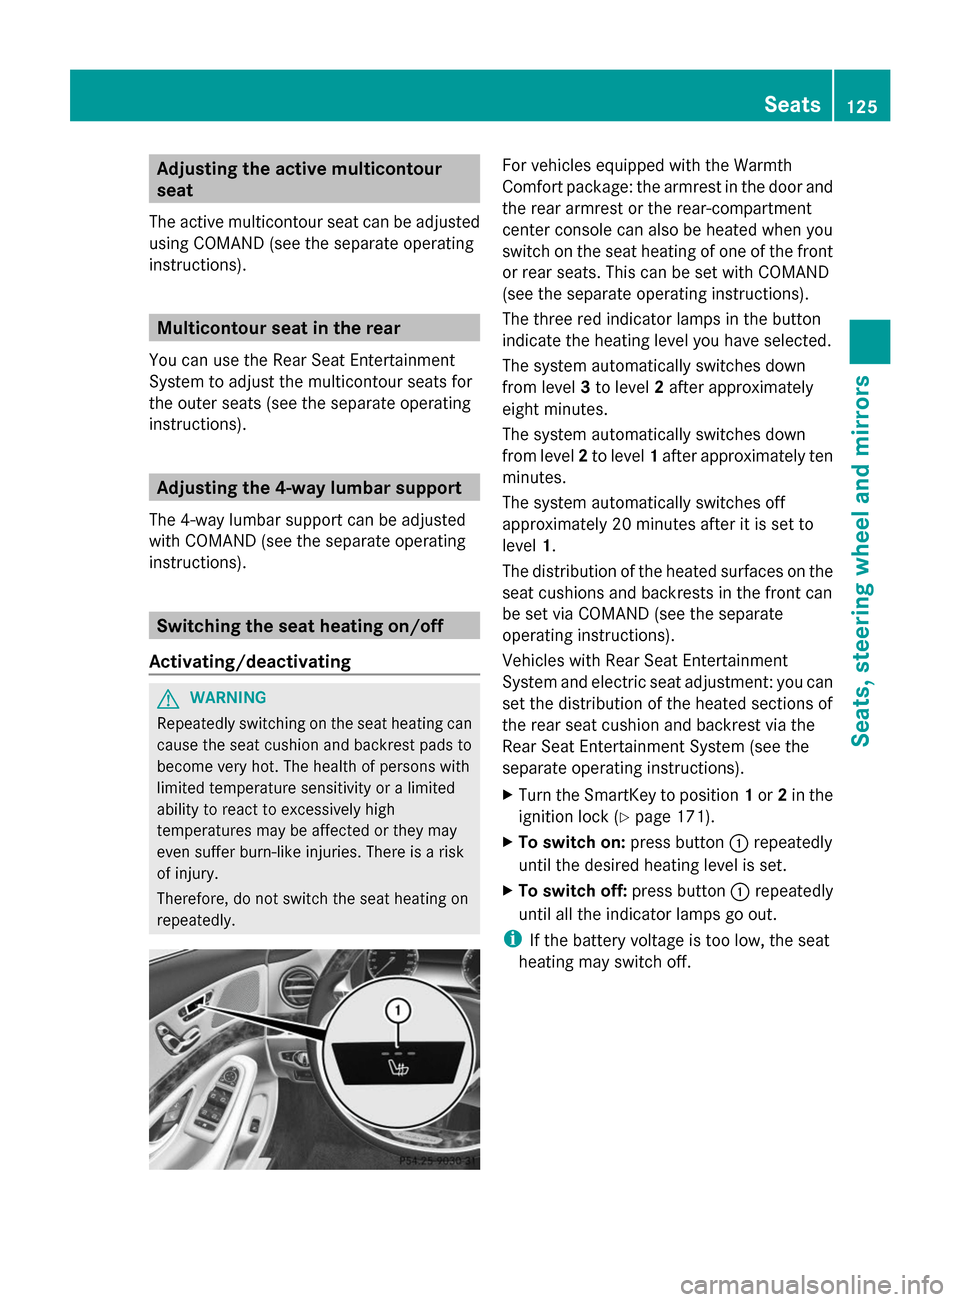
The three red indicator lamps in the button
indicate the heating level you have selected.
The system automatically switches down
from level
3to level 2after approximately
eight minutes.
The system automatically switches down
from level 2to level 1after approximately ten
minutes.
The system automatically switches off
approximately 20 minutes after it is set to
level 1.
The distribution of the heated surfaces on the
seat cushions and backrests in the front can
be set via COMAND (see the separate
operating instructions).
Vehicles with Rear Seat Entertainment
System and electric seat adjustment: you can
set the distribution of the heated sections of
the rear seat cushion and backrest via the
Rear Seat Entertainment System (see the
separate operating instructions).
X Turn the SmartKey to position 1or 2in the
ignition lock (Y page 171).
X To switch on: press button0043repeatedly
until the desired heating level is set.
X To switch off: press button0043repeatedly
until all the indicator lamps go out.
i If the battery voltage is too low, the seat
heating may switch off. Seats
125Seats, steering wheel and mirrors Z
Page 133 of 434

Adjusting the exterior mirrors
X
Turn the SmartKey to position 1or 2in the
ignition lock (Y page 171).
X Press button 0044for the right-hand exterior
mirror or button 0087for the left-hand
exterior mirror.
The indicator lamp lights up in the button
that has been pressed.
The indicator lamp goes out again after
some time. You can adjust the selected
mirror using adjustment button 0043as long
as the indicator lamp is lit.
X Press adjustment button 0043up, down, or
to the left or right until you have adjusted
the exterior mirror to the correct position.
You should have a good overview of traffic
conditions.
The convex exterior mirrors provide a larger
field of vision.
After the engine has been started, the
exterior mirrors are automatically heated if
the rear window defroster is switched on and
the outside temperature is low. Folding the exterior mirrors in or out
electrically X
Turn the SmartKey to position 1or 2in the
ignition lock (Y page 171).
X Briefly press button 0043.
Both exterior mirrors fold in or out.
i Make sure that the exterior mirrors are
always folded out fully while driving. They
could otherwise vibrate.
i If you are driving faster than 30 mph
(47 km/h), you can no longer fold in the
exterior mirrors.
Setting the exterior mirrors If the battery has been disconnected or
completely discharged, the exterior mirrors
must be reset. The exterior mirrors will
otherwise not fold in when you select the
"Fold in mirrors when locking" function in the
on-board computer.
X
Turn the SmartKey to position 1or 2in the
ignition lock (Y page 171).
X Briefly press button 0043.
Folding the exterior mirrors in or out
automatically This function is only available in vehicles for
Canada.
When the "Automatic mirror folding" function
is activated in COMAND (see the separate
operating instructions): Mirrors
131Seats, steering wheel and mirrors Z
Page 136 of 434

backrest in the lumbar and shoulder
regions
R active multicontour seat: side bolsters of
the backrest, shoulder of the backrest,
contour of the backrest, dynamic function
level
R seat heating: distribution of the heated
sections of the seat cushion and backrest
R driver's side: position of the exterior
mirrors on the driver's and front-passenger
sides X
Adjust the seat accordingly (Y page 112).
X On the driver's side, adjust the steering
wheel (Y page 127 )and the exterior mirrors
(Y page 131).
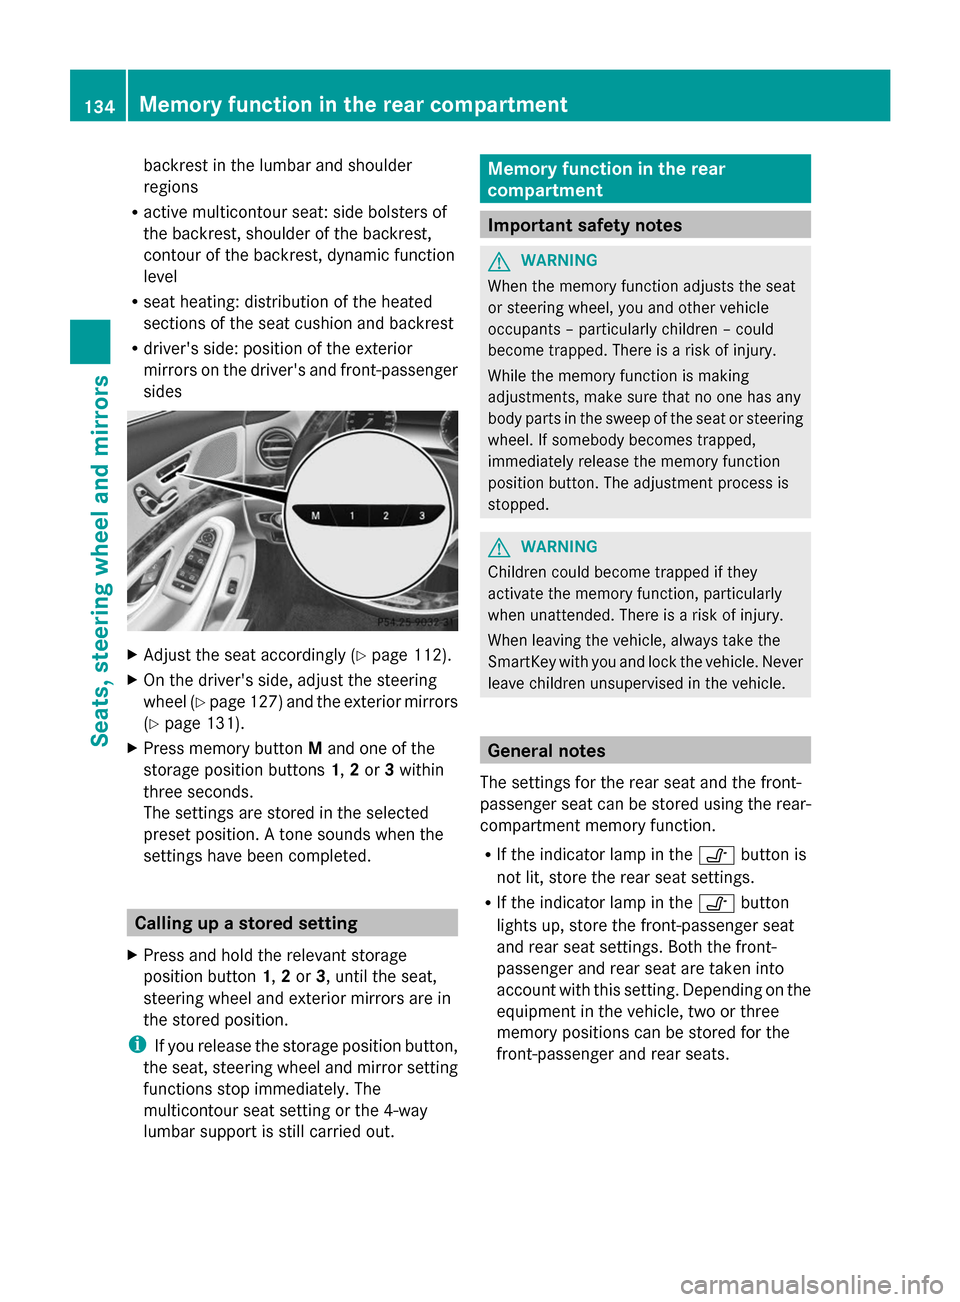
X Press memory button Mand one of the
storage position buttons 1,2or 3within
three seconds.
The settings are stored in the selected
preset position. A tone sounds when the
settings have been completed. Calling up a stored setting
X Press and hold the relevant storage
position button 1,2or 3, until the seat,
steering wheel and exterior mirrors are in
the stored position.
i If you release the storage position button,
the seat, steering wheel and mirror setting
functions stop immediately. The
multicontour seat setting or the 4-way
lumbar support is still carried out. Memory function in the rear
compartment
Important safety notes
G
WARNING
When the memory function adjusts the seat
or steering wheel, you and other vehicle
occupants – particularly children – could
become trapped. There is a risk of injury.
While the memory function is making
adjustments, make sure that no one has any
body parts in the sweep of the seat or steering
wheel. If somebody becomes trapped,
immediately release the memory function
position button. The adjustment process is
stopped. G
WARNING
Children could become trapped if they
activate the memory function, particularly
when unattended. There is a risk of injury.
When leaving the vehicle, always take the
SmartKey with you and lock the vehicle. Never
leave children unsupervised in the vehicle. General notes
The settings for the rear seat and the front-
passenger seat can be stored using the rear-
compartment memory function.
R If the indicator lamp in the 0095button is
not lit, store the rear seat settings.
R If the indicator lamp in the 0095button
lights up, store the front-passenger seat
and rear seat settings. Both the front-
passenger and rear seat are taken into
account with this setting. Depending on the
equipment in the vehicle, two or three
memory positions can be stored for the
front-passenger and rear seats. 134
Memory function in the rear compartmentSeats, steering
wheel and mirrors
Page 137 of 434

Storing settings
General notes With the memory function in the rear, you can
store up to three different settings, e.g. for
three different people.
The following settings are stored as a single
memory preset:
R position of the seat, backrest and head
restraint
R multicontour seat: the side bolsters of the
backrest as well as the contour of the
backrest in the lumbar and shoulder
regions
R seat heating: distribution of the heated
sections of the seat cushion and backrest
if the indicator lamp in the 0095button is
not lit.
The following settings are stored to a memory
position, if the indicator lamp in the 0095
button lights up:
R position of the footrest for the front-
passenger seat, if available
R position of the screen, if available
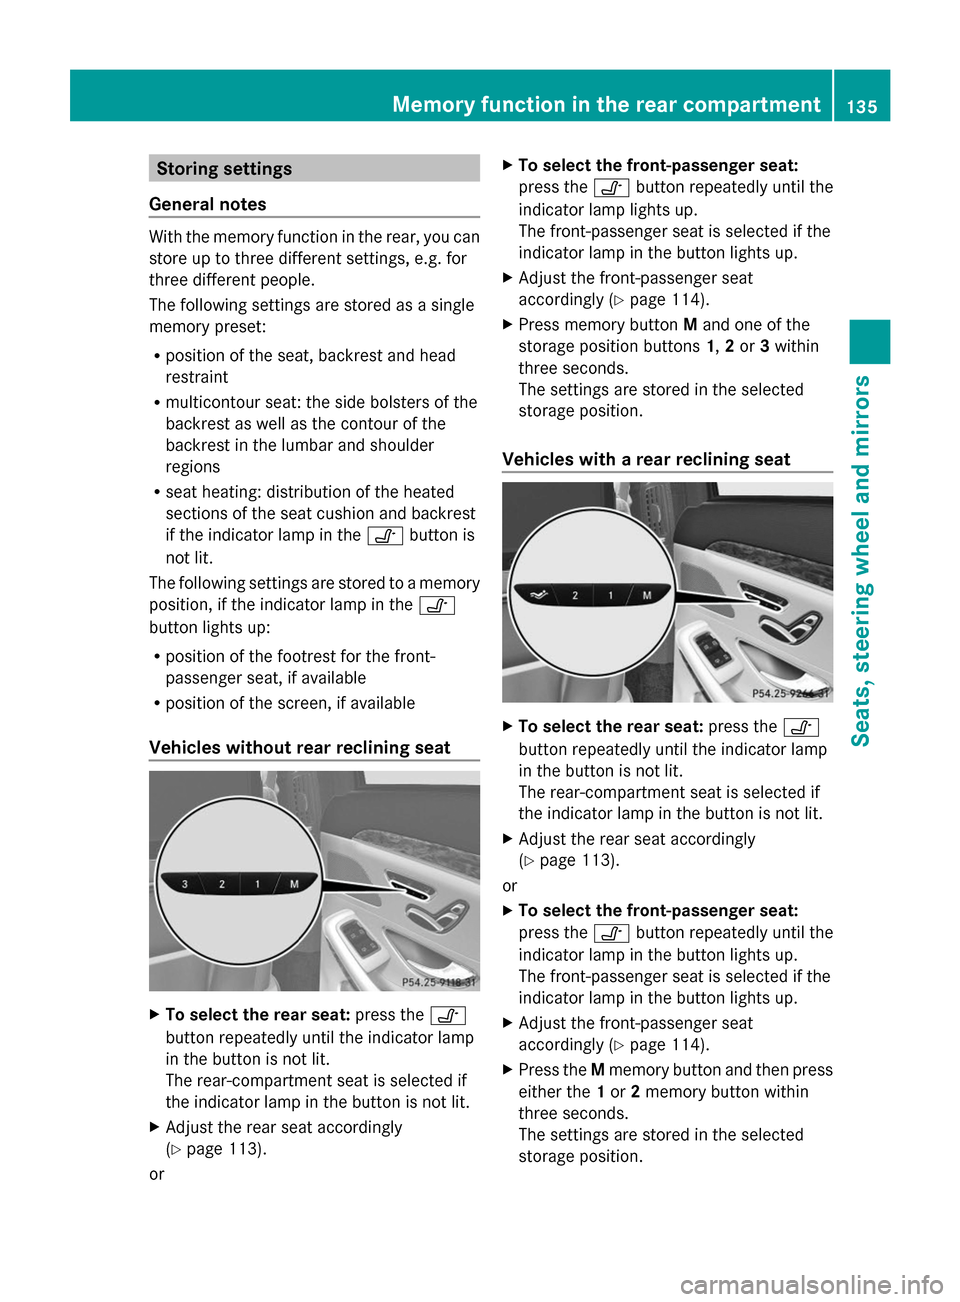
Vehicles without rear reclining seat X
To select the rear seat: press the0095
button repeatedly until the indicator lamp
in the button is not lit.
The rear-compartment seat is selected if
the indicator lamp in the button is not lit.
X Adjust the rear seat accordingly
(Y page 113).
or X
To select the front-passenger seat:
press the 0095button repeatedly until the
indicator lamp lights up.
The front-passenger seat is selected if the
indicator lamp in the button lights up.
X Adjust the front-passenger seat
accordingly (Y page 114).
X Press memory button Mand one of the
storage position buttons 1,2or 3within
three seconds.
The settings are stored in the selected
storage position.
Vehicles with a rear reclining seat X
To select the rear seat: press the0095
button repeatedly until the indicator lamp
in the button is not lit.
The rear-compartment seat is selected if
the indicator lamp in the button is not lit.
X Adjust the rear seat accordingly
(Y page 113).
or
X To select the front-passenger seat:
press the 0095button repeatedly until the
indicator lamp in the button lights up.
The front-passenger seat is selected if the
indicator lamp in the button lights up.
X Adjust the front-passenger seat
accordingly (Y page 114).
X Press the Mmemory button and then press
either the 1or 2memory button within
three seconds.
The settings are stored in the selected
storage position. Memory function in the rear compartment
135Seats, steering wheel and mirrors Z
Page 228 of 434

R
you are driving faster than 6 mph
(10 km/h)
R a wheel spins, ESP ®
intervenes or fails. The
00E5 warning lamp lights up in the
instrument cluster.
A warning tone sounds. The parking symbol
disappears and the multifunction display
shows the Park Assist Canceled
Park Assist Canceled
message.
When Active Parking Assist is canceled, you
must steer and brake again yourself.
If a system malfunction occurs, the vehicle is
braked to a standstill. To drive on, depress the
accelerator again. Rear view camera
General notes Rear view camera
0043is in the trunk lid handle.
Rear view camera 0043is an optical parking and
maneuvering aid. It shows the area behind
your vehicle with guide lines in the COMAND
display.
The area behind the vehicle is displayed as a
mirror image, as in the rear view mirror.
i The text of messages shown in the
COMAND display depends on the language
setting. The following are examples of rear
view camera messages in the COMAND
display. Important safety notes The rear view camera is only an aid. It is not
a replacement for your attention to your
immediate surroundings. You are always
responsible for safe maneuvering and
parking. When maneuvering or parking, make
sure that there are no persons, animals or
objects in the area in which you are
maneuvering.
Under the following circumstances, the rear
view camera will not function, or will function
in a limited manner:
R
if the trunk lid is open
R in heavy rain, snow or fog
R at night or in very dark places
R if the camera is exposed to very bright light
R if the area is lit by fluorescent light or LED
lighting (the display may flicker)
R if there is a sudden change in temperature,
e.g. when driving into a heated garage in
winter
R if the camera lens is dirty or obstructed.
Observe the notes on cleaning
(Y page 358)
R if the rear of your vehicle is damaged. In
this event, have the camera position and
setting checked at a qualified specialist
workshop
The field of vision and other functions of the
rear view camera may be restricted due to
additional accessories on the rear of the
vehicle (e.g. license plate holder, bicycle
rack).
i The rear view camera is protected from
raindrops and dust by means of a flap.
When the rear view camera is activated,
this flap opens.
The flap closes again when:
R you have finished the maneuvering
process
R you switch off the engine
Observe the notes on cleaning
(Y page 358). 226
Driving syste
msDriving and parking
Page 232 of 434

Object detection
The rear view camera can detect moving and
stationary objects. If, for example, a
pedestrian or another vehicle is detected,
these objects are marked with bars. The
system is only able to detect and mark
stationary objects when your vehicle is
moving. By contrast, stationary objects will
always be detected and marked.
To ensure that you can use the function, it
must be switched on in COMAND (see the
separate operating instructions). 360° camera (surround view)
General notes The 360° camera is a system consisting of
four cameras.
The system analyzes images from the
following cameras:
R Rear view camera
R Front camera
R Two cameras in the exterior rear view
mirrors
The cameras capture the immediate
surroundings of the vehicle. The system
supports you, e.g. when parking or if vision is
restricted at an exit.
The 360° camera images can be shown in full
screen mode or in seven different split-screen
views on the COMAND display. A split-screen
view also includes a top view of the vehicle.
This view is calculated from the data supplied
by the installed cameras (virtual camera).
The six split-screen views are:
R top view and picture from the rear view
camera (130° viewing angle)
R top view and image from the front camera
(130° viewing angle without displaying the
maximum steering wheel angle)
R top view and enlarged rear view
R top view and enlarged front view R
top view and pictures from the rearward
facing mirror cameras (rear wheel view)
R top view and pictures from the forward
facing mirror cameras (front wheel view)
When the function is active and you shift the
transmission from position Dor Rto N, you
see the view which was active before the
360° view in the COMAND display. The
dynamic guidelines are hidden.
When you change between transmission
positions Dand R, you see the previously
selected front or rear view.
Important safety notes The 360°camera is only an aid and may show
a distorted view of obstacles, show them
incorrectly or not at all. The 360°camera is
not a substitute for attentive driving.
You are always responsible for safe
maneuvering and parking. When
maneuvering or parking, make sure that there
are no persons, animals or objects in the area
in which you are maneuvering.
You are always responsible for safety, and
must always pay attention to your
surroundings when parking and
maneuvering. This applies to the areas
behind, in front of and beside the vehicle. You
could otherwise endanger yourself and
others.
The 360° camera will not function or will
function in a limited manner:
R
if the doors are open
R if the exterior mirrors are folded in
R if the trunk lid is open
R in heavy rain, snow or fog
R at night or in very dark places
R if the cameras are exposed to very bright
light
R if the area is lit by fluorescent light or LED
lighting (the display may flicker)
R if the camera lenses fog up, e.g. when
driving into a heated garage in winter,
causing a rapid change in temperature 230
Driving systemsDriving and parking
Page 261 of 434

Maintenance menu
Introduction In the
Serv
Servmenu, you have the following
options:
R Calling up display messages in message
memory (Y page 265)
R Checking the tire pressure electronically
(Y page 391)
R Calling up the service due date
(Y page 352)
R Displaying the coolant temperature
(Y page 259)
Displaying the coolant temperature G
WARNING
Opening the hood when the engine is
overheated or when there is a fire in the
engine compartment could expose you to hot
gases or other service products. There is a
risk of injury.
Let an overheated engine cool down before
opening the hood. If there is a fire in the
engine compartment, keep the hood closed
and contact the fire department.
! A display message is shown if the coolant
temperature is too high.
If the coolant temperature is over
248 ‡(120 †), do not continue driving. The
engine will otherwise be damaged.
The coolant temperature is also shown
digitally in the tachometer (Y page 33).X
Use 00E2 on the steering wheel to call up
the list of menus.
X Press the 0064or0063 button on the
steering wheel to select the Service
Service
menu.
X Confirm by pressing 0076on the steering
wheel.
X Use 0064 or0063 to select the Coolant Coolant
submenu.
The coolant temperature is shown as a bar
display.
Under normal operating conditions and with
the specified coolant level, the coolant
temperature may rise to 248 ‡ (120 †). Settings menu
Introduction In the
Settings Settings menu, you have the following
options:
R Changing assistance settings
(Y page 259)
R Changing the light settings (Y page 262)
R Changing the instrument cluster settings
(Y page 262)
R Restoring the factory settings
(Y page 263)
Assistance submenu Deactivating/activating ESP
®
Observe the "Important safety notes" section
in the description of ESP (Y page 76). Menus and submenus
259On-board computer and displays Z
Page 286 of 434

Display messages Possible causes/consequences and
0050
0050Solutions 00AC
Coolant Too Hot Coolant Too Hot
Stop Vehicle Turn Stop Vehicle Turn
Engine Off Engine Off The coolant is too hot.
A warning tone also sounds.
G WARNING
Do not drive when your engine is overheated. This can cause some
fluids which may have leaked into the engine compartment to
catch fire.
Steam from the overheated engine can also cause serious burns
which can occur just by opening the hood.
There is a risk of injury.
X Pull over and stop the vehicle safely and switch off the engine,
paying attention to road and traffic conditions.
X Secure the vehicle against rolling away ( Ypage 190).
X Wait until the engine has cooled down.
X Make sure that the air supply to the engine radiator is not
blocked, e.g. by snow, slush or ice.
X Do not start the engine again until the display message goes out
and the coolant temperature is below 248 ‡ (120 †).
Otherwise, the engine could be damaged.
X Pay attention to the coolant temperature display.
X If the temperature increases again, visit a qualified specialist
workshop immediately.
Under normal operating conditions and with the specified coolant
level, the coolant temperature may rise to 248 ‡ (120 †). 284
Display
messagesOn-board computer and displays