2014 MERCEDES-BENZ S-CLASS COUPE interior lights
[x] Cancel search: interior lightsPage 16 of 413
K
Key Changing the battery ...................... .88
Checking the battery ...................... .88
Convenience closing feature .......... 101
Convenience opening feature ........ 100
Display message ............................ 298
Door central locking/unlocking ...... .85
Emergency key element ................... 87
Important safety note s.................... 84
KEYLESS-GO start function .............. 86
Loss ................................................. 89
Modifying the programming ............. 86
Overview .......................................... 84
Positions (ignition lock) ................. 159
Problem (malfunction) ..................... 89
Starting the engine ........................ 161
Key positions
Key ................................................ 159
Start/Stop button .......................... 159
KEYLESS-GO
Convenience closing ...................... 101
Deactivation ..................................... 85
Locking ............................................ 85
Unlocking ......................................... 85
Kickdown
Driving tip s.................................... 171
Kneebag ............................................... 50 L
Lamps see Warning and indicator lamps
Lane Keeping Assist
see Active Lane Keeping Assist
Licence plate lamp (display mes-
sage) ................................................... 280
Light sensor (display message) ....... 281
Lighting
see Lights
Lights
Activating/deactivating the Intel-
ligent Light System ........................ 260
Active light function ....................... 127
Adaptive Highbeam Assist PLUS .... 128
Automatic headlamp mode ............ 125
Cornering light function ................. 127 Dipped-beam headlamp
s............... 125
Driving abroad ............................... 124
Foglamps (extended range) ........... 128
Hazard warning lamps ................... 126
Headlamp flashe r........................... 126
Intelligent Light System (func-
tion) ............................................... 127
Light switch ................................... 124
Main-beam headlamp s................... 126
Misted up headlamp s.................... 130
Motorway mode ............................. 127
Parking lamps ................................ 126
Rear foglamp ................................. 125
Setting exterior lighting ................. 124
Side lamps ..................................... 125
Switching the spotlight on/of f....... 261
Turn signals ................................... 126
see Interior lighting
see Replacing bulbs
LIM indicator lamp
Cruise control ................................ 186
DISTRONIC PLUS ........................... 193
Variable SPEEDTRONIC ................. 189
Limiting the speed
see SPEEDTRONIC
Loading guidelines ............................ 314
Locking
see Central locking
Locking (doors)
Automatic ........................................ 92
Emergency locking ........................... 93
From inside (central locking but-
ton) .................................................. 91
Locking centrally
see Central locking
Luggage net hooks ............................ 319
Lumbar support
Adjusting the 4-way lumbar sup-
port ................................................ 111 M
M+S tyres ........................................... 378
MAGIC BODY CONTROL .................... 204
MAGIC SKY CONTROL ....................... 104
Main-beam headlamps
Adaptive Highbeam Assist PLUS .... 128
Display message ............................ 280 Index
13
Page 19 of 413

Perfume atomizer
Operating ....................................... 146
Perfume vial ................................... 146
Problem (malfunction) ...................1 48
Petrol ................................................. .403
Pets in the vehicle ............................... 69
Plastic trim (cleaning instruc-
tions) ................................................. .349
Power closing ...................................... 92
Power socket
Boot ............................................... 324
Power windows
see Side windows
PRE-SAFE ®
(anticipatory occupant
protection)
Operation ......................................... 59
PRE-SAFE ®
(preventive occupant
safety system)
Display message ............................ 272
PRE-SAFE ®
Brake
Activating/deactivating ................. 258
Display message ............................ 273
Function/notes ................................ 77
Important safety notes .................... 78
Warning lamp ................................. 309
PRE-SAFE ®
PLUS (anticipatory
occupant protection PLUS)
Operation ......................................... 59
Program selector button .................. 171
Protection against theft
ATA (Anti-Theft Alarm system) ......... 80
Immobiliser ...................................... 80
Interior motion sensor ..................... 81
Tow-away protectio n ........................81
Protection of the environment
General notes .................................. 22
Pulling away
Automatic transmission ................. 162
General notes ................................ 162
Hill start assist ............................... 162 Q
Qualified specialist workshop ........... 25R
Radiator cover ................................... 338 Radio
Selecting a station ......................... 251
Radio-based vehicle components
Declaration of conformity ................ 24
Reading lamp ..................................... 130
Rear compartment
Setting the air vents ..................... .156
Stowage compartment .................. 317
Rear foglamp
Display message ............................ 280
Switching on/off ........................... 125
Rear lamps
see Lights
Rear seats
Overview .......................................... 40
Rear window blind ............................ 322
Rear window heating
Problem (fault) ............................... 145
Switching on/off ........................... 144
Rear-compartment seat belt sta-
tus indicator ........................................ 48
Rear-view mirror
Anti-dazzle mode (automatic) ....... .119
Dipping (manual )........................... 117
Recuperation display ........................ 247
Refuelling
Fuel gaug e....................................... 32
Important safety notes .................. 175
Refuelling process ......................... 176
see Fuel
Remote control
Auxiliary heating/ventilation .......... 150
Changing the batteries (auxiliary
heating) ......................................... 152
Garage door opener ....................... 328
Programming (garage door
opener) .......................................... 328
Replacing bulbs
General notes ................................ 131
Replacing the battery (auxiliary
heating remote control) .................... 152
Reserve (fuel tank)
see Fuel
Reserve fuel
Display message ............................ 284
Warning lamp ................................. 307
Residual heat (climate control) ........ 14616
Index
Page 56 of 413
passenger seat could then, for example, come
into contact with the vehicle's interior, espe-
cially if the person is sitting too close to the
dashboard. This poses an increased risk of
injury or even fatal injury.
When the front-passenger seat is occupied,
always make sure that:
R the classification of the person in the front-
passenger seat is correct and that the front-
passenger front airbag is enabled or disa-
bled in accordance with the person in the
front-passenger seat.
R the front-passenger seat has been moved
back as far back as possible.
R the person is seated correctly.
Make sure, both before and during the jour-
ney, that the status of the front-passenger
front airbag is correct. G
WARNING
If you secure a child on the co-driver's seat in a rearward-facing child restraint system and
the PASSENGER AIR BAG ON indicator lamp
lights up, the co-driver's airbag could be
deployed in the event of an accident. The childcould be struck by the airbag. There is an
increased risk of injury, possibly even fatal.
In this case, always ensure that the co-driver's
airbag is disabled. The PASSENGER AIRBAG
OFF indicator lamp must light up.
If the PASSENGER AIR BAG OFF indicator
lamp remains off and/or the PASSENGER AIR BAG ON indicator lamp lights up, do not install
a rearward-facing child restraint system on
the front-passenger seat. Further information can be found under "Problems with the auto-matic front-passenger front airbag deactiva-
tion system" (Y page 56). G
WARNING
If you secure a child in a forward-facing child
restraint system on the front-passenger seat
and you position the front-passenger seat too close to the dashboard, in the event of an
accident, the child could:
R come into contact with the vehicle's inte-
rior if the PASSENGER AIR BAG OFF indi-
cator lamp is lit, for example
R be struck by the airbag if the PASSENGER
AIR BAG ON indicator lamp is lit
This poses an increased risk of injury or even fatal injury.
Always move the front-passenger seat as far
back as possible and fully retract the seat
cushion length. Always make sure that the
shoulder belt strap is correctly routed from
the vehicle seat-belt extender to the shoulder
belt guide on the child restraint system. The
shoulder belt strap must be routed forwards
and downwards from the retracted seat-belt
extender. If necessary, adjust the front-
passenger seat accordingly. Always observe
the information about suitable positioning of
the child restraint system in this Owner's
Manual as well as the child restraint system
manufacturer's installation instructions.
If the automatic front-passenger front airbag
deactivation system detects that:
R the front-passenger seat is unoccupied, the
PASSENGER AIR BAG OFF indicator lamp
lights up after the system self-test and
remains lit. This indicates that the front-
passenger front airbag is disabled.
R the front-passenger seat is occupied by a
child in a rearward-facing child restraint
system, the PASSENGER AIR BAG OFF indi-
cator lamp lights up after the system self-
test and remains lit. This indicates that the
front-passenger front airbag is disabled.
But in the case of a child in a rearward-
facing child restraint, the PASSENGER AIR
BAG ON indicator lamp can light up after
the system self-test and remain lit. This
indicates that the front-passenger front air- Occupant safety
53Safety Z
Page 126 of 413
Useful information
............................124
Exterior lighting ................................ 124
Interior lighting ................................. 130
Replacing bulbs ................................. 131
Windscreen wipers ...........................131 123Lights and windscreen wipers
Page 133 of 413
If you are driving at speeds below approx-
imately 25 km/h or the roads are ade-
quately illuminated:
The main-beam headlamps are switched off
automatically. The Kindicator lamp in
the instrument cluster goes out. The _
indicator lamp in the multifunction display
remains lit.
X To switch off: move the combination
switch back to its normal position or move
the light switch to another position.
The _ indicator lamp in the multifunc-
tion display goes out. Headlamps misted up on the inside
Certain climatic and physical conditions may
cause moisture to form in the headlamp. This
moisture does not affect the functionality of
the headlamp. Interior lighting
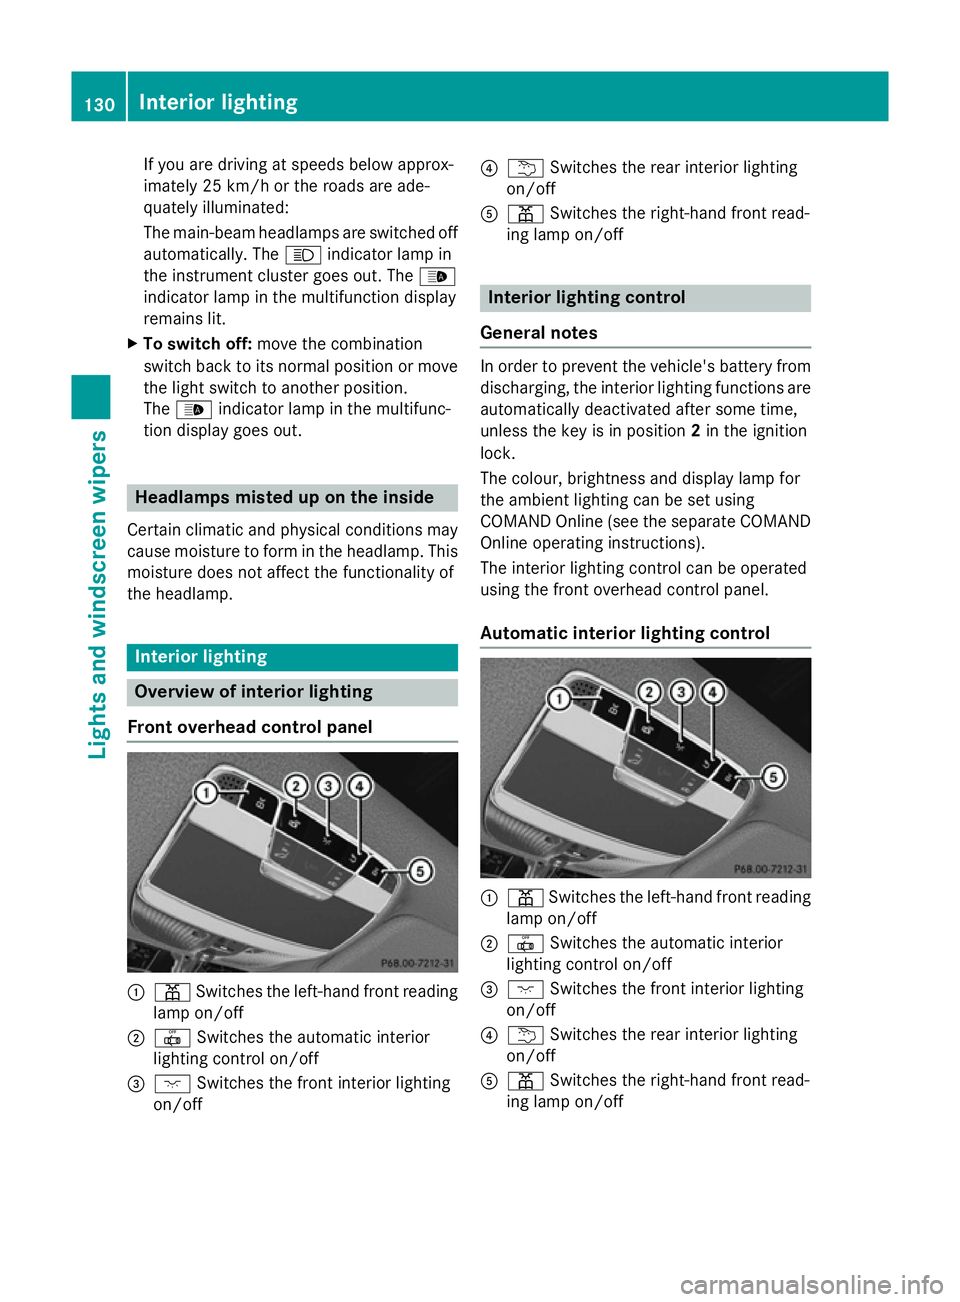
Overview of interior lighting
Front overhead control panel :
p Switches the left-hand front reading
lamp on/off
; | Switches the automatic interior
lighting control on/off
= c Switches the front interior lighting
on/off ?
u Switches the rear interior lighting
on/off
A p Switches the right-hand front read-
ing lamp on/off Interior lighting control
General notes In order to prevent the vehicle's battery from
discharging, the interior lighting functions are
automatically deactivated after some time,
unless the key is in position 2in the ignition
lock.
The colour, brightness and display lamp for
the ambient lighting can be set using
COMAND Online (see the separate COMAND
Online operating instructions).
The interior lighting control can be operated
using the front overhead control panel.
Automatic interior lighting control :
p Switches the left-hand front reading
lamp on/off
; | Switches the automatic interior
lighting control on/off
= c Switches the front interior lighting
on/off
? u Switches the rear interior lighting
on/off
A p Switches the right-hand front read-
ing lamp on/off 130
Interior lightingLights and windscreen wipers
Page 134 of 413

X
To switch on/off: press the|button.
When the automatic interior lighting con-
trol is activated, the button is flush with the overhead control panel.
The interior lighting automatically switches
on if you:
R unlock the vehicle
R open a door
R remove the key from the ignition lock
The interior lighting is activated for a short
time when the key is removed from the igni-
tion lock. This delayed switch-off can be
adjusted using COMAND Online (see the sep- arate COMAND Online operating instruc-
tions).
Manual interior lighting control :
p Switches the left-hand front reading
lamp on/off
; | Switches the automatic interior
lighting control on/off
= c Switches the front interior lighting
on/off
? u Switches the rear interior lighting
on/off
A p Switches the right-hand front read-
ing lamp on/off
X To switch the front interior lighting on/
off: press the cbutton.
X To switch the rear interior lighting on/
off: press the ubutton.
X To switch the reading lamps on/off:
press the pbutton. Crash-responsive emergency lighting
The interior lighting is activated automatically
if the vehicle is involved in an accident.
X To switch off the crash-responsive
emergency lighting: press the hazard
warning lamp button.
or X Lock and then unlock the vehicle using the
key. Replacing bulbs
The front and rear light clusters of your vehi-
cle are equipped with LED light bulbs. Do not replace the bulbs yourself. Contact a qualifiedspecialist workshop which has the necessaryspecialist knowledge and tools to carry out
the work required.
Lamps are an important aspect of vehicle
safety. You must therefore make sure that
these function correctly at all times. Have the
headlamp setting checked regularly. Windscreen wipers
Switching the windscreen wipers on/
off
! Do not operate the windscreen wipers
when the windscreen is dry, as this could
damage the wiper blades. Moreover, dust
that has collected on the windscreen can
scratch the glass if wiping takes place when the windscreen is dry.
If it is necessary to switch on the wind-
screen wipers in dry weather conditions,
always operate them using washer fluid.
! If the windscreen wipers leave smears on
the windscreen after the vehicle has been
washed in an automatic car wash, this may
be due to wax or other residue. Clean the
windscreen with washer fluid after an auto-
matic car wash. Windscreen wipers
131Lights andwindscreen wipers Z
Page 141 of 413
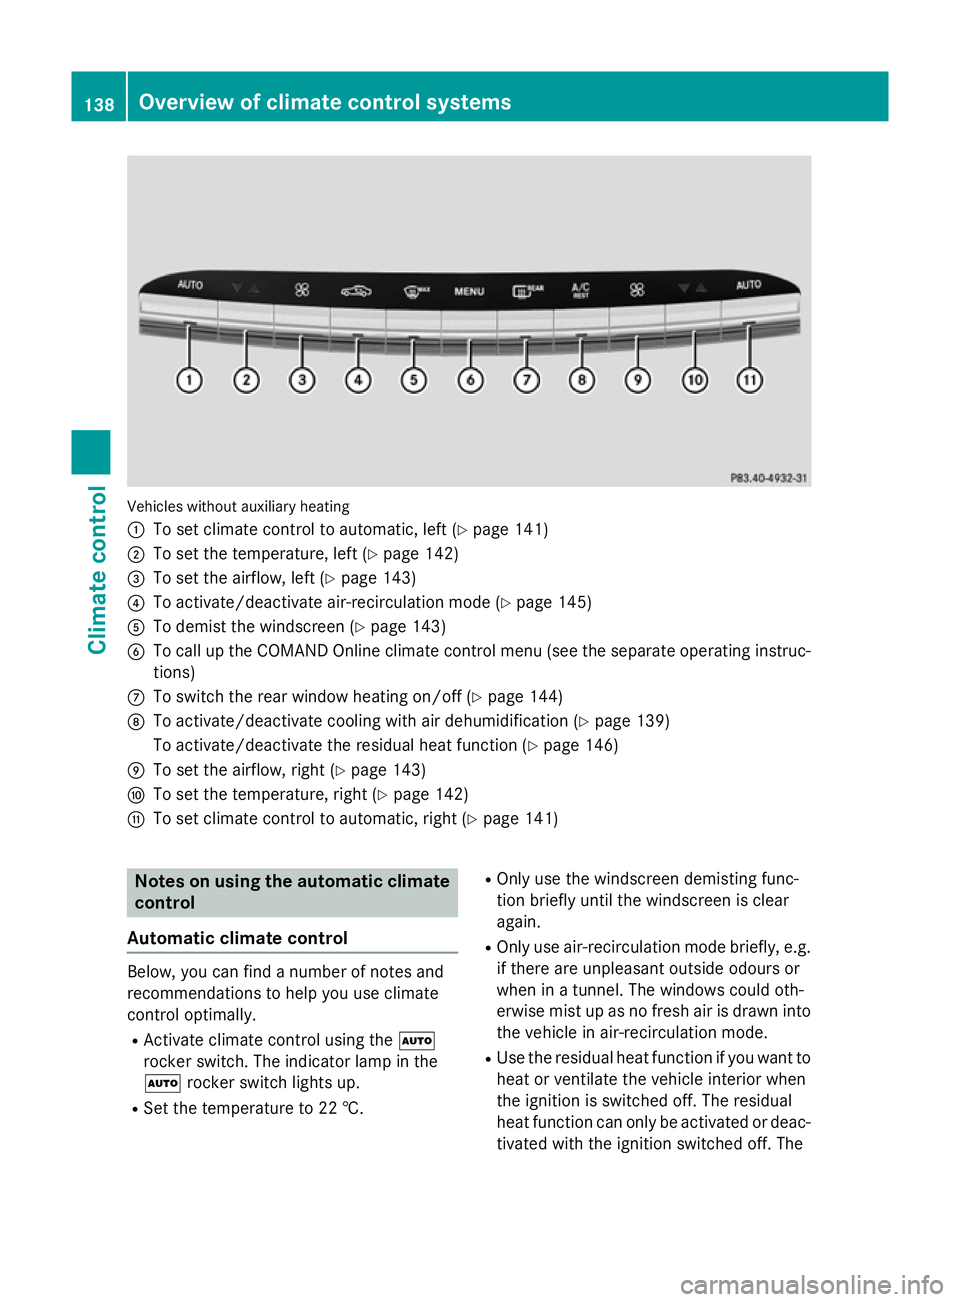
Vehicles without auxiliary heating
:
To set climate control to automatic, left (Y page 141)
; To set the temperature, left (Y page 142)
= To set the airflow, left (Y page 143)
? To activate/deactivate air-recirculation mode (Y page 145)
A To demist the windscreen (Y page 143)
B To call up the COMAND Online climate control menu (see the separate operating instruc-
tions)
C To switch the rear window heating on/off (Y page 144)
D To activate/deactivate cooling with air dehumidification (Y page 139)
To activate/deactivate the residual heat function (Y page 146)
E To set the airflow, right (Y page 143)
F To set the temperature, right (Y page 142)
G To set climate control to automatic, right (Y page 141)Notes on using the automatic climate
control
Automatic climate control Below, you can find a number of notes and
recommendations to help you use climate
control optimally.
R Activate climate control using the Ã
rocker switch. The indicator lamp in the
à rocker switch lights up.
R Set the temperature to 22 †. R
Only use the windscreen demisting func-
tion briefly until the windscreen is clear
again.
R Only use air-recirculation mode briefly, e.g.
if there are unpleasant outside odours or
when in a tunnel. The windows could oth-
erwise mist up as no fresh air is drawn into
the vehicle in air-recirculation mode.
R Use the residual heat function if you want to
heat or ventilate the vehicle interior when
the ignition is switched off. The residual
heat function can only be activated or deac-
tivated with the ignition switched off. The 138
Overview of climate control systemsClimate control
Page 148 of 413
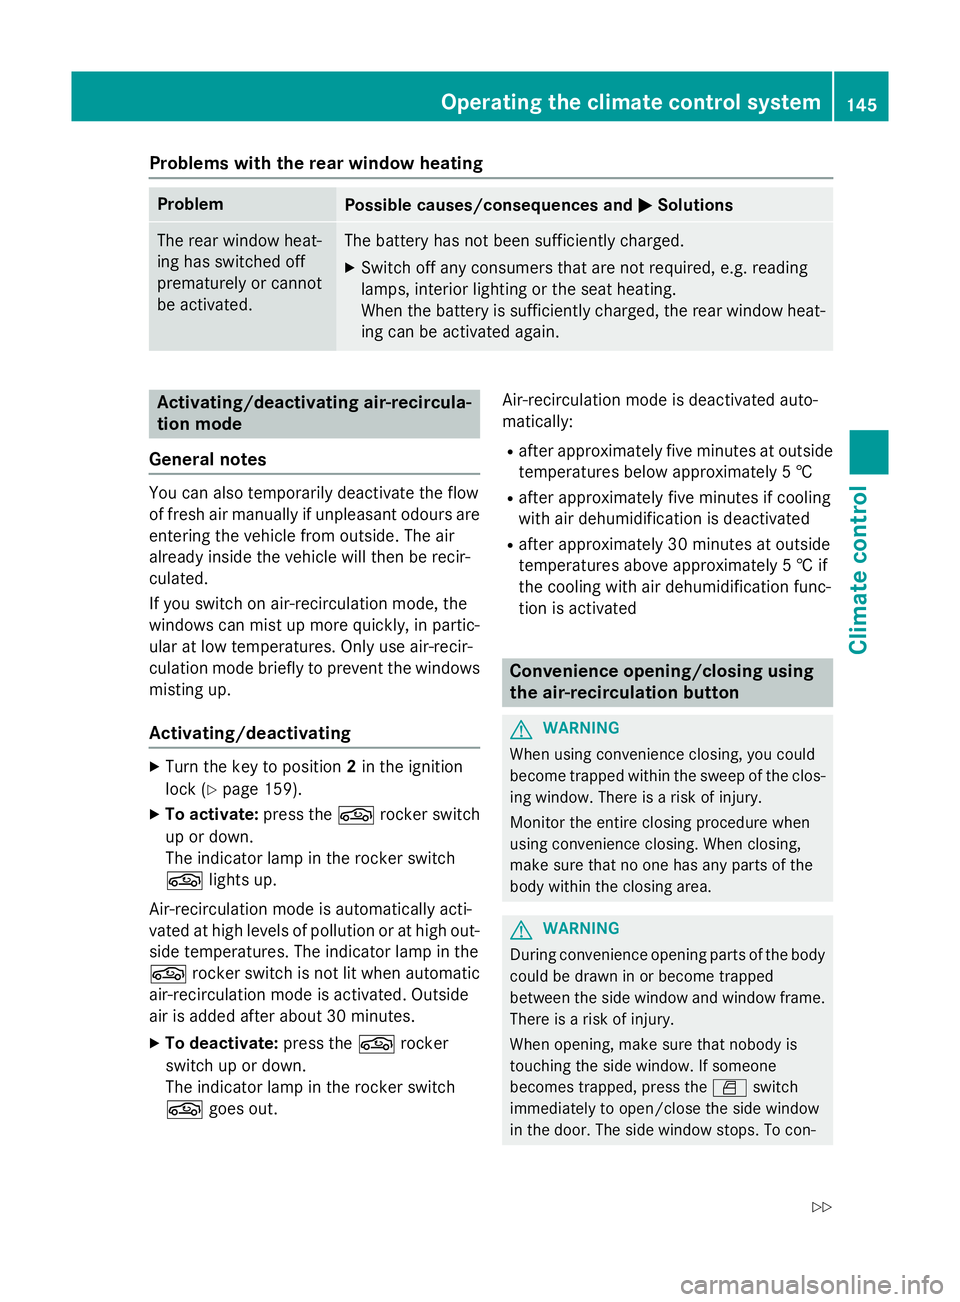
Problems with the rear window heating
Problem
Possible causes/consequences and
M
MSolutions The rear window heat-
ing has switched off
prematurely or cannot
be activated. The battery has not been sufficiently charged.
X Switch off any consumers that are not required, e.g. reading
lamps, interior lighting or the seat heating.
When the battery is sufficiently charged, the rear window heat-
ing can be activated again. Activating/deactivating air-recircula-
tion mode
General notes You can also temporarily deactivate the flow
of fresh air manually if unpleasant odours are
entering the vehicle from outside. The air
already inside the vehicle will then be recir-
culated.
If you switch on air-recirculation mode, the
windows can mist up more quickly, in partic-
ular at low temperatures. Only use air-recir-
culation mode briefly to prevent the windows misting up.
Activating/deactivating X
Turn the key to position 2in the ignition
lock (Y page 159).
X To activate: press thegrocker switch
up or down.
The indicator lamp in the rocker switch
g lights up.
Air-recirculation mode is automatically acti-
vated at high levels of pollution or at high out- side temperatures. The indicator lamp in the
g rocker switch is not lit when automatic
air-recirculation mode is activated. Outside
air is added after about 30 minutes.
X To deactivate: press thegrocker
switch up or down.
The indicator lamp in the rocker switch
g goes out. Air-recirculation mode is deactivated auto-
matically:
R after approximately five minutes at outside
temperatures below approximately 5 †
R after approximately five minutes if cooling
with air dehumidification is deactivated
R after approximately 30 minutes at outside
temperatures above approximately 5 † if
the cooling with air dehumidification func-
tion is activated Convenience opening/closing using
the air-recirculation button
G
WARNING
When using convenience closing, you could
become trapped within the sweep of the clos- ing window. There is a risk of injury.
Monitor the entire closing procedure when
using convenience closing. When closing,
make sure that no one has any parts of the
body within the closing area. G
WARNING
During convenience opening parts of the body could be drawn in or become trapped
between the side window and window frame.
There is a risk of injury.
When opening, make sure that nobody is
touching the side window. If someone
becomes trapped, press the Wswitch
immediately to open/close the side window
in the door. The side window stops. To con- Operating the climate control system
145Climate control
Z